Revell 1/96 Cutty Sark
|
KIT # |
? |
|
PRICE: |
$40-50 via on line auctions |
|
DECALS: |
useless due to age |
|
REVIEWER: |
Len Roberto |
|
NOTES: |
|
HISTORY |
Probably the most famous of the clipper ships, the Cutty Sark was launched in 1869. Intruding into the steam era, these ships were built for 2 reasons- to haul as much cargo as possible as fast as possible. The Cutty Sark and her sister ships such as the Thermopylae were the culmination of sailing ship design and technology. They were beautiful greyhounds of the sea. For a full history, visit the current ship’s site based in Greenwich, England: http://www.cuttysark.org.uk/history.html
|
THE KIT |
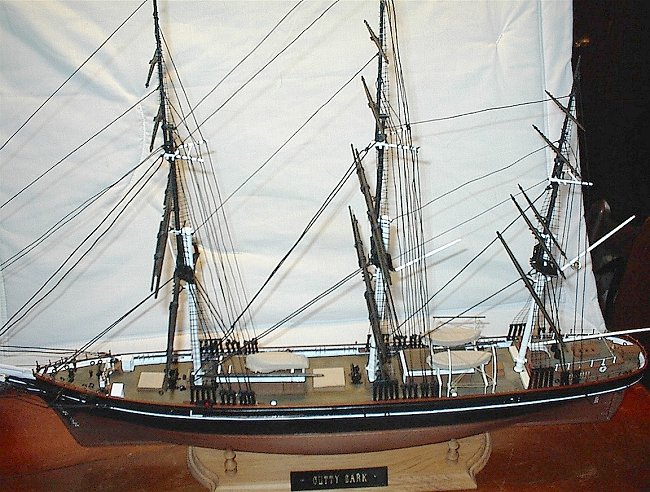
I am not sure of the initial release of this kit but 1959 is the date molded into the inner hull of my sample. My boxing was a 1974 issue- the kit is no longer in production but can be found on ebay for $40-$70.00 for a complete kit. I got mine for….$1.00 at a yard sale! I took my chances and when I got home- I found the kit to be complete however the original owner had slapped the lower masts together terribly and I had to do some careful disassembly to get them apart. All else was complete! The rigging line came in black and tan, 2 thicknesses each and was very good. Anchor chain was also included. Decals for the ornate bow and stern decorations looked to be a problem and they were. The kit includes preformed shrouds and ratlines. These are what the crew uses to climb up to the masts to work the yards. You can make your own if you are so inclined but I used what was in the kit. After watching the movie Master and Commander, I was inspired to get into sailing ship models. In retrospect, the 3-foot long+ Cutty Sark model with its very complex mast, yard and rigging plan was not the best choice but for $1.00, I rolled the dice.
|
CONSTRUCTION |
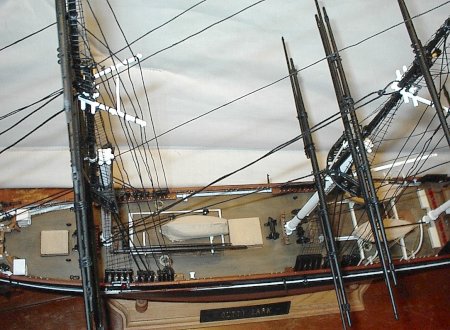
This is a big kit measuring over 3 feet from tip of the bowsprit to stern and over 23 inches tall to the tip of the mainmast. I decided right away to not even try adding sails. Most plastic sailing ship kits, this one included, provide bulky looking vac plastic sails that never look right. From what I have read, it is perfectly normal to not add sails to show off the rigging in clear detail. The instructions are very good but some improvements need to be made to make the building easier and provide strength when the rigging comes into play. My first challenge after gluing the two hull halves together was how to secure the model for the rest of the build. I have an old dish drying rack shaped like a U with squared off bottom and 4 legs. It has slots that you use for resting dishes in while they dry. I flipped it over and bent the 4 legs (with rubber tips) in a little to make a very convenient cradle to securely hold the hull during the rest of the build.
 After much research on building a
plastic sailing ship, I learned some tips that greatly helped me along
the way. Here are my tips in no particular order:
After much research on building a
plastic sailing ship, I learned some tips that greatly helped me along
the way. Here are my tips in no particular order:
The deck comes in 3 sections so you have to deal with the seams. I installed the parts and wrapped the hull with elastic bands to get a good join at the edges. The instructions actually have a great way to simulate wood, I altered it a little from past experience. First you paint the deck flat black. When dry, paint it a dark tan or beige. Then you sand in one direction until you see the plastic grain show as well as the flat black coming through. Looks pretty good but then I drybrushed a lighter tan and even tried some chalk pastel browns and tans. Sanded a little more and you get a pretty good representation of a scrubbed teak deck.
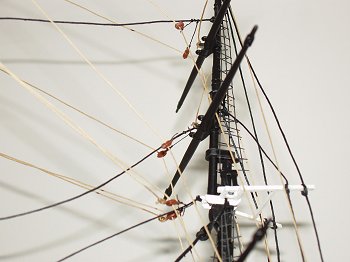
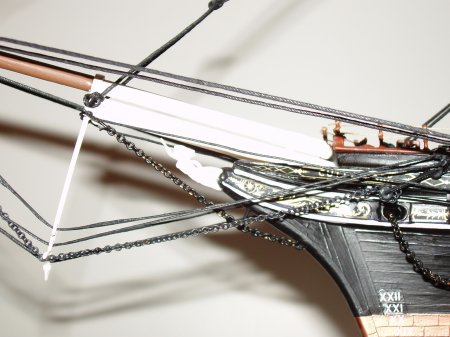
These are tiny hoops where lines are tied off and there are scores of them on the deck, bulwarks and hull. Everything I read said the plastic ones supplied in the kit are not strong enough to take the strain of the rigging so replace them with metal ones. I bought a bag of them from Micromark for $5.00. This is a must. When you get to rigging, the pressure of the line as well as the act of threading and tying the knot means the metal replacements are well worth it.
Make sure you scrape away paint and join these securely- these will again have a lot of strain on them when lines are tied to them later on.
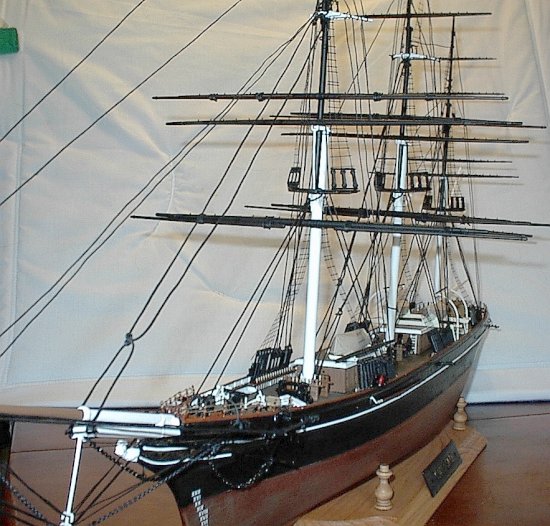
Basic construction was not that difficult, it basically involves adding the various hatches and deckhouses as well as pinrails. Masts were a little more finicky but still no major pitfalls. Once the ship was assembled and painted and the masts were completed- I glued the masts into their slots. Because I was inexperienced at this and the instructions did not point it out, the rigging was harder than it should have been because I did not set up the masts by adding the blocks before gluing the masts into the ship. It is not impossible, but I could see while I was into the rigging that it would have been easier if I had tied the blocks to the crosstrees and mast tops beforehand rather than adding them afterwards.
RIGGING TIPS:
Of course this is the part that scared hell out of me, especially when you look at the giant sheet of rigging instructions. In fact, I am still not done rigging this model! Once you get into it however, it is challenging and rewarding to see the model come alive with the lines attached.
 WHAT YOU NEED FOR RIGGING:
The Revell plan for rigging is actually very clear. I had to study each section very closely before I started to make sure I understood where lines started and ended.
Rigging is classified into 2 kinds: Standing and Running. Standing rigging is usually permanent and is meant to support the masts and bowsprit. Running rigging is used to lift yards and sails into position and to “work” the ship. This type involves blocks (like pulleys to help in heavy lifting) as well as lines.
Before I started rigging, I needed a crash course in knot tying. I did not get crazy learning too many but the knots I used most were the simple overhand knot and the better one which is 2 half hitches. I had to practice knot tying before I started!
I started with standing rigging using he heavy black thread and as you move higher up the masts, you switch to lighter black thread. This included forestays, backstays, bowsprit rigging and chain, and then the lines from mast tops around crosstrees and down to deadeyes. I tried to add footropes but failed miserably- I could not get the lines to sag and look decent so I bagged that thought.
 Once this step was done, I cut out the preformed
shrouds and ratlines on the pattern provided and attached them to the
model.
Once this step was done, I cut out the preformed
shrouds and ratlines on the pattern provided and attached them to the
model.
Then I began the running rigging using the tan thread. For these lines you need to also install the blocks and run lines through them down to pinrails. This is where it starts to get hairy because you are weaving lines around and through some areas that are hard to access and then you have to loop the line around belaying pins and it gets difficult. I used CA glue to help me secure lines at the deck level and used the Elmer’s/ water mixture to strengthen all other knots at yard ends and mast tops. Don’t even try this stuff if you had a bad day- your hands must be steady and if you move to quickly, you can knock a yard off or break something off while trying to get into position to thread or tie a line.
I tried to do just a few lines at each sitting and did it symmetrically. Tie off the port side line and then repeat the same line on starboard side. Then walk away for a while!
Care must be taken to not bend the masts and yards out of alignment. I learned afterward that other more skilled shipwrights use brass rods trapped inside the plastic masts to add strength. This would have helped but still you have to be very careful when tying off lines that you don’t over tighten. You will notice that lines you thought were taut, slacken as you move the tension around by tying new lines. Another tip, always take more line than you think you need- it sucks when you misjudge and have too little line to work with to secure it!
|
COLORS AND MARKINGS |
As you would expect, the ship’s appearance changed a lot during her long career. The Revell instructions need to be corrected in many areas. Here is a revised color plan:
Hull: a mixture of copper and zinc oxidizing to a greenish tinge.
Topsides: Black. No boot topping. Edge of covering board white. No other white lines, and no gold stripe.
Lower masts (iron): White.
Topmasts & Topgallant masts: Wood. Vancouver spars, varnished.
Doublings and caps white.
Bowsprit: White, inboard and outboard.
Jib boom: Black.
 Dolphin striker: White.
Whisker booms: Black.
Yards: Black (no white tips)
Figurehead: White.
Tops, spreaders etc: White.
Deckhouses and sides of monkey poop: Varnished teak. Tops of deckhouses bare teak with white cove. Monkey poop bare teak with margin plank in varnished teak.
Pinrail & topgallant rail: Varnished teak.
Bulwarks inside: White.
Deck fittings (windlass, capstan, pumps, bollards etc.): Black.
Davits: White.
Stanchions: White.
Decks: Scrubbed teak.
Boats: White with teak gunwale strake.
Decals did not work that well due to age, they broke into a million pieces and I was not able to get them all on the model. Looking for a set in good shape if anyone has any!
DISPLAY PREP:
I exchanged the kit plastic stand for a basswood sign board and drilled 4 holes to make a cradle using ornate wood decorative stands. Total cost for this was about $5.00.
|
CONCLUSIONS |
For about $15.00, this kit was a challenge and a joy- and is still not finished with more rigging to go. If you have any interest in sailing ships or men-of-war from the age of sail, there are a good number of plastic kits out there. This one has launched me into a whole new area of not only modeling, but also a new branch of history to explore and research. Building is not difficult but the rigging can seem daunting. If care is taken and you give it a try, any modeler can do it.
|
REFERENCES |
http://www.cuttysark.org.uk/ for current pics of the restored ship
http://www.naplak.com/modeling/articles/cutty_sark.htm for a great article (not yet finished) on building the kit by a master and great guy Jake Groby
http://204.119.244.226/World/Cutty_Sark/index.htm awesome photo index of someone’s visit to the ship…
Len Roberto
March 2004 If you would like your product reviewed fairly and
fairly quickly, please contact
the editor or see other details in the
Note to
Contributors.