
Marvel Comics 1/9 Silver Surfer
|
KIT # |
48653 |
|
PRICE: |
@$15.00 |
|
DECALS: |
None |
|
REVIEWER: |
George Oh |
|
NOTES: |
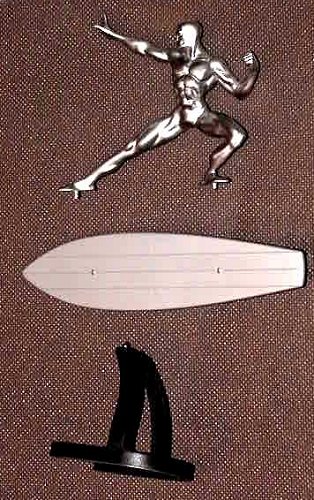
Snap kit with 17 parts, including stand |
|
HISTORY |
The Silver Surfer is a super hero who cruises through the universe on a surfboard – he doesn’t need a spacesuit or a spaceship with hyper-drive. He uses his vast cosmic powers to battle evil forces. The Marvel Comics 1/12th-scale kit of the Silver Surfer is a model of the figure sculptured by Sandy Collora.
 I’d never heard of the
Silver Surfer. But when I saw the Marvel Comics kit of the Silver Surfer
in a toyshop for A$10-00, and as I didn’t have anything to enter into a
Melbourne Model Expo (the biggest Model competition in Australia), I
decided to buy the kit and build it for Expo. I thought that it would be
an easy model to do in the 4 weeks I had, and that it would produce an
eye-catching model.
I’d never heard of the
Silver Surfer. But when I saw the Marvel Comics kit of the Silver Surfer
in a toyshop for A$10-00, and as I didn’t have anything to enter into a
Melbourne Model Expo (the biggest Model competition in Australia), I
decided to buy the kit and build it for Expo. I thought that it would be
an easy model to do in the 4 weeks I had, and that it would produce an
eye-catching model.
|
THE KIT |
I chose the Silver Surfer because it would build into a decent-sized model (8” tall figure), it didn’t have too many (17 chunky silver-grey) parts and I couldn’t stuff-up the markings ‘cos there weren’t any. Another plus was that the paint scheme was easy – an overall silver. I didn’t even have to paint his facial features. Naturally, the Silver Surfer is modelled standing on a 1-piece surfboard (in the cartoons, his board looks like a short ice-cream stick), and the board & figure are perched on a 2-piece stand. One thing I like about building figures is that you already have a fair idea as to what piece goes where. But, like most things in life, nothing is easy, so you’ve got to be prepared for the unexpected.
|
CONSTRUCTION |
The back of the 2-piece stand was hollow, and I wanted to cover it. I glued a piece of thin (0.5mm) plastic card over it, then, after the glue had dried, trimmed it to shape (easier that way). Naturally, the mating edges needed subsequent filling and sanding. And the join seams of the two-piece stand needed filling & sanding as well – but you’d expect that.
 I
spray-painted the stand flat black.
I
spray-painted the stand flat black.
The belly of the surfboard was also hollow, and I wanted to cover it, too. But first, I had to fill the cavity with something solid (& preferably cheap). I took the surfboard to the local hobbyshop to find a sheet of balsa wood that was exactly as thick as the depth of the cavity (2.5mm) – SUCCESS. It was easy to cut a piece of the balsa wood to exactly fit the cavity. The balsa wood wasn’t even glued in – it was covered with 0.5mm plastic card that were glued to the edges of the surfboard. Because of the board’s fin and the step that would accept the stand, the belly of the surfboard needed three pieces of card. Naturally, where card met card (or surfboard), the seams needed filling and sanding, too. This would have been impossible without the full thickness of the balsa behind it (nothing to lean on). There were two knockout pin marks on the top of the surfboard, but Silver Surfer’s feet covered them. I didn’t reshape the fin, but I did thin-down its back edge.
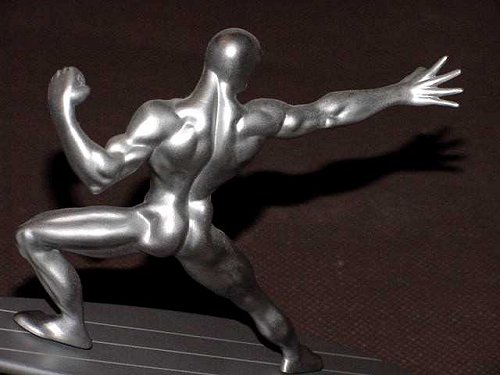
To the figure. Without hesitation, I removed all of the huge locating pins and sockets from the inside all of the parts. Assembly of the whole figure using Humbrol liquid cement took all of an hour. Take a little care to align the parts as it will help to minimise the filling and carving needed later. His fingers and feet had quite prominent mould seams that needed careful attention.
There were several bad sink dimples on the backs of his hands, which needed filling. This is no problem, as you expect this sort of moulding problem. But now, Marvel Comics threw me a wobbly one. Where each piece of the figure joined, there were join seams ranging in size from large cracks (down the limbs & torso) to ABSOLUTELY HUGE crevasses where the limbs and neck joined the torso. OK, that’s a bit of a problem. I filled them with a combination of plastic card, Milliput epoxy pitty, Tamiya putty, and finally Mr. Surfacer 500, with each filling medium being wet-sanded. Some carving was required to blend his neck into his torso. And some scribing was required to define the thumb and index finger of his clenched fist. Finally, after a couple of weeks of filling, sanding & respraying (one cycle per afternoon after work), all of my filling was smooth to touch and even looked perfect under very bright light.
|
PAINTING |
 I utilised the pegs under
his feet to mount him onto a piece of wood so I could paint him without
handling him. Being fussy, I wanted my Silver Surfer to be as shinny as
the Rolls Royce Silver Lady. Unfortunately, under silver paint, the
slightest imperfection in the filling becomes painfully obvious. The
better the paint finish, the worse the imperfection appears. Worse
still, I couldn’t find a silver spraypaint I was happy with. I tried
Humbrol Silver fox, Tamiya AS21 and an automotive chrome, all from
spraycans. All were just grainy greys, and so they were each wet-sanded
off (= smooth). So I was now using the sliver paint as the fault
detector, filler of scratches and final coat of paint. Finally, I
settled on Testors Metaliser in Stainless steel. This is a spray-only
paint (from a bottle) that must be buffed to a lustre with a soft cloth.
The more you buff, the better the shine. But the finish is fragile, so I
sealed it in with a coat of Johnson’s “One go”, an acrylic floor polish,
applied slowly with a wide soft flat brush. This significantly
toned-down the brilliantly shiny finish.
I utilised the pegs under
his feet to mount him onto a piece of wood so I could paint him without
handling him. Being fussy, I wanted my Silver Surfer to be as shinny as
the Rolls Royce Silver Lady. Unfortunately, under silver paint, the
slightest imperfection in the filling becomes painfully obvious. The
better the paint finish, the worse the imperfection appears. Worse
still, I couldn’t find a silver spraypaint I was happy with. I tried
Humbrol Silver fox, Tamiya AS21 and an automotive chrome, all from
spraycans. All were just grainy greys, and so they were each wet-sanded
off (= smooth). So I was now using the sliver paint as the fault
detector, filler of scratches and final coat of paint. Finally, I
settled on Testors Metaliser in Stainless steel. This is a spray-only
paint (from a bottle) that must be buffed to a lustre with a soft cloth.
The more you buff, the better the shine. But the finish is fragile, so I
sealed it in with a coat of Johnson’s “One go”, an acrylic floor polish,
applied slowly with a wide soft flat brush. This significantly
toned-down the brilliantly shiny finish.
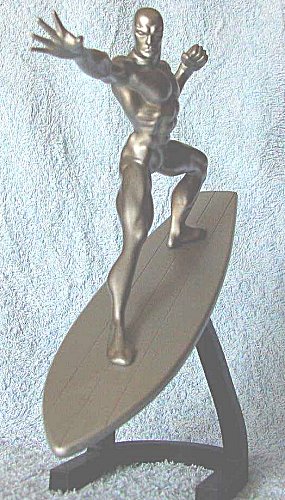
I left the surfboard the AS21 silver so that its silver finish was different from that of the figure. The finishing touches were to brush-paint the step in the belly of the surfboard with flat black to blend-in with the stand, and to glue a couple of bits of plastic against the walls of the sockets in the surfboard that accepted the pegs under Silver Surfers feet. This locked him onto his board without the need to glue him on. This way, I didn’t risk marking either of the silver finishes with glue & the whole model dismantles easily for transport to model shows.
|
CONCLUSIONS |
I thought that Silver Surfer looked great, but Expo merely complimented me on my excellent filling work. Oh well, I was happy with him, and mine is the only opinion I ever really worry about. This kit, and the other Marvel Comics kits, is ideal as a first model for a beginner. Or you could go to town on it as I did. Incidentally, the instructions state that the model is 1/12th-scale, which would make the Silver Surfer 2.43m (8’) tall. If he was 1.8m (6’) tall, the model is 1/9th-scale.
December 2003
If you would like your product reviewed fairly and quickly, please contact
me or see other details in the Note to
Contributors.