Paperwright 1/250 Harbour Light
|
KIT #: |
02309 |
|
PRICE: |
$AUD 0.00 |
|
DECALS: |
None for me to stuff up. |
|
REVIEWER: |
George Oh |
|
NOTES: |
Freebui with other purchases |
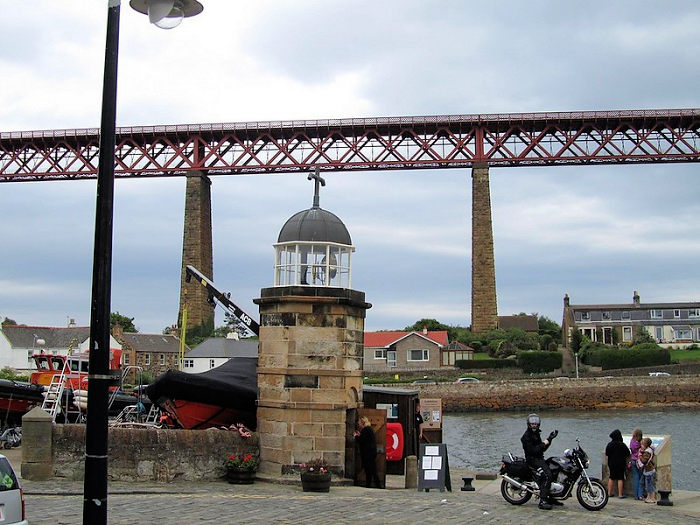 The Firth of
Forth is an estuary in Scotland where the Forth River empties into the North Sea
via a firth (or fiord). A ferry used to ply the last narrow point before the
wide mouth of the estuary, from North Queensferry (on the North bank), to
Queensferry/Dalmeny in the South - so named because Saint Margaret of Scotland,
wife of King Malcolm III of Scotland is said to have crossed there in 1068. In
1817, a small lighthouse was built in North Queensferry to guide the ferrys, and
it was named the North Queensferry lighthouse. In 1882/90, the 2.5 mile-long
Forth Railway bridge was built above the ferry route. From 1964 to 82, a road
tunnel existed under the Forth. In Sep, 1964, the Forth Road bridge was opened,
then in Aug, 2017, the Queensferry Crossing road bridge was opened. Both are a
little way to the west of the rail bridge, and the small lighthouse (now known
as the light tower of Inverkeithing) still sits on the small peninsula between
them (at 60 Main Street).
The Firth of
Forth is an estuary in Scotland where the Forth River empties into the North Sea
via a firth (or fiord). A ferry used to ply the last narrow point before the
wide mouth of the estuary, from North Queensferry (on the North bank), to
Queensferry/Dalmeny in the South - so named because Saint Margaret of Scotland,
wife of King Malcolm III of Scotland is said to have crossed there in 1068. In
1817, a small lighthouse was built in North Queensferry to guide the ferrys, and
it was named the North Queensferry lighthouse. In 1882/90, the 2.5 mile-long
Forth Railway bridge was built above the ferry route. From 1964 to 82, a road
tunnel existed under the Forth. In Sep, 1964, the Forth Road bridge was opened,
then in Aug, 2017, the Queensferry Crossing road bridge was opened. Both are a
little way to the west of the rail bridge, and the small lighthouse (now known
as the light tower of Inverkeithing) still sits on the small peninsula between
them (at 60 Main Street).
After the Forth Road bridge was opened, the small lighthouse was
decommissioned as it no-longer needed. Gradually, it fell into disrepair till,
in February 2009 the North Queensferry Heritage Trust took on the restoration of
the tower. Trust members repaired the stonework and some of the missing
steps. The lantern was removed and repaired. It was replaced on 19th
August 2009 and houses a 21-inch diameter parabolic reflector. Then, on 22nd
June 2010, Her Royal Highness The Princess Royal, relit the light. It is said to
be the world's smallest operational lighthouse.
 Occupying
only half of a sheet of A4 paper, this is a small card-model that makes into a
kit only 23mm/1" tall. It is marketed as a harbour light, and it differs from
the North Queensferry lighthouse in three ways. The entrance door of the North
Queensferry lighthouse is at ground level, whereas the kit has 7 ascending
stairs. The North Queensferry lighthouse is made of (sand?)stone whereas the
model's exterior is smooth and white. The North Queensferry lighthouse is topped
by an iron(?) t-shaped pipe(?) structure whereas the modeller is supposed to
place a sphere there. Being a card model, the windows of the light room are
solid.
Occupying
only half of a sheet of A4 paper, this is a small card-model that makes into a
kit only 23mm/1" tall. It is marketed as a harbour light, and it differs from
the North Queensferry lighthouse in three ways. The entrance door of the North
Queensferry lighthouse is at ground level, whereas the kit has 7 ascending
stairs. The North Queensferry lighthouse is made of (sand?)stone whereas the
model's exterior is smooth and white. The North Queensferry lighthouse is topped
by an iron(?) t-shaped pipe(?) structure whereas the modeller is supposed to
place a sphere there. Being a card model, the windows of the light room are
solid.
I
photo-enlarged this model to 1/125-scale, in a photocopier so that it would be
easier to build. There were four things I wanted to do to this model. I wanted
to put a light inside the light room (a first for me) because, without one, it
is just a weird house. To make the light visible, the light room windows would
have to be replaced by something transparent. The model had a paper dome atop
the light room, but the 'petals' that formed it were to be butt-joined to
each-other - I wanted to replace it with something else. And I wanted to put a
wind-vane on top of the dome.
 Construction
is abnormally logical. All parts are assembled in strict numerical order, and
they MUST be cut-out of the surrounding card ACCURATELY with a very-sharp knife
and a steel ruler. Then the parts MUST be attached precisely by the join
surfaces. Some parts are required to be pasted onto thicker-card. The hardest
part demanded of the modeller, is to read the instructions correctly, and to
fold (or roll) the part towards, or away from, the printed surface. At all
times, I used industrial-quality, water-based wood-glue.
Construction
is abnormally logical. All parts are assembled in strict numerical order, and
they MUST be cut-out of the surrounding card ACCURATELY with a very-sharp knife
and a steel ruler. Then the parts MUST be attached precisely by the join
surfaces. Some parts are required to be pasted onto thicker-card. The hardest
part demanded of the modeller, is to read the instructions correctly, and to
fold (or roll) the part towards, or away from, the printed surface. At all
times, I used industrial-quality, water-based wood-glue.
The
base-plate was glued onto a square of wood, and placed under weight for
24-hours, to ensure it dried flat. At the same time, the base plinth and the
steps were similarly glued onto 1mm-thick card, and other parts were folded-over
and glued. A were given the same weight treatment. The core of the lighthouse
was glued to the plinth, then the wrap-around parts were stitched-glued around
it. All were held in-place by reversed wooden cloths pegs as they dried.
All the
while, I was building-in the ability to insert a light into the light room from
underneath the wooden base, by drilling each part before they were glued-on. As
well, a plastic tube was inserted into the core to provide added rigidity to the
core, and a smooth guiding path for the light bulb and its wires. The base of
the tube was chamfered so that it would fit tightly into the wood hole I drilled
through the wooden base.
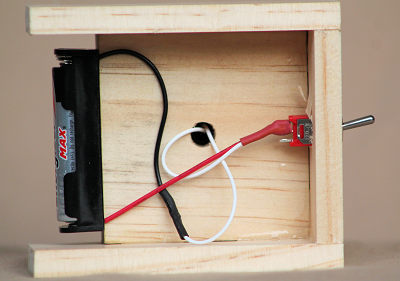
 Plan A was to
use an LED (Light-Emitting Diode) but its light would have been projected
vertically, and it required a 9-volt battery plus two diodes in the circuit. I
adopted the simpler Plan B - to use a tiny grain-of-rice light bulb (rather than
a larger grain-of-wheat bulb), mainly because its light radiates out in all
directions, and it required only a 1.5-volt battery. I used a AAA for its ready
availability, and its small size. My friend (Mr Ed) guided my purchasing, and he
did all of the soldering. I chose a toggle switch (over a sliding switch)
because it would be easier to conceal in the extended basal box.
Plan A was to
use an LED (Light-Emitting Diode) but its light would have been projected
vertically, and it required a 9-volt battery plus two diodes in the circuit. I
adopted the simpler Plan B - to use a tiny grain-of-rice light bulb (rather than
a larger grain-of-wheat bulb), mainly because its light radiates out in all
directions, and it required only a 1.5-volt battery. I used a AAA for its ready
availability, and its small size. My friend (Mr Ed) guided my purchasing, and he
did all of the soldering. I chose a toggle switch (over a sliding switch)
because it would be easier to conceal in the extended basal box.
The
clear glazing of the light room was easy - once I'd come-up with a workable
plan. I cut a strip of thin clear plastic from a store-bought disposable water
bottle. This I taped over the kit part and used it as a guide to scribe-on all
of the frame-work (with that steel ruler). After cutting it out then folding it
into shape, the two ends were superglued to each other. At this time, I should
have put a black wash into the scribing. It was stitch-glued onto the floor of
the light room to ensure its shape was accurate, and then the roof was likewise
stitch-glued (to a lesser extent) onto it.
Instead
of the paper dome, I elected to use a plastic one cut from a vacformed packaging
sheet. It 'aint a hemisphere, but I'll live with it. I'm still on the hunt for a
suitable wind vane to crown the dome - or to come-up with a plan how to
scratch-build one.
Neither
painting nor decaling was required, so I couldn't stuff-up those jobs. Yay!!
With the
circuit complete, and the light bulb shoved-up into the light room, I secured
the wires simply by bending them where they emerged from under the wood. Next,
the plastic battery carrier was nailed to the backside of the wood. Three thin
lengths of wood were wrapped around the front and sides of the wooden base to
form a basic box. Lastly, holes of increasing diameter were drilled into the
front plate (wider ones were drilled part-way into its back) to anchor the
barrel of the switch. My light has two modes - on or off, whereas the light of
the North Queensferry lighthouse flashes once every 15 seconds.
I
suspect that David Hathaway of Papershipwright, might have altered this model in
height and name (from the North Queensferry lighthouse) to bypass copyright laws
(or something).
A
Lady-friend of mine applied for a job with the Heritage Trust, because it
involved a little light house keeping.
I don't
believe that I could have lit this model in its original 1/250-scale, yet I
found it easily manageable in this enlarged 1/125-scale. The only down-side to
this model, is that my Lady reckons that it looks better on her dressing table
when the light is on, than it does in my display case, with the light off. Both
the model and the electrical circuit are simple, so both are ideal for a
beginner in card models and lighting a model. I've more lighthouses to build
(Thanks, David), and I'll probably light them, too, because both aspects are
fun.
George
Oh
11 May 2023
Copyright ModelingMadness.com. All rights reserved. No reproduction in part or
in whole without express permission.
If you would like your product reviewed fairly and fairly quickly, please
contact
the editor or see other details in the
Note to
Contributors.
Back to the Main Page
Back to the Review
Index Page
Back to the Previews Index Page