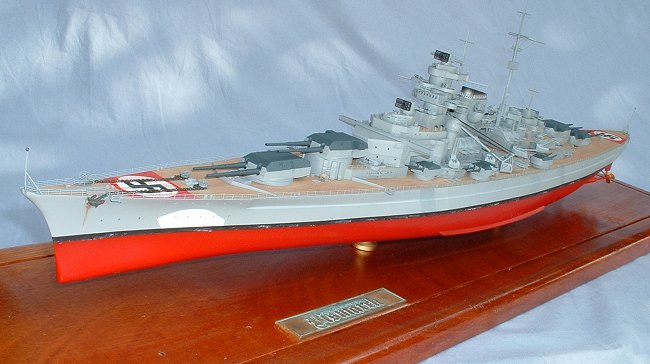
Tamiya 1/350 Bismark
|
KIT # |
7800 |
|
PRICE: |
$47.00 (or more) |
|
DECALS: |
None |
|
REVIEWER: |
Ramsés M. Montes (Dominican Republic) |
|
NOTES: |
GMM Photo-etched set, and some scratch building. Not completed, some details missing at the time the review was made |
|
HISTORY |
The Battleship Bismarck (along with her sister the
Tirpitz) was by far one of the most advanced vessels of WWII. After a series
of tests, the Kriegsmarine realized that the Bismarck was capable of
delivering 150,000+ hp and 30+ knots, for a
 vessel that weighs 41,000 tons
that is very fast. The main armament consisted of 8-38cm guns that made it a
very powerful adversary, so the next logical step was to send it to the
battlefront.
vessel that weighs 41,000 tons
that is very fast. The main armament consisted of 8-38cm guns that made it a
very powerful adversary, so the next logical step was to send it to the
battlefront.
The German High Command decided to send the Bismarck on a special mission in the Atlantic called “Operation Rheinübung”, which consisted on sending a powerful task force to attack the allied escorts north of the equator.
The Bismarck encountered it first adversaries on Saturday 24th May 1941. During this first encounter the battleship Hood (the pride of the Royal Navy), the “unsinkable” Hood was impacted from a distance of more than 8 miles on the rear ammunition depot. The Hood broke in two pieces and sank. The whole deal from beginning to end lasted barely 8 minutes. After this, the British had realized the power of the Bismarck. There was only one order issued after that. Sink the Bismarck!
When the British finally caught up with the Bismarck they pounded her for several hours, more that 2000 salvoes where fired at her, but still she held. The Bismarck finally sank taking most of the crew with her. It was demonstrated that the Bismarck was not sank by the British; the crew scuttled her (Discovery Channel) so you can see what strong ship she was.
|
THE KIT |
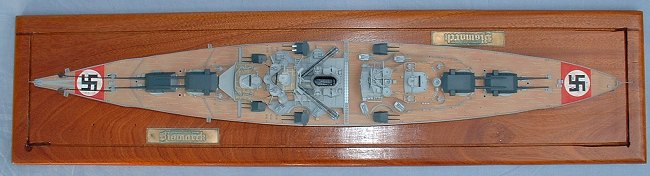
 It is big!
As usual with Tamiya, the kit is flawlessly molded, there is very minimal flash (not to say none) and the fit is very good. The hull comes in one whole piece, the deck is made of 3 separate parts and it features the teak wood texture. The rest is pretty much the upper structures and armament. Unfortunately the walls of the structures are almost completely plain, there is very little detail (except for some portholes and boxes) but nothing that cannot be fixed with patience.
There are no photo-etched parts in this kit and no decals.
|
CONSTRUCTION |
As usual, I start with the fore and aft castles. The
way I like to do it is to treat each structure as an individual model so I
don’t go nuts. I first decided to build all the individual structures that
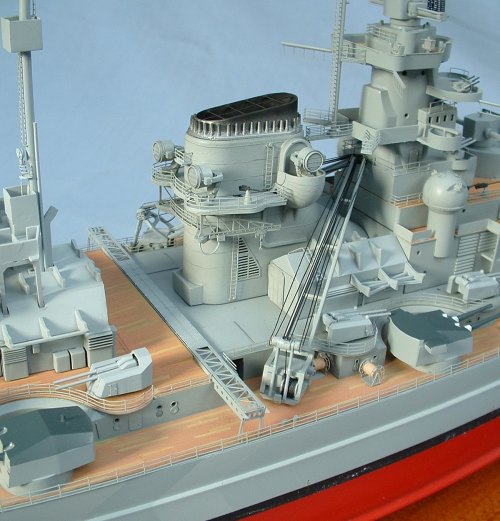
required putty. Next, the floors of the upper structures of this model do not
have any detail, so I preceded to scribe line by line the teak wood floors
(what a pain in the…). After that, I drilled all the portholes using a pin
 vice and did the scratch building to the rangefinders, removed the molded
ladders. I painted the teak floors and after that I added the PE portholes,
yardarms, ladders and watertight doors. I then painted the upper structures
and finally added the railings and radars.
vice and did the scratch building to the rangefinders, removed the molded
ladders. I painted the teak floors and after that I added the PE portholes,
yardarms, ladders and watertight doors. I then painted the upper structures
and finally added the railings and radars.
I then took on the artillery. I don’t particularly enjoy this because it involves building a lot of the same many times (it gets boring after a while) but when I finally decided to face it I grabbed the main guns (38 cm). I drilled out the guns using a pin vice, added the PE (Photo etched) ladders, armored windows and range finder hoods; I did the same for the secondary (15 cm). For the A.A. 10.5 cm, I cut the barrels (the slimmer portion of it) and used hypodermic needles (cut the needles, trimmed them to size with a Dremel, and cleaned out the edge of the hole with a needle pin) added the necessary PE. The machineguns barrels where also cut and replaced with diabetic hypodermic needles (the originals where too thick) the quadruple AA guns on the fore castle where completely scratch-built (the originals looked like two boxes with little sticks coming out of them).
Next was the hull. I drilled all the portholes and the water drain holes. The hull lacks the intake grills of the original hull, so I proceeded to thin with a Dremel the wall and cut out the grill intake holes, I then glued the grill (I used part of a mesh that comes with the Peugeot 206 WRC made by Tamiya) Then the puttying and sanding was done. After that the deck was placed, putty was applied to the gaps and sanded. The teak wood floor was re-scribed and the teak was painted. Then the hull was painted. Finally the entire upper structures where placed along with the artillery and remaining PE.
|
CAMOUFLAGE & MARKINGS |
 As a kid I had spent a decent amount of time on naval
shipyards and dry docks, so I have a fair amount of visual experience with
ships. The hulls are painted with Antifouling paint to prevent algae and
parasites from sticking to the hull, there is a particular one witch is the
typical red, but it has an orange look to it. Tamiya recommends their Hull
Red, for my taste that is way too dark (it looks like dark brown) I painted my
hull with Tamiya Red X-7 with a couple of drops of Yellow (to give it the
orange look). For the teak, I went to the local wood shop and got a piece of
teak, simulated the color using a mixture of Dark Yellow, White, Red, and
Yellow. Painted different shades (from lighter to darker) of the same basic
color, on every shade I masked some wood planks, finally all masking was
removed and the whole thing was misted with the first (the lightest) color to
tone-down the contrast.
As a kid I had spent a decent amount of time on naval
shipyards and dry docks, so I have a fair amount of visual experience with
ships. The hulls are painted with Antifouling paint to prevent algae and
parasites from sticking to the hull, there is a particular one witch is the
typical red, but it has an orange look to it. Tamiya recommends their Hull
Red, for my taste that is way too dark (it looks like dark brown) I painted my
hull with Tamiya Red X-7 with a couple of drops of Yellow (to give it the
orange look). For the teak, I went to the local wood shop and got a piece of
teak, simulated the color using a mixture of Dark Yellow, White, Red, and
Yellow. Painted different shades (from lighter to darker) of the same basic
color, on every shade I masked some wood planks, finally all masking was
removed and the whole thing was misted with the first (the lightest) color to
tone-down the contrast.
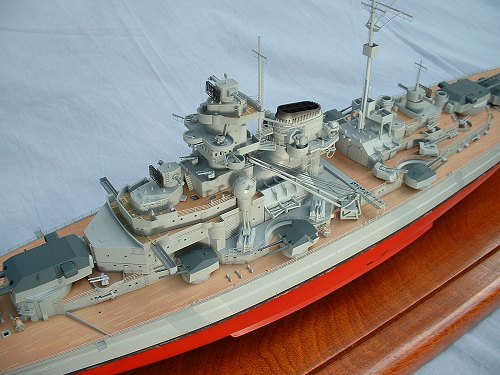
The overall gray was achieved using white and gradually adding German Grey XF-63, and the main and secondary turrets where painted using a mixture of German Grey, a bit of blue and white to make it lighter. The model came with no decals.
|
CONCLUSIONS |
Tamiya’s Bismarck is a good kit, but it is too plain if
built out of the box, in my opinion, if you don’t use some PE’s the thing will
look la a toy. If you want your Bismarck to look great it will require a good
set of Photo-etched parts and a lot of patience, my personal favorite is the
Gold Medal Models set, but if you want to go cheaper Edwards makes a similar
set for less. I highly recommend the kit as a starting platform and it is good
for any modeler that can use putty and a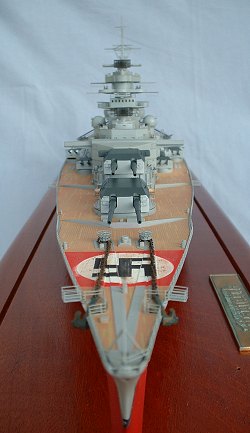 n airbrush properly.
|
REFERENCES |
Aside from past experience as a reference, all of my references where obtained online.
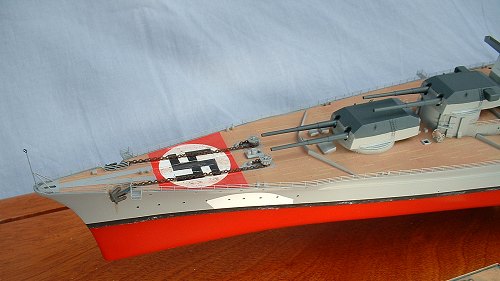
The Bismarck is a great subject, but a lot of speculation revolves around it when it comes to the paint. I can tell you at least that both swastikas on the deck where there at the time she was scuttled, they where painted over a red background not a gray one and they where covered with canvas (not painted over like some people suggest) but they where there, if you don’t believe it, go ask Robert Ballard (the guy who found the wreck) or visit his website. There is a company that makes a very expensive, museum quality model (about $7000 USD), and they did all the research on the Bismarck (they even went to the shipyard that made the damn thing) and obtained the actual paint colors. Here are some places you can go to for reference:
Enjoy!!!
http://www.fineartmodels.com/bismarck.htm
April 2003
If you would like your product reviewed fairly and fairly quickly, please contact the editor or see other details in the Note to Contributors.