Revell Clipper Ship Flying Cloud
|
KIT # |
H-344 |
|
PRICE: |
@$15.00 |
|
DECALS: |
Ship name, flag sheet |
|
REVIEWER: |
Bill Michaels |
|
NOTES: |
Old but accurate model. Easily converted to other clipper ships |
|
HISTORY |
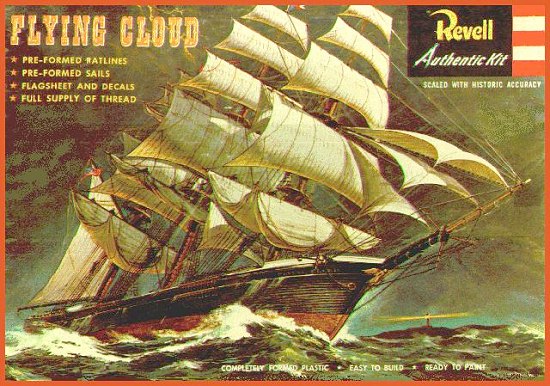
Author’s Note: This full-build review is for the Revell kit of the Clipper Ship Flying Cloud. I used an old copy of the kit, from 1957, but this model has been re-released a number of times since then. I built my model as the Clipper Ship Sword Fish, a conversion that required little more than a change in paint scheme and nameplate.
The Clipper Ship Sword Fish
The Sword Fish was built in 1851, in New York, at William Webb’s East River shipyard. She was launched in September 1851, and soon participated in one of the greatest clipper ship contests of the decade.
In the early 1850s, the exploits of the fast clippers and their record-setting passages were big news. There was a huge rivalry between the ships of Boston’s Donald McKay and New York’s William Webb. This rivalry was as big as today’s sports contests—it was the World Series of Clipper Ships!
In November, 1851, Flying Fish departed from Boston, and three days later, Sword Fish left New York, both bound for San Francisco. This was the contest of the season, with huge press interest, and large sums were wagered on the outcome. The ship with the shortest passage to San Francisco would win bragging rights for the home city.
Early events favored Flying Fish, and she crossed the equator 4 days ahead of her rival. Sword Fish pushed hard, and made up the time in the south Atlantic. The ships reached Cape Horn in a virtual tie, and spent part of the time rounding the Horn racing side by side. Once they cleared the Cape, the ships became separated.
Seven days later, Flying Fish reached latitude 50 degrees South, a full day ahead of her rival. But the Pacific was to be Sword Fish’s ocean. By the time she reached the equator, Sword Fish had made up the time and now had a two day lead. She then raced on to San Francisco, increasing her lead by another three days. Sword Fish arrived in San Francisco on February 10, 1852, with a passage of 90 days, 16 hours from New York. Flying Fish arrived on February 17, with a passage of 98 days from Boston.
Webb had finally beaten McKay, although Sword Fish fell just 19 hours short of the record time set by McKay’s Flying Cloud the year before. Still, it was an impressive victory for the new clipper. In fact, Swordfish’s passage turned out to be the fourth faster ever from New York to San Francisco.
Sword Fish had a number of other fast passages, but not quite as remarkable as her maiden voyage. She sailed the New York to San Francisco to China to New York routes. The ship was lost in July 1862 when her anchors fouled and she was driven ashore near the mouth of the Yangtse River.
There is surprisingly little information available about Sword Fish. We know her general dimensions: length, beam, mast height, etc. There are no known photographs of her—only a couple of images in paintings and illustrations of the day. These give us an understanding of her general appearance, but don’t help much in the way of specific details. Most of the details available come from published accounts—newspaper and magazine stories of the day.
Crother’s excellent work The American Built Clipper Ship is the best resource for anyone interested in modeling American Clipper ships. There is an incredible amount of detailed information about these vessels in his book. Even Crothers, however, could not unearth much about Sword Fish. I used this book as a primary resource, and I learned:
Sword Fish was considered an “Extreme Clipper” in hull shape. Her hull was black (all clippers were), and the bulwarks were a buff color. Her waterways (where the deck meets the bulwarks on the inside of the hull) were blue. The deckhouse was white with wood trim, and the roof was probably the same blue as the waterways. Her masts were probably a light wood color, and her yards were black. She had a raised quarterdeck and focs’le, and a large deckhouse on the main deck. There is no specific deck layout known.
With the above in mind, the Revell kit of the Flying Cloud seemed to be a good candidate for conversion into Sword Fish. The Revell kit has the right general layout and rig, and there is nothing in the kit that contradicts any known facts about Sword Fish. Basically, all it takes to convert the kit to Sword Fish is the appropriate paint scheme and name plate!
|
CONSTRUCTION |
Hull and Deck
The decks have engraved plank detail. Real wooden decks don’t stay “wood tan” color for long—they weather fairly quickly. I wanted to give them the slightly worn look that wood that is starting to weather has. I airbrushed the decks with Model Master Acrylic “wood”, to get a base coat. I let it dry for a couple of days, and then I applied an oil wash made using artist’s burnt sienna paint. The first, heavier, wash was concentrated in the planking details. After it had dried for a day or two, a second lighter was applied to the entire deck. This took the “new wood” look away, and gave the entire deck a worn, used look.
 I
painted as many of the deck details as I could before the deck was installed
in the hull. All of the detail painting was done using a fine brush, and
access was easier with the deck out of the model. The gratings, hatches, etc.
were painted a medium brown, and than a dark wash was applied to highlight the
engraved detail.
I
painted as many of the deck details as I could before the deck was installed
in the hull. All of the detail painting was done using a fine brush, and
access was easier with the deck out of the model. The gratings, hatches, etc.
were painted a medium brown, and than a dark wash was applied to highlight the
engraved detail.
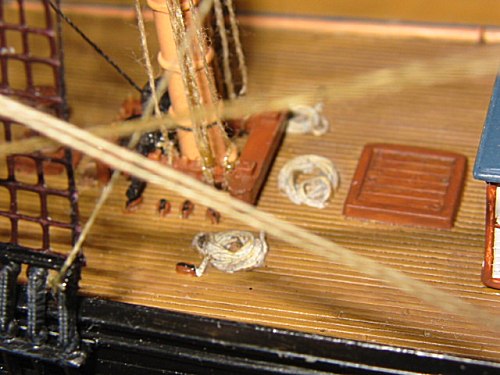
The decks have the slightly annoying molded- in pulley blocks and coils of line. No clipper skipper worth his salt would have allowed these lubberly messes to be strewn about the decks of his vessel! I decided to leave them in place, as I didn’t want to have to deal with all the missing planking detail that would result if I tried to remove them. I did, however, remove the coils from smooth surfaces such as the roofs of the deckhouses. To paint the ones that remained, I used a color that most closely matched the tan of my rigging line. The rope detail was highlighted by the same dark wash used on the rest of the deck fittings.
The main deck house was assembled off of the model, and airbrushed white. The window frames, door frames, and corner boards were then painted a medium brown. The main cabins on the clipper ships were considered to be luxury accommodations, and the fit and finish of the woodwork was of high quality. I used a semi-gloss brown here to give the wood accents a nice varnished look. All of the kit’s cabin windows are just holes—I used Testors canopy glue to make window glass.
The hull halves fit together well, and were glued together without the deck. At this point, the focus was on getting a good join from stem to stern- fit of the deck would be addressed later. The hull has a mixture of raised and engraved plank detailing, and raised detailing for the copper bottom. The rudder is molded as a part of the hull, and does not have any copper plate detail.
The hull bottom was painted copper using the paint from the new Model Master acrylic Marine Paints line. This paint was brushed on, and went on smoothly, and covered well. The upper hull was painted semi-gloss black.
The hull was mounted on an oak base, using oak coat pegs as pedestals. The hull is mounted to the pegs using short lengths of brass rod. The hull is a tight press fit on the brass rods, so it could be removed for painting. It is much easier to get the mounting worked out before you glue the deck in place!
The hull and decks fit surprisingly well. The foc’sle deck was a little too wide, and needed a little sanding to fit. Gaps were minimal, and easily filled with super glue.
Masts and spars
Each mast is made up from 6 parts, plus 5 more for the yardarms. Fit of the masts was generally good. I recommend assembling one mast at a time—that way there’s no chance of getting the yards mixed up. I built and painted all three masts, but didn’t add the yards until the mast was on the model. I kept the yards on the sprues until I needed them. I then cleaned up and painted each mast’s set as a group.
The masts and spars required a fair amount of work to get them ready. The masts had visible mold seam lines on each side, which required a fair amount of time with the knife and sanding stick to clean up. The portions of the lower masts were especially tedious, as they have molded in mast hoops every quarter inch or so. This meant that each “valley” between the raised hoops had to be cleaned up individually, taking care not to sand off the adjacent raised detail.
The yards required the most work to get them ready. The molds were mis-aligned, which meant that all 17 spars were out of round. Each piece had a ledge running the length of the spar that needed to be cleaned up. After cleanup, you’ll be left with spars that have a definite oval cross section, but there’s not much you can do about it, short of making replacements form wood.
My kit had the preformed ratlines that are nowadays only found in the large sailing ship kits. These ratlines are formed form some sort of plastic-like thread, and seem to be bonded together in some sort of heating process. I think that these ratlines look better on the small scale models than regular molded plastic pieces, which I think are way too heavy a molding to look right. (But they are easier to install!) I think Revell switched over to the hard plastic ratlines for the small sailing ship kits around 1980.
Rigging
 My
kit came with only one spool of line, tan in color. Usually, these kits come
with two colors of thread, black and tan. Black thread is used for the
standing rigging, and was regular rope painted with tar to make it
weatherproof. (Standing rigging refers to those lines used to hold the masts,
etc. in place. Running rigging refers to the lines that were used to adjust
and control the sails, the lines that were in constant use.) The thread
provided with the kit was too thick, so I replaced it with a smaller diameter
thread.
My
kit came with only one spool of line, tan in color. Usually, these kits come
with two colors of thread, black and tan. Black thread is used for the
standing rigging, and was regular rope painted with tar to make it
weatherproof. (Standing rigging refers to those lines used to hold the masts,
etc. in place. Running rigging refers to the lines that were used to adjust
and control the sails, the lines that were in constant use.) The thread
provided with the kit was too thick, so I replaced it with a smaller diameter
thread.
The kit’s instructions provided two different rigging plans, a simplified one and a more involved “scale” plan. The simplified plan is very simple, and is too little rigging for a model of this size.
A few words about rigging the model: When working in this scale, it is not practical to represent every line. My goal was to create the illusion of complex rigging, while keeping within the limits of the scale. I used the kit’s rigging plan as a starting point, but added some additional lines to improve the look. For example, on a square-rigger, there are a lot of lines running up the mast from the fife rails. I added 5 lines per side here, and ran them up the mast, one to each yard. I think it really improves the look of the model. Though of less than sterling quality, the image shows how this is done.
Sails
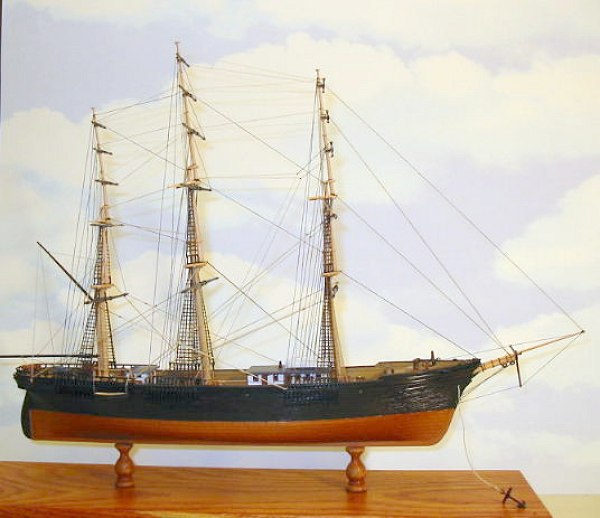
The kit comes with the standard vacuum molded thin plastic billowing sails. I personally don’t like them, so I elected to build my model without them, in the fashion of many museum models. When you build a square-rigger with out sails, you need to address two issues: the position of the yards, and what to do with the running rigging.
The upper yards on a square-rigger were moveable. When the sail was set, the yard was hoisted higher up the mast. Thus the yards could be in one of two positions- sail set, or sail furled. Many of the larger scale models account for this, and show two positions for moveable yards. (The big Revell Constitution and Cutty Sark do, for example.)
Smaller sailing ship models are often designed to be built only one way. (This kit is one of those.) The kit provided mounting points for the yards in their raised locations, because the kit assumes you’ll be adding the supplied sails. On my model, I opted to go for the museum look, where the yards are set as if the sails are set, and then the sails themselves are omitted for clarity.
If the sails are gone, what do you do with the lines that are supposed to be attached to them? Most ship modelers will install them if possible, tying them off at the yard. (Lines that go from the sail directly to the deck are often omitted, such as staysail sheets.) On my model, I deleted all the sheet lines, and added those lines mentioned earlier from the fife rails to the yards to simulate the buntlines and clewlines that would normally be there.
Rigging Tips and Tricks
 -
-
-
The bowsprit is brittle—I left mine off as long as possible, so I wouldn’t break it. Once I installed it, I immediately rigged it—it adds a lot of support to the piece.-
Do one mast at a time. I installed the main mast, and did as much rigging as I could. I then added the yards one at a time, starting at the bottom and working my way up. Once the yards were rigged, I installed the foremast, and then added the yard to it, one by one. The mizzen was built and most of the rigging was done before the mast was attached to the model.-
Use beeswax to prepare the thread. Run the thread through the wax, then run it over a hot light bulb. The wax will set in the line, making it a little stiffer, and it will reduce the “fuzzies”.-
Use polyester thread—it won’t sag and tighten with changes in humidity like cotton thread does.-
Use a couple of slightly different colors for your running rigging—lines were continuously aging and getting replaced—the lines are not all one color on a real ship. The embroidery threads come in a wide variety of tan/light brown colors.-
Use a dab of glue to secure every knot. I used drops of super glue, but diluted white glue also works. The glue soaks into the knot, locking it in place.-
Use knots or small dabs of paint to simulate blocks.|
CONCLUSIONS |
Unlike early attempts at box scale warships, Revell’s sailing ships have always tended to be accurate models. Maybe this was because they were always considered to be advanced models, and not build-it-yourself toys. (Compare the Flying Cloud to one of the infamous flat-bottomed warship kits from this era!) The kit also seems to match the information on Flying Cloud in Crother’s book, which means it is pretty accurate.
The molding techniques used aren’t up to today’s standards, but they are still pretty good. If you can’t find a copy of Flying Cloud, Revell’s Stag Hound is almost the same kit in a different box, and I would assume that kit to be as good as this one. (Both models have the same hull.)
Now that my model is completed, I’ve thought of a few things I wish I’d done along the way. The model’s pinrails are molded on the inside of the hull, and can’t be used to secure rigging lines to. I think I could have drilled a few small diameter holes in them, to take the small diameter thread I was using. I could have then had some running rigging going to the pinrails, a detail I don’t have at all in my model. I also could have drilled a couple of holes in the mast platforms, or added small metal eyes, to make it easier to attach stays to the masts in places. Nearly every stay ends in a knot tied around the circumference of the mast, because there was nowhere else to secure the line. Also, if I had all the time in the world, I would have made my own ratlines. (The kit supplied ones are better than hard plastic, but not as good as hand-made ones.)
One last note: This is not the same kit as the Revell Cutty Sark of approximately the same size. I had suspected that this might just be a re-boxing of the Cutty Sark kit, but it isn’t. I compared my kit to the current release of the Cutty Sark kit, and they are definitely different kits.
|
REFERENCES |
The American-Built Clipper Ship, 1850-1856: Characteristics, Construction, and Details by William L. Crothers
Description of some of the great clipper ship races: http://www.eraoftheclipperships.com/page34web6.html
April 2003
Copyright ModelingMadness.com
If you would like your product reviewed fairly and quickly, please contact the editor or see other details in the Note to Contributors.
Back to the Reviews Index Page 2018