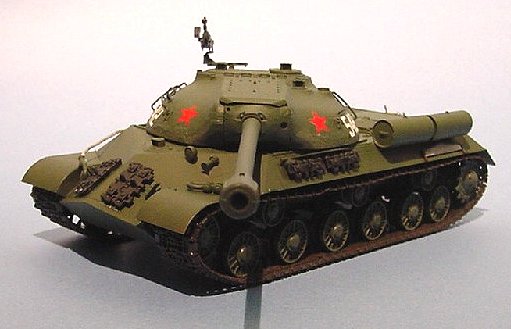
Tamiya 1/35 JS-3 Stalin
|
KIT # |
35211 |
|
PRICE: |
CDN$49.99 |
|
DECALS: |
Five Vehicles |
|
REVIEW : |
Olivier Lacombe |
|
NOTES: |
Vinyl tracks |
|
HISTORY |
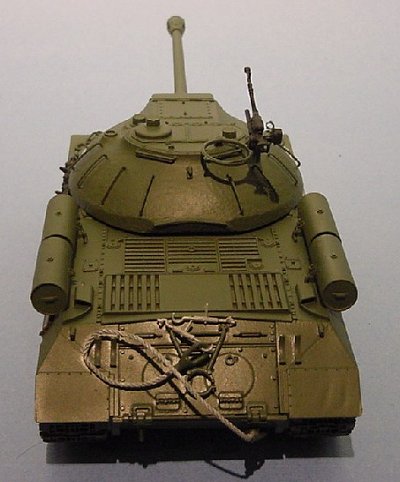
The JS-3 was Russia’s answer to Germany’s heavyweight, the Tiger, King Tiger and their Jagdpanzer companions. The third in the JS serie, it was different from the earlier two by having a cast turret shaped in a flat bowl (this turret shape is still found on modern Russian tanks). Armed with a powerful 122 mm L/43 main gun, it was a match for anything on the battlefield and with its thick armor (250 mm!), it could take a licking and still move on at 40 km/h under the power of its 520hp engine to search for another target.
The world first saw this tank at the victory parade in Berlin, but there are no reports of the tank engaging any German units at the end of the war. However, some of the early JS-3 might have been engaged against the Japanese in Manchuria in August 1945. Along with modifications to the basic design, the production went on to total some 1 800 machines. Nowadays, we can still see the effect of this vehicle on today’s MBT (whether they are Russian or Western) in the hull and turret shapes.
|
THE KIT |
 The kit contains 4 sprues of
olive-drab styrene, the lower and upper hulls, the turret, 2 vinyl tracks
(Warning : don’t do like me and store them on a flat surface, not all twisted,
you’ll see why later), and a length of string (70 cm of it). You get the usual
Tamiya quality, sharp details and all the rest. A commander figure is also
provided. The turret cupola and the hulls are very nicely done, with a nice
cast iron effect where such material would have been used. Poly-caps are
provided for the sprockets.
The kit contains 4 sprues of
olive-drab styrene, the lower and upper hulls, the turret, 2 vinyl tracks
(Warning : don’t do like me and store them on a flat surface, not all twisted,
you’ll see why later), and a length of string (70 cm of it). You get the usual
Tamiya quality, sharp details and all the rest. A commander figure is also
provided. The turret cupola and the hulls are very nicely done, with a nice
cast iron effect where such material would have been used. Poly-caps are
provided for the sprockets.
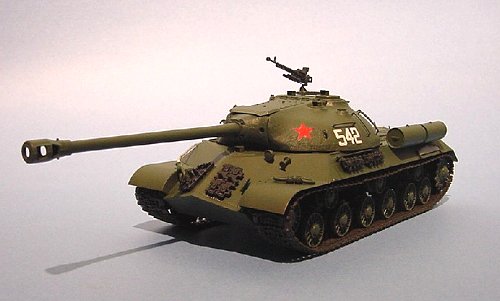
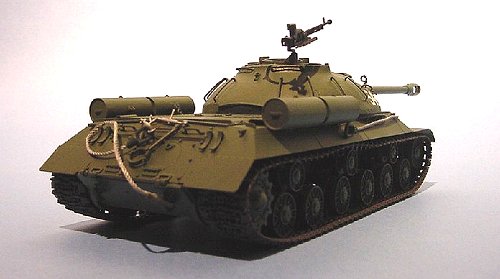
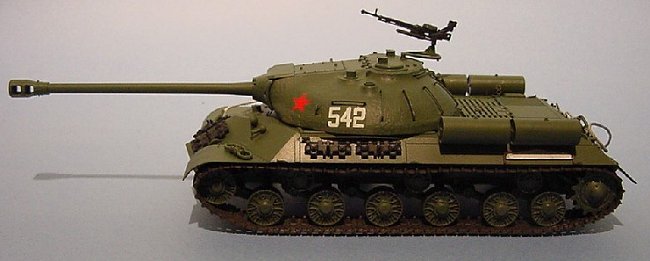
You have the option of adorning your tank with a powerful 12,7mm DshK machine gun, 4 drop tanks on the sides of the rear deck, spare track links and for the decals, you get generic markings for five vehicles, as no units are specified : 3 sets of numbers, two red stars and two of what appears to me as a divisional emblems. They are nicely printed, albeit a bit thick but in register.
The instructions are also what you would expect to get from Tamiya, and they provide you with a comparative chart of German and Soviet tanks in World War 2, starting with the PzKfw III Ausf.L and the T-34/76 to the King Tiger and the JS-3.
|
CONSTRUCTION |
I like to build by sub-assemblies, so I started the model by assembling the wheels, which consists of six support rollers, 14 road wheels and two drive sprockets. Next came the four drop tanks and the rear panel on which I left off the gun support for ease of painting. The auxiliary tanks have a noticeable seam which was dealt with Tamiya Putty and sanded without great care, since the tanks were jettisoned when emptied to be salvaged later on, so they were rarely in top shape.
 I skipped the part where
they make you attach all the wheels to the lower hull to after the beast was
painted, but I did attach all the suspension arms. Instead, I mated the two
hulls together and attached all the accessories on top, save for the drop tanks,
the spare tow hooks, the saw and the spare track links. The turret was my next
area of concern. Tamiya provides you with two benches, but no mention of them
are made in the instructions and since the kit has no interior, they are best
left off. I glued everything on the turret, that is all the hatches (which I
closed since I didn’t wanted to use the figure), the periscopes, and the gun
mantle, but I left the machine gun support off to be glued after the painting.
The two gun halves were glued and maybe it’s just me, but I applied a heavy dose
of Squadron White Putty to it, sanded it smooth and primed with Testor’s Combat
Grey (small jars), after which I inserted it in its mantle. The mantle fit is
good, but not first class. What I did is that I applied some cyano to the sides
where the seam is located and sanded it lightly. You get an effect similar to a
weld line.
I skipped the part where
they make you attach all the wheels to the lower hull to after the beast was
painted, but I did attach all the suspension arms. Instead, I mated the two
hulls together and attached all the accessories on top, save for the drop tanks,
the spare tow hooks, the saw and the spare track links. The turret was my next
area of concern. Tamiya provides you with two benches, but no mention of them
are made in the instructions and since the kit has no interior, they are best
left off. I glued everything on the turret, that is all the hatches (which I
closed since I didn’t wanted to use the figure), the periscopes, and the gun
mantle, but I left the machine gun support off to be glued after the painting.
The two gun halves were glued and maybe it’s just me, but I applied a heavy dose
of Squadron White Putty to it, sanded it smooth and primed with Testor’s Combat
Grey (small jars), after which I inserted it in its mantle. The mantle fit is
good, but not first class. What I did is that I applied some cyano to the sides
where the seam is located and sanded it lightly. You get an effect similar to a
weld line.
The mighty JS-3 was now ready for its trip to the paint shop.
|
PAINT |
I picked Testor’s Model Master Russian Armour Green for the job and went on to paint it with my Aztek A470 airbrush. I was in for a big surprise. When I started to shoot the paint, I immediately noticed that it wasn’t covering the olive-drab styrene very much. I checked my paint mix and found it adequate. I kept on ‘til the underside was all wet, as were the bottom of the suspension and the top of all the wheels which had been glued on a lengthy strip of 3M blue tape along with the tanks.
 When I returned to the paint
shop to give the top of the tank a coat, the same thing happened again, with the
paint mix being adequate again. GRRR. I checked in
my paint inventory and found out that Testor’s Model Master RLM 82 was a close
match to Russian Armor Green. I recoated both the top and the bottom with it
and I finally had something worth of the Red Army, but the wheels and the tanks
were in a poor shape. I decided to paint them by hand with RLM 82. It still
covered the plastic like a hen would cover an ostrich’s egg. Stalin was getting
mad by now, since the tank he was promised wasn’t out of the paint shop yet. I
decided to try out something : I brushed some Model Master Light Grey on the
back of a road wheel, then coated with RLM 82, but to no avail, the grey showed
through the green paint. Reluctantly, I hand brushed all the wheels one by one,
but I didn’t paint the inside of the wheels, since it wouldn’t show too much
after the model would be complete.
When I returned to the paint
shop to give the top of the tank a coat, the same thing happened again, with the
paint mix being adequate again. GRRR. I checked in
my paint inventory and found out that Testor’s Model Master RLM 82 was a close
match to Russian Armor Green. I recoated both the top and the bottom with it
and I finally had something worth of the Red Army, but the wheels and the tanks
were in a poor shape. I decided to paint them by hand with RLM 82. It still
covered the plastic like a hen would cover an ostrich’s egg. Stalin was getting
mad by now, since the tank he was promised wasn’t out of the paint shop yet. I
decided to try out something : I brushed some Model Master Light Grey on the
back of a road wheel, then coated with RLM 82, but to no avail, the grey showed
through the green paint. Reluctantly, I hand brushed all the wheels one by one,
but I didn’t paint the inside of the wheels, since it wouldn’t show too much
after the model would be complete.
|
CONSTRUCTION CONTINUES |
 With the painting problems
behind me, it was time to get the threads up on the vehicle. I did the mistake
of not storing them on a flat surface and they are twisted somewhat, but I can
live with it. I started by gluing all the wheels at their proper spots then I
slid the tracks over the wheels and attached them as shown in the instructions
with super glue. To replicate the sag between the return rollers, I applied
some cyano on the rollers and glued the track in place with accelerator. Then
the spare track links and the DshK where painted Gun Metal and I managed to lose
the ammo box, break the machine gun support, detail the saw, glue the tanks and
the spare track links in place (they give you the choice of two types of link
sections : long and short. I glued the long ones on the front of the hull and
the short ones on the left side (see the pictures) along with the cables. I
followed the instructions for the string, on which you glue both ends of a 10 cm
section, then cut it and insert it in tow hooks after which you place them at
the rear of the tanks around some hooks (painted flat aluminium) in a manner
than I couldn’t duplicate, so I placed one at the rear and the other on the
right side of the hull. I then closely examined the tank’s hull, and made a few
RLM 82 touch ups here and there with a brush.
With the painting problems
behind me, it was time to get the threads up on the vehicle. I did the mistake
of not storing them on a flat surface and they are twisted somewhat, but I can
live with it. I started by gluing all the wheels at their proper spots then I
slid the tracks over the wheels and attached them as shown in the instructions
with super glue. To replicate the sag between the return rollers, I applied
some cyano on the rollers and glued the track in place with accelerator. Then
the spare track links and the DshK where painted Gun Metal and I managed to lose
the ammo box, break the machine gun support, detail the saw, glue the tanks and
the spare track links in place (they give you the choice of two types of link
sections : long and short. I glued the long ones on the front of the hull and
the short ones on the left side (see the pictures) along with the cables. I
followed the instructions for the string, on which you glue both ends of a 10 cm
section, then cut it and insert it in tow hooks after which you place them at
the rear of the tanks around some hooks (painted flat aluminium) in a manner
than I couldn’t duplicate, so I placed one at the rear and the other on the
right side of the hull. I then closely examined the tank’s hull, and made a few
RLM 82 touch ups here and there with a brush.
|
DECALS |
I chose to disobey Mr. Tamiya’s recommendations and picked up the first set of numbers and the red star for my tank. They went without any problems since the paint used are gloss. All the left-over bits were glued (machine gun, etc…) and the JS-3 was over coated with Testor’s Dull Coat.
|
CONCLUSIONS |
It was an easy and fun built, with the majority of the work done in one evening. However, the paint mishap made me put aside the project for almost a month. I recommend this kit to anyone who’d like to enter the world of 1/35 armor modeling, and beginners will have no problems whatsoever putting together a fearsome Soviet heavy tank.
|
REFERENCES |
The instruction booklet!
Copyright ModelingMadness.com
If you would like your product reviewed fairly and fairly quickly, please contact the editor or see other details in the Note to Contributors.
Back to Reviews Page 2018