Military
Wheels Kits
1/72
Tram-Car Series ‘X’
| KIT #: | 7230 |
| PRICE: | AUD$20.00 |
| DECALS: | One Option |
| REVIEWER: | Peter Hobbins |
| NOTES: | Model completed with window glass left out |
| HISTORY |
 As
predominantly an aircraft and armour modeller, I claim no expertise either
with regard to the history or the design features of tram-cars. However,
having grown up in
As
predominantly an aircraft and armour modeller, I claim no expertise either
with regard to the history or the design features of tram-cars. However,
having grown up in
| THE KIT |
| CONSTRUCTION |
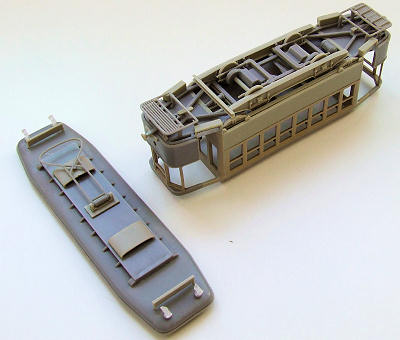
After making allowance for the large parts count and associated preparation
of small pieces, construction of this model is relatively straightforward.
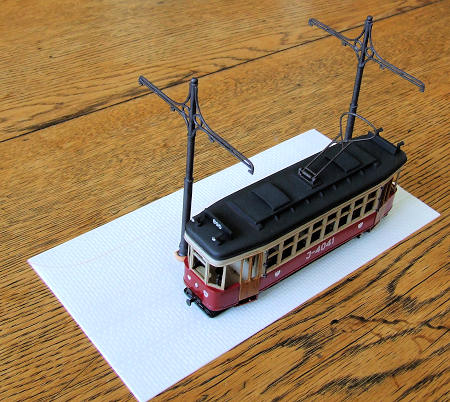
This, however, may be because I cheated. Given that I intended the tram to
form part of a larger
 diorama,
I chose not to install any of the window panes. This obviated any concerns
about marring or fogging the clear plastic when installing each piece, and
greatly speeded painting. I didn’t fancy masking 52 separate windows – and
doing so both inside and out.
diorama,
I chose not to install any of the window panes. This obviated any concerns
about marring or fogging the clear plastic when installing each piece, and
greatly speeded painting. I didn’t fancy masking 52 separate windows – and
doing so both inside and out.
This
means that after the mould seams are cleaned up on most of the pieces, the
tram can be put together in relatively straightforward subassemblies. I
built the chassis with running gear, paying particular attention to align
the walls with the cab sections to keep everything square. The interior as
well as exterior joins need to be sanded smooth as they are all visible in
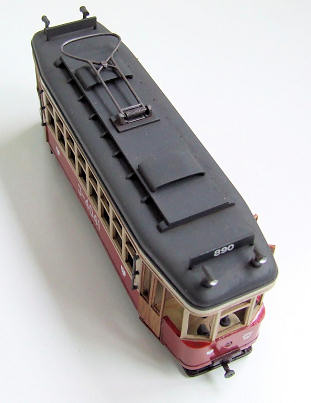
the assembled model. The roof structure and pantograph were built as a
subassembly – it is worth taking the trouble to ensure that the pantograph
isn’t glued in place as this will assist in aligning it later with the
overhead wires, if desired. Keeping the roof separate until the final stages
both assists with checking on the alignment of the chassis and painting the
interior. The running gear on the underside is complex but well laid-out in
the instructions, although I ended up omitting a few stray pieces.
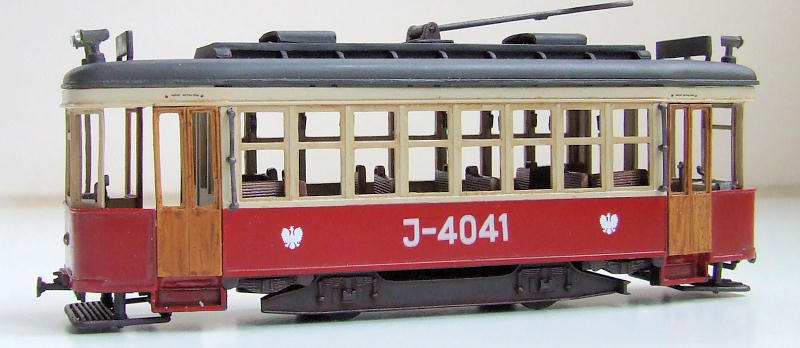
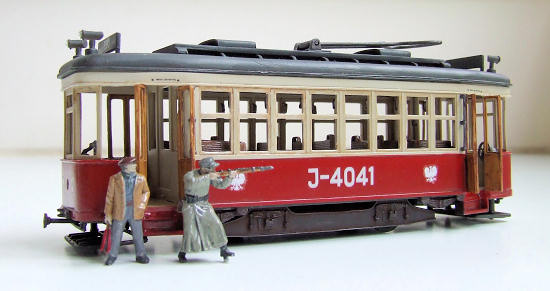
I assembled the passenger seats but left these and the interior grab-rails off until after the interior walls were painted; ditto for the doors and external handrails. In fact, the only real assembly problem I found with the tram was after painting, when the doors would not fit into their allotted spaces without some slicing, and the window frames on the side of the cab were simply too large for the place they are intended to occupy. In fact, the most fiddly construction step was building the two tram-line poles, which required a lot of careful sanding to keep relatively round and not to lose the moulded-in detail.
| COLORS & MARKINGS |
Once
again, I cheated. Originally I had based my idea on a wonderful image of an
ISU-152 assault gun dragging a tram down a war-torn city street. But could I
find that photo when it came time to paint my tram? I therefore decided to
include the tram in a
 larger
diorama representing
larger
diorama representing
MW’s
suggested colour scheme is very attractive, featuring white above scarlet
sides, with black running gear and a dark grey roof. I altered this slightly
to replace the white with a creamier colour and a dirty black for the roof.
I painted the interior in the matching cream colour, while the seats,
hand-holds and doors were painted in an attempt at wood effect. This entails
undercoating in an enamel pale yellow or tan, followed by an acrylic dark
brown top-coat. To achieve this effect, I use the unstirred pigment from the
bottom of the brown jar (I use mainly Gunze acrylics), while loading the
brush largely with the clear fluid from the top half of the jar. With a bit
of patience this creates streaks on the surface that approximate wood grain;
it works better some times than others. Technically I should have carried
the effect on to the window frames too, but that seemed a recipe for
disappointment so I left well enough alone.
Leaving  out
the kit’s Soviet decals, I hunted in the spares box for some German-looking
lettering for the tram’s side (I think it came from a Swiss Hawker Hunter
kit!), plus various small logos and German stencils. I would have loved a
white town name for the destination boards, but no such luck so I used some
numerals instead. This just left some model railway lenses for the main
headlight and roof-top lamps. Most of the model was then detailed with a
thinned wash of burnt umber oil paint, with an extra-heavy coating on the
running gear. For the moment I have left the roof separate until I place the
tram in the diorama, so that I can place some troops in it, at which point I
will complete the weathering to better blend it into the scene.
out
the kit’s Soviet decals, I hunted in the spares box for some German-looking
lettering for the tram’s side (I think it came from a Swiss Hawker Hunter
kit!), plus various small logos and German stencils. I would have loved a
white town name for the destination boards, but no such luck so I used some
numerals instead. This just left some model railway lenses for the main
headlight and roof-top lamps. Most of the model was then detailed with a
thinned wash of burnt umber oil paint, with an extra-heavy coating on the
running gear. For the moment I have left the roof separate until I place the
tram in the diorama, so that I can place some troops in it, at which point I
will complete the weathering to better blend it into the scene.
| CONCLUSIONS |
This is quite a detailed kit that presents few construction challenges, although if you insist on installing glass in the windows then I’d suggest laying in a stock of clear styrene and plenty of masking tape. Whether as a colourful display model on its own, or as part of a diorama (er, even if you cheat a little), it certainly makes an interesting diversion from small-scale armour kits. The addition of the vacformed base and associated poles makes this quite a neat little package and good value for the price.
February 2010 If you would like your product reviewed fairly and quickly, please
contact
me or see other details in the
Note to
Contributors.