Verlinden 200mm Dutch Grenadier
|
KIT # |
1463 |
|
PRICE: |
€10.00 on sale |
|
DECALS: |
N/A |
|
REVIEWER: |
Erik Wauters |
|
NOTES: |
First resin kit and first use of oils |
|
HISTORY |
Instead of making historical mistakes I will admit I don't know anything about it apart from being a Napoleonic era soldier figure.
|
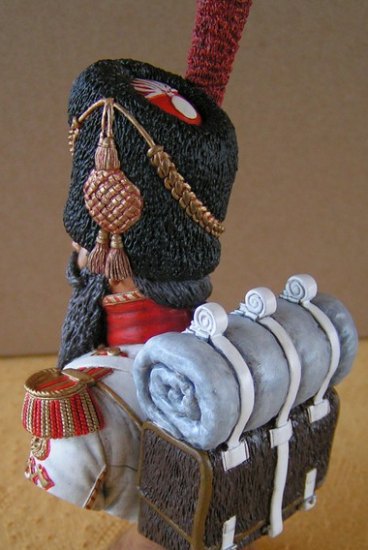
THE KIT |
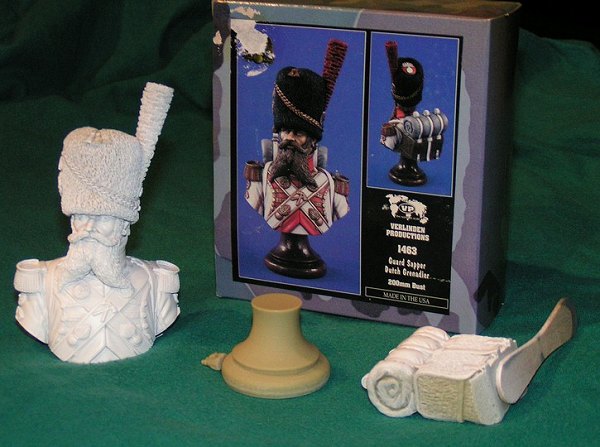 Only
5 resin parts (body & head & hat in one, stand, backpack and 2 smaller
parts of the hat), very good quality of casting, very little cleanup
necessary, no instructions or painting guide, only the picture on the box
for guiding.
Only
5 resin parts (body & head & hat in one, stand, backpack and 2 smaller
parts of the hat), very good quality of casting, very little cleanup
necessary, no instructions or painting guide, only the picture on the box
for guiding.
|
CONSTRUCTION |
This is my first resin figure, and therefore I chose a big 200 mm (1/9 th scale) kit that would make it easier to paint the details ( I use to drink a lot of coffee and I don't have a really steady hand for small details ).
The cleanup consists of making a
few cuts with a fine saw and some sanding to remove the unwanted resin.
This was done under water to reduce dust inhalation (resin dust is toxic,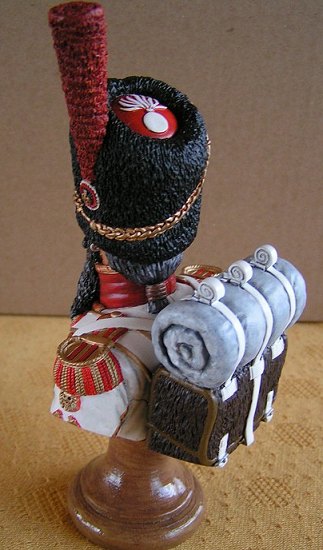 be carefull and inform yourself). Parts were then washed and let dry.
Some people want everything glued together before painting, but in this
case you best glue the backpack at the end, so you can reach every corner
without any problem. As you might know CA-glue is best for these resin
parts.
be carefull and inform yourself). Parts were then washed and let dry.
Some people want everything glued together before painting, but in this
case you best glue the backpack at the end, so you can reach every corner
without any problem. As you might know CA-glue is best for these resin
parts.
|
COLORS & MARKINGS |
Normally a primer would not be necessary but because there's a lot of white to paint I started with an excellent white primer: Tamiya Fine Surface Primer (in a spraycan), this is an expensive primer but it is worth the extra money : it gives a very fine almost glossy surface and adheres well. This white primer gives a solid white colour and whether I have to paint a white aircraft, white airliner or something else I always start with this primer.
I wanted to try oils for the first time and bought a set of 10 colours, which is enough as you can mix them easily, thinning is done with turpentine. But you can't just start painting with oils because they are translucent, you need a good base colour and for this you can use enamels.
 I started spraying
the face and stand by airbrush with Humbrol 63 sand. Then with handbrush
the hat was painted black, the red areas were filled in and the backpack
got darkbrown and grey . Finally I used gold for all the decoration on
the uniform : this is the most time consuming part and you need a sharp
eye, but if I can do it , everybody can ! Once you are satisfied with
your base colour you can go on with the oils, If you never used them
before I advice you to find some good tips in books or on the internet.
Down the page I've included a link to an introduction to figure painting
with oils. Once you know the basics, it's not so difficult and you can
always improve your skills as you move on.
I started spraying
the face and stand by airbrush with Humbrol 63 sand. Then with handbrush
the hat was painted black, the red areas were filled in and the backpack
got darkbrown and grey . Finally I used gold for all the decoration on
the uniform : this is the most time consuming part and you need a sharp
eye, but if I can do it , everybody can ! Once you are satisfied with
your base colour you can go on with the oils, If you never used them
before I advice you to find some good tips in books or on the internet.
Down the page I've included a link to an introduction to figure painting
with oils. Once you know the basics, it's not so difficult and you can
always improve your skills as you move on.
I started mixing some colours that were close to the base enamel colours and then added darker and lighter tones and used them on my figure to make highlights and shades. You best start with the eyes and the face as these make your figure come to life, if you make a mistake here you can still wipe of the oils and restart. What is great about oils is that their long drying times makes them suitable for shading and blending. After a while I got the hang of it and it opened a whole new world for me.
 If you are happy
with the face, you can do the rest of the uniform and backpack. If you
want the stand to look like wood you can paint dark brown oil over the
sand coloured enamel and you get a nice wood effect. The beard started
out dark brown and then added grey and white to simulate greying of the
hairs. After the oil painting done I sprayed gloss varnish and let it all
dry for several weeks. Then continued again with some oil washes until
satisfied. A final dullcoat and don't forget a little drop of gloss in
the eyes and it was finished.
If you are happy
with the face, you can do the rest of the uniform and backpack. If you
want the stand to look like wood you can paint dark brown oil over the
sand coloured enamel and you get a nice wood effect. The beard started
out dark brown and then added grey and white to simulate greying of the
hairs. After the oil painting done I sprayed gloss varnish and let it all
dry for several weeks. Then continued again with some oil washes until
satisfied. A final dullcoat and don't forget a little drop of gloss in
the eyes and it was finished.
|
CONCLUSIONS |
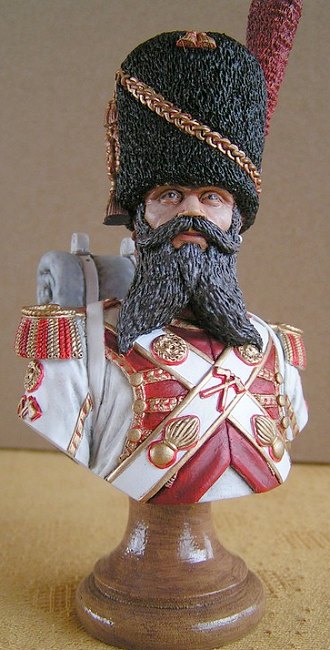
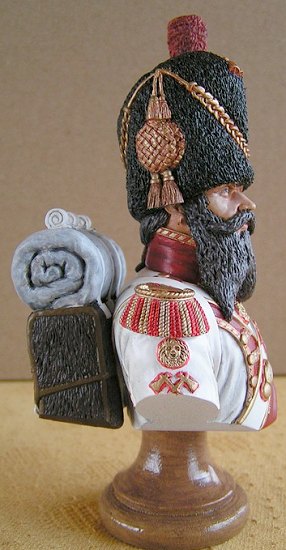
An excellent cast figure easy to assemble, looks really cool and because of the larger size easy to paint, very good for a first time resin project. This was only my third figure, my first resin kit and first time use of oils. I can say that I'm happy with the result, but can still learn more of course.
|
REFERENCES |
1. Figure painting for beginners : http://www.btinternet.com/~model.soldiers/page38.html
2. My modelling site : http://users.pandora.be/erik.wauters/
July 2004
Copyright ModelingMadness.com
If you would like your product reviewed fairly and fairly quickly, pleasecontact the editor or see other details in the Note to Contributors.