ICM 1/16 Night King
| KIT #: | 16201 |
| PRICE: | $24.99 |
| DECALS: | None required |
| REVIEWER: | Dan Lee |
| NOTES: | From HBO's Game of Thrones |
| HISTORY |
WINTER IS COMING!
The Night King is a creation of famed author George R. R. Martin whose book series “A Song of Ice And Fire” is the basis for the most illegally downloaded TV show in the world, HBO's Game of Thrones (note to any HBO lawyers: I paid for all my digital editions.)
 The Night
King is the leader of “The Others” (novels)/”White Walkers” (TV Show) and is a
very powerful and dangerous enemy to the realms of men. In large part thanks to
his uncanny SAM like spear throwing ability and such magical powers like riding
dragons, raising the dead and creating blinding winter storms.
The Night
King is the leader of “The Others” (novels)/”White Walkers” (TV Show) and is a
very powerful and dangerous enemy to the realms of men. In large part thanks to
his uncanny SAM like spear throwing ability and such magical powers like riding
dragons, raising the dead and creating blinding winter storms.
According to visions by Bran Stark (from the TV show), the Night King was originally a First Man who had a really bad encounter with the Children of the Forest. The Children needed a magical weapon to fight off the First Men who had invaded the continent of Westros and were slaughtering them so they captured him then turned him into the Night King as a means to win the war against the First Men. Like most fictional superweapons, the Night King turned on its creators forcing the Children of the Forest and the First Men to ally to defeat him during the legendary “Long Night” some thousands of years before the events of Game of Thrones.
No one really knows why he came back after all these years as not even the Starks, who pride themselves on reminding everyone of their house motto: Winter Is Coming. Could because of dragons. Maybe the Night King wanted revenge. Or a deal was broken. Whatever the reason, the Night King came back and is going to make Westros pay.
| THE KIT |
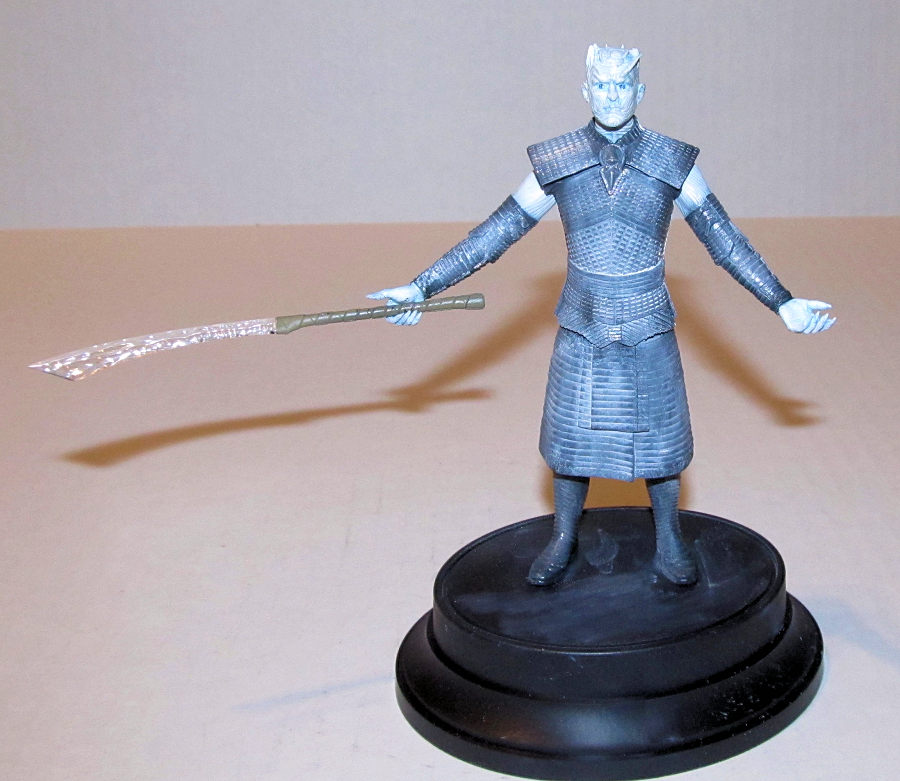
ICM came up with this deceptively simple kit. The small cardboard box contains a 3 piece stand, one grey sprue (C) of 17 parts, one clear sprue (D) of a single part, a single glossy instruction sheet/painting guide and a sheet color glossy print of the Night King himself. The parts will require some work as there is a touch of flash and mold markings that need to be cleaned up. They are well detailed parts.
| CONSTRUCTION |
 The parts are
nicely detailed, but the fit isn't Bandai quality. I first needed to clean up
the parts as the mold markings and flash were carefully sanded away so as not
damage the impressive surface detail.
The parts are
nicely detailed, but the fit isn't Bandai quality. I first needed to clean up
the parts as the mold markings and flash were carefully sanded away so as not
damage the impressive surface detail.
My intention of a quick build ended up being bogged down as I found out the fit wasn't anything that I expected. I glued the legs together and then found that the halves of the armoured skirt would not fit around the legs! I put the parts back into the box as I didn't have the patience at the time to slog my way through what I thought would have been an easy build.
A month later, I opened up the box again a better idea and a bit more patience. I began with the torso instead of the legs. I had to sand down the mating surfaces of the torso halves till the parts fit together without any pressure then the parts were glued together with Tamiya extra thin. I had a couple of areas that had some gaps that were filled up with Vallejo plastic putty.
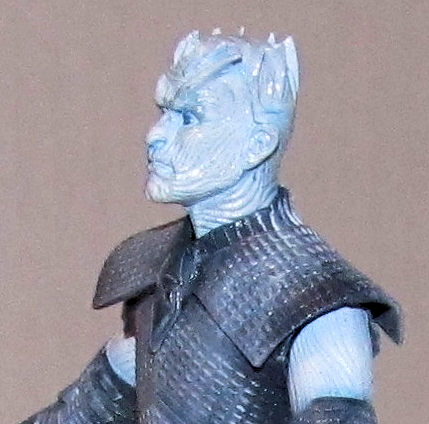 Next up I
worked on the head. The head is actually four small pieces. Two for the neck and
two for the head. I glued everything together and the neck actually required a
touch of sanding as there were some gaps that needed to be dealt with. I used
Vallejo plastic putty and a small piece of 600 grit sandpaper to deal with the
gaps. Again the fit between the head and neck wasn't exactly what I thought it
was going to be as there were gaps to be filled which required a toothpick
smearing in a dab of Vallejo putty into the gaps and the excess was wiped away
with a damp Q-tip. The fingers were glued onto the palms of each arm and more
Vallejo plastic putty was used to fill in the gaps between the palms and
fingers.
Next up I
worked on the head. The head is actually four small pieces. Two for the neck and
two for the head. I glued everything together and the neck actually required a
touch of sanding as there were some gaps that needed to be dealt with. I used
Vallejo plastic putty and a small piece of 600 grit sandpaper to deal with the
gaps. Again the fit between the head and neck wasn't exactly what I thought it
was going to be as there were gaps to be filled which required a toothpick
smearing in a dab of Vallejo putty into the gaps and the excess was wiped away
with a damp Q-tip. The fingers were glued onto the palms of each arm and more
Vallejo plastic putty was used to fill in the gaps between the palms and
fingers.
I finally got around to the armoured skirt that had stopped me earlier. I first of all had to cut away part of the top of the legs so the top skirt could at least fit snuggly. Next I had shave off the bulge of the crotch (which would have made noted story psycho Ramsay Bolton, er, proud) and a quarter inch off the butt so the skirt could fit together without a 1/16 inch gap. There was still a gap, but it was easier to fix.
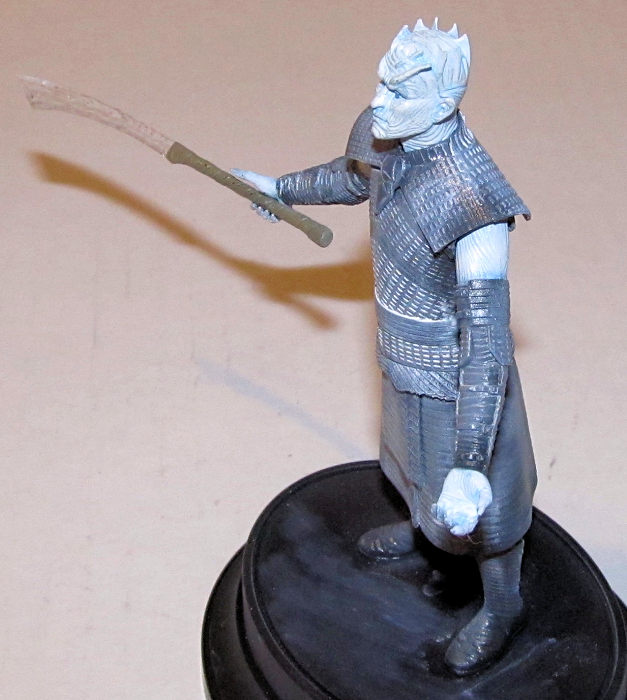
I used Tamiya extra thin to glue the skirt to the legs and gap filling CA glue to seal the gaps. When it was dry I took a small file and sanded each fold in the skirt on both sides of the hips to remove the excess CA glue. The task was quite tedious and I didn't really enjoy doing it, but it did work. The clear sword was cleaned up of nub and mold markings in preparation for painting.
| COLORS & MARKINGS |
ICM provides a color guide, but I also used photos from the TV series. First any exposed flesh was sprayed gloss white. The various exposed areas on the arms were masked off and the arms and torso were painted gunmetal then the leather bands were masked off and sprayed NATO black. The instructions say semi gloss black, but from what I've seen in the pictures that the greyish NATO black looks a lot more like the black leather used in the show. I guess this is more up to interpretation or how one's eyes perceive color.
 The legs were
done the same way. The skirt and shoes were painted NATO black and then the leg
armor was painted gunmetal. I hand pained the exposed flesh of the legs white. I
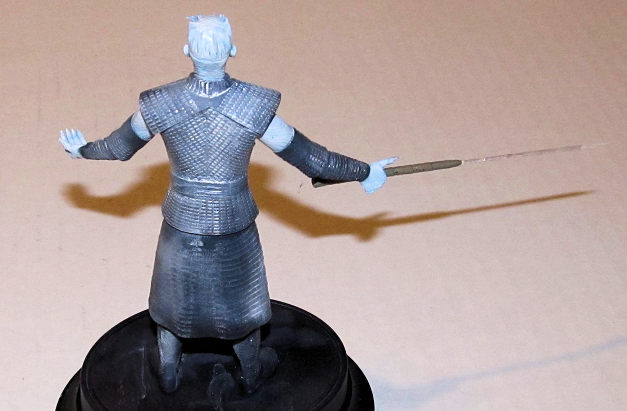
masked off the clear “ice” blade of the sword and painted the hilt NATO black
then Desert yellow. Lastly, I sprayed the neck piece emblem with Vallejo Metal
Color Magnesium to provide a metallic contrast to the duller armor.
The legs were
done the same way. The skirt and shoes were painted NATO black and then the leg
armor was painted gunmetal. I hand pained the exposed flesh of the legs white. I
masked off the clear “ice” blade of the sword and painted the hilt NATO black
then Desert yellow. Lastly, I sprayed the neck piece emblem with Vallejo Metal
Color Magnesium to provide a metallic contrast to the duller armor.
Once the paint was dry, I made an Azure Blue watercolor wash (a drop of Azure blue paint, a few table spoons of water and a drop of liquid soap) that I put on the flesh to give it a blue tone. When it was dry, the excess was wiped away with a damp Q-tip. I then brushed on faded panzer grey pigment to add in the grey tones as per the show. Finally, I took toothpicks dabbed with clear blue, light blue and white to create the eyes which were not all the great (hey it's 1/16 scale!)
The rest of the Night King was brushed with AK zinc oxide pigment to represent the snow and dust as per the pics from the show. I ended up wiping away the excess with damp Q-tips.
The Night King took a coat of Tamiya flat clear. When that was dry, the exposed skin was sprayed with a Xtracrylix semi gloss coat.
Using CA glue, I added the torso to the legs then the armored shoulders and finally the head. The arms were added last and posed to make it look like he was raising the dead. The sword was added to the right hand without the need for glue.
| CONCLUSIONS |
This is not a Bandai figure kit which is almost as vice free as one can get in a model. You will need to do a fair amount of “old school” model making to assemble this ICM kit which is apparently a new line for them. The paint job is simple and the weathering will make the kit pop. Definitely more for the experienced builder who wants to get into figures and not for the casual GoT fan/novice modeler who thought it would be a good idea.
Dan Lee
21 December 2018
Copyright ModelingMadness.com.
If you would like your product reviewed fairly and fairly quickly, please contact the editor or see other details in the Note to Contributors.
Back to the Main Page Back to the Review Index Page Back to the Previews Index Page