| KIT #: | See article |
| PRICE: | See article |
| DECALS: | On Dinosaurs?? |
| REVIEWER: | Scott Lyle |
| NOTES: |
| INTRODUCTION |
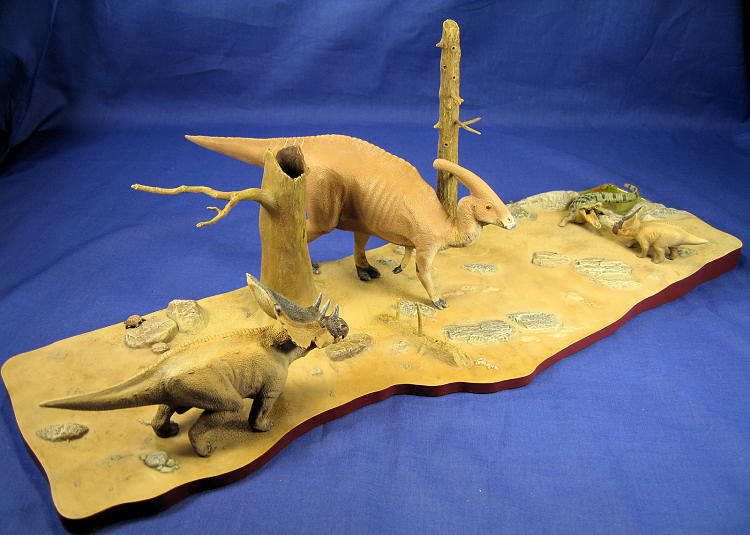
“Searching for Water”
Tamiya’s dinosaur diorama kits have been out for a few years now and are probably the most accurate and detailed injection molded dinosaur kits we’re liable to see for some time. Featuring beautifully sculpted dinosaurs, the kits also include detailed bases with enough trees, rocks, foliage, and other primitive creatures to nicely fill out the scene. Like the Aurora Prehistoric Scenes kits of yesteryear, the bases from the various kits can interlock so you can create your own big Cretaceous scene – but this time without the historically incorrect cavemen mingling with your dinosaurs!
| THE KIT |
The four kits that are designed to work together are
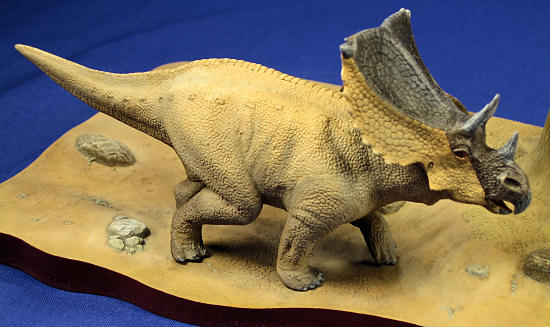
Chasmosaurus, a small horned (as opposed to horny) dinosaur; Parasaurolophus, a
large duck-billed dinosaur; Triceratops, a large horned dinosaur; and the world
famous Tyrannosaurus Rex, presumably there to eat them all.
If you fit the four bases from each kit together
you’ll have a scene that measures roughly 14” by
 20”.
Since I don’t have enough room to display a scene
that size, I decided to cut it in half and build two separate dioramas, each
measuring roughly 7” by 20”.
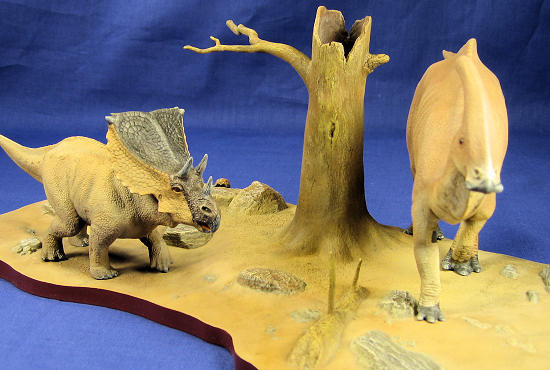
For this diorama I chose to feature the Chasmosaurus,
her young’n (included with the kit), and Parasaurolophus, saving Triceratops and
T-Rex to battle it out in a future scene.
The way the bases lay out with each other meant that
instead of using the base from the Parasaurolophus kit, I would have to use the
base from the Triceratops kit.
20”.
Since I don’t have enough room to display a scene
that size, I decided to cut it in half and build two separate dioramas, each
measuring roughly 7” by 20”.
For this diorama I chose to feature the Chasmosaurus,
her young’n (included with the kit), and Parasaurolophus, saving Triceratops and
T-Rex to battle it out in a future scene.
The way the bases lay out with each other meant that
instead of using the base from the Parasaurolophus kit, I would have to use the
base from the Triceratops kit.
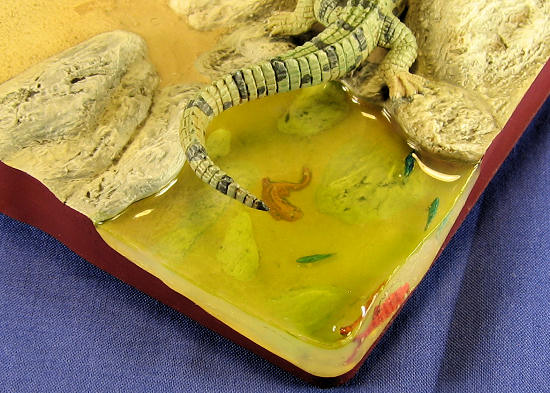
True to the thoughtful touches that modelers have come to enjoy from Tamiya, the Triceratops base features a sunken section that can be covered with a kit-supplied piece of clear plastic, replicating a small pool. Since the kit also includes a frog and four fish, one can model a small, three-dimensional pond! This gave me the idea for the diorama – thirsty dinosaurs looking for water during the height of the dry season.
To add drama to the scene I decided to add the crocodile from Tamiya’s “Mesozoic Creatures” set; angry and defending his watery turf from the young Chasmosaurus. This of course isn’t pleasing its mother – nor is the fact that a big, thirsty Parasaurolophus has just ambled onto the scene.
| CONSTRUCTION |
The dinosaurs went together incredibly fast,
primarily because there were so few parts – basically just their four legs, a
couple of parts for their heads, and the tw o
halves of their bodies.
The two body halves mated together very well,
requiring just a little sanding to remove the seam.
Where the legs and heads join the bodies I worked
Squadron Green Putty into the joint and once that was dry, used a scribing tool
to scribe random lines in the area to replicate the dinosaurs’ scaly skin.
With great looking, finished dinosaurs ready for
paint in just a couple of evenings, these kits represent a great break from
other projects that involve photo etch, resin cockpits, rigging, and other such
items that us modelers often delve into.
o
halves of their bodies.
The two body halves mated together very well,
requiring just a little sanding to remove the seam.
Where the legs and heads join the bodies I worked
Squadron Green Putty into the joint and once that was dry, used a scribing tool
to scribe random lines in the area to replicate the dinosaurs’ scaly skin.
With great looking, finished dinosaurs ready for
paint in just a couple of evenings, these kits represent a great break from
other projects that involve photo etch, resin cockpits, rigging, and other such
items that us modelers often delve into.
The two bases I chose to use feature the remains of dead trees, so those had to be glued together and then to the base, resulting in some seam work. Tamiya separately molds some rocks and those have to be glued to the base as well. Since I was making one large scene, the two bases had to be glued together, which I did with some CA glue. To make sure the bases stayed flat as the glue cured I put some books on them and then let them sit over night on a flat surface. There was a large seam between the two bases, which I filled with Squadron Green Putty. Once it was dry I sculpted the putty with a scribing tool to replicate the rough surface of the bases.
| COLORS & MARKINGS |
I wanted to paint the base before painting the
dinosaurs.
I felt that to make the dinos look more realistic in their
 environment,
I needed to know how that environment was going to look!
My first step was to prime the base with a coat of
Tamiya’s Light Gray Spray Primer right out of the can.
I then preshaded the base with Testors Acrylic
Leather, airbrushing it around the rocks, trees, and molded-in footprints.
Next I sprayed Tamiya’s AS-15 Tan right out of the
can onto the earth surfaces, misting it on lightly to let the preshading show
through.
This was followed by airbrushing some Testors Acrylic Sand
onto the rougher parts of the base, again letting the preshading show through.
The trees were sprayed Testors Military Brown, and
the rocks were then hand-painted in various shades of gray and light brown.
Once the paint was dry I went over the whole base
with a 50/50 wash of raw umber/black, and then lightened up some areas with a
50/50 wash of raw umber/raw sienna.
environment,
I needed to know how that environment was going to look!
My first step was to prime the base with a coat of
Tamiya’s Light Gray Spray Primer right out of the can.
I then preshaded the base with Testors Acrylic
Leather, airbrushing it around the rocks, trees, and molded-in footprints.
Next I sprayed Tamiya’s AS-15 Tan right out of the
can onto the earth surfaces, misting it on lightly to let the preshading show
through.
This was followed by airbrushing some Testors Acrylic Sand
onto the rougher parts of the base, again letting the preshading show through.
The trees were sprayed Testors Military Brown, and
the rocks were then hand-painted in various shades of gray and light brown.
Once the paint was dry I went over the whole base
with a 50/50 wash of raw umber/black, and then lightened up some areas with a
50/50 wash of raw umber/raw sienna.
At this point the base was looking a bit darker than I wanted due to the washes. I dry-brushed the rocks with Testors Light Gray to brighten them up a bit. I also dry-brushed the trees with a light brown color I mixed myself, as well as some yellow. I then carefully airbrushed some Tamiya Buff on to the base, concentrating it around the lower portions of the rocks and trees, as well as anywhere that the washes darkened a bit too much. Finally I brush-painted the vertical edges of the base a mixture of Testors Acrylic Anti-Fouling Red and Burnt Umber.
Painting the Dinosaurs
With my vague notion of creating a “dinosaurs in the
dry season” scene, I looked at some pictures of African waterholes on the
internet for inspiration.
From there I looked at the various African animals
that could be seen in those pictures, and decided I’d try to paint the
Chasmosauruses more or less like Wildebeests, and the Parasaurolophus like an
Impala (the gazelle, not the car).
My first step was to prime the
dinos with Tamiya’s Light Gray
Spray Primer.
I painted the Parasaurolophus first, preshading him
by airbrushing Testors Acrylic Leather into all of his folds, recesses, and
shadowy areas.
I then airbrushed his lower areas with some Tamiya
XF-2 Flat White that had a couple drops of brown in it to dull it down a bit,
and his
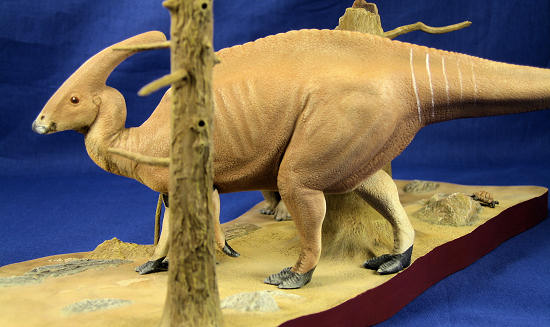 upper
surfaces with Tamiya XF-52 Flat Earth, being sure to leave a fair amount of the
Leather uncovered.
I painted the Chasmosauruses using a similar
approach.
The folds and creases were preshaded with Testors Raw
Umber, and then Tamiya XF-57 Flat Buff was sprayed over that.
upper
surfaces with Tamiya XF-52 Flat Earth, being sure to leave a fair amount of the
Leather uncovered.
I painted the Chasmosauruses using a similar
approach.
The folds and creases were preshaded with Testors Raw
Umber, and then Tamiya XF-57 Flat Buff was sprayed over that.
All three dinosaurs were given a wash of about 50:50 raw umber/raw sienna, applied over all surfaces with a ¾” wide brush. This was followed by lightly drybrushing them with lighter shades of their base colors. A pattern of Dark Gray and Dark Brown was painted on the faces of the Chasmosauruses to make them look a little more interesting, while some dark gray blotches were added to the Parasaurolophus’ armpits and feet. Both were drybrushed to add more depth. All of the toenails, horns, and beaks were painted Testors Panzer Gray and drybrushed with Testors Neutral Gray. Finally the eyes were painted Testors Leather with black pupils, and a coat of Testors Acrylic Gloss to provide some shine.
I wanted the crocodile to look like the real thing, so I painted its undersides Testors Wood and then airbrushed some Testors Acrylic RAF Interior Green on its upper surfaces. I brush-painted the black stripes, and then washed and drybrushed him per my normal procedure. His mouth was picked out in a beigey-pink that I mixed up, and his teeth were painted a light beige color. A dark wash added some nice grunginess to his mouth, and some gloss finished it off.
| FINAL ASSEMBLY |
The trickiest part of creating the water effect was
figuring out how to “dam” the water to keep it on the base.
Electrical tape was certainly “water-tight” enough
to use, but when I took off the tape one night to check my progress it took some
chunks of the water with it!
Not good.
I ended up taping some Tamiya yellow masking tape
around the edge in such a way that the non-sticky side was facing the water.
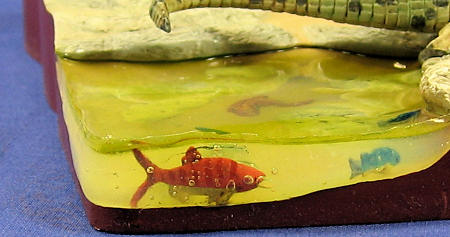
Once I did this, I was able to keep pouring more and
more layers until I had built up about a ½” thickness of water, positioning the
fish that came with the base in between the layers as I went.
It was a time consuming process as the water shrinks
as it dries, meaning I was continually adding more all the time.
Finally when it looked right, I removed the
 tape.
Thankfully, the water held its shape.
I painted the surface with a diluted mixture of
Tamiya Clear Yellow to give it a murky look, and the pond was finally done!
tape.
Thankfully, the water held its shape.
I painted the surface with a diluted mixture of
Tamiya Clear Yellow to give it a murky look, and the pond was finally done!
It was now time to put it all together.
The dinosaurs were glued into position with Walthers
Goo, and then I added the tiny frog from the Triceratops kit and the turtle from
the Chasmosaurus kit.
My Cretaceous watering hole was open for business.
| CONCLUSIONS |
Tamiya’s dinosaur kits are beautifully done productions. The fit of the kits is flawless, and the diorama bases provide the settings for great scenes. If you’re interested in dinosaurs and haven’t already checked out these kits, I highly recommend you do so!

July 2008
Copyright ModelingMadness.com
If you would like your product reviewed fairly and fairly quickly, please contact the editor or see other details in the Note to Contributors.