Aurora Black Bear and Cubs
| KIT: | Aurora Black Bear and Cubs |
| KIT #: | ? |
| PRICE: | ? |
| DECALS: | None |
| REVIEWER: | Scott Lyle |
| NOTES: | Includes resin and photo etched parts |
| HISTORY |
It’s a crisp fall day here in New England and a mother black bear and her two cubs are out rolling around in the backyard - or at least that’s what I was telling myself as I was building this kit. One of five diorama-style kits Aurora issued in the 1960s and 70s as part of its American Wildlife series, this model depicts a mother black bear and her two cubs playing with each other in the woods. A couple of years ago I was able to purchase one on ebay, and I recently got around to building it.
| THE KIT |
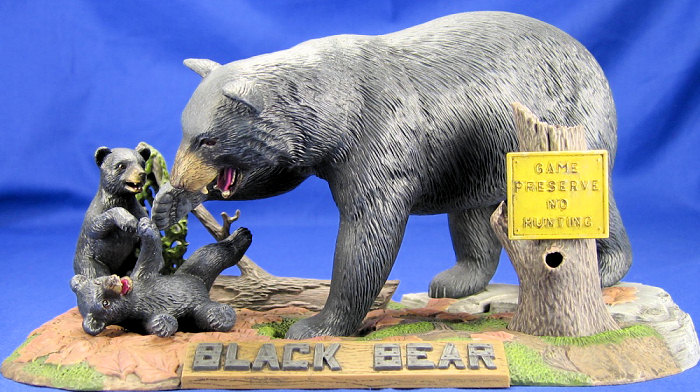
Aurora’s “Black Bear and Cubs” kit depicts a mother black bear playfully pawing at her two cubs on a woodsy, scenic base. It consists of parts to make the mother bear and cubs, as well as a base, parts for a stump, a “No Hunting” sign, and a broken tree branch. All of the parts are molded in black plastic.
| CONSTRUCTION |
 Given the age of the kit (roughly 40 years old), the parts went together fairly
well. What made assembly tricky was dealing with the seams. While
the seams weren’t that bad, it was hard to make them look like simulated plastic
fur! I ended up assembling the bear’s four legs, head, and body as
subassemblies, sanding the seams flat, filling the gaps with Green Squadron
putty, and then using a scribing tool to scribe “fur” – lots of random lines in
different directions - over the sanded areas.
Given the age of the kit (roughly 40 years old), the parts went together fairly
well. What made assembly tricky was dealing with the seams. While
the seams weren’t that bad, it was hard to make them look like simulated plastic
fur! I ended up assembling the bear’s four legs, head, and body as
subassemblies, sanding the seams flat, filling the gaps with Green Squadron
putty, and then using a scribing tool to scribe “fur” – lots of random lines in
different directions - over the sanded areas.
Since the plastic is black, it was hard to see how the seams were shaping up, so several times during the process I brush-painted on some neutral gray paint to see how the seams looked. This process had to be repeated several times until I was happy with the effect. At that point the legs and head were glued to the body, and the sanding-filling-scribing-paint checking process was repeated to the areas surrounding them. The cubs were built in a similar fashion, as were the stump and fallen tree branch. With construction complete it was painting time.
| COLORS AND MARKINGS |
I used Tamiya’s Light
Gray Spray Primer right out of the can to prime the bear, cubs, and base, and
then I had to confront another issue – how do you really paint a black object?.
I knew just painting the bears pure black wouldn’t look right, so I looked at
some pictures of black bears on the internet. The majority of pictures I looked
at showed the bears to be a very dark blue-black with purple or even violet
highlights. I settled on a painting plan that mirrors that which I have used in
the past to paint the black leather uniforms of World War 2 German Panzer
crewman. Using the Aztek A470 airbrush with the beige tip, I sprayed the bears
 an overall very dark gray, basically flat black with a couple of drops of white
mixed in. This was followed by an overall dry-brushing of enamel navy blue and
a lighter dry-brushing of enamel violet on the bears’ upper surfaces. The claws
were painted Panzer gray and then dry-brushed with Neutral gray. Their snouts
were brush-painted Testors Acrylic Leather, and then dry-brushed with lighter
shades of beige. Their mouths were painted pink and their teeth were painted
light beige (no animal ever has white teeth!), and then a wash of a 50/50 mix of
black/raw umber was brushed on to “dirty up” their mouths – who knows where a
bear’s mouth has been!
an overall very dark gray, basically flat black with a couple of drops of white
mixed in. This was followed by an overall dry-brushing of enamel navy blue and
a lighter dry-brushing of enamel violet on the bears’ upper surfaces. The claws
were painted Panzer gray and then dry-brushed with Neutral gray. Their snouts
were brush-painted Testors Acrylic Leather, and then dry-brushed with lighter
shades of beige. Their mouths were painted pink and their teeth were painted
light beige (no animal ever has white teeth!), and then a wash of a 50/50 mix of
black/raw umber was brushed on to “dirty up” their mouths – who knows where a
bear’s mouth has been!
One of the focal points of any animal, monster or dinosaur is always the eyes. I painted the bears’ eyes Testors Acrylic Leather with Panzer Gray pupils. I placed a very small dot of black in the center of each pupil, and then a really tiny dot of white in the center of that. This method is recommended by Tamiya in all of their excellent dinosaur diorama kits (I hope to show some of those in the future) and I find it does really create very good looking eyes. To finish the bears I airbrushed a coat of Testors Semi-Gloss over all three of them in the hopes this would duplicate the sheen you see on the fur of real animals. The last step was to apply some Testors Gloss on to the eyes and mouths of each bear, and a little onto the nostrils of the mother bear. I get some bad hay fever in September – maybe she does too…
 The kit’s
base is a beautifully molded piece complete with rocks, bare earth, tufts of
grass, roots, and nicely molded fallen leaves. With those leaves on the ground
the scene lends itself to a fall scene, so with that in mind I started by
airbrushing the bare earth areas Testors Dark Tan. I next brush-painted the
rocks some different shades of gray, the grassy areas green, and the leaves a
couple of different shades of a tan-orange color that I mixed up. The stump and
branch were painted medium brown, and then the whole base, stump, and branch
were given a wash of raw umber/black. Once this was dry I dry-brushed lighter
shades of the respective colors onto the rocks, earth, grass, stump, branch and
leaves. While I like the overall look of the base, I wish I had painted
brighter autumn colors on the fallen leaves to make the whole scene “pop” a bit
more.
The kit’s
base is a beautifully molded piece complete with rocks, bare earth, tufts of
grass, roots, and nicely molded fallen leaves. With those leaves on the ground
the scene lends itself to a fall scene, so with that in mind I started by
airbrushing the bare earth areas Testors Dark Tan. I next brush-painted the
rocks some different shades of gray, the grassy areas green, and the leaves a
couple of different shades of a tan-orange color that I mixed up. The stump and
branch were painted medium brown, and then the whole base, stump, and branch
were given a wash of raw umber/black. Once this was dry I dry-brushed lighter
shades of the respective colors onto the rocks, earth, grass, stump, branch and
leaves. While I like the overall look of the base, I wish I had painted
brighter autumn colors on the fallen leaves to make the whole scene “pop” a bit
more.
The “No Hunting” sign was painted yellow and the wood portion of the “Black Bear” lettering on the base was painted Testors Wood, and then both were given a raw umber/black wash. The “Black Bear” lettering was picked out in black, and then lightly dry-brushed with Neutral Gray. I used CA glue to attach all of the parts to the base, and the model was done.
| CONCLUSIONS |
 While it lacks the drama of some of the other kits in the series, it’s probably
the easiest to find on ebay these days. This kit is a fun build, full of
nostalgia for modelers that remember Aurora’s classic figure kits. I recommend
this kit to anyone who wants a break from their modeling norms, or who wants to
experiment with new painting techniques. I find that I learn a lot about
shading, dry-brushing, washes and other techniques that I can apply to my usual
military modeling whenever I build one of these kits. And while my 2 ½ year old
daughter could care less about my tanks and fighters, she’s definitely
interested in the “momma bear and baby bears” on my shelf!
While it lacks the drama of some of the other kits in the series, it’s probably
the easiest to find on ebay these days. This kit is a fun build, full of
nostalgia for modelers that remember Aurora’s classic figure kits. I recommend
this kit to anyone who wants a break from their modeling norms, or who wants to
experiment with new painting techniques. I find that I learn a lot about
shading, dry-brushing, washes and other techniques that I can apply to my usual
military modeling whenever I build one of these kits. And while my 2 ½ year old
daughter could care less about my tanks and fighters, she’s definitely
interested in the “momma bear and baby bears” on my shelf!
PS: I recommend a piece of plexiglass be firmly between your bear model and your 2 ½ year old at all times.
October 2007
If you would like your product reviewed fairly and quickly, please contact me or see other details in the Note to Contributors.