 Not much is
known about this. E2046 didn’t provide a history either……If based on her name,
she could be an adult version of all the fairy tale princess that had to kiss a
frog to turn him back to human again…..
Not much is
known about this. E2046 didn’t provide a history either……If based on her name,
she could be an adult version of all the fairy tale princess that had to kiss a
frog to turn him back to human again…..| KIT #: | FG 11197 |
| PRICE: | $54.00 |
| DECALS: | Eye decals |
| REVIEWER: | Donald Zhou |
| NOTES: | Advantages: Extremely detailed, Excellent resin casting, Two body options Disadvantages Some parts are small, fully clothed figure complex, and slight molding error |
| HISTORY |
Not much is
known about this. E2046 didn’t provide a history either……If based on her name,
she could be an adult version of all the fairy tale princess that had to kiss a
frog to turn him back to human again…..
| THE KIT |
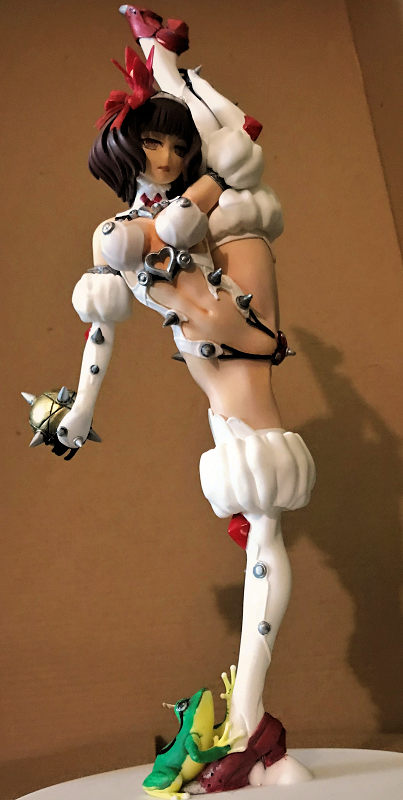
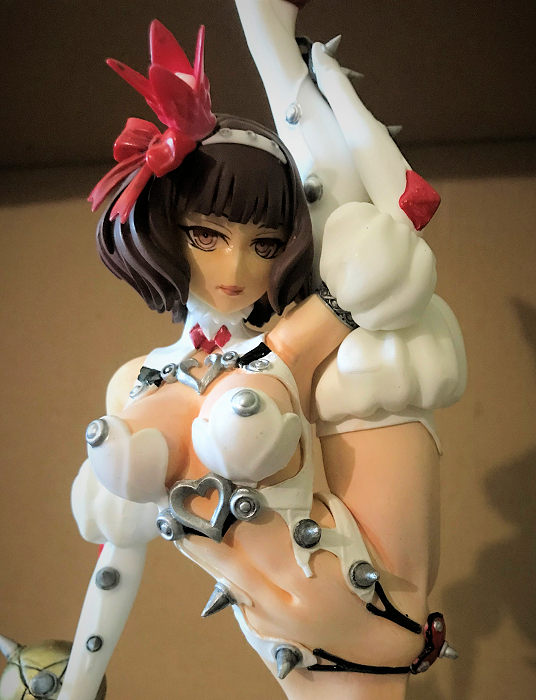
Yeah, was trolling E2046 web site when they had one of their many sales and this figure popped up. I was intrigued to say the least. It’s not just the cute little frog at her feet, but it’s also her pose, a very striking, for men (or even some ladies), wince inducing “pull your left leg up until it snaps vertical stance” that reveal her everything “downstairs”! Now, looking at the parts breakdown pic at the E2046 site, it seems there are two bodies, one completely naked, the other has various straps and spikes and pointy bits attached to it. Now, the easiest is the fully naked body…….But that’s also the most boring. The clothed option is more fun, but also requires you to come up with a plan of attack since there are a LOT of pointy stuff that goes on there with different colors. The majority of color is white…..GRRR……White doesn’t cover a thing and will be hard since it attracts dust but no other options. This means the fully clothed one is definitely not for beginners so keep that in mind.
| CONSTRUCTION |
Main construction is minimum. Again with these
figures, since there are so many different colors, you want to keep them
separated. The only thing that got assembled was the legs, with the main legs,
the two “puff balls” and the upper liner. The right arm was assembled. Here I
encountered a mistake. For some strange reason, if you assembled the way it is
in the instructions, the arm will be bent “forward”. Ie, the human arms is
designed to bend this way “>” normally, not this way “<”. Most humans can’t even
bent their arms “<” this way while keeping it straight forward too! And no, I
did not put the arm “puff ball” in reverse. The way the arms are molded, you
can’t assemble it any other way. The way the puff ball goes on the shoulder,
with a metal ring in between, the location peg is far longer than the elbow
joint one so you can goof it up. All of this meant I had to hack away the
location peg on the elbow and then just eye ball it. A little messy and
 annoying
but I got it over with. I left the left arm joint separated until the upward
swinging leg is joint first so I can play around with the assembly so the hand
can hold onto the leg properly. Other than that, it’s the frog at her feet. This
includes the main body with his arms and legs. I left the little crown off for
now. Main construction done.
annoying
but I got it over with. I left the left arm joint separated until the upward
swinging leg is joint first so I can play around with the assembly so the hand
can hold onto the leg properly. Other than that, it’s the frog at her feet. This
includes the main body with his arms and legs. I left the little crown off for
now. Main construction done.
NOTE: Just be noted I’m of course, doing the fully clothed option. If you are doing the fully naked option, the head goes on the fully naked body now. With mine, the neck piece is separate since its white with red triangles so the head will not go on until final assembly.
| COLORS & MARKINGS |
Painting is complex to say the least, least of which is all the white straps she’s wearing. Sigh, since Model Master has ended and my local hobby town don’t have any MM acrylic white anymore and they ran out of Tamiya’s, I used the OTHER MM, Mission Model white…It turned into a disaster cause the paint won’t grip the resin…And no, the first thing I did after breaking out the kit was to wash them with hot soapy water to remove any dirt and mold release agent on the molding….This forced me to drive 2 hours to the next hobby town for Tamiya’s white…Sigh….This white is sprayed onto the straps and anything that’s white, this include her legs and arms. Her body and head is sprayed with Testor’s Flesh Base…..I’ve located another four bottle, which will hold me for quite a while more but hoping please someone pick up the Model Master line.
For the body, Tamiya’s flesh and Testor Flesh, warm were applied to various nooks and crannies, including under the breasts, where her straps goes on, butt crack, belly button etc. Some lighter, other heavier. For shading and shadowing, slightly darker flesh shadow color and sunkiss peach from Apple Barrel were added sequentially to added color to it.
For the face, I washed it with Tamiya Flesh, then
highlight a bit with Testor Flesh Warm. The lips is Testor Flesh Warm since from
the pics on E2046 web site, it looks like she’s not wearing lipsticks. Next is
her eye decals. This is where there are some confusion. The eye decals supplied
in the kit is one whole piece. AKA, you have to cut them to shape since they are
not separated off their backing paper. Also, the whites of the eyes are not
printed on so you have to paint them. I forgot the white of the eyes but it
seems to be no problem since her eyes are anime and big. Also, a hint of
warning, DO NOT EVER use Mr. Marks softer
 cause it
just EATS these eye decals! I forgot and use it and promptly turned the decals
to mush! Thank goodness there is a second pair and I used Tamiya softener, which
works fine. Strangely though, if you purchased any of the E2046 aftermarket eye
decal set like me (I have Set E), then those are separated from the backing
paper with whites of the eyes printed on them and responded very well to Mr.
Marks Softer! GO Figure!
cause it
just EATS these eye decals! I forgot and use it and promptly turned the decals
to mush! Thank goodness there is a second pair and I used Tamiya softener, which
works fine. Strangely though, if you purchased any of the E2046 aftermarket eye
decal set like me (I have Set E), then those are separated from the backing
paper with whites of the eyes printed on them and responded very well to Mr.
Marks Softer! GO Figure!
Her heels needed some work since its red body, metallic grey tip and what look like weathered with gunmetal. The heels, her chastity strap (the thing that goes between her legs and cover up her nasty bits), flower and bow on her head were sprayed with Tamiya Red. Now, the heels are then colored with metallic grey for the tip and then weathered with gunmetal before dry brushed with red again. Her hair is sprayed with Tamiya red brown before highlighted with Apple Barrel Barn Red.
For the frog, it’s Apple Barrel Light Yellow for the belly and Shamrock Green for the top. Now for its own decal. Unfortunately, the decal is painted straight. This include the eyes, the stripes down the sides and the heart shaped motif on the back. VERY unfortunately, the frog is anything BUT straight. The eyes are curved, so is the sides and the back. I wasted the first decal trying to figure out how to make it work. The process I found out was this, first, cut of the eyes and then cut half way through the eyeballs so they can conform to the eye socket. After you get the eyes settled down, cut off the stripes and have them run down the sides. Then put down the heart on the back. Trust me, a lot easier to work with this way then trying to get the whole entire thing down on the frog’s body!
| FINAL CONSTRUCTION |
There is A LOT left.
 The first
thing to go on should be her main body strap. Put this on first. If you put on
her upright leg first, the strap will not be able to be sneaked in anymore (ask
me how I know). It was tough getting the strap to settle down on her body but I
did. The rear left strap will not go into the hole so I had to heat it up with a
hair dryer to get it to go. Once the strap is down, I inserted the neck piece.
Unfortunately, there is a slight seam issue between the strap and the neck. This
forced me to putty it up and then sand smooth. Rather than deal with the
headache of trying to get the offending putty white enough, I decided to color
this part black. This is why you see the semi-gloss black “stripe” there. They
look like the strap’s take off point which is what I intended.
The first
thing to go on should be her main body strap. Put this on first. If you put on
her upright leg first, the strap will not be able to be sneaked in anymore (ask
me how I know). It was tough getting the strap to settle down on her body but I
did. The rear left strap will not go into the hole so I had to heat it up with a
hair dryer to get it to go. Once the strap is down, I inserted the neck piece.
Unfortunately, there is a slight seam issue between the strap and the neck. This
forced me to putty it up and then sand smooth. Rather than deal with the
headache of trying to get the offending putty white enough, I decided to color
this part black. This is why you see the semi-gloss black “stripe” there. They
look like the strap’s take off point which is what I intended.
Next are the legs. After her heels are dried, I inserted them into the right place. You can’t mess this up since the right foot has an insertion slot that goes all the way through her heel to be placed on the display stand while the left don’t have any slot. Then the legs are inserted and superglued to their perspective places. With the left upright leg, be sure to snap it down until you feel a slight jolt to signal it’s seated properly. The right make sure it’s all the way down.
I decided at this point to cement the figure to its display stand. Now, the kit does provide you with a peg that holds her heel up and make sure it contacts the stand. However, the whole entire figure is held up by that single contact point and it sure look measly so I reinforced it by drilling a hole through the stand and figure’s heel and inserted a brass rod through them so they have some reinforcement inside. I then used superglue through the brass rod’s hole and two parts epoxy glue on the sole of the heel to make sure it sticks to the stand. The figure still wibble quite a bit when you touch her but the bottom is now nice and completely joined to its base.
With the display stand solved, time for the arms. The right arm is already joined so its cemented onto the right should. The left is still in pieces. Now, before you insert the arms, notice there are two metal arm bands that needed to be inserted first. Both are colored silver with black wash. The left arm puff ball is inserted onto the shoulder after the silver arm band. Then carefully, the left elbow is inserted on, making sure there is enough clearance for her hand to grab the now upright left leg. Afterwards, both hands are inserted into their correct slots.
 Next are
the four straps that hold up her chastity strap. There are two Y shaped ones up
front and two normal ones on the back. These are painted first with gloss black
but after that did not hold, switched to semi-gloss black. I took the chastity
strap, put on some tape underneath and stick it between the legs and carefully
arranged the holding straps into position before supergluing them into position.
Now, all the prickly stuff.
Next are
the four straps that hold up her chastity strap. There are two Y shaped ones up
front and two normal ones on the back. These are painted first with gloss black
but after that did not hold, switched to semi-gloss black. I took the chastity
strap, put on some tape underneath and stick it between the legs and carefully
arranged the holding straps into position before supergluing them into position.
Now, all the prickly stuff.
There are a lot spikes or “prickly stuff” all over her! In fact, so much that once these spikes goes on, it’s hard to find a good handling spot where to hold her. The spikes on her body strap went on no problem. The rest however, have a slot to go into the body, mainly the hands, arms, legs and even a tiny one on her chastity strap (OUCH!). These have their tips molded onto the strip of resin that are holding them together! Cussing and cursing, I carefully removed them off of their strip, then had to reshape them and sand the point down before repainting them again. These went down no problem except I lost a spike that was supposed to go on the hand and was forced to make another one with stretched sprue. Sigh, hopefully, I can make the carpet monster to cough it back up again….The last bit is the brass spikey ball on her right hand. It’s painted brass, sealed with some future and silver spikes on the ball. After that, it’s superglued onto her hand…..Almost done.
The last two bits are her hair and the frog. With the hair, I painted with red brown and barn red highlight and then dry brushed a bit with some chocolate brown. Her hair holder is inserted first, then the flower on her head and the bow tie.
The frog, after careful painting and decaling, the final bit is his crown, painted gold and then put on the slot in his head. Then the whole entire thing is placed carefully onto the slot on the display stand, with his hands holding onto her ankle. Figure done!
| CONCLUSIONS |
A lot more complex than initially thought cause again, you need a plan of attack with her fully clothed option…Well, fully clothed in quotation mark that is. I put some tape underneath her chastity strap so you can remove it to reveal her nasty bits and her breast covers can also be removed for a full birthday suit display! The breast covers can be held in place onto the heart shaped joint piece so you don’t need tape. Otherwise, it’s a figure that’s very unique in my figure display base to say the least, what with that hip breaking, leg snapping pose! The frog at the base not only add some color but completes this unique figure! Highly recommended.
Donald Zhou
22 November 2021 Copyright ModelingMadness.com. All rights reserved. No
reproduction in part or in whole without express permission. If you would like your product reviewed fairly and fairly quickly, please
contact
the editor or see other details in the
Note to
Contributors.