E2046 1/4 Ada Wong
|
KIT #: |
FG 12787 |
|
PRICE: |
$124 plus shipping
|
|
DECALS: |
eyes |
|
REVIEWER: |
Donald Zhou |
|
NOTES: |
Advantages: Extremely detailed, Excellent resin
casting! Huge. Disadvantages: Heavy, lots of multimedia parts with no
explanation how they all go, eye decals a little off and no flower
decals for her dress. |
 The
Japanese game, biohazard, was first created at around 1993 and released on the
titular Sony PlayStation console back in 1996. It’s the world’s first so called
“survival-horror” game that became popular. It eventually spawn, now 8 direct
sequels and a bunch of spin-offs. The story takes place in a small mid-west
American town called “Raccoon City” (HA), just your normal small to mid-size
American city with a population of less than 50,000…..Everything seemed normal
until one day, town folks ended up dead, some of whom looked like they’ve been
eaten! So the local city department sent in their special unit called S.T.A.R.S
or Special Tactical And Rescue Service to investigate. This unit contains
eventually some of the better well know characters of the entire universe such
as Jill Valentine (Mrs. “Jill Sandwich”), Christ Redfield and the titular bad
guy Albert Wesker. While on investigation, Team 1’s helicopter crashed, sending
Team 2 to the rescue. While investigating, they were attacked by some very
vicious, very off dogs. The team escapes into what looks like an abandoned
mansion in the middle of nowhere. Upon entering, they quickly discovered the
mansion was completely amiss. There were puzzles, booby traps everywhere. Not
only that, it was quickly discovered the entire place was overrun by zombies and
other nonsensical creatures. With the team trapped within, they quickly
discovered the entire house was a front that led to a huge underground research
center owned by the nefarious Umbrella Corporation. In this base, the seemingly
innocuous pharmaceutical company was conducting research into biological weapons
and one of which they developed was the T-Virus that turned anyone infected into
the undead and other creatures into deadly B.O.W’s or Biological Organic Weapons
such as the artificially created “Hunters” and the “Lickers” based on human
genome spliced with T-virus enhanced DNA. The baddest creature would be the
“Tyrant” class super creature bred for battle. This serves as the end game boss
creature.
The
Japanese game, biohazard, was first created at around 1993 and released on the
titular Sony PlayStation console back in 1996. It’s the world’s first so called
“survival-horror” game that became popular. It eventually spawn, now 8 direct
sequels and a bunch of spin-offs. The story takes place in a small mid-west
American town called “Raccoon City” (HA), just your normal small to mid-size
American city with a population of less than 50,000…..Everything seemed normal
until one day, town folks ended up dead, some of whom looked like they’ve been
eaten! So the local city department sent in their special unit called S.T.A.R.S
or Special Tactical And Rescue Service to investigate. This unit contains
eventually some of the better well know characters of the entire universe such
as Jill Valentine (Mrs. “Jill Sandwich”), Christ Redfield and the titular bad
guy Albert Wesker. While on investigation, Team 1’s helicopter crashed, sending
Team 2 to the rescue. While investigating, they were attacked by some very
vicious, very off dogs. The team escapes into what looks like an abandoned
mansion in the middle of nowhere. Upon entering, they quickly discovered the
mansion was completely amiss. There were puzzles, booby traps everywhere. Not
only that, it was quickly discovered the entire place was overrun by zombies and
other nonsensical creatures. With the team trapped within, they quickly
discovered the entire house was a front that led to a huge underground research
center owned by the nefarious Umbrella Corporation. In this base, the seemingly
innocuous pharmaceutical company was conducting research into biological weapons
and one of which they developed was the T-Virus that turned anyone infected into
the undead and other creatures into deadly B.O.W’s or Biological Organic Weapons
such as the artificially created “Hunters” and the “Lickers” based on human
genome spliced with T-virus enhanced DNA. The baddest creature would be the
“Tyrant” class super creature bred for battle. This serves as the end game boss
creature.
After the success of the first game, a
demand for a sequel became very evident. Resident Evil 2 was released back in
1998, for its 30 year anniversary, a complete remake was released in 2019. It
features heroes Claire Redfield, the sister to Chris and rookie cop Leon
Kennedy. Through Leon’s adventure, he would be a rather mysterious figure known
as Ada Wong. A spy with a supermodel body, charms to boot….And a penchant of
luring men in and then stab them in the back. Throughout his adventures, Leon
got twisted and turned by Ada, who was out to capture the T-Virus for a rival
chemical company. In the end, it seemed she sacrificed herself to save Leon
life, or so Leon thought.
 In Resident
Evil 4, Leon, now a secret service agent working for the President, was sent to
Spain to search for the whereabouts of the missing President’s daughter, all the
leads pointed to a small Spanish village of Pueblo. Once arrived, Leon instantly
noticed something was amiss. Further adventures and searches turned out not only
the President’s daughter Ashley “equipped with ballistics” Grahams, but a
familiar femme fatale face from Leon’s past…Ada did not die at the endo of RE2.
Throughout his adventures, Ada seemed to have turned before finally showing her
true colors by double crossing him. Ada finally met her comeuppance in RE 6,
where she is killed unceremoniously trying to steal the new T-virus out of an
infested Washington D.C. Throughout the series, she has become a very popular
dark, but not dark enough sort of pseudo-semi-villain of the RE series, not
truly evil, only doing whatever it takes to the highest bidder.
In Resident
Evil 4, Leon, now a secret service agent working for the President, was sent to
Spain to search for the whereabouts of the missing President’s daughter, all the
leads pointed to a small Spanish village of Pueblo. Once arrived, Leon instantly
noticed something was amiss. Further adventures and searches turned out not only
the President’s daughter Ashley “equipped with ballistics” Grahams, but a
familiar femme fatale face from Leon’s past…Ada did not die at the endo of RE2.
Throughout his adventures, Ada seemed to have turned before finally showing her
true colors by double crossing him. Ada finally met her comeuppance in RE 6,
where she is killed unceremoniously trying to steal the new T-virus out of an
infested Washington D.C. Throughout the series, she has become a very popular
dark, but not dark enough sort of pseudo-semi-villain of the RE series, not
truly evil, only doing whatever it takes to the highest bidder.
I actually got this kit from E2046 last year. I
preordered it two years earlier but it took over a year before E2046 got enough
orders, then get the molds in to produce the kit. I also paid a boatload, around
$330 total for it, the kit, itself was almost $200, plus tax, plus the airmail
fee…..Since the kit, like my Megan kit, is too heavy to be air shipped, I was
forced to use SpeedPak, which cost me another $80 before it arrived in October
of last year.
Upon opening the package, one is greeted by several
large sized resin piece. The pieces are not many. The biggest and heaviest is
her base. Again, don’t understand why E2046 included a large bottom piece that
will never be seen once you cement them onto the bottom of the base. The base is
more than strong enough to hold its own. I saved it as a base for future
projects. Her main body is separated into three major pieces, her dress and her
two legs. The legs are joint on her panty joint and the seam is small but still
there but since it’s mostly hidden, you can get away with it. Her arms, upper
body and head are separate, so is her hair. The other two big pieces are the
steel girder that go on the concrete base to allow her to pose onto the base
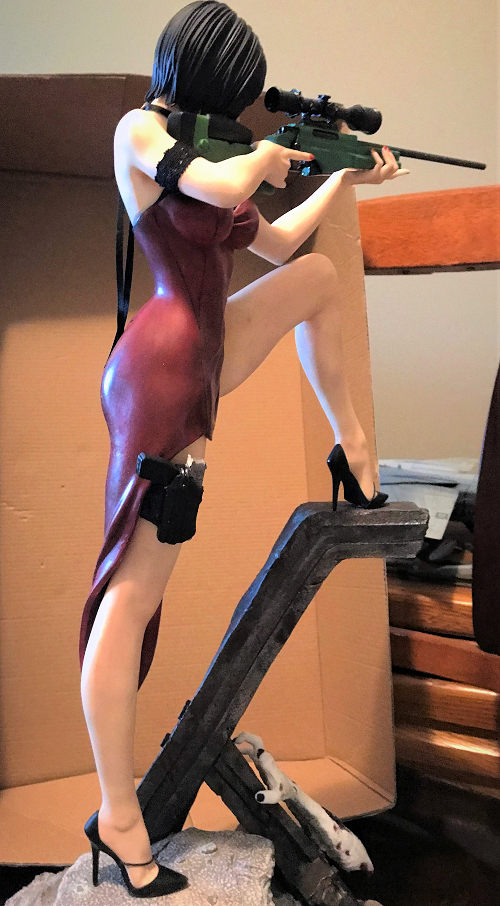
along with a broken off zombie hand. The smaller pieces mainly deal with her
grappling hook pistol leg brace, and her sniper rifle. Two small clear pieces
are also included for the sniper scope on top. DO NOT toss these as I almost did
before I caught myself!
The kit also contains some multi-media parts. The
biggest is the long pipe to simulate the sniper gun barrel. There is also a
sheet of lace for her arm band and a solid lace strip for her neck. Finally, it
took a bit to figure this one out but a sheet of what looks like tan faux
leather is included. Took a bit to figure out this is the leg strap for her
grappling hook pistol holster. No, it’s not a pistol, but a grappling hook gun
like Batman’s batgrappling hook. Those who played the games know this.
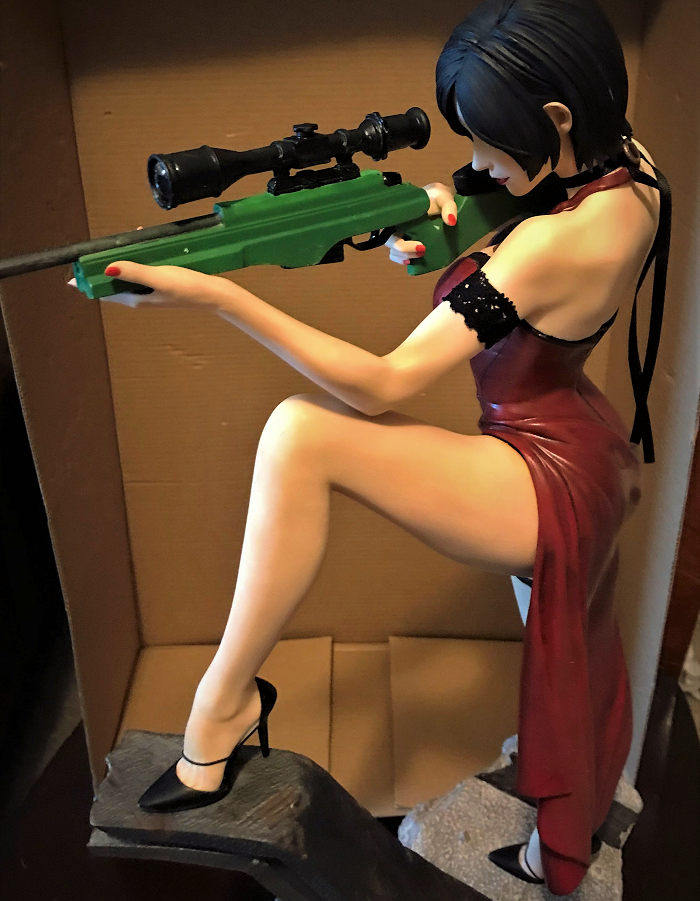
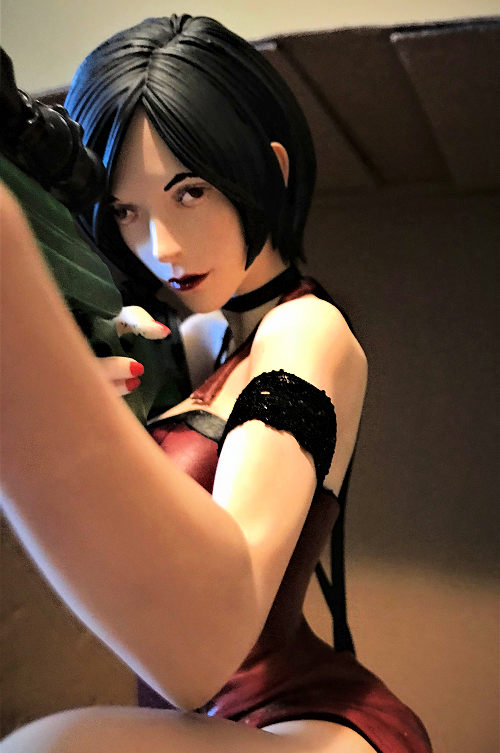
A sheet with two pair of eyes are included. These eyes
are weird in that they look upward since Ada here is looking through the
eyepiece of a sniper scope. One thing is missing are all of her flower prints on
her dress. Hopefully, E2046 can rectify this later on. Other than the heavy
weight of the kit, the rest is normal.
Not much going on! Again, with resin kits like this,
things are just beyond simple. I simply superglued her legs together, that’s it.
And then the two metal girders. Other than that, main assembly complete.
 As
expected, the vast majority of this kit is all about painting, airbrushing, and
your skills in wet and dry brushing.
As
expected, the vast majority of this kit is all about painting, airbrushing, and
your skills in wet and dry brushing.
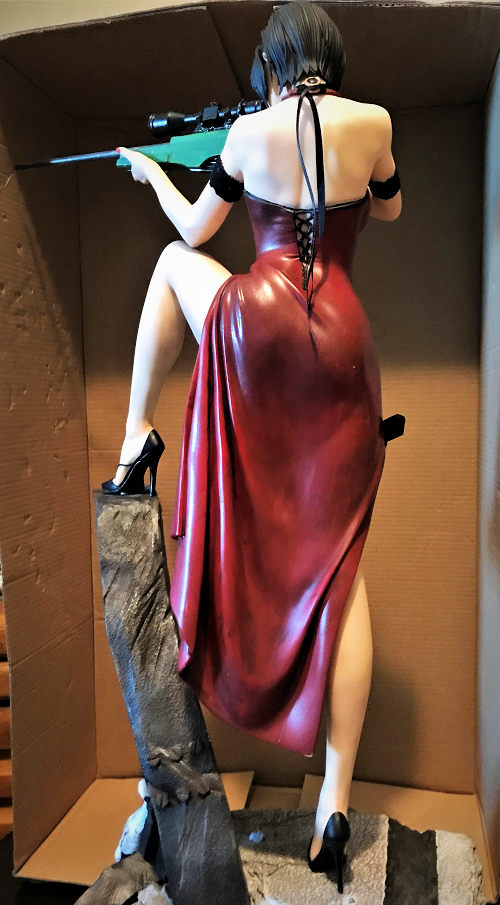
First things first, have to track down the correct
color for her dress. Finally, Vallejo’s scarlet red seemed to be a close match.
But I instantly messed it up by diluting it with lacquer thinner, which
absolutely slush it to junk! I had to get a second bottle and then had to wet
brush it with cherry red to off set it and fill in the mess. Took me four days
to get her dress down enough where the colors don’t clash and blended well
enough that at least on camera, you can’t tell the mess up. It was hell to say
the least. One thing missing on her dress though, and fans of RE 4 will
instantly know this, are a lack of her flower prints on the dress. E2046 did not
provide a decal sheet for the flower prints and I can’t find any suitable
replacements. Hope they cured this problem with follow up versions.
Next, all fleshy bits were sprayed with Testor’s Flat
Flesh, Base. Again, since Testor’s is now basically truly defunct, I only spared
one coat…Sigh, gotta save the rest for future projects, I’ll do the rest of
flesh painting with Apple Barrel or Vallejo paints. After that is dried, I
brushed on the central panty liner with semi-gloss black. The tricky bit was the
panty liner between her crouch since they hug tightly around her thighs. I first
used a very thin brush with a bit of flat black to mark down the black edge, no,
I did not use tape. The edge is so convoluted mix of compound curves and steep
vertical to horizontal transitions, getting tape to stick is haphazard at best
so I just eyeballed it. After the edge is dry, I used a slightly thicker brush
to carefully fill the rest. Luckily, most of her buttock are hidden by the dress
so you have a little leeway. After dried, I set that aside to work on her face.
With her face, I used the Flesh base as a start, then
worked in Testor’s Flesh, Warm and some Apple Barrel sun kiss peach, Flesh base,
shadow where needed. I painted her lips red and added shadows to her brows and
lashes. Next is painting her eyeballs white before adding the eye decals. Here,
I ran into a slight unfixable problem. The eye decals are great, and you get two
pairs 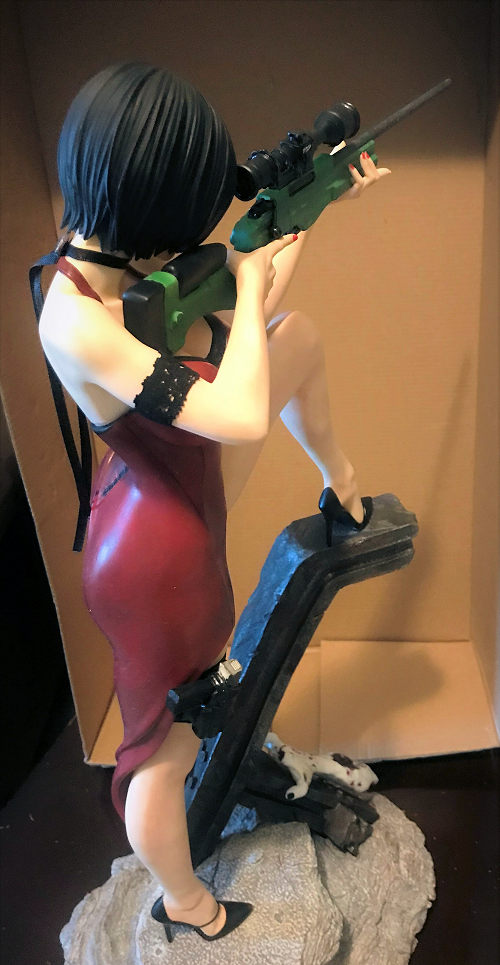 if you
mess one up but the way they are designed and printed, and due to the contour of
her face and the curvature of her eyeballs, once you put the eye decals on, it
cause them to slightly go weird. From the side view, on camera, it look like the
eyeballs are split, when you look head on, they look alright. You just have to
look at her face “dead on” to see where her eyes are pointed. Don’t know how you
can fix this but hopefully, again, E2046 fixed this in the later version.
if you
mess one up but the way they are designed and printed, and due to the contour of
her face and the curvature of her eyeballs, once you put the eye decals on, it
cause them to slightly go weird. From the side view, on camera, it look like the
eyeballs are split, when you look head on, they look alright. You just have to
look at her face “dead on” to see where her eyes are pointed. Don’t know how you
can fix this but hopefully, again, E2046 fixed this in the later version.
I then finished painting the rest. Gunmetal for the
metal barrel. Forest Green for the gun stock, semi-gloss black for the scope
etc. The tricky part is the faux leather sheet. I figured out that you supposed
to cut them down to size and design two leg wraps for her grappling pistol
holster. I painted them flat black, then cut them based on the leg holster and
the cut outs on her right leg.
The hardest part of the exercise is the base. It’s
multi-dimensional and need multiple colors with multiple passes to get it right.
I first sprayed the base with gunship grey. It’s a little dark but offers the
correct shading for the base color. The metal girder, including the one hidden
in the base itself, I sprayed and painted with Tamiya Gunmetal. Next, was two
weeks worth of washes and dry brushing. I first used Apple Barrel Pewter grey to
lighten the base, this required three coatings, then sequentially lighter colors
before concluding with light ghost grey and dark ghost grey. These colors
though, I had to use sparingly cause again, Testors is now defunct. After that,
I used Tamiya Earth, flat brown, and Apple Barrel various dust and dirt colors
to sequentially add dirt and mud to the base. For the metal girder, after the
initial gunmetal spray, I went in with burnt metal, a very light flat black
wash, then some Tamiya Red Brown and Mission Models light rust and dark rust.
The last bit on the base is the zombie hand. I didn’t color it. Undead flesh is
white and the base resin white is perfect. For the various scars, fallen off
chunks of flesh, I painted those in bright red, then after dried, used various
Apple Barrel purple to wash the wounds off before sealing it with a coat of flat
black to denote festered and decomposing flesh. With that done, it’s time to
bring everything together.
First, Ada herself. I assembled her heels to her
feet…Always make me smirk a bit since in all the movies and games, main female
leads always seems to run around with 3 inch heels….Wonder how their feet feel
after spending the whole adventure in those…Anyways…After that, I inserted her
legs into her dress. The fit is extremely tight. So tight in fact, I elected not
to super glue her lower into her dress for ease of transportation to shows.
Her head is now superglued to the upper body along
with her arms. Don’t worry about the seams. After her hair went on, I carefully
took her two different laces and for the one with the pattern, carefully cut
them down to size so they will wrap around her arm seams, thus, hiding them. I
turned the joint to the inside to not show them. For the single none patterned
lace, I wrap it around her neck joint. Now, there is a clear piece that looks
like a broach so I colored it with purple from the inside sine it’s clear and
gold on the outside before supergluing it onto the lace wrap to hold it down.
It’s still a little floppy so I then carefully fold them and pat them down with
a drop of superglue so it looked a bit more natural. After that is dried, I cut
the neck wrap to size before inserting the upper body to the dress and
superglued it down. Now, there is a little resin strap. This is her dress neck
strap that goes around her neck. Unfortunately, after using a hair drier to heat
it up and wrap it around Ada’s neck, the strap was 4mm too short on one side,
forcing me to use AB epoxy putty to fix. Nothing special but again, hope E2046
notice this problem and fix it.
 After the
main lead has dried out, I assemble her weapon. The metal barrel doesn’t really
fit that well into the stock so it forced me to putty it up and repaint. The
scope, I carefully inserted to the two clear eye pieces into the scope, then put
the scope onto the rifle. Had to use a hair drier to force her hands open. After
inserting the rifle through, forced them shut again. It took a bit of adjustment
so the rifle line up with her eye. This is important cause the eye decals are a
bit off and you need her right eye to line up with the scope or else they would
look even weirder.
After the
main lead has dried out, I assemble her weapon. The metal barrel doesn’t really
fit that well into the stock so it forced me to putty it up and repaint. The
scope, I carefully inserted to the two clear eye pieces into the scope, then put
the scope onto the rifle. Had to use a hair drier to force her hands open. After
inserting the rifle through, forced them shut again. It took a bit of adjustment
so the rifle line up with her eye. This is important cause the eye decals are a
bit off and you need her right eye to line up with the scope or else they would
look even weirder.
After that was done, I removed her lower body. First,
I carefully inserted both her leg straps into one side of the holster. After
checking the fit, I carefully inserted her holster into the slot, then dapping
slight amount of superglue here and there along the “trenches”, I wrapped the
leather straps around her leg. Finally, with a pair of tweezers and a hobby
knife, I inserted the other end through the holster before supergluing the strap
onto the holster. Ada done! Well, almost….In one of the smaller zip lock bag,
there is a very thin black colored string. Checking the pictures, I realized
this denotes her shoe straps. Sighing, I carefully measure out the measurements
and superglued them onto her shoes and across her feet. Now truly done, I set
her aside to work on the base.
The base is
simple. Again, the steel girders insertion point is deep and tight enough that I
decided not to superglue them on for ease of transportation. Same with the
zombie hand. I can get it just to cling onto the girder base without falling off
so I left it as it is. After assembling, I decided to take it downstairs for a
few more washes of dust, dirt and some more rusts here and there to add more
color to it. Assembling is easy, getting Ada onto it wasn’t nearly as easy. This
is because there are two plugs on the bottom of her feet. The right foot one
goes into a hole on the concrete base, the left goes into a hole on top of the
girder. Both are big, deep and tight so much so, I had to trim them down a
little in order to fit in properly. However, I did not want to trim them too
loose cause again, I want Ada to come off her base if the time comes. It took a
while of cajoling and careful pushing and then trimming to finally get her to
stick easily (enough that is) onto the base without the worry of her falling off
or snapping the plugs. Model finally done!
Man, is she HUGE! At ¼ scale, she’s no slouch but on
top of that base? That’s when her size becomes really apparent. And she looks
all sorts of different than the other female figures out there, I mean, a pretty
lady with a very big sniper rifle and a look that says, “DO NOT mess with me”!
This fits Ada Wong’s personality to a T to say the least! A great model, highly
recommended.
Donald Zhou
16 December 2022Copyright ModelingMadness.com. All rights reserved. No
reproduction in part or in whole without express permission.
If you would like your product reviewed fairly and
fairly quickly, please
contact
the editor or see other details in the
Note to
Contributors.
Back to the Main Page
Back to the Review
Index Page
Back to the Previews Index Page