E2046 Kaga (Kantai Collection)
| KIT #: | FG9810 |
| PRICE: | @$60.00 shipped |
| DECALS: | Eyes and flight deck |
| REVIEWER: | Dale Rannals |
| NOTES: | Resin |
| HISTORY |
Kaga was a Japanese Tosa class battleship launched in 1921. Kaga and Tosa were to have been basically enlarged Nagato's. Alas, it was not to be. Kaga and her sister became two of the victims of the Washington Naval Treaty, destined for the scrap yard. However, she was to receive a new lease on life . One of the battlecruiser hulls, Amagi, which was slated for conversion to an aircraft carrier, was damaged in an earthquake. Kaga's hull was selected as a replacement.
Kaga ended up as a 38,000 ton, 812ft long carrier of 28 knots.
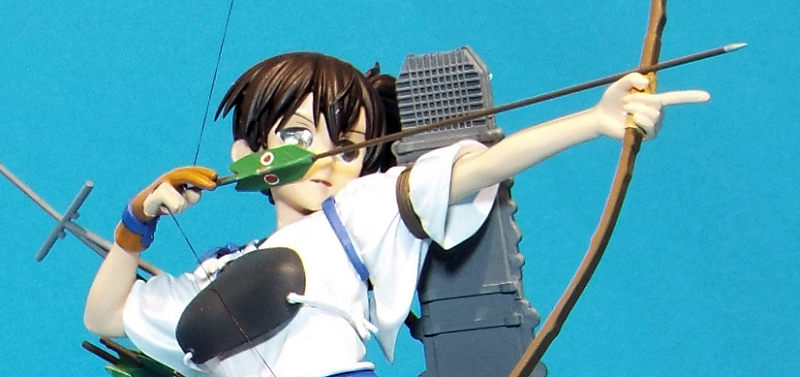
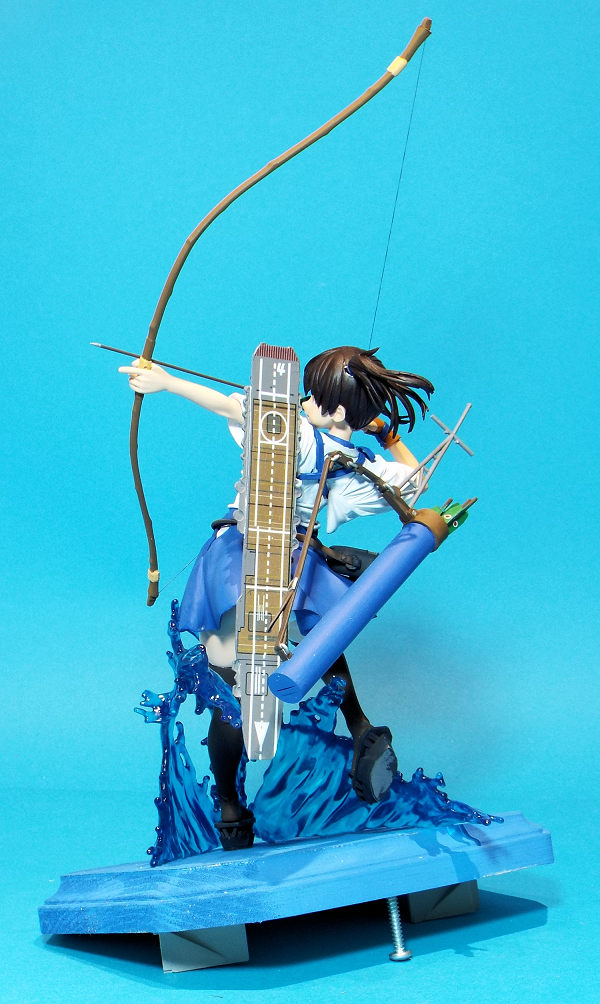
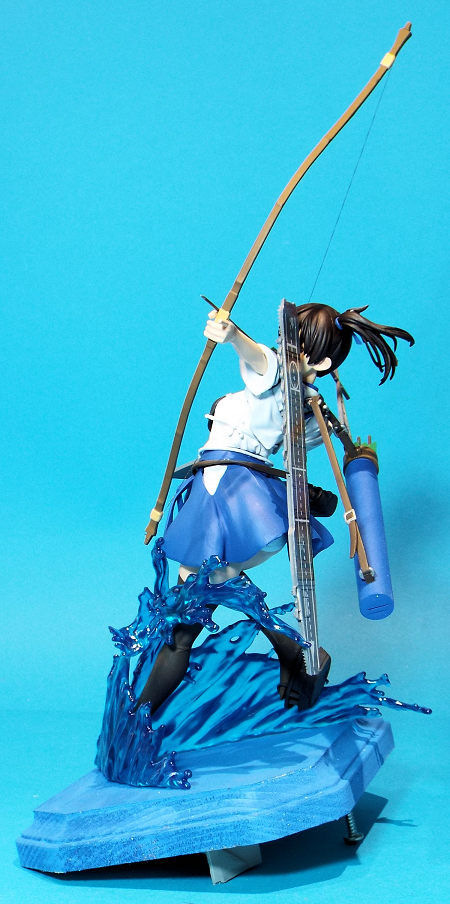
But wait, this Kaga has much better lines. What exactly do we have here? Well, this Kaga is the personification of the warship in a Japanese Anime series named “The Kantai Collection”.
The Kantai Collection (translated as "Fleet Collection", subtitled as "Fleet Girls Collection"), known as KanColle for short, is a 2015 Japanese anime television series based on the Japanese game of the same name. Check it out if you're into it; check it out anyway if you're not. It's pretty cool.
| THE KIT |
This is a resin kit from E2046. The kit is made up of 57 pieces of light tan, nearly flawless resin. Instructions are pretty minimal, consisting of a couple of pages showing photos of the parts (for inventory purposes), a page devoted to how to heat of and bend resin pieces if needed for proper fit, and a simple assembly page, showing roughly where parts go. As we are talking arms and legs and such, it fairly simple to figure things out. There is a decal sheet included, consisting of decals for the eyes and the flight deck (carried on her back … tough Girl).
This kit differed from the
norm of E2046 kits as the were no keyed tabs/slots. Everything was pretty much a
butt fit. There were holes shallowly indicated on the assembly areas, I'm
assuming to drill holes and insert metal rods for a more positive fit. I did not
do this, for 1) the parts fit together very well as is, and 2) I would have just
drilled the hole angles wrong and made assembly worse. As it turned out I had no
problems with the fit of the kit.
| CONSTRUCTION |
Construction started by cutting off and sanding down any casting blocks. Then the parts were thoroughly washed in warm soapy water. Primer is next, as it is needed to get any paint something to bite into and stay. I normally use Tamiya Fine Primer for this. It sprays nice, is a light gray color, and is very durable. However, this time I tried using a generic automotive primer in a rattle can. It worked well enough, but the dark gray color was harder to cover over, and it was a much coarser paint, not as fine/smooth as the Tamiya. I will switch back on my next kit.
I got the primer sprayed, but the kit sat for a few months as I finished up some other kits. When I got back to this, it was a nice cold winter, so I decided to use Vallejo acrylic paints as I wanted to avoid airbrushing anything. I find Vallejo paints amazing in how they brush. Very fine pigments allow for a paint that is a pleasure to brush. They give amazingly complete coverage. I used the kit photos from E2046 to decide on colors, but it came down to white, a vibrant blue, and some browns and grays.
So, parts cleaned up …. check. Parts washed and primered …. check. Colors picked out ….. check. Time to paint. I tried to do the painting in groups. Gather everything that needs to be white, then blue, etc. The Hinomaru on the arrows flights I painted by hand. Did okay on most of them and from normal viewing distance they look decent. Soon everything was painted and assembly began. One thing to remember about Vallejo paints is they wear off from handling fairly easily, so after all was together, I went back over and touched up any areas my ham fists boogered up.
 An area
that is always difficult to get just right, and can make or break one of these
figures, is painting the eyes. Luckily decals for these are becoming more
regular, and E2046 gives a spare set just in case something goes wrong on the
first try. (I also scan the decals anyway just to have a backup set.) The eye
decals and the flight deck applied very well.
An area
that is always difficult to get just right, and can make or break one of these
figures, is painting the eyes. Luckily decals for these are becoming more
regular, and E2046 gives a spare set just in case something goes wrong on the
first try. (I also scan the decals anyway just to have a backup set.) The eye
decals and the flight deck applied very well.
I drilled a hole in her left foot (ouch) and glued in a metal rod. I then painted a rectangular wooden display base (from a local craft store – like $2) and drilled a corresponding hole for the rod. A very cool feature of this kit is the water being kicked up by Kaga during her attack. These are depicted by several pieces of clear resin. I used a very old bottle (25+ yrs) of Tamiya clear blue on these, painting a light coat on all sides. They definitely contribute to the very dynamic pose of the kit. Putting these in place made a very sturdy, almost interlocking structure that helps support her. To put her at a better looking angle, I propped up the back of the base, screwing on spare fenders from a tank kit; looking thru the gallery at E2046, this is pretty much the norm.
The last thing I did was attach her Daikyu bow, as I surely would have broken it off had I done it beforehand. Put an about-to-be-launched arrow in place and used EZ-Line for the string. All done.
| CONCLUSIONS |
This is another fantastic kit from E2046. I cannot praise enough the quality of the resin parts. Superb. This kit was odd in that it lacked the tab and slot assembly of the other kits I've gotten, but it was not a problem whatsoever. The eye decals are a welcome addition as it removes the frustration from trying to paint those. Wholly recommended for anyone interested,
| REFERENCES |
The Internet.
31 July 2018
Copyright ModelingMadness.com
If you would like your product reviewed fairly and fairly quickly, please contact the editor or see other details in the Note to Contributors.
Back to the Main Page Back to the Review Index Page Back to the Previews Index Page