Paper Shipwright 1/125 Old Mumbles Lighthouse
|
KIT #: |
A01986 |
|
PRICE: |
3 quid
|
|
DECALS: |
Not needed |
|
REVIEWER: |
George Oh |
|
NOTES: |
Paper printed kit |
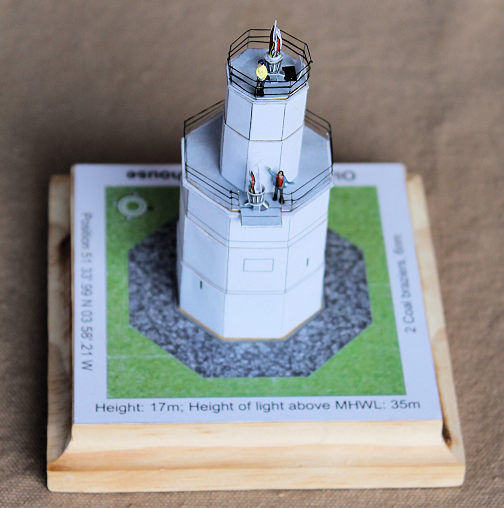
 In July, 1792, the Swansea
Harbour Trust was authorised to build a lighthouse to guide ships along the
South Wales coast and into Swansea Bay, while avoiding the Mixon Shoal (a
sandbank that lies just below the normal low-water level). Architect William
Jernegan designed the lighthouse, and its construction was completed in 1794. It
was a 17m/56'-tall, two-stage, octagonal, brick tower and it was built on the
outer of two islands at Mumbles Head, 35m above the high-water mark. Known as
the Mumbles Lighthouse, it was equipped with two vertically-separated coal
braziers so that it looked different from the single beacons of the adjacent St
Ann's Head and Flatholm lighthouses. The first brazier was on the roof of the
tower's first stage, and the second brazier was on the roof of the second stage.
In July, 1792, the Swansea
Harbour Trust was authorised to build a lighthouse to guide ships along the
South Wales coast and into Swansea Bay, while avoiding the Mixon Shoal (a
sandbank that lies just below the normal low-water level). Architect William
Jernegan designed the lighthouse, and its construction was completed in 1794. It
was a 17m/56'-tall, two-stage, octagonal, brick tower and it was built on the
outer of two islands at Mumbles Head, 35m above the high-water mark. Known as
the Mumbles Lighthouse, it was equipped with two vertically-separated coal
braziers so that it looked different from the single beacons of the adjacent St
Ann's Head and Flatholm lighthouses. The first brazier was on the roof of the
tower's first stage, and the second brazier was on the roof of the second stage.
But the coal braziers were
only visible out to 5 miles, and difficult (and expensive) to keep lit, so they
were soon r eplaced with oil-fired lanterns, with the upper light covered with a
raised glass extension. In 1860, a single dioptic light was fitted, and
accommodation, a fort and a gun battery were built against the tower. In 1905, a
rotating shield-with-slits mechanism was fitted to make the light appear to
flash. In 1934, the lighthouse was automated and in 1969, the lighthouse was
electrified. Modern improvements included a solar panels in 1995 and an LED
light in 2017.
eplaced with oil-fired lanterns, with the upper light covered with a
raised glass extension. In 1860, a single dioptic light was fitted, and
accommodation, a fort and a gun battery were built against the tower. In 1905, a
rotating shield-with-slits mechanism was fitted to make the light appear to
flash. In 1934, the lighthouse was automated and in 1969, the lighthouse was
electrified. Modern improvements included a solar panels in 1995 and an LED
light in 2017.
Once I discovered David
Hathaway's Paper Shipwright web-site, I began buying card models from him. He
included this one as a free-be (as per his web-site). This one came on a single
coloured A4 sheet and could be built into 1/250-scale model, less than 40mm
tall, of the original coal-fired 1794 lighthouse. I took one look at it, then I
enlarged it (to 1/125-scale?) onto an A3 card.
There is no instruction
sheet like plastic modellers are used-to, but detailed instructions ARE
included. The modeller MUST read them carefully, and then follow them precisely,
to produce an accurate model. For example, there are several wrap-around layers,
and the underside layers have indicators as to where the outer layers attach.
This will correctly line-up the printed-on details. Look for the legend that
deciphers the little symbols that surround each part. They tell you to where to
fold/roll parts, and in-which direction they must be folded/rolled.
 I started this model the day
after I started my 4-weeks Christmas holiday because I had the time, and it
looked like an easy build. There were two things I targeted for improvement. I
wanted to cut away the two doors and then reposition them for a more 3D
appearance. And I wanted to dump the printed railings (because they are solid)
and replace them with wire and thread.
I started this model the day
after I started my 4-weeks Christmas holiday because I had the time, and it
looked like an easy build. There were two things I targeted for improvement. I
wanted to cut away the two doors and then reposition them for a more 3D
appearance. And I wanted to dump the printed railings (because they are solid)
and replace them with wire and thread.
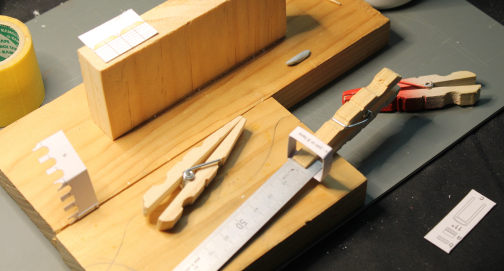
I cut each piece out of the
card only when they were required. The secret is to use a sharp/new straight
blade and a steel ruler to cut precisely along the outer lines. If you cut
precisely, the parts will fit really well - just like a new Airfix kit. Use
wood glue (not Tamiya quick-setting), but let it dry for at-least overnight,
because 1) the water-based glue will warp the card if it is still damp, or 2)
the two cards will separate. You'll need clamps or weights. At first, I used
a too-strong modelling clamp that warped the wet card, and so then I learnt to
use reversed wooden cloths pegs (as long as you keep them clear of the glue). As
the build progressed, I made a wooden anvil which allowed me to support a card
piece while I painted the wood glue onto it. The card wouldn't bend under the
brush, and the glue wouldn't get into unwanted places. Pieces of scrap wood were
useful to clamp larger assemblies at right-angles, or to press-down onto parts,
as they dried.
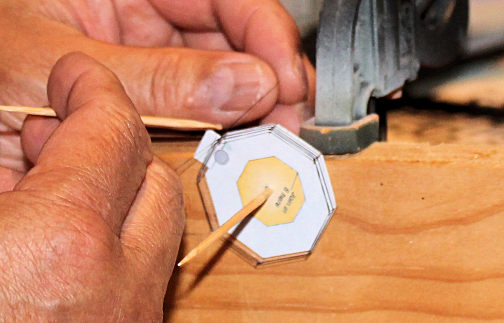
I started this model by
gluing part 1 (the base) onto a measured and dressed, wooden square. Part 2 (the
first stage core) was formed into a tube, then Part 3 was put on top to solidify
it. Part 4 wrapped around the outside of 2, and then Part 5 was wrapped around
the outside of 4. Keep advancing numerically. Not all plastic models are like
this. I thought about stuffing the core with styrofoam, but this proved
unnecessary.
 The model's parts have two
doors printed on lower-stage parts - one on the outer-most part (#5) and one on
core (#2) which will be covered by other layers (#4 & #5), and a lining-up door
pattern in printed on #4. I carefully cut-out the door on #5 and the pattern on
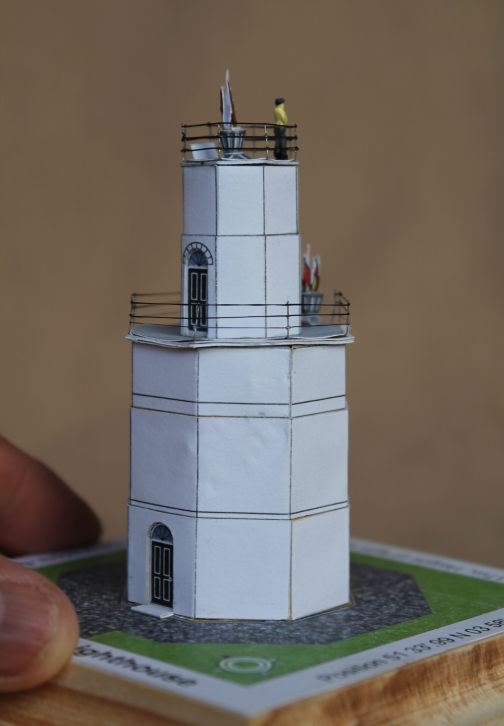
#4 to reveal the door on #2. On the upper stage, there was no door - just two
dark door shapes on parts #8 (the upper-stage core) & #10 (the wrap-around). I
cut both shapes away, then placed the spare door (from #2) behind #8. This way,
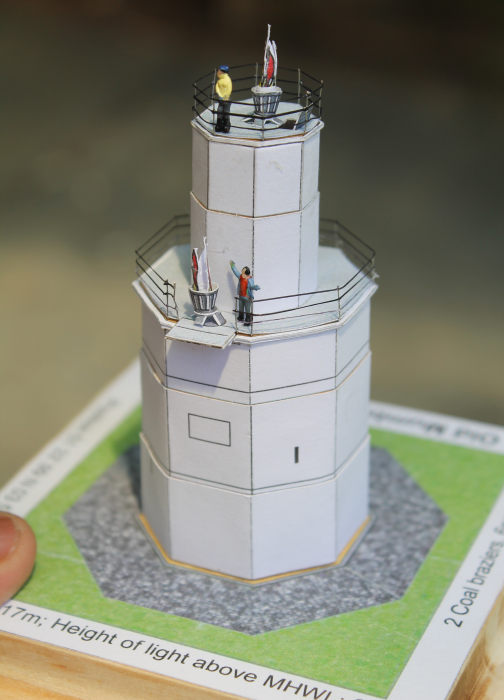
both doors are recessed, yet visible and identical. On the roof of the upper
stage, there is a hatch. It may have been used to get coal to the second fire
(via a crane or winch?) Anyway, I cut it out, and re-attached it in an open
position - just for a little interest.
The model's parts have two
doors printed on lower-stage parts - one on the outer-most part (#5) and one on
core (#2) which will be covered by other layers (#4 & #5), and a lining-up door
pattern in printed on #4. I carefully cut-out the door on #5 and the pattern on
#4 to reveal the door on #2. On the upper stage, there was no door - just two
dark door shapes on parts #8 (the upper-stage core) & #10 (the wrap-around). I
cut both shapes away, then placed the spare door (from #2) behind #8. This way,
both doors are recessed, yet visible and identical. On the roof of the upper
stage, there is a hatch. It may have been used to get coal to the second fire
(via a crane or winch?) Anyway, I cut it out, and re-attached it in an open
position - just for a little interest.
There are three details on
the first stage of the tower - the entry door, a (printed) rectangular recess
and a projection from the roof (for the first fire). The base shows clearly
where the entry-door is to be placed. Lining-up all of the first stage layers
places the recess on the back of the tower. That's the easy bit, because now it
gets hard. There is no indication where the small extension should go - above
the entry door, or on the other side above the recess. An old artwork of the
lighthouse shows the all of those details aligned one above the other, and
that's how these models are depicted on the Internet. But current photos of the
lighthouse shows the recess and the extension above each-other, but on the other
side, away from the entry door.
Other detail is the door on
the second stage, but there is no indication in the instructions as to whether
this door should open onto the first fire, or on the other side away from it.
Current photos suggest that is opens behind the first fire. Now, I'm no Old
Salt, or an architect, but logically, I would position both fires on the tower's
seaward side, because that's where the ships are that need to be guided by them.
And because the full force of a stormy sea would come from that seaward/weather
side, I'd have all access doors on the lee/sheltered/landward side of the tower.
So, I assembled my model with the fires on one side, and the doors on the other
- which disagrees with all my Internet references (which disagree with each
other).
 The tower has a railing
round the top of both stages, but they are printed double-height on the card.
After cutting each out, the card is folded-over to show railing on both inside
and outside faces. I didn't use them because they are solid, whereas you can
always see through a railing fence. None of the PE stuff I had was the right
size, so I had to scratch-build replacements instead. I superglued lengths of
fine wire to stick-out from the underneath of each stage's roof piece. They were
bent up to form the stanchions, then fine black EZ-Line (cotton was too thick)
was superglued to them to form the railings. Only after the fences were formed,
were the roofs glued in-place. A little force was needed to ensure a seamless
bond, and extra time was needed to keep the roof pieces flat (ask me how I
know). Unfortunately, the wires under the roofs, coupled with the insufficient
time the weight was applied, created painfully-visible areas of separation
between the ceiling panels and the roof panels. Rats!!! I tried to add a narrow
skirt around the roofs to hide them, but failed because there is a step between
the roof and the fence.
The tower has a railing
round the top of both stages, but they are printed double-height on the card.
After cutting each out, the card is folded-over to show railing on both inside
and outside faces. I didn't use them because they are solid, whereas you can
always see through a railing fence. None of the PE stuff I had was the right
size, so I had to scratch-build replacements instead. I superglued lengths of
fine wire to stick-out from the underneath of each stage's roof piece. They were
bent up to form the stanchions, then fine black EZ-Line (cotton was too thick)
was superglued to them to form the railings. Only after the fences were formed,
were the roofs glued in-place. A little force was needed to ensure a seamless
bond, and extra time was needed to keep the roof pieces flat (ask me how I
know). Unfortunately, the wires under the roofs, coupled with the insufficient
time the weight was applied, created painfully-visible areas of separation
between the ceiling panels and the roof panels. Rats!!! I tried to add a narrow
skirt around the roofs to hide them, but failed because there is a step between
the roof and the fence.
The last elements were the
two little round braziers on their 4-legged stands, and a tube of fire within
them. These were difficult because of their tiny size, and the requirement to
roll a cone around 3mm in diameter. I succeeded here because I shaped them on
the tip of a pencil. Somehow, I don’t believe that a coal fire would exhibit
flames 1m/3’ high.
 Painting and Decaling. None
needed - Yay!!!
Painting and Decaling. None
needed - Yay!!!
I wanted to add a small
figure to the lighthouse, to provide an indication of the size. My spares box
had figures in 1/144-scale and model railway N-gauge, but when I compared them
to the doors, they were all too large, and 1/350-scale figures were too small.
Success came when I tried an N-gauge child (but don't tell anybody it 'aint an
adult). A modelling college (Hi E) pointed-out that the doors were already
showing the scale, but they were to at the back, so I still used a couple of
(repainted) figures near the fires. Unfortunately (for me) my son pointed-out
that the figure beside the upper fire is a woman ("Waddaya mean you didn't know?
You can see she's got tits!!!)
This was quite an easy model
to build. In fact, it was how I first started building models - with partly
cut-out cardboard parts. Card models usually cost less than vacformed models and
are definitely waaaaaay cheaper than injected plastic model kits. Another
advantage is that the modeller can photocopy the original, so that, if you
stuff-up a part (or the build) you have an unlimited number of replacement parts
to immediate hand. Or (as I did) you can up the scale - which you CAN'T DO on a
vac or injection kit.
MM has at least two other
card models in the kit reviews. This one was an easy model to build, so I'm
happy to recommend it to even a novice card modeller (but not to a Junior
modeller, because of the need for a very-sharp blade, and the requirement for
precision cutting). And being a lighthouse with coal-fired lights, it is an
unusual subject. If I was to do this model again (and I can, if I wanted-to),
I'd consider replacing the paper fires in the braziers, with pieces of clear red
and orange plastic (or something), or perhaps flickering LEDs. Next, I have to
muster the courage to start a more-challenging card model of a ship.
George Oh
24 March 2023Copyright ModelingMadness.com. All rights reserved. No
reproduction in part or in whole without express permission.
If you would like your product reviewed fairly and
fairly quickly, please
contact
the editor
or see other details in the
Note to
Contributors.
Back to the Main Page
Back to the Review
Index Page
Back to the Previews Index Page