Battle of France 1940: Crossing the Muse
| HISTORY |
Perhaps the most pivotal battle of the 1940 French campaign was the Battle of Sedan, where the forces of German General Heinz Guderian successfully established a bridge across the Meuse River on May 13-14. Using that bridge the Germans were able to stream tanks and armored forces across the river and begin heading west towards their ultimate goal, the English Channel. Had the French been able to keep the Wehrmacht bottled up on the other side of the river, the campaign might have turned out differently.
Leading up to the battle the Allies assumed
it would take days for the Wehrmacht to move any significant forces
through the heavily wooded Ardennes. On the morning of May 13th however,
infantry elements of the German 1st Panzer Division reached the Meuse
near Gaulier, a suburb of Sedan. Using assault rafts and supported by
tanks they were able to cross the river under heavy French resistance
and establish a foothold on the other side. During that night German
engineers built a pontoon bridge across the river that was strong enough
to support tanks, and by the next morning, the bulk of the 1st Panzer
Division’s Panzers were across.
 The French forces in the area were
simply too small in number to stem the tide of the better led, better
organized, and better equipped German forces. The Germans soon built
more bridges, and with troops and armor pouring across the Meuse, Guderian issued his famous command for his forces to turn west, begin
driving, and never stop no matter what. The dash for the Channel and the
shocking defeat of France - then the largest army in the world – had
begun.
The French forces in the area were
simply too small in number to stem the tide of the better led, better
organized, and better equipped German forces. The Germans soon built
more bridges, and with troops and armor pouring across the Meuse, Guderian issued his famous command for his forces to turn west, begin
driving, and never stop no matter what. The dash for the Channel and the
shocking defeat of France - then the largest army in the world – had
begun.
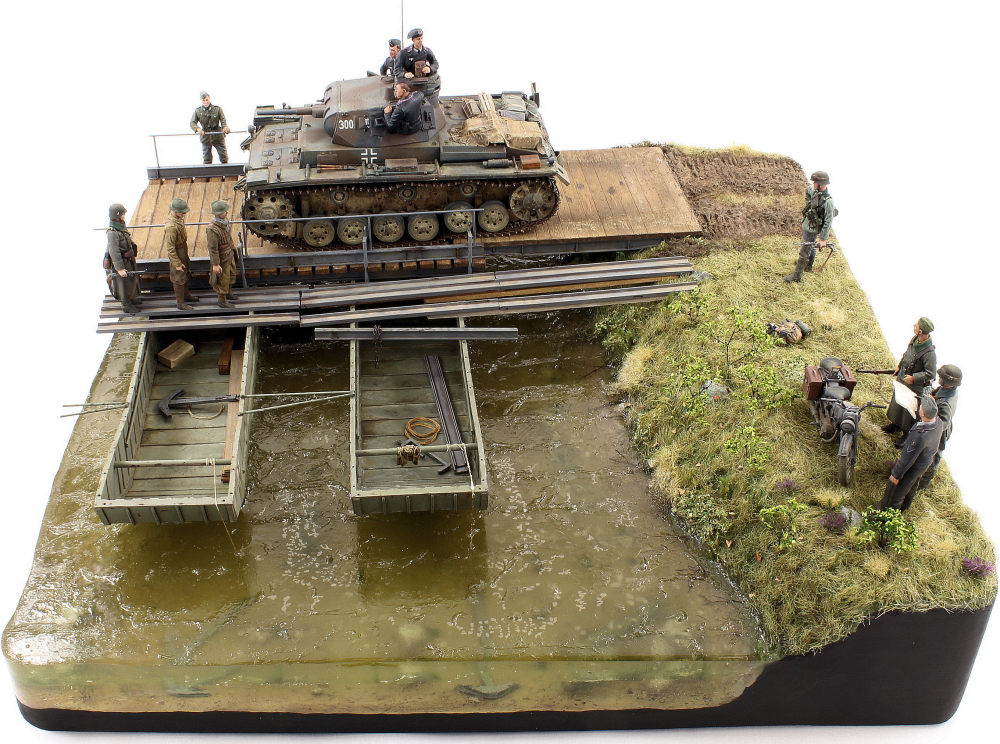
I’ve been wanting to build a diorama featuring German armor crossing the Meuse pontoon bridge for a while now but have been held back by a couple of things, chiefly the lack of any mainstream kits of the pontoons and bridge structure, and also the need to pour a lot of epoxy resin to recreate the river. The first problem, the lack of kits of the pontoons and bridge can only be solved through scratch-building, and a fair amount of it at that. As for the second problem, a few years ago I experimented with polyester resin but it stank so bad and seemed so difficult to work with that it put me off. Luckily there are many affordable epoxy resins on the market that are odor-free and easy to work with.
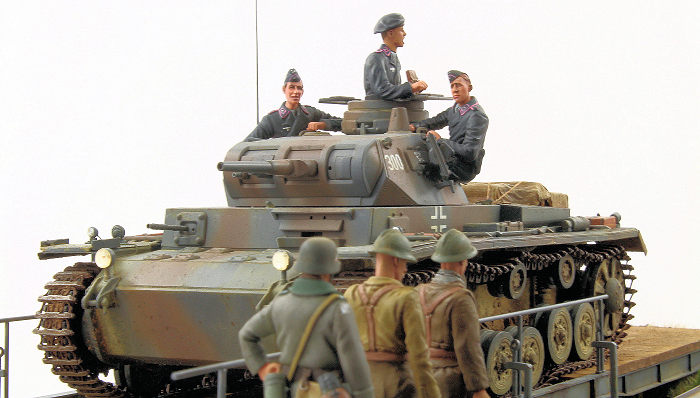
Needing something to drive across the bridge, I liberated the DML Panzer III Ausf. E from a previous “Battle of France” diorama I built (the write-up for which is on this site). I have the bad habit of finishing a diorama and then soon after deciding I can redo it to make it better. In this way I have probably built 10 dioramas in the last few years but really only have a handful to display. There has to be a name for this affliction – perhaps DIS, Diorama Inadequacy Syndrome?
| THE KIT |
The Germans considered the ability to cross
rivers quickly a vital skill, so entering the war they were well trained and
equipped in the art. The building block of their bridges was a simple
pontoon boat, about 24’ long and open on top. A whole series of them, when
spread across a river and with a bridgework laid across them
 was called an 8
ton bridge. When two pontoons were mated back to back and then similarly
spread in mated pairs across a river the bridge capacity was doubled,
allowing Panzer IIIs and IVs to cross. This was the type of bridge the
Germans constructed at the Meuse.
was called an 8
ton bridge. When two pontoons were mated back to back and then similarly
spread in mated pairs across a river the bridge capacity was doubled,
allowing Panzer IIIs and IVs to cross. This was the type of bridge the
Germans constructed at the Meuse.
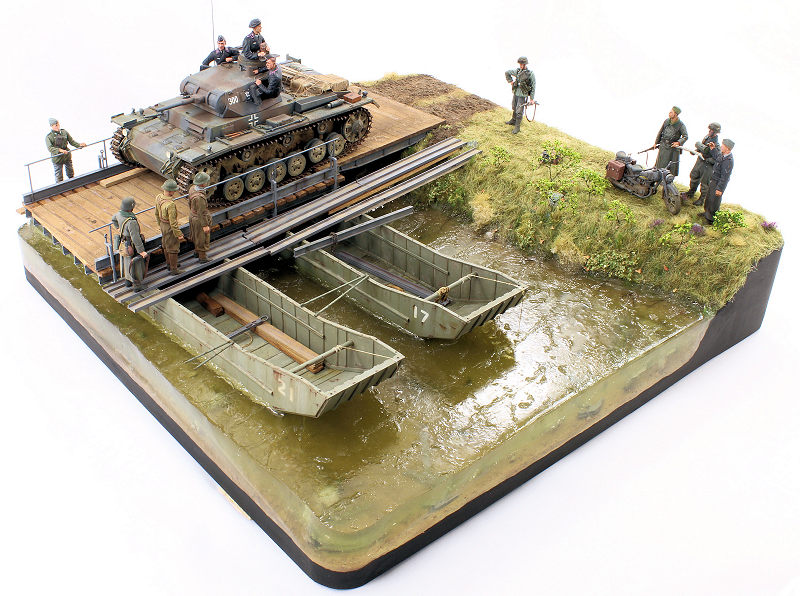
Since each pontoon was roughly 24’ long, two of them back-to-back would be 48’ long, or 16.5” long in a 1/35 scale diorama. So in the interest of space and aesthetics I decided to only depict the full pontoons on one side of the bridge and “partial” pontoons on the “back” side of the diorama. With that in mind I had to scratch-build two full pontoons, two partial pontoons, one full bridge section, a ramp section connecting the bridge to the land, and all the various anchors, railings, ropes, and gear that would be present with such a structure. Upon realizing this I really began wishing for Tamiya to release a “1/35 German Early War Pontoon Bridge Set” in the very near future.
Luckily I was able to find the next best thing; an online set of plans for scratch-building the pontoons from https://miniscaping.com/guide/28/step/view/. Without that resource I probably would not have tackled this project. As for the bridge I found only vague descriptions of what it consisted of, so I cobbled that together as best I could using photos and some artistic liberties.
| CONSTRUCTION |
Construction of the Pontoons/Bridge: Starting with the pontoons, the online guide calls out for a fairly long list of plastic sheets and shapes, all of which can be found at any hobby store with a good selection of Evergreen plastic items.
The first step has you cut out the pontoon sides.
Next I added the interior ribs from half-round stock, and followed that by
gluing the sides and bottom together. Following along with the guide more
ribs and details come next, followed by a smart way to replicate the riveted
exterior. Using very thin plastic sheet and a pin
 vise or riveting wheel,
small indentations are made at regular intervals using a ruler. The sheets
are then cut to the same shape as the pontoon sides and then glued on to the
sides with the indentations facing outwards.
vise or riveting wheel,
small indentations are made at regular intervals using a ruler. The sheets
are then cut to the same shape as the pontoon sides and then glued on to the
sides with the indentations facing outwards.
Again back to the guide, more pieces are added until you finally have what seems to be a very fair representation of a German pontoon boat. Satisfied with that I built one more, and then two more “rear halves” of pontoon boats.
Without plans for the bridge structure I “guess-timated” from various pictures and started with a base of eight, evenly spaced ¼” high I-beams that run parallel to the direction of the road across the bridge. On top and perpendicular to those were 3/32” thick balsa wood “timbers”, also evenly spaced. Two more ¼” high I-beams formed the “curbs” of the bridge, and then the clamps that hold the whole thing together were scratch-built.
A ramp section that connects the bridge to the mainland was constructed basically the same way, though I had to shape the eight bottom I-beams to be contoured on each end so they create less of a “step” on each end.
| COLORS & MARKINGS |
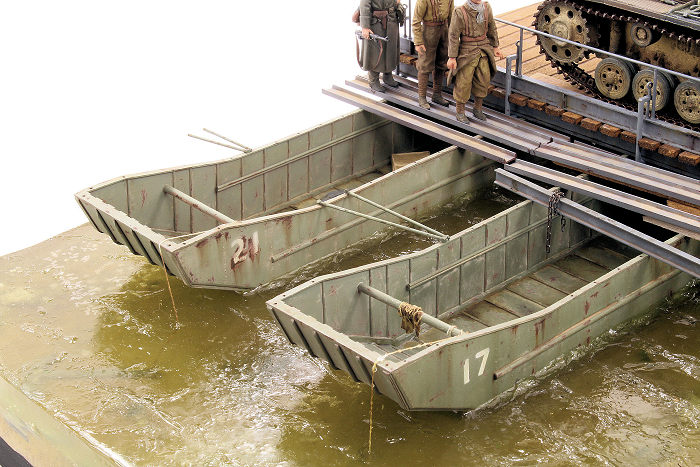
Painting of the Pontoons/Bridge: I wanted the pontoons to look well used and worn, so they were perfect candidates for the hairspray technique. I primed them using Tamiya’s Liquid Surface Primer and then gave them a basecoat of Tamiya XF-9 Hull Red. That was followed by a couple of layers of hairspray (Tresemme Ultra Mist – ooh la la…) and then I applied a top coat of Tamiya XF-65 Field Gray, the tone of which I varied from one pontoon to the next by adding a XF-2 Flat White.
I let the Field Gray set for about a half hour before starting the chipping process using water and an old, short bristled brush. The field gray comes off in nice random chips, allowing the Hull Red underneath to look like rust.
 To further the impact of the chips I added tiny
dots of Vallejo Model Color Chocolate Brown in their centers, and then added
rusty streaks using AK Interactive Rust Streaks.
To further the impact of the chips I added tiny
dots of Vallejo Model Color Chocolate Brown in their centers, and then added
rusty streaks using AK Interactive Rust Streaks.
To add a little life to the otherwise drab expanses of field gray I sprayed hull numbers on each side using XF-2 Flat White and homemade stencils. Other effects included a pin wash all around the ribs and any seams using AK Interactive Afrika Korps Wash, a nice neutral brown shade. I splotched some of this on the floors of the pontoons and also streaked it down the outside vertical surfaces to replicate dusty rain streaks.
To paint the bridge I first sprayed all of the steel beams Tamiya XF-54 Dark Sea Grey and then added a dark brown pin wash into the seams, as well as some random rust stains and chips. The balsa wood planks were stained using Vallejo’s Acrylic Sepia Wash. The real bridges had some type of covering laid over the planks, of what material I can’t tell. From my reference photos it looks almost like a heavy canvas, maybe to prevent the passing tanks from showering the pontoons below with mud and dirt? If so I can’t imagine the material would survive for very long. At any rate I replicated that with tissue paper coated in a water/white glue mixture. Once dry it was painted with Tamiya XF-57 Buff and stained again with the Vallejo Acrylic Sepia.
The ramp was similarly painted and weathered with pigments and oil stains. And with that, it was time to figure out the base, scenery, and water.
| THE BASE |
Construction of the Base: For a sturdy base I opted for ½”thick PVC trim board. Sold in a 2’ x 4’ sheet at my local home improvement store, I cut a piece about 14” square. Before going too much further I needed to start experimenting with the epoxy resin to see how it would interact with plaster, Styrofoam, paint, and all of the other things it would come into contact with.
There are many brands of epoxy resin on the
market; I opted for one called “Art N’ Glow” if for no other reason that it
had good reviews on Amazon and was readily available in affordable
quantities. It proved to be very easy to work with. It comes in two bottles,
one being the resin and the other the hardener. You mix the
 desired amounts
together in a 50/50 ratio for about 5 minutes and then pour it into your
mold or diorama. I practiced with some scrap material and found that masking
tape worked fine for “damming” the edges of my base, and that the epoxy
resin didn’t interact with any paints or materials at all, nor did it give
off much of an odor. It can be poured in 1/4” thick layers every six hours
and dries solid in one day, with a full cure taking roughly 5 days. Paint or
pigments can be mixed in as well to tint it to a desired color, though I
found paint worked better then pigments which tended to not dissolve very
well.
desired amounts
together in a 50/50 ratio for about 5 minutes and then pour it into your
mold or diorama. I practiced with some scrap material and found that masking
tape worked fine for “damming” the edges of my base, and that the epoxy
resin didn’t interact with any paints or materials at all, nor did it give
off much of an odor. It can be poured in 1/4” thick layers every six hours
and dries solid in one day, with a full cure taking roughly 5 days. Paint or
pigments can be mixed in as well to tint it to a desired color, though I
found paint worked better then pigments which tended to not dissolve very
well.
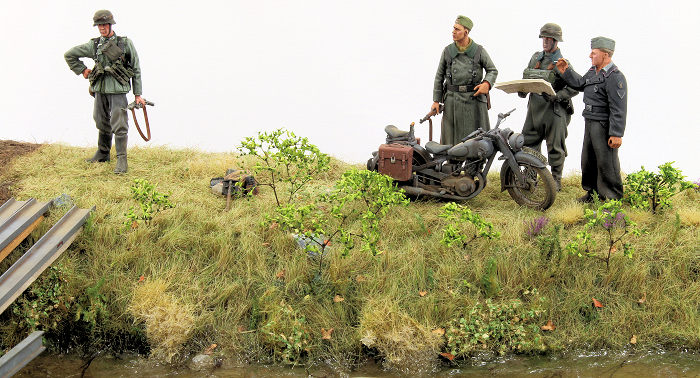
Armed with my newfound knowledge I built up my base with a Styrofoam embankment and then covered the river bottom and riverbank sides with plaster mixed with sand and water. Into this I pressed small pebbles and twigs to create an interesting river bottom. I then sprayed the whole thing a lightened shade of Tamiya XF-52. The riverbank was sprayed Tamiya XF-5 Flat Green and then covered with static grass and various dried plants. Some small moss plants were added to the river bottom for more interest, as well as two scratch built anchors with thread to tie them to their pontoons.
My plan was for the resin to be ¾” thick, poured in three ¼” thick layers, with the boat submerged in the top ¼” layer. With my base edges dammed I mixed the first batch of resin, tinted it with some Vallejo Sepia paint, and poured it in. Everything went well and six hours later I poured the next layer. With the resin now roughly ½” thick, I glued my pontoons in place with CA glue, otherwise they would float on the final layer. Hoping my pontoons were “watertight” I dammed their open backsides with masking tape, mixed up the final batch of resin, and poured it in.
As it turns out my pontoons did spring a couple of minor leaks. The resin is very thick and slow moving, but it evidently has the ability to squeak through any hole no matter how small. I would cover those small leaks later with gear.
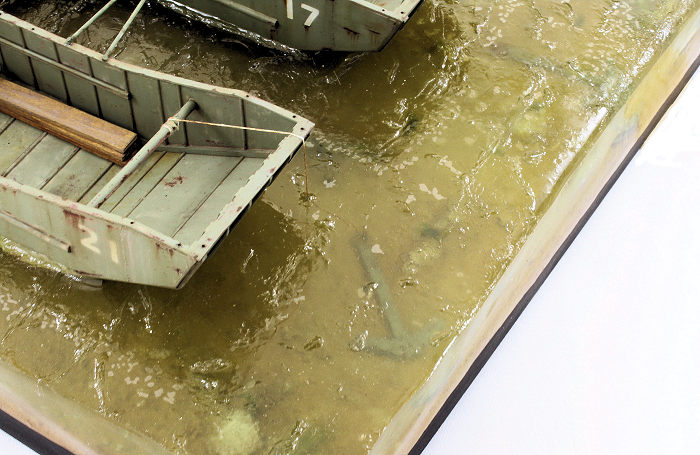 I was very happy with how the resin turned out. I
did notice a couple of issues: by mixing paint into each batch I wasn’t
going to get a perfect color match between the layers, so some different
bands of color can be seen when looking at the resin from the side. My other
quibble was with the masking tape dams on the edges. Over the long edges the
tape tended to wrinkle a little where I would have preferred perfectly
straight edges. Something to keep in mind for next time.
I was very happy with how the resin turned out. I
did notice a couple of issues: by mixing paint into each batch I wasn’t
going to get a perfect color match between the layers, so some different
bands of color can be seen when looking at the resin from the side. My other
quibble was with the masking tape dams on the edges. Over the long edges the
tape tended to wrinkle a little where I would have preferred perfectly
straight edges. Something to keep in mind for next time.
Once the resin had cured I added some waves on the flat surface using Liquitex Gloss Super Heavy Gel Medium, a clear-drying artist’s gel. I then glued the ramp to the pontoon bridge and riverbank, and added some more landscaping around it.
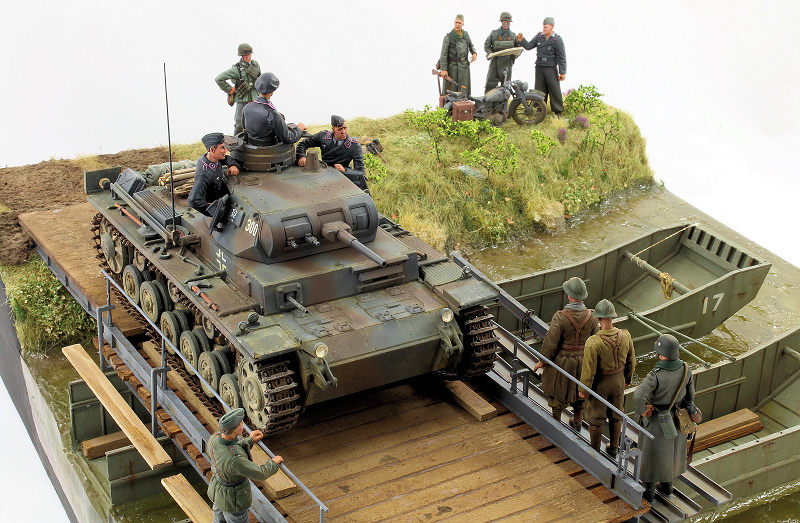
Adding the Tank, Figures & Finishing it Up: As mentioned before, the Panzer III and its accompanying figures were pilfered from a previous diorama. To make it work with my ramp I had to reposition the rear two wheels on each side. Once this was done I added more gear to the back of the tank and glued it in place.
Walking beams were fashioned from Evergreen channel stock, painted and weathered and placed along the bridge per photos. A pair of captured French POWs from Dragon’s “Sedan 1940” kit were added to the walkway planks. More figures and a Tamiya DKW Motorcycle from their “German Motorcycle Orderly Set” were then added. I tried to pose them all as if they were interacting organically to convey the idea of a busy area with a unit on the move.
More gear was added to the boats in the form of wood planks, pieces of channel, a spare anchor, and a few other effects. A small pile of soldier’s gear was also added to the riverbank. A few touch-ups of paint here and there and it was done.
| CONCLUSIONS |
Conclusions: Yikes, this turned into my most ambitious modeling project to date. This diorama took me about six months start to finish, and that doesn’t include the fact that the tank had been previously built and painted. Scratch-building the bridge and pontoons took some time, as did working with the base and the epoxy resin. I’m happy with how it all came out however, and I’ll definitely try to incorporate more resin water effects into my future projects.
| REFERENCES |
- Firefly Collection #5, “Case Yellow”
- Osprey Publications, Campaign #264, “Fall Gelb 1940 (1)”
- Concord Publications #6001, “The German Army: Blitzkrieg 1939-41”
- Wikipedia, the Online Encyclopedia
7 February 2020
Copyright ModelingMadness.com
If you would like your product reviewed fairly and fairly quickly, please contact the editor or see other details in the Note to Contributors.
Back to the Main Page Back to the Review Index Page Back to the Previews Index Page