|
KIT # |
MV-16 |
|
PRICE: |
£18 |
|
DECALS: |
None |
|
REVIEW & |
|
|
NOTES: |
Resin Kit with Photo-etched Details |
Planet Models 1/72 AS-2 Guideline
|
KIT # |
MV-16 |
|
PRICE: |
£18 |
|
DECALS: |
None |
|
REVIEW & |
|
|
NOTES: |
Resin Kit with Photo-etched Details |
|
HISTORY |
Probably the best known surface-to-air missile, the Russian-built SA-2 was launched in vast numbers into the skies over North Vietnam. Though their actual hit rate was poor, particularly once effective counter-measures were introduced, the sheer numbers fired guaranteed that large numbers of American airman came to experience the hospitality of the Hanoi Hilton courtesy an SA-2.
|
THE KIT |
For Scott's preview of the kit contents, click here.
 The
SA-2 was first kitted in this scale by
Airfix, a long, long time ago.
This kit is a collector's item, and goes for a lot of money, if you can find
one. Planet Models has now allowed non-collectors a chance to own one, at a
somewhat lower price.
The
SA-2 was first kitted in this scale by
Airfix, a long, long time ago.
This kit is a collector's item, and goes for a lot of money, if you can find
one. Planet Models has now allowed non-collectors a chance to own one, at a
somewhat lower price.
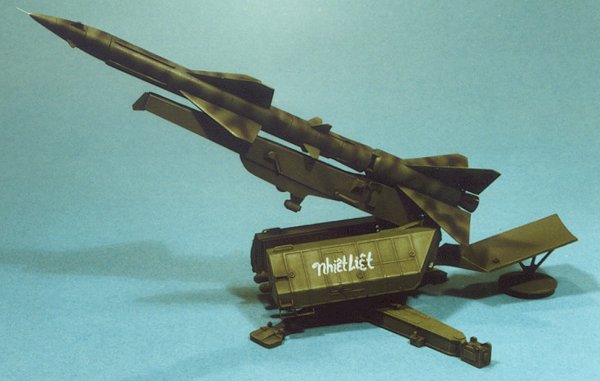
Packaged in a stout box, with a black and white drawing on the lid, Planet Models' SA-2 consists chiefly of well-cast resin components. A tiny photoetched sheet provides additional details. Instructions consists of a single sheet, with a brief multi-lingual history. Generic painting recommendations are given, and no decals are included.
Detail on the resin parts is generally good. The sides of the launcher feature some particularly delicate detail. The missile parts themselves are slightly warped, so care must be taken to minimise this. One or two small sections had broken off some of the larger components, but these were contained within the packaging, and easily repaired. In some areas details were vaguely cast, or obscured by balls of resin. No air bubbles were noted in any of the parts.
|
CONSTRUCTION |
The majority of construction time is taken up with removing the resin parts from their pouring blocks. For the most part this is straightforward, although some of the smaller parts tended to blend into their pour stubs, making identifying the edge of the part difficult. I started assembly with the missile itself. The main body consists of three parts- the exhaust nozzle, the booster section, and the forward body. The forward section was slightly warped. I tried to correct this with some warm water, but I don't think I entirely removed the warp. I used a brass pin to attach the booster section to the forward body, to ensure good alignment. Cyanoacrylate glue was used for all assembly- in hindsight, two-part epoxy would have provided more adjustment time for the larger components.
 To
the assembled body are added sixteen fins, each of which must be carefully
separated from its casting block, and the mating face sanded square. For the
smaller fins, photoetched parts might have been more appropriate. It was very
difficult to maintain a grip on these while cleaning them up. A single extra
small fin is provided.
To
the assembled body are added sixteen fins, each of which must be carefully
separated from its casting block, and the mating face sanded square. For the
smaller fins, photoetched parts might have been more appropriate. It was very
difficult to maintain a grip on these while cleaning them up. A single extra
small fin is provided.
I built the launcher unit as three subassemblies- the base and turntable, the main "box" with the blast deflector, and the elevating arm. The launcher arm is designed to fit in place after assembly. It can elevate, but I found the toothed elevation gear interfered with the mount. The pivot at the base of the unit consists only of a short pin. I drilled out the base and box and fitted a brass pin, which provided more support. I inverted the installation of the turntable with respect to the instructions- according to the side view drawing of the assembled unit (which is missing several details), this is the correct orientation.
The blast deflector assembly requires some care to install correctly. This has its own support foot, which must be set at the correct angle. It's easiest to do this once the base unit is assembled, allowing you to adjust the fit of the blast deflector to the main launcher unit. Two hydraulic rams are connected between the blast deflector arms and the rear of the launcher. I had to shorten these to fit- no clear guidance is provided as to how these should be attached to the launcher.
No hints are given when it comes to attaching the missile to the launch rail. As far as I can tell, they only contact at the rear, large-diameter booster section. I drilled holes in the launch rail and booster section, and installed short brass pins. These also provided convenient handling points during painting.
The majority of the photoetched parts form perforated steps on the sides of the launcher. These look good, and make the finished unit look much less bulky. I have managed to knock them off several times, however. I replaced the grab rails with wire, as the etched parts looked too flat.
A short projection on the side of the launcher arm fits into the base, allowing you to pivot the launcher arm. This is a tight fit, but the friction on the joint keeps the arm in whatever position you choose. The toothed elevation gear may interfere with the base slightly- this can lead to snapping off the delicate teeth when adjusting the launcher arm.
|
PAINT & DECALS |
 The
kit painting instructions suggest light grey for the missile, and dark green or
sand for the launcher. No decals are provided. Most photos I've seen of North
Vietnamese missiles suggest dark green missiles, sometimes with a sloppy
camouflage of one or more other colours. I elected to use one shade of dark
green for the launcher, a slightly different shade for the missile itself, and
then a random overspray of black on the missile.
The
kit painting instructions suggest light grey for the missile, and dark green or
sand for the launcher. No decals are provided. Most photos I've seen of North
Vietnamese missiles suggest dark green missiles, sometimes with a sloppy
camouflage of one or more other colours. I elected to use one shade of dark
green for the launcher, a slightly different shade for the missile itself, and
then a random overspray of black on the missile.
To add some interest to the plain colours, I preshaded both missile and launcher with black. I also drybrushed the launcher with lightened shades of the base colour, and applied washes to bring out some of the more detailed areas. At this point the model still lacked something. Searching my references, I found a picture of an SA-3 launcher with a large Vietnamese patriotic slogan painted on it. Grabbing my triple-zero brush and some white paint, I set to decorating the launcher sides- I think this really adds a lot to the finished product. And yes, I do have some idea of what the slogan says (Thanks Barry!), and I have no idea how poor my Vietnamese grammar or spelling is!
|
CONCLUSIONS |
Planet Models' SA-2 makes an interesting addition to any collection. The kit is pricey, but builds up very well. The finished model is quite robust, and seems stable in any configuration, so you can spend hours repositioning it to your heart's content. If you've got really deep pockets, why not buy six, and build a diorama of a complete star-of-David-shaped SAM complex!

If you would like your product reviewed fairly and quickly, please contact me or see other details in the Note to Contributors.