|
KIT # |
4606 |
|
PRICE: |
€4.99 |
|
DECALS: |
Two aircraft |
|
REVIEWER: |
Leon Wohlert |
|
NOTES: |
|
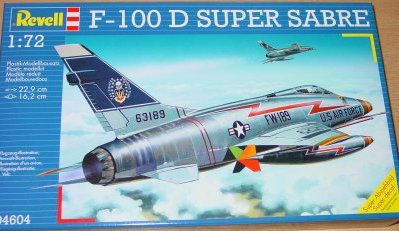
HISTORY |
In my opinion the most beautiful of the Century Series, this fighter was the first operational fighter capable of level supersonic flight. First flight was on the 25th of May 1953, but in October of that year all F-100s were grounded until problems caused by the vertical stabilizer were solved. This was accomplished by enlarging the stabilizer substantially. Production and development went on and eventually, total production reached 2294 machines. Besides the USAF the ‘Hun’ flew with the air forces of Denmark, France, Turkey and Taiwan.
|
THE KIT |
 When I
opened the box I was pleasantly surprised to see the old ESCI Super Sabre!
(Actually, the Revell AG kit is a new mold one from Italeri. Though close to the
ESCI kit, it isn't exactly the same. Ed) I had built the ESCI kit fifteen
years or so ago, and remember that back then I enjoyed it a lot. It was state of
the art back then. During construction I found out the molds had been altered
somewhat, but to the good except for one major blunder. This kit has better
detail and more parts than the ESCI version. Especially the Landing gear seems
more petite (but that could be my memory playing tricks on me), and the
instrument panel and side consoles now show raised detail instead of the decals
in the ESCI kit.
When I
opened the box I was pleasantly surprised to see the old ESCI Super Sabre!
(Actually, the Revell AG kit is a new mold one from Italeri. Though close to the
ESCI kit, it isn't exactly the same. Ed) I had built the ESCI kit fifteen
years or so ago, and remember that back then I enjoyed it a lot. It was state of
the art back then. During construction I found out the molds had been altered
somewhat, but to the good except for one major blunder. This kit has better
detail and more parts than the ESCI version. Especially the Landing gear seems
more petite (but that could be my memory playing tricks on me), and the
instrument panel and side consoles now show raised detail instead of the decals
in the ESCI kit.
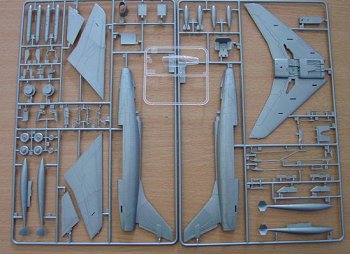
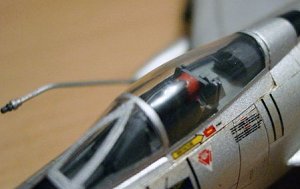
The sprues are molded in silver, with a one piece canopy
which is very clear. It’s clear.....but it also is a canopy from hell. I will
die not knowing what possessed the Revell engineers when they saw fit to add a
frame to the canopy that is non-existent on the real thing! I carefully sanded
it off and polished the canopy back to high gloss. I had never done this before
and it gave me the creeps seeing a perfectly clear canopy going grey while I was
sanding. The end result looks okay but next time I will
 use higher grit sandpaper
and toothpaste. There’s also a clear part for the gun sight. Everything looks
crisp, with finely engraved panel lines on all parts.
use higher grit sandpaper
and toothpaste. There’s also a clear part for the gun sight. Everything looks
crisp, with finely engraved panel lines on all parts.
The instruction sheet is quite good and detail painting instructions can be found throughout the instructions. Since this plane is a potential tail-sitter you need to put weight in front of the main landing gear. The instructions point this out and suggest 20 grams.
All in all, not the kind of box that would give this “Oh crap!” feeling when you first open it and makes you wonder why you didn’t just simply burn the money you spent on it. Very nice indeed for $ 5!
|
CONSTRUCTION |
 Construction
starts with the three-piece ejection seat which looks really nice. The ejection
handles seem a bit oversized to me but that can easily be fixed. Next is
painting the instrument panels, bathtub, cockpit walls on the inner fuselage
sides, intake trunk and forward wheel bay. When all this is assembled and
painted the cockpit is glued in place together with the nose wheel bay and the
fuselage halves can be glued together. Fit so far was pretty good.
Construction
starts with the three-piece ejection seat which looks really nice. The ejection
handles seem a bit oversized to me but that can easily be fixed. Next is
painting the instrument panels, bathtub, cockpit walls on the inner fuselage
sides, intake trunk and forward wheel bay. When all this is assembled and
painted the cockpit is glued in place together with the nose wheel bay and the
fuselage halves can be glued together. Fit so far was pretty good.
Next the air intake and gun sight are glued in place. The gun sight consists of two parts. I replaced the supplied clear gun sight with one I cut from acetate sheet. This small alteration is such an improvement! The fit of the air intake was so-so, and it needs some work to get it flush with the fuselage. Finally in this stage the horizontal stabilizers are to be glued on, but I decided to wait with that until the main wing was in place to ease alignment.
The main wing is a one piece lower part with two upper halves plus two wing fences. Fit was quite good again, and so far no problems.
While the main wing dried I started on the main landing gear. The tires are split in halves, are threaded and look convincing. The main leg has a finely done break fluid hose molded on. It takes some fiddling to construct the MLG, but when done it looks really, really nice. It’s a complicated mechanism and I think they represented it quite nicely.
 Next
the wing is glued to the fuselage and the hood is glued in place. Too bad Revell
decided to make this a one-piece part. The ESCI kit had a two piece canopy and
it could be displayed open. Well, nothing a razor saw can’t fix. I left it
closed.
Next
the wing is glued to the fuselage and the hood is glued in place. Too bad Revell
decided to make this a one-piece part. The ESCI kit had a two piece canopy and
it could be displayed open. Well, nothing a razor saw can’t fix. I left it
closed.
The large ventral air brake can be built in the open position and it wouldn’t look wrong either: I’ve seen several photos of F-100s with the brake in the open position when parked. The brake assembly consist of the brake itself and two actuators. The inside of the brake also has surface detail.
There’s an arrester hook for the French version. The instructions state that the hinge-point of the hook is glued in the center of the fuselage while the end of the hook is glued off-center, to the left. I.e. the arrester hook is glued at an angle. I am not sure if this is right as I thought it was odd, but I followed the instructions. There are two refueling probes: the early style straight one plus the later bent probe. Must have been a drag hooking up to a tanker with the straight one and trying to fly straight......
Next the pre-assembled main landing gear is glued in place and the gear cover doors, which also have nicely done inner surface details. The instructions show a frontal view to ease positioning.
Under wing stores comprise of two large fuel tanks with sway-braces, two rocket launchers that look rather uninspiring, and two 500 lbs free-fall bombs. If I remember correctly, the ESCI kit also had Bullpups, but I’m not sure. I chose to leave off the launchers. Lastly I pre-painted the exhaust nozzle, of which two different types are provided.
Now that construction was done it was time for paint.
|
PAINT & DECALS |
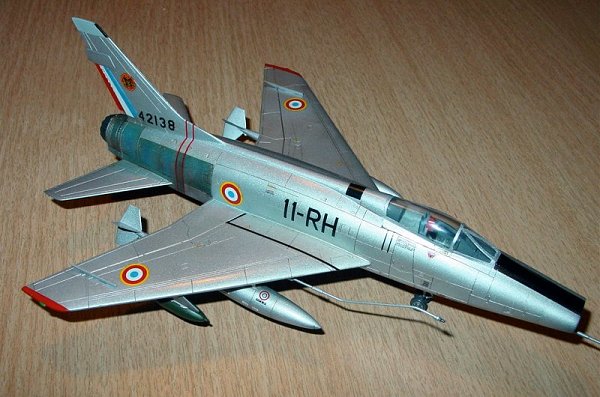
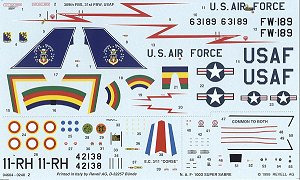
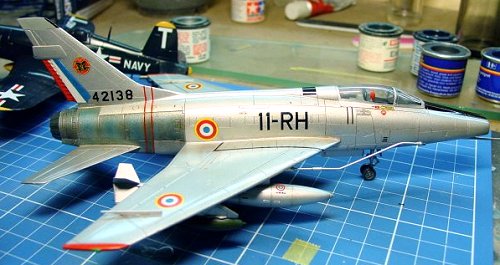
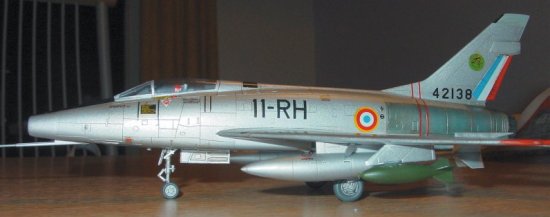
The decal sheet covers two aircraft: one French F-100D of the E.C. 2/11 “Corse” (Corsica) which was based at Toul Air Base in 1972, the other a USAF 309th Fighter Bomber Squadron F-100D in the scheme depicted by the box art. This is a really colorful bird, and you get decals for all the striping and two very large ones to cover the vertical stabilizer.
 I opted
for the French aircraft. I masked off the canopy with Tamiya tape and gave the
whole kit a coat of Heller 66 or 99 silver. This proved to be a mistake soon.
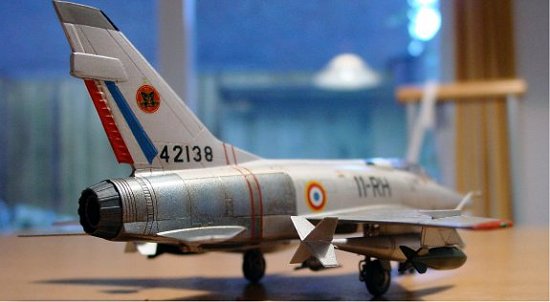
The Piece-De-Resistance on this kit for me was the tailpipe since for my
airbrushing skills it was a challenge to get it right. I wanted to make it look
gooooooood!
I opted
for the French aircraft. I masked off the canopy with Tamiya tape and gave the
whole kit a coat of Heller 66 or 99 silver. This proved to be a mistake soon.
The Piece-De-Resistance on this kit for me was the tailpipe since for my
airbrushing skills it was a challenge to get it right. I wanted to make it look
gooooooood!
When I masked off the tailpipe and had to re-position a piece of tape the silver stuck to the tape when I removed it....Darn! What a nightmare! I didn’t know what to do so I just sanded and resprayed the affected area and gave the plane several coats of Krylon clear gloss in the hope this would strengthen the silver coat enough for it to take masking without problems. On my next F-100 I will paint the tailpipe first and then mask THAT off.
I went ahead and masked off the area as per the instructions. I started off with airbrushing the burnt area Humbrol 56 aluminum. Next I mixed several colors of red and brown to create a rusty shade and airbrushed that along the panel lines of the burnt area. After Humbrol clear blue was thinned to a very thin mixture, almost water like, and thin coats of clear blue were added to the panels. Lastly I misted a few coats of the fuselage color on to the burnt area to tone it down a bit. I did all this without allowing the paint to dry. I think it’s called wet-blending. Then came the moment of truth and I gently pulled off the Tamiya tape. No paint was lifted and I smoked a cigarette like I just had sex.
Next the wingtips were masked off and painted Humbrol gloss red and the anti glare shield was also masked off and airbrushed Tamiya black acrylic.
Now a few coats of Krylon clear gloss extracted from the can were airbrushed on the entire model to provide a base for the decals.
 You
get a LOT of decals with this kit. The decals sheet is clearly divided in to a
USAF, French, and common sections. The decals are super-thin, in perfect
register and the colors look great. They reacted very well to MicroSet and
Microsol (see the French flag on the rudder). I really like the newer Revell
decals. They are even better than many Microscale sheets I used, with their
ridiculously simple and unreadable instruction sheets copied on a Russian 1950
vintage copier. There are a lot of stencils on the sheet also. I used almost
all. The decals came off of the backing paper within seconds of dipping them in
cold water and they were not prone to ripping or curling at all. In fact, this
kit is worth it’s money for the decal sheet only.
You
get a LOT of decals with this kit. The decals sheet is clearly divided in to a
USAF, French, and common sections. The decals are super-thin, in perfect
register and the colors look great. They reacted very well to MicroSet and
Microsol (see the French flag on the rudder). I really like the newer Revell
decals. They are even better than many Microscale sheets I used, with their
ridiculously simple and unreadable instruction sheets copied on a Russian 1950
vintage copier. There are a lot of stencils on the sheet also. I used almost
all. The decals came off of the backing paper within seconds of dipping them in
cold water and they were not prone to ripping or curling at all. In fact, this
kit is worth it’s money for the decal sheet only.
After decalling was done I weathered the plane with burnt umber and turpentine. This was also a first for me and I learned a lot. Thinner is better, is my conclusion. Finally everything was sealed with Krylon clear gloss again, followed by a final coat of Humbrol 135 semi-gloss clear.
|
CONCLUSIONS |
I had great fun with this kit. Fit was good and details are just right. It’s better detailed than many 1/48 kits. A beginner will have no trouble with it, and the advanced modeler can break a leg super-detailing it. I would say: buy four of them and enjoy!
Copyright ModelingMadness.com. All rights reserved. No reproduction in part or in whole without express permission.
If you would like your product reviewed fairly and fairly quickly, please contact the editor or see other details in the Note to Contributors.
Back to Reviews Page 2021