|
KIT # |
EM 3002 |
|
PRICE: |
$6.97 when new |
|
DECALS: |
Two options |
|
REVIEWER: |
Clarence Wentzel |
|
NOTES: |
|
HISTORY |
The F3H Demon is one of a group of lesser-known
aircraft designs that started production in the mid ‘50s and were a link
between the aircraft of the Korean War and those of the Century Series
era. The Demon was probably more famous or infamous for the failure of
it’s initial engine than for it’s subsequent successes. The Navy had
directed that the Demon be designed around the Westinghouse J-40 engine
which was supposed to double the thrust of then available engines.
Unfortunately the J-40 did not come close to delivering the promised
power plus it was very unreliable. This problem
 adversely affected not
only the Demon program but also others such as the F4D Skyray, A3D Sky
Warrior, the B-52 and the F-102. In the case of the Demon, the Allison
J-71 engine was made available. This was not an optimum solution but did
provide the Demon with an acceptable powerplant. The first twenty-one
aircraft produced for the Westinghouse engine could not be retrofitted
and were subsequently towed through St. Louis and barged down the river
to Memphis for use as instructional airframes. This generated a
congressional investigation but the Demon remained in production.
adversely affected not
only the Demon program but also others such as the F4D Skyray, A3D Sky
Warrior, the B-52 and the F-102. In the case of the Demon, the Allison
J-71 engine was made available. This was not an optimum solution but did
provide the Demon with an acceptable powerplant. The first twenty-one
aircraft produced for the Westinghouse engine could not be retrofitted
and were subsequently towed through St. Louis and barged down the river
to Memphis for use as instructional airframes. This generated a
congressional investigation but the Demon remained in production.
The Demon was redesigned to make best use of the J-71 engine. This included a 17.5% increase in wing area. This revised model was designated F3H-2N. In parallel, a missile-armed version was developed. This model, the F3H-2M (M for Missile) included improved radar and other minor differences. The service usage of the Demon started in 1956 and continued through 1964. Over twenty squadrons in both Atlantic and Pacific Air Groups used the Demon and it was involved in operations in the South China Sea (Matsu and Quemoy), Lebanon and the Cuban Missile Crisis. Although many considered the Demon to be a failure, the Demon did provide the Navy with its first modern jet. Once the bugs were worked out, it proved to be a dependable aircraft for all weather conditions that was easy to fly and land on a carrier. More importantly, it gave the design team of McDonnell the experience needed to develop their next generation of jet aircraft, the F-4 Phantom II.
|
THE KIT |
 The Emhar kit has been around since 1991. It has a
basic cockpit, but is accurate in size and shape and has recessed panel
lines that are somewhat crude by current standards. The kit comes with
two external fuel tanks, four missiles and an alternate load of four
rocket pods. The bolt-on refueling probe is also included. The nose
section is assembled as a separate unit and then assembled into the
fuselage. The unique air intakes of the Demon mesh well with the nose
section to provide a realistic looking assembly. An all-flying
stabilizer can be assembled at any angle chosen by the modeler. The
trailing edges of the wings and rudder are very thick and can benefit
from judicious sanding and filing. The decals are accurate but very
thick. The kit has the feel of the old Frog kits with recessed panel
lines that are somewhat thick but not as bad as the old Matchbox kits.
No resin or photo-etched parts are included but I used Airwaves set
AC72-60 for the Demon to improve the level of detail of the model.
The Emhar kit has been around since 1991. It has a
basic cockpit, but is accurate in size and shape and has recessed panel
lines that are somewhat crude by current standards. The kit comes with
two external fuel tanks, four missiles and an alternate load of four
rocket pods. The bolt-on refueling probe is also included. The nose
section is assembled as a separate unit and then assembled into the
fuselage. The unique air intakes of the Demon mesh well with the nose
section to provide a realistic looking assembly. An all-flying
stabilizer can be assembled at any angle chosen by the modeler. The
trailing edges of the wings and rudder are very thick and can benefit
from judicious sanding and filing. The decals are accurate but very
thick. The kit has the feel of the old Frog kits with recessed panel
lines that are somewhat thick but not as bad as the old Matchbox kits.
No resin or photo-etched parts are included but I used Airwaves set
AC72-60 for the Demon to improve the level of detail of the model.
|
CONSTRUCTION |
I had no major problems with the assembly of the
kit. The parts fit together well without the need for major amounts of
filler. No flash was apparent and the parts cleaned up well except for
the mentioned thick trailing edges of the wings and rudder. The only
areas where some filler was needed was with part 44, the curved panel
behind the exhaust and below the fuselage and the top edge of the nose
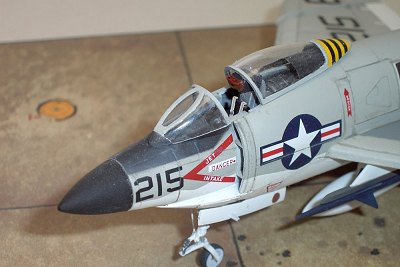
where it connects to the fuselage. Starting with the cockpit, the kit
comes with a good representation of the McDonnell ejection seat. The
Airwaves set provides belts, footrests and the face shield grab handle to
dress this up. The cockpit tub has the consoles molded in the correct
place but they have no details or decals. The same goes for the
instrument panel. Again, the Airwaves set provides parts that either
replace or supplement these areas.
 Before permanently affixing the
ejection seat in place, the modeler should trial fit the nose to the
fuselage. I found that I needed to shim the ejection seat up about
1/16-inch in order for the upper portion of the seat to be properly
visible. When finally gluing the nose to the fuselage, be sure to check
the alignment of the parts. My parts fit well together but any
misalignment in this area would make the model look strange. I ended up
with a small opening between the nose and the fuselage at the top of the
air intake. This was closed with some super glue and painted.
Before permanently affixing the
ejection seat in place, the modeler should trial fit the nose to the
fuselage. I found that I needed to shim the ejection seat up about
1/16-inch in order for the upper portion of the seat to be properly
visible. When finally gluing the nose to the fuselage, be sure to check
the alignment of the parts. My parts fit well together but any
misalignment in this area would make the model look strange. I ended up
with a small opening between the nose and the fuselage at the top of the
air intake. This was closed with some super glue and painted.
The nose landing gear of the Demon is a somewhat complex design. The Emhar kit does a good job of reproducing this area except for a couple of braces. These are supplied by Airwaves along with the nose wheel torque links to replace the kit parts. I kept the kit torque links because they look ok and provide a stronger assembly. The kit provides all of the major parts for the main gear. The torque links are separate and were replaced by parts from the Airwaves set. For the equipment bay area behind the cockpit, the kit provides a well-molded filler panel. With some appropriate dry brushing, this looks very good, better than the part provided by Airwaves.
My first impression of the fuel tanks and the
missiles was poor. I thought that Emhar had really dropped the ball on
these parts. The tanks were a strange shape and the missiles looked like
toys. The Ginter reference showed that the tanks were correct in shape
and the missiles were the Sparrow I design and were also correct for
early usage. I planned to build an
 F3H-2M version so I had to fill and
eliminate the center mounting location under the wing. Note-the kit
provides two fuel tanks but in practice, the Demon usually carried only
one tank. The second tank caused so much extra drag that it more than
used up the added fuel. I only installed the left tank. The Demon
design also included four machine guns. In practice two were usually
removed and external cover plates installed. A set of cover plates is
included in the Airwaves set. The only other area that needed some
fixing was the wheel wells in the wings. A void is shown between the
upper and lower surfaces. I boxed these in with some spackling compound
just to eliminate the opening. I chose not to add the air-refueling
probe because it was not shown on the squadron aircraft that I was
modeling. Also, the kit included a wing-mounted pitot tube. As near as
I can tell, this was only used on the prototypes and F3H–1s.
F3H-2M version so I had to fill and
eliminate the center mounting location under the wing. Note-the kit
provides two fuel tanks but in practice, the Demon usually carried only
one tank. The second tank caused so much extra drag that it more than
used up the added fuel. I only installed the left tank. The Demon
design also included four machine guns. In practice two were usually
removed and external cover plates installed. A set of cover plates is
included in the Airwaves set. The only other area that needed some
fixing was the wheel wells in the wings. A void is shown between the
upper and lower surfaces. I boxed these in with some spackling compound
just to eliminate the opening. I chose not to add the air-refueling
probe because it was not shown on the squadron aircraft that I was
modeling. Also, the kit included a wing-mounted pitot tube. As near as
I can tell, this was only used on the prototypes and F3H–1s.
|
COLORS AND MARKINGS |
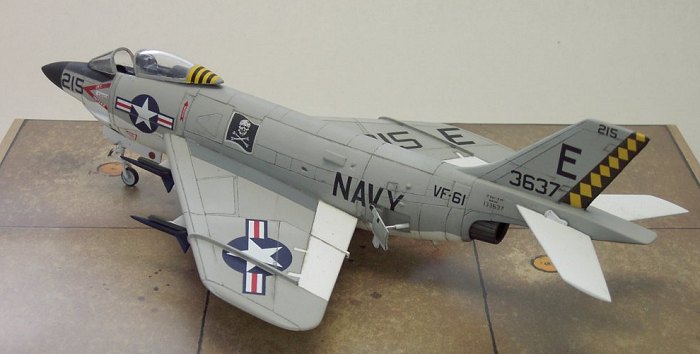
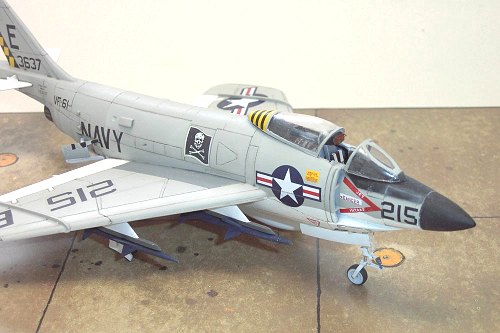
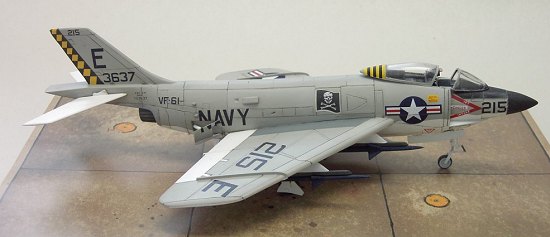
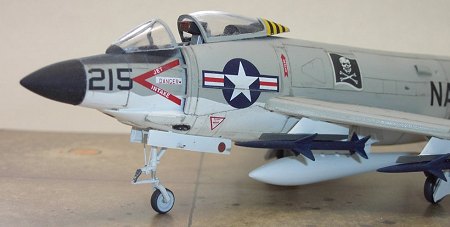
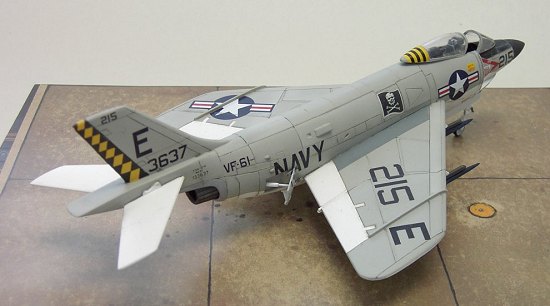
I chose to build the model in the markings of VF-61
because I liked the skull and crossbones marking and the black and yellow
tail markings. A color photo of the aircraft with the kit markings was
included in the Ginter book. Great – yes? No! The markings on the tail
were “AJ”. This would be appropriate for a Demon in the November 1957
timeframe but Demon aircraft were updated in late 1956 with an upper wing
mounted spoiler. This is very visible but is not included with the kit
or the Airwaves set. I could try to simulate the spoiler by scribing or
adding a metal or plastic part but I decided to backdate
 the markings.
In the 1956/57 timeframe, VF-61 featured an “E” on the tail – note the
photos on the cover of the Ginter book and page 3 of the Squadron book.
This also allowed me to use the early Sparrow I missiles, which were
painted blue.
the markings.
In the 1956/57 timeframe, VF-61 featured an “E” on the tail – note the
photos on the cover of the Ginter book and page 3 of the Squadron book.
This also allowed me to use the early Sparrow I missiles, which were
painted blue.
The Demon is represented in the after-market decal area by Super Scale – 72-657 & 658 and Almark S-19. The kit decals were very thick and since Super Scale set 658 included the same aircraft, tried to use as many of the Super Scale decals as possible. The only kit decals used were the squadron insignia, the rudder markings and the model/serial number marking. These parts were either wrong of didn’t exist with the after market decals. I used the rest of the decals from the Super Scale set and made the “E”s by cutting and pasting various decals. The only other item that was missing from the kit and Super Scale decals were a number of small flush antennae on the underside of the aircraft. These were provided on the Almark decal sheet and were added.
I gave the model an initial coat of Mr. Surfacer to clean up the surface and to slightly minimize the panel lines. I then painted the model using Testors Model Masters enamels. Light Gull Gray and White were used. I lightened the gray and re-sprayed a few panels to break up the overall monochromatic look. I then used Future to provide a base for the decals and to seal the decals. Next I applied a thin wash of oil paints for the panel lines. I used a combination of black, white and burnt sienna to provide a color that was compatible with the Gull Gray. Finally, I finished the model with a clear flat acrylic.
|
CONCLUSIONS |
 I was pleased with the final product. I made the
model because I wanted to add the Demon to my collection and this was the
only available kit except for the Rareplanes version. I had expected the
kit to be crude but ended up impressed with its accuracy and good fit.
It really was an easy model to complete. Note, in checking a June, 1992
review of the kit in SAM, I found that Emhar produced two versions. Kit
no. 3001 depicts the later F3H-2 and does include the spoilers for people
who are not as anal as your author. This model provides a good
representation of this important airplane that could have been much more
well known if it had had a better engine.
I was pleased with the final product. I made the
model because I wanted to add the Demon to my collection and this was the
only available kit except for the Rareplanes version. I had expected the
kit to be crude but ended up impressed with its accuracy and good fit.
It really was an easy model to complete. Note, in checking a June, 1992
review of the kit in SAM, I found that Emhar produced two versions. Kit
no. 3001 depicts the later F3H-2 and does include the spoilers for people
who are not as anal as your author. This model provides a good
representation of this important airplane that could have been much more
well known if it had had a better engine.
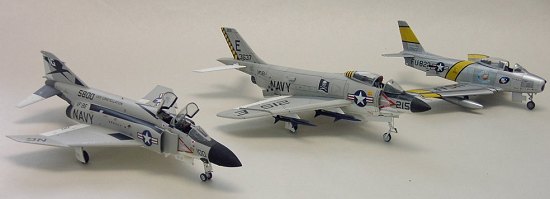
In the end, I was surprised at how large the Demon was. It was very big single engine, single seat aircraft, particularly for its time.
March 2004
|
REFERENCES |
McDonnell F3H Demon – Naval Fighters No. 12 by Steve Ginter
F3H Demon in Action – Squadron Signal Aircraft No. 140 by Jim Mesko
Air Enthusiast No. Forty-three. Article by Mike Spick.
http://www.f3hdemon.homestead.com/ A good web site with some great color photos.
If you would like your product reviewed fairly and fairly quickly, please contact the editor or see other details in the Note to Contributors.