| KIT #: | 02205 |
| PRICE: | 25 Euros in 2008 |
| DECALS: | Two options |
| REVIEWER: | Spiros Pendedekas |
| NOTES: |
| HISTORY |
The Shenyang J-5 (歼-5) is a Chinese-built single-seat jet interceptor and fighter aircraft. It was derived from the license-built MiG-17. To introduce modern production methods to Chinese industry the PLAAF obtained plans for the MiG-17F Fresco-C day fighter in 1955, along with two completed pattern aircraft, 15 knockdown kits, and parts for ten aircraft. The first J-5 (Φ0101), performed its initial flight on 19 July 1956 with test pilot Wu Keming at the controls.
 Plans were
obtained in 1961 for the MiG-17PF interceptor and production began, as the J-5A
(F-5A), shortly afterwards. At this time the Sino-Soviet split occurred, causing
much disruption to industrial and technical projects, so the first J-5A did not
fly until 1964, when the type was already obsolete. A total of 767 J-5s and
J-5As had been built when production ended in 1969.
Plans were
obtained in 1961 for the MiG-17PF interceptor and production began, as the J-5A
(F-5A), shortly afterwards. At this time the Sino-Soviet split occurred, causing
much disruption to industrial and technical projects, so the first J-5A did not
fly until 1964, when the type was already obsolete. A total of 767 J-5s and
J-5As had been built when production ended in 1969.
The Chinese also built a two-seat trainer version of the MiG-17, designated the Chengdu JJ-5, by combining the two-seat cockpit of the MiG-15UTI, the VK-1A engine of the J-5, and the fuselage of the J-5A. All internal armament was deleted and a single Nudelman-Richter NR-23 23 mm cannon was carried in a ventral pack. Production of the JJ-5 reached 1,061 when production ceased in 1986, with the type exported to a number of countries.
The type saw widespread use by the PLAAF, until supplanted by more capable aircraft, such as the Shenyang J-6 and later the Chengdu J-7.
| THE KIT |
This kit was initially released before the millennium as the J-5, followed soon after by the radar version (J-5A). It has been reboxed with many decal options by Hobbycraft in 2001 (Scott’s thorough preview here) and re-released by Trumpeter in 2004. Mine is the original release, offered at the very attractive price of 25 euros 15 years ago.
 Upon opening
the sturdy box, you are greeted with some nicely cast parts with crisp engraved
detail and no flash. It is obvious that the design of this kit was based on the
very good 1/48 Tamiya Mig-15. This is not bad at all! Cockpit detail, including
the seat, is ok, if not a tad on the basic side, especially for 1/32, leaving a
bit to be desired here. If you are inclined to pose the canopy open, extra
detailing this area will pay off.
Upon opening
the sturdy box, you are greeted with some nicely cast parts with crisp engraved
detail and no flash. It is obvious that the design of this kit was based on the
very good 1/48 Tamiya Mig-15. This is not bad at all! Cockpit detail, including
the seat, is ok, if not a tad on the basic side, especially for 1/32, leaving a
bit to be desired here. If you are inclined to pose the canopy open, extra
detailing this area will pay off.
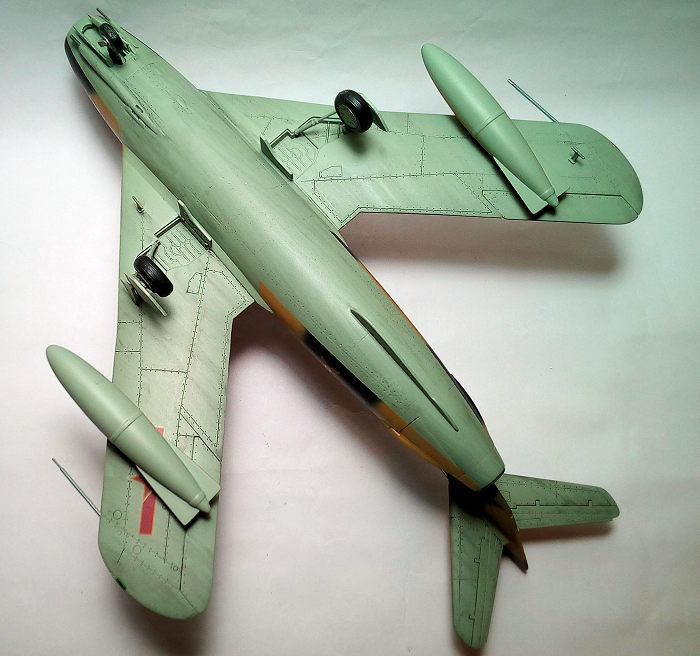
As in the Tamiya kit, a full engine, along with a nice dolly are provided, with the option of removable rear fuselage part. Landing gear parts and wells are well represented, though I wouldn’t mind having brake lines depicted. Rubber tires are provided, together with separate rims, which are hollow from the inside, requiring the modeler to somehow cover this (the brave ones could scratch build a brake assy there!).
Regarding the external stores, only two wing tanks are provided.
Instructions, though simple, might be a bit confusing at places, with no internal color callouts as well. A simple decal sheet is provided, with four PLAAF insignia and a series of red fuselage numbers. No camo suggestion, not even the “Φ” letter that appears at the box art’s “Φ0101” depicted subject (the first J-5 flown) are provided. So, in painting and camoing, you are completely on your own! Decals quality and registration looks good, but the red color is definitely opaque.
| CONSTRUCTION |
I started by gluing the instrument panel and a rear support structural rod at the cockpit tub, then trapped it between the two front fuselage parts, together with the characteristic intake splitter. Having decided to model my Shenyang without showing the engine, I assembled the rear fuselage, including airbrakes (in “closed” position), fin and tailplanes, 12 pieces in total. The whole subassembly was then attached to the front fuselage part, followed by the attachment of the wings. Take your quality aligning time here, as to achieve the slight anhedral that is so characteristic in Mig17/J5/Lim6.
 For basic
cockpit and seat color I chose light blue (which is speculative, light gray
might be a safer bet), with black instrument panel/side consoles (drybrushed in
silver), seat cushions and gunsight base. The intake trunking, as well as the
wheel rims, were painted Testors Steel. The wheel rims had their hollow rear
faces blanked by suitable pieces of sheet styrene (on second thought, I might
have fabricated some kind of brake assemblies there…well, next time…).
For basic
cockpit and seat color I chose light blue (which is speculative, light gray
might be a safer bet), with black instrument panel/side consoles (drybrushed in
silver), seat cushions and gunsight base. The intake trunking, as well as the
wheel rims, were painted Testors Steel. The wheel rims had their hollow rear
faces blanked by suitable pieces of sheet styrene (on second thought, I might
have fabricated some kind of brake assemblies there…well, next time…).
In order to busy up the cockpit area, I decided to add the nice kit supplied pilot (who awfully resembles the Tamiya Mig-15 one…). His uniform was painted a custom made khaki, with white helmet, black shades and boots, grey oxygen hose and gloves, “flesh” face, and yellow seat belts. Under my usual “closed canopy” attitude, things might look busy enough…
Having a complete basic structure, I then started to insert pieces of lead in the area up of the front wheel well, that I deliberately had left open. Once I figured the weight was sufficient, I formulated the lead pieces with my sons’ modeling clay inside the fuselage and attached the bottom part, followed by the front intake ring. I then assembled the three piece wing tanks and two piece nose landing gear. The underside nose gun pods were attached, too. Being sure that I would definitely break the attached barrels during the build, I bravely removed (cut) all three of them, with a plan to attach them at the final stages…
Fit was generally good, with some gaps here and there, taken care of appropriate filling and sanding. It was then paint shop time!
| COLORS & MARKINGS |
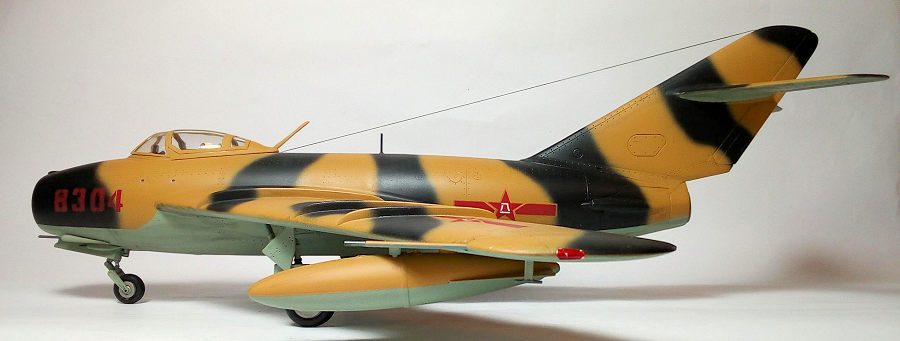
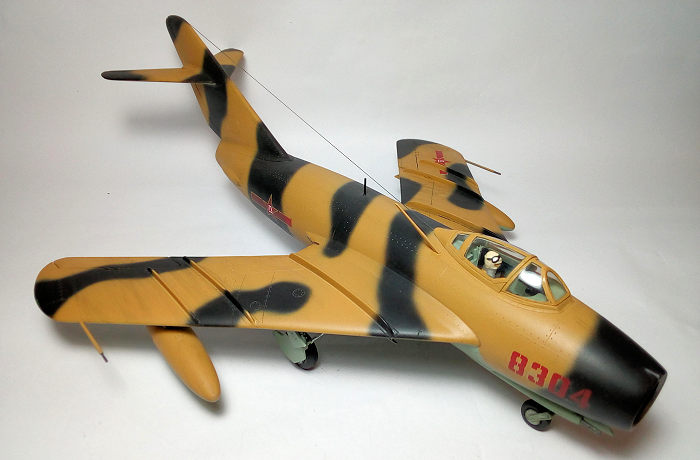
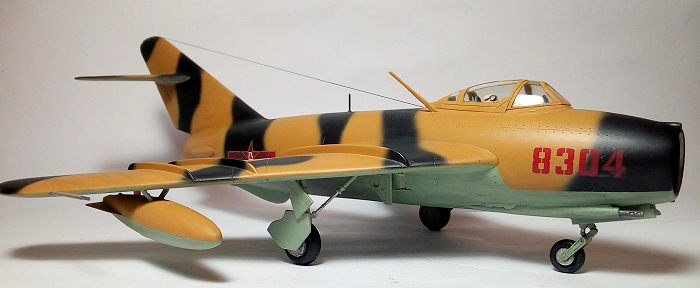
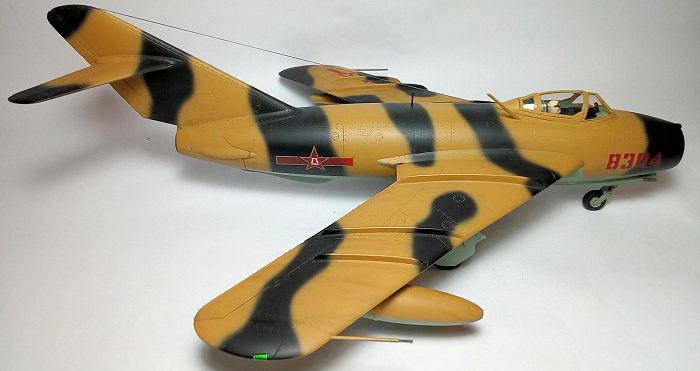
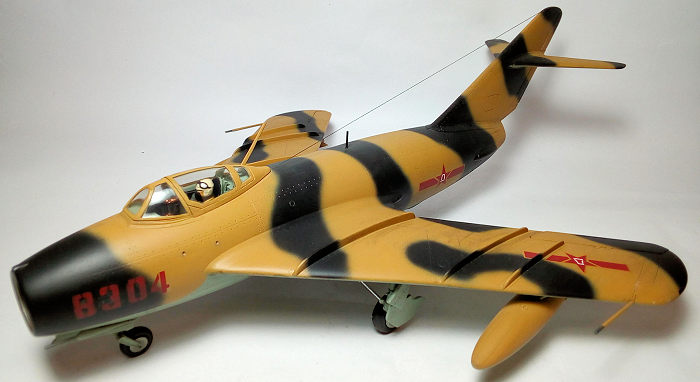
I was searching for a nice “exotic” scheme for my J-5, when I came across a
beautiful profile by artist Americo Maya, of a disruptive sand/black pattern
over light blue. It depicts the s/n 8304 aircraft, flown as a night fighter,
circa 1958. Interestingly, the wing applied insignia are depicted as “USA
style”, i.e. at the top and bottom side of the port wing only! It is believed
that, although most of the PLAAF MiG-17s in 1958 were left without any
camouflage, the aircraft flown by night-fighter units, were usually camouflaged
- a practice 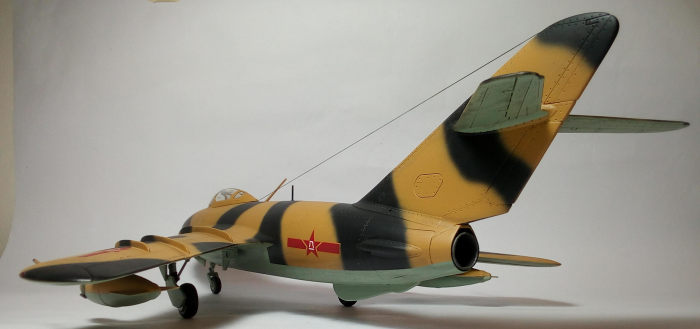 introduced
by the Soviets during the Korean War. The same scheme of the same plane, has
been rendered by artist Tom Cooper, as well. Feeling that I had sufficient
validation for my amazing exotic scheme, I pressed on!
introduced
by the Soviets during the Korean War. The same scheme of the same plane, has
been rendered by artist Tom Cooper, as well. Feeling that I had sufficient
validation for my amazing exotic scheme, I pressed on!
I started by applying Hu65 Light Blue at all under surfaces, including wing tanks, both sides of landing gear doors, wheel bays and landing gear struts (my decision on painting landing gear and wheel bays the same underside color is speculative). Upon drying, I gave it a protective coat of Future and masked it. Next I sprayed Hu63 Sand on top surfaces, followed by freehand Hu33 Black, with my Revell Vario at its finest settings. Deeming the camo acceptable, I removed the masking and gave the topsides another coat of Future.
I used the kit decals, which were minimal – only 4 insignias and the nose code that was made by using the appropriate digits from the decal sheet. The decals were a tad on the translucent side and some silvering took place at the code numbers (this was likely my mistake), but were thin and adhered well. They were then sealed with a coat of Future.
| FINAL CONSTRUCTION |
I attached the control stick, the seat with the pilot on it and the gunsight, followed by the landing gear struts and doors. After press fitting the nice looking vinyl tires at the rims, I attached the wheels at the landing gear struts, checked alignment and left everything to dry.
I then attached the wing tanks, the two outer wing pitots, the two underwing probes and the gun barrels. Their tips, together with the gun barrels, were painted gun metal. I also attached the two top antenna masts.
 A tube piece
of appropriate width and thickness (from my spares) was used as exhaust. It was
painted Testors Burned Metal and attached to the rear. I did not use the kit
supplied exhaust, as It had good exterior detail and I wanted to keep it, in
order to make a mini model of the Klimov engine and display it separately.
A tube piece
of appropriate width and thickness (from my spares) was used as exhaust. It was
painted Testors Burned Metal and attached to the rear. I did not use the kit
supplied exhaust, as It had good exterior detail and I wanted to keep it, in
order to make a mini model of the Klimov engine and display it separately.
I then gave the whole model a black wash that brought out not only all engraved external detail, but also the raised wheel wells one. For weathering, I used dry pastels and artists oils, in order to simulate subtle staining and dirtying, mainly at the undersides and guns area. The ladder attachment points received some subtle silver dry brushing. After performing the required touchups, I gave the model its final almost matt clear coating (Humbrol matt/gloss at 80/20 ratio).
I hand painted and then attached the nicely framed windscreen and canopy, the small resulting gaps taken care of white glue. The intake splitter transparency was attached with white glue, too. For the antenna wire, I run a piece of stretched sprue from the area aft of the canopy to the fin top. The wingtip lights were represented by blobs of clear red and green paint, on top of silver paint that had been applied beforehand.
I then called this bird done!
| CONCLUSIONS |
If you want an 1/32 Mig-17/Lim-6Bis/J-5), this is pretty
much it. The good news is that this kit is definitely a pleasant surprise: based
on the very good Tamiya quarterscale Mig-15, it is a good kit, with nice details
all over and some omissions/oversimplifications/
 If you are
so inclined, there have been quite a few aftermarket extras to enhance/correct
the cockpit, landing gear and wheel wells, air brake, guns and tail areas. Of
course, you will have to check current availabilities (Scalemates is an
excellent starting point). There are numerous markings options, many of them
extremely interesting. The low prices this kit is offered, make it even more
appealing.
If you are
so inclined, there have been quite a few aftermarket extras to enhance/correct
the cockpit, landing gear and wheel wells, air brake, guns and tail areas. Of
course, you will have to check current availabilities (Scalemates is an
excellent starting point). There are numerous markings options, many of them
extremely interesting. The low prices this kit is offered, make it even more
appealing.
It is a straightforward build with no surprises, making it an ideal first 1/32 attempt even for a relatively inexperienced modeler, resulting in a nice big model. Of course, the experienced modeler will address all kit discrepancies and produce his masterpiece.
Though I’ve heard some complaints, mainly for inaccurate tail and canopy shape, the completed model, OOB, definitely looks like a Mig-17.
Unlikely most 1/32 jets, the finished model is not massive, and will find its place at most display cases quite easily. Take my suggestion, go for a colorful less mainstream camo and you will have an eye catcher in your showcase!
Happy modeling!
| REFERENCES |
Wikipedia
Scalemates
Wings Palette
Various internet sites (pics, info and models built)
6 August 2021 Copyright ModelingMadness.com. All rights
reserved. No reproduction in part or in whole without express permission. If you would like your product reviewed fairly and fairly quickly, please
contact
the editor or see other details in the
Note to
Contributors.