Hobby Boss 1/72 MiG-15UTI
| KIT #: | 80262 |
| PRICE: | $10.00 or so |
| DECALS: | Two options |
| REVIEWER: | Spiros Pendedekas |
| NOTES: | Easy Assembly series |
| HISTORY |
 Following
the 14 July 1958 Revolution, which resulted in the end of monarchy in Iraq, the
influence of the Iraqi Communist Party grew significantly. The first commander
of the now Iraqi Air Force (the "Royal" prefix was dropped after the
revolution), Jalal Jaffar al-Awqati, an outspoken communist, encouraged prime
minister Abd al-Karim Qasim to improve relations between Iraq and the USSR. The
Soviets reacted quickly, and in the autumn of 1958 a series of arms contracts
was passed between Iraq and the Soviet Union and Czechoslovakia.
Following
the 14 July 1958 Revolution, which resulted in the end of monarchy in Iraq, the
influence of the Iraqi Communist Party grew significantly. The first commander
of the now Iraqi Air Force (the "Royal" prefix was dropped after the
revolution), Jalal Jaffar al-Awqati, an outspoken communist, encouraged prime
minister Abd al-Karim Qasim to improve relations between Iraq and the USSR. The
Soviets reacted quickly, and in the autumn of 1958 a series of arms contracts
was passed between Iraq and the Soviet Union and Czechoslovakia.
As a result of the above contracts, the delivery of various aircraft was stipulated, including MiG-17F fighters, Ilyushin Il-28 bombers and Antonov An-2 and An-12 transports. Among these was a number of the mass produced (2012 units) MiG-15UTI trainers. The type, which in essence was the two seat derivative of the charismatic yet temperamental MiG-15, retained the advanced (for the time) flight characteristics, but also the idiosyncrasies (unrecoverable spin after stall, severe buffeting after Mach 0.92) of the single seater brother, providing crucial jet training to Iraqi pilots for many years until the late 80s.
| THE KIT |
 This is the
regularly reboxed two seat version of the HobbyBoss 1/72 “Easy Assembly” MiG-15,
a by all means good, solid kit with few and of little importance shortcuts taken
due to its Easy Assembly nature, a real bargain for the price offered. For an
in-depth look at the kit’s contents, you may read our Editor’s thorough preview found
at the ever growing MM archives.
This is the
regularly reboxed two seat version of the HobbyBoss 1/72 “Easy Assembly” MiG-15,
a by all means good, solid kit with few and of little importance shortcuts taken
due to its Easy Assembly nature, a real bargain for the price offered. For an
in-depth look at the kit’s contents, you may read our Editor’s thorough preview found
at the ever growing MM archives.
The specific kit was bought from my hometown’s sole petite hobby shop in 2021 and I decided to build and send it to a good friend who lives in Bordeaux, France as a 2023 christmas present. Off to the bench then!
| CONSTRUCTION |
I started by attaching the intake splitter and exhaust nozzle onto the lower fuselage half, followed by the very comprehensive one piece cockpit tub which has all basic stuff molded in (only the seats and instrument panels were provided separately). Since the model is a serious candidate for severe tail sitting, I suitably formulated a 20g fishing weight by light hammering on a trial and error basis and trapped it beneath the cockpit tub. The top fuselage half was then attached, followed by the main wings and tail planes. The starboard nose gun was also attached at this time, together with the air brakes at “closed” position and this concluded the main assembly.
 Basic
cockpit and seat frames color was Humbrol HT2 Blue (discontinued, dries at a
lovely slightly gray-ish light blue shade, somewhere between Hu65 Light Blue and
Hu87 tank Gray). The same color was used for the fore and aft inner “anti-glare”
areas. Instrument panels, side consoles, stick grips and all seat cushions were
painted black. The flat and devoid of any detail instrument panels received some
“instruments” by pinning silver color onto them, together with a few red and
yellow like “pins”, to simulate some sort of levers and knobs, deeming that this
oversimplified instrumentation will pass unnoticed under the closed canopy.
Basic
cockpit and seat frames color was Humbrol HT2 Blue (discontinued, dries at a
lovely slightly gray-ish light blue shade, somewhere between Hu65 Light Blue and
Hu87 tank Gray). The same color was used for the fore and aft inner “anti-glare”
areas. Instrument panels, side consoles, stick grips and all seat cushions were
painted black. The flat and devoid of any detail instrument panels received some
“instruments” by pinning silver color onto them, together with a few red and
yellow like “pins”, to simulate some sort of levers and knobs, deeming that this
oversimplified instrumentation will pass unnoticed under the closed canopy.
Intake innards were painted steel and the exhaust Testors Burned Metal. I would not mind if the exhaust featured some extra depth, but, maybe, this is asking too much from an “Easy Assembly” base kit. The seats received seat belts made from masking tape and were left off, to be attached at end stages.
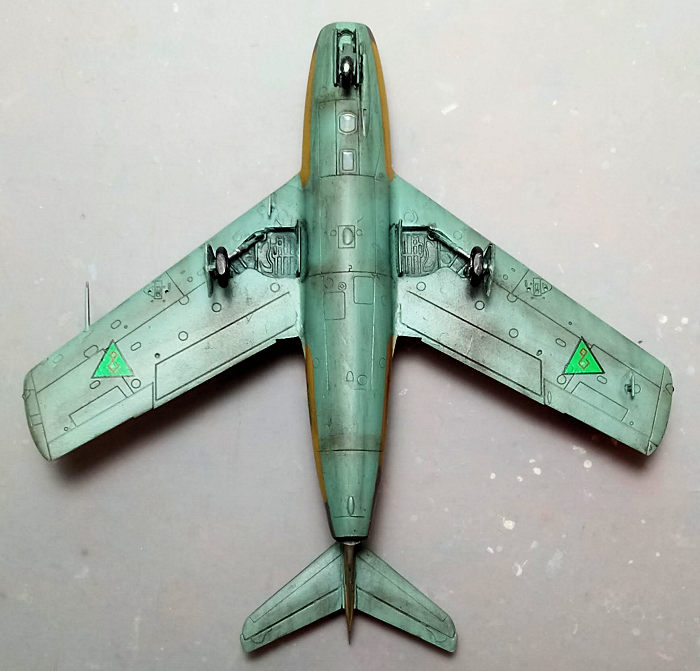
Since I opted to go for an Iraqi example that featured light blue undersides, I decided, in order to facilitate painting, to use the same color for the landing gear struts and door/bay innards. This has chances to be an oversimplification, but, on the other hand, such shades, apart from the more common “light gray” and “blue gray ones”, have been reported/observed in various Mig-15 examples.
Having decided to follow the lazy way and opting to paint everything underneath the same shade, I went on adding all landing gear parts sans the main wheels. Fit was overall good, though some joints needed some treatment, first with liquefied styrene and then with “normal” puttying and sanding. A nasty ejector pin mark laid between ribbing in each of the main top bay walls, not easily removable, but, again, not that prominent, so I decided to “leave as is” and headed to the paint shop!
| COLORS & MARKINGS |
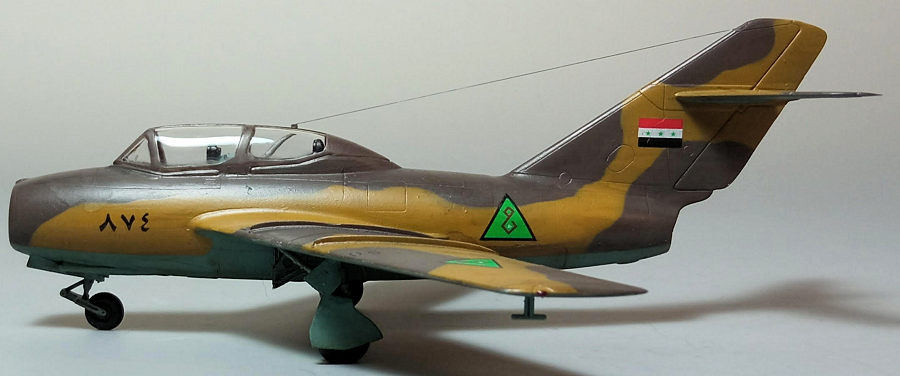
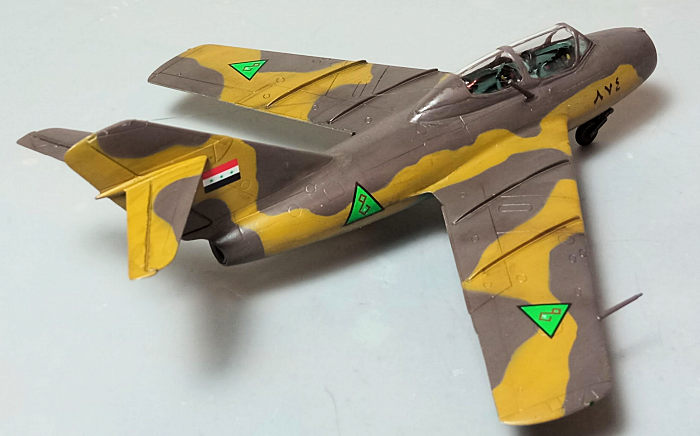
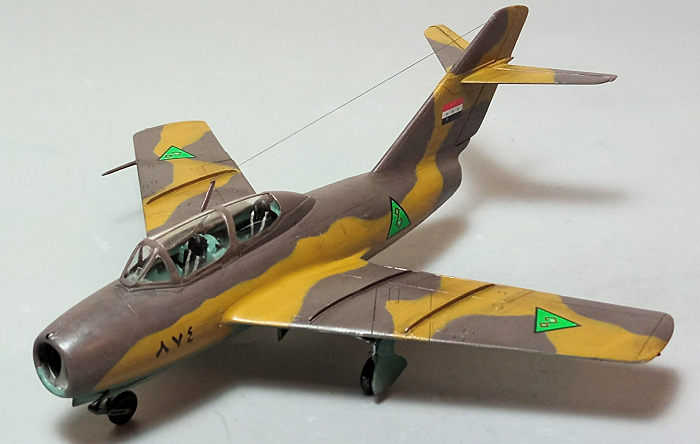
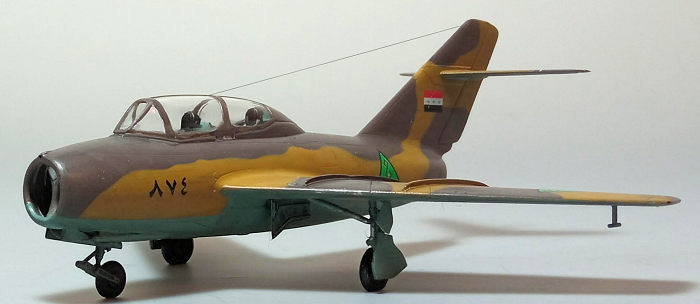
Iraqi Mig-15UTIs
featured, at least from a point onwards, a desert style camo with dark brown and
sand topsides over light blue undersides. By studying net available pics of
seemingly captured/abandoned examples (where the topsides had fainted
significantly), I decided to depict the bird at happier times with less faded
colors. Not claiming any means of accuracy, I decided to use the same Humbrol
HT2 I had painted the cockpit for the undersides, whereas I used Hu98 Chocolate
and hu225 Middle stone for the top dark brown and sand shades respectively.
 Onto the
painting process, I first gave all undersides a coat of light blue, then masked
it off and gave the topsides the dark brown shade, followed by the lighter sand.
For the upper demarcation lines I used strings of tak and carefully sprayed at
more or less right angles, in order to achieve a tight but not dead hard effect.
A coat of Future prepared the bird for decaling.
Onto the
painting process, I first gave all undersides a coat of light blue, then masked
it off and gave the topsides the dark brown shade, followed by the lighter sand.
For the upper demarcation lines I used strings of tak and carefully sprayed at
more or less right angles, in order to achieve a tight but not dead hard effect.
A coat of Future prepared the bird for decaling.
I used the kit decals, which behaved nicely, easily detaching from their backing
paper and positively following all surface contouring with the help of some
decal softening solution, exhibiting no silvering at all. One thing I noticed is
that, being really thin, the decals are not that tolerant to repositioning,
tending to fold over themselves, so better try to place them right first time.
Also, a number of us might find the green shades on the bright side, but nothing
too pronounced and toned down once the final coat is applied. No stenciling is
provided, but I doubt those birds carried any. A coat of Future sealed the
decals, ending a very pleasant decal session.
| FINAL CONSTRUCTION |
Finalizing the cockpit, I attached the seats in position. The prominent gunsight is not provided, although there is a cutout at the front dash board cover, so I attached one from spares, more or less similarly looking. The main wheels were filed to look weighted and attached in position, with the bird nicely standing on its shoes. All wheels had black tires and I decided to give the rims a green color (again, an assumption - steel is the standard way to go). The prominent main wheels’ brake housings were painted black, then dry brushed with silver and all oleos were highlighted with a fine tip silver pen.
 Though both
styles of drop tanks are provided (the rarely used “slipper” and the typically
used “normal”), I decided against using neither of them, as those trainer birds
were not uncommonly seen in “clean” configuration and also look better that way
to my eye (translation: Yours Truly, trying to justify his laziness on building
and painting the drop tanks…).
Though both
styles of drop tanks are provided (the rarely used “slipper” and the typically
used “normal”), I decided against using neither of them, as those trainer birds
were not uncommonly seen in “clean” configuration and also look better that way
to my eye (translation: Yours Truly, trying to justify his laziness on building
and painting the drop tanks…).
Having decided to depict a not too beat-up bird, weathering was somehow limited to a black wash (more heavily applied in the wheel wells and door innards) and the limited use of dark brown and dark pastels to simulate some dirt, grime and the like. A satin cote sealed everything and gave the bird its final hue.
The
canopy had its well defined frames hand painted and attached in position by
simply press-fitting, the tiny gaps then being treated with white glue, the
latter also used to replicate the two belly mounted camera glasses. The antenna
mast was then attached and thin stretched sprue was run from it to the
corresponding position at the fin leading edge, to represent the aerial wire.
The typically snapped-off front gun was replicated by a piece of stretched
sprue, painted Testors Burned Metal. Finally, tiny blobs of red and green clear
paint were “pinned” to represent the wingtip lights, before calling the petite
trainer done!
| CONCLUSIONS |
This is a pretty nice kit for this important plane. Overall shape looks spot on, molding is excellent, overall fit is good, panel lines are finely recessed, detail at key areas is sufficient, canopy is well molded and decals are great. Construction itself is very simple and pleasant, easily tackled by a novice, maybe even a toddler beginning his modeling adventures, who will find the instructions clear and concise and come up with a great looking MiG-15 trainer.
The fact that we refer
to an “Easy Assembly” kit, sold at a big fraction of the prices the modeler has
to pay for other good kits, only makes this offering a bargain by all means. It
might not (and does not intend to) rival the latest and greatest Wunderkits,
but, really, is not lacking that much and costs roughly half of them, offering
the modeler clear and solid choices. Buy in confidence.
Happy Modeling!
20 October 2023
Copyright ModelingMadness.com. All rights reserved. No reproduction in part or in whole without express permission.
If you would like your product reviewed fairly and fairly quickly, please contact the editor or see other details in the Note to Contributors.