Eduard 1/72 MiG-15
| KIT #: | 7057 |
| PRICE: | $27.35 |
| DECALS: | Several options |
| REVIEWER: | Dan Lee |
| NOTES: |
Aires Resin Exhaust for Mig-15Bis, Master brass gun barrels and pitot tube |
| HISTORY |
The Mig-15 (NATO codenamed: Fagot) was the premier jet fighter of the Soviet Union during the early 1950s. It was developed out of the ashes of the Mig-9 which was a disaster in part because the designers placed the armament right in front of the intake which caused engine flameouts due to the cannon gas being sucked into the jet engine.
Thanks in part to the
British willing to sell the Soviets a license to build the Nene jet engine, the
Mig-15 quickly came to form based on the Mikoyan-Gurevich Bureau's earlier
design for a rocket interceptor despite a passing similarity to the Kurt Tank
designed Ta-183. It was armed with a pair of 23mm cannon and a 37mm cannon which
was a good armament for taking down bombers, but not gre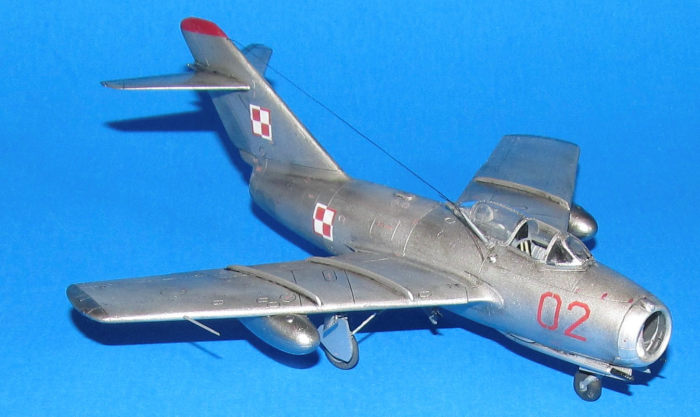 at for shooting down
fast agile jet fighters. The differing ballistic properties between the 23mm and
37mm cannons would later freak out US Sabre pilots as they saw 23mm shells
passing on one side of their plane and 37mm shells passing on the other when
attacked by a Mig-15 in a turn.
at for shooting down
fast agile jet fighters. The differing ballistic properties between the 23mm and
37mm cannons would later freak out US Sabre pilots as they saw 23mm shells
passing on one side of their plane and 37mm shells passing on the other when
attacked by a Mig-15 in a turn.
The Mig-15 would be the main Soviet fighter involved in the Korean War where it fought the similar F-86 Sabre over Mig Alley. Both sides overclaimed kills in these even fights. Despite the F-86's victories, the Soviet “Honchos” collected more than their share of kills.
During the early years of the Cold War, the Mig-15 was exported to Warsaw Pact nations and various client nations in need of a combat proven fighter including Poland.
Thanks to advancing technology, the Mig-15 would be supplanted by faster, more modern jets during the 1960s. In an ironic twist, the Soviets pilots would have the same problem as the Americans had in Vietnam which was lack of air combat maneuvering skills (aka dogfighting.) The Sovs proverbial smack to the head came during the 1970 “War of Attrition” between Egypt and Israel when Soviet advisors were mauled (5 shot down vs one damaged) by experienced/skilled Israeli jet fighters in a very embarrassing one sided dogfight.
| THE KIT |
 The Eduard 1/72 Mig-15
came out in 2014 to great fanfare as it became the best available Mig-15 in the
1/72 scale. See Scott's
preview of the similar Mig-15Bis to see what is in the box.
The Eduard 1/72 Mig-15
came out in 2014 to great fanfare as it became the best available Mig-15 in the
1/72 scale. See Scott's
preview of the similar Mig-15Bis to see what is in the box.
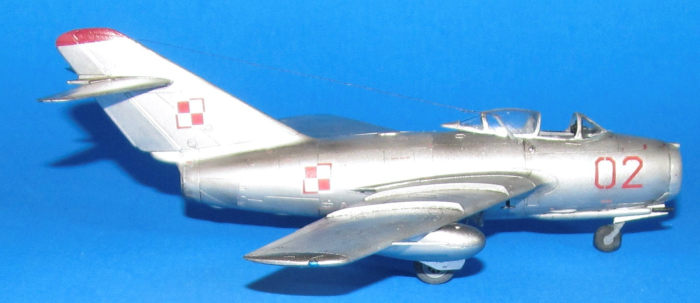
I picked up this kit for sentimental reasons as it had markings for a Polish AF Mig-15 (aka LIM-1) which was featured in the early and inaccurate 1/72 Airfix Mig-15 kit. I wanted to make the Polish Mig-15 I imagined I made when I was six.
| CONSTRUCTION |
It all began with the intakes and cockpit parts. I sprayed the insides of the intake with Vallejo Air RLM01 Silver while the cockpit interior was sprayed with Tamiya Neutral Grey.
I added the various Eduard PE that comes with the kit. Some of the smaller pieces gave me fits mostly because I discovered that my vision isn't what it used to be (ah, the joys of getting old.) I glued them on with tiny dabs of CA glue. The only pieces I didn't add were the tiny levers (I have a bad enough time with these in 1/48, I wasn't going to try in 1/72.)
 Next I used the Aires 1/72
resin exhaust (which is actually for the BIS) to replace the two piece,
impossible to sand the prominent seams, exhaust. First the pieces were removed
from the resin stubs using a Hasegawa razor saw. It was then cleaned up and
washed with dish soap to remove any of the release agent. Finally the resin
parts were primed with Stynylrez and when dry, sprayed with Vallejo Metal Color
Gunmetal.
Next I used the Aires 1/72
resin exhaust (which is actually for the BIS) to replace the two piece,
impossible to sand the prominent seams, exhaust. First the pieces were removed
from the resin stubs using a Hasegawa razor saw. It was then cleaned up and
washed with dish soap to remove any of the release agent. Finally the resin
parts were primed with Stynylrez and when dry, sprayed with Vallejo Metal Color
Gunmetal.
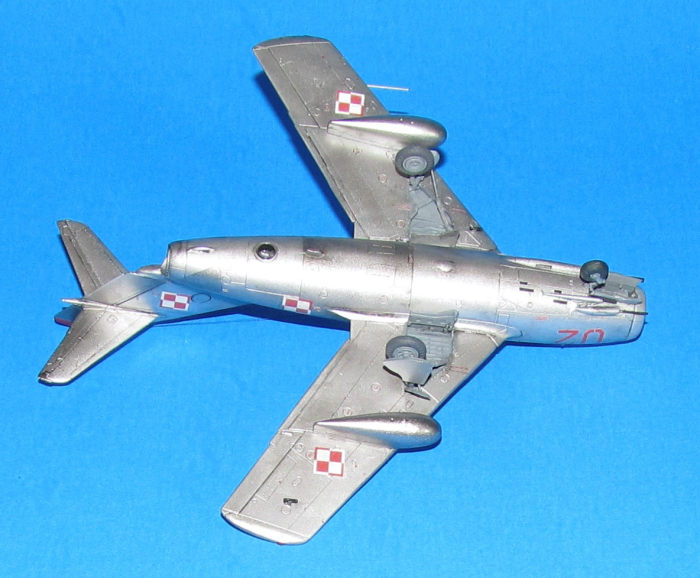
I then added the cockpit and exhaust into the fuselage along with the rudder piece. The visible seams were glued with CA glue while the interior attachment points were glued with Tamiya extra thin glue. I did the same with the external pod drop tanks similar to US WW2 style drop tanks (the F-86 Sabre style fuel tanks were for the more modern versions and I didn't use them.)
There was a fair amount of sanding of the seams as NMF can be quite demanding. I ended up doing this several times with different grades of sandpaper to remove the seams and smooth out the surface. I used up to 3200 grit to polish it (I was priming the surface so I don't need to do as much polishing.)
The wings were constructed in the same fashion. The interiors were painted neutral grey first then glued together (CA glue along the external seams) and the seams sanded smooth. The wings were then glued into the fuselage.
I left off the ailerons and most of the tiny external parts as it was almost time to prime and paint.
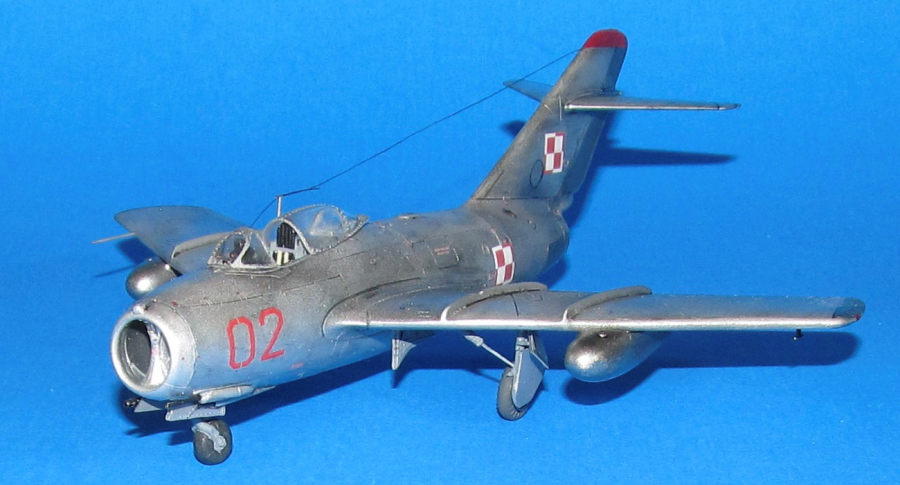
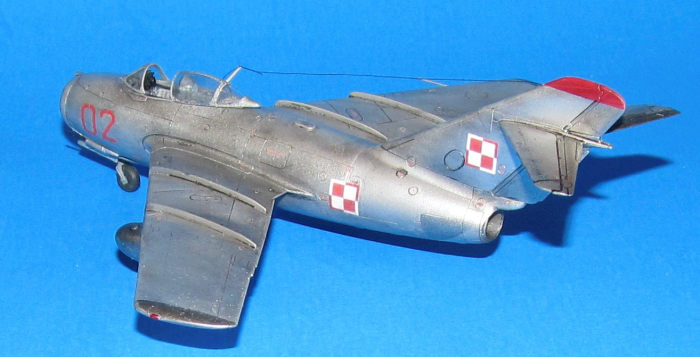
| COLORS & MARKINGS |
I first sprayed on Stynylrez to provide a solid primer for the Vallejo Metal Color (referred to as VMC) paint to grab onto. I polished the surface relatively smooth as most if not all of the spray blots and drops were polished away but I needed a couple of primer coats to get full coverage after polishing the surface. FYI, I used cut to shape/size foam sponges from various aftermarket packages to protect the cockpit and wheel wells from overspray.
Once the primer was done,
I sprayed on the first coat of VMC Aluminum as the base color. I had to polish
this coat too due to imperfections so it required at least two thin coats. When
everything was done with the base coat, I used a Tom Cleaver aerial photo of a
Mig-15 in flight as the guide to painting the panels various tones of NMF paint.
I used a combination of low tack masking tape
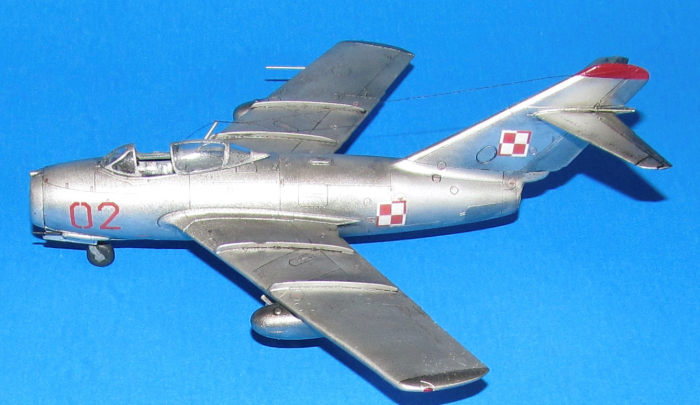 with VMC Dull Aluminum, Dark
Aluminum, White Aluminum, Steel (for the exhaust) and Vallejo Air- RLM01
(Silver) for various areas. It didn't take long as each shade took about 15
minutes of work and the low tack tape I used for masking didn't damage the
semi-cured paint. The fuel tanks were done the same, but one of them fell off
the work bench and needed to be redone.
with VMC Dull Aluminum, Dark
Aluminum, White Aluminum, Steel (for the exhaust) and Vallejo Air- RLM01
(Silver) for various areas. It didn't take long as each shade took about 15
minutes of work and the low tack tape I used for masking didn't damage the
semi-cured paint. The fuel tanks were done the same, but one of them fell off
the work bench and needed to be redone.
Next I masked off the ailerons and did the same thing while the top of the rudder was painted flat white then gloss red as per the Polish Mig-15 paint scheme. The canopy was masked then painted neutral grey and when it was dry, painted VMC White Aluminum. Vallejo acrylic gloss was sprayed as the gloss coat for decals.
Decals were the new Eduard decals and I had some issues with them. They work fine, but the decal numbers seem to be attached to the decal and I found I had to scrap the decal number residue off the actual decal so I recommend that you remove the decal number before soaking the actual decal in water. Also they were too damn small. So many tiny decals and my close up eyesight was not so great (got a new prescription after I finished this model which work a lot better, but it was annoying to do with the older glasses) which is why the decals took a lot longer to do (obviously.) Some of the tiny red decals were replaced with dots of red paint as I found it easier to do than hunt for tiny red decals.
Also I was missing a Polish checkerboard on my copy of the decal sheet as my copy only had 5 of the 6 required. Eduard's customer service was top notch and they sent both decal sheets (which was nice as I only asked for the insignias.) The decals only required some MicroSet to settle down into the detail.
I used Tamiya black and brown panel line colors for the wash. The excess removed with mineral spirits and done in a well ventilated room. Once the panel wash was dry, I sprayed a gloss coat and removed the various masks from the canopy.
| FINAL CONSTRUCTION |
I glued on the already painted ailerons and the nose/intake on. For the most part the parts fit without the use of filler, but I need some work to get the intake piece to fit without a big gap.
 Next up I used fine black
repair thread for the radio wire. I used a 0.5mm drill bit to make a hole in the
tail, insert the thread into the hole with a dab of CA glue to hold it. Once
cured, I attached the line to the top of the antenna and held it in place with
another dab of CA glue. One that was dry, I inserted the remaining line into a
predrilled hole in the fuselage and glued it in place. The line was tightened up
by waving an extinguished match underneath.
Next up I used fine black
repair thread for the radio wire. I used a 0.5mm drill bit to make a hole in the
tail, insert the thread into the hole with a dab of CA glue to hold it. Once
cured, I attached the line to the top of the antenna and held it in place with
another dab of CA glue. One that was dry, I inserted the remaining line into a
predrilled hole in the fuselage and glued it in place. The line was tightened up
by waving an extinguished match underneath.
The already painted landing gear was added with the nose wheel being a simple straight forward assembly while the main landing gear was fiddly. It takes a fair amount of work to align the main landing gear and its various tiny parts.
Next the various canopy parts were glued together along with the gunsight. I discovered that the gunsight is actually too big for the windscreen and needed to be trimmed down to allow the windscreen to sit on the model correctly. The rear canopy parts went together much easier.
Lastly, I inserted the painted Master brass gun barrels and pitot tube into the various holes. I had to drill out the holes (carefully) using a 1mm and 0.7mm drill bits.
| CONCLUSIONS |
The Eduard Mig-15 is a very nice 1/72 kit that has detail which is almost too fine for this middle aged modeller to build. If they were to scale up this 1/48, the level of detail would still be amazing. All optical issues aside, this kit makes a fine looking Mig-15 and worthy of the accolades it has received. Overall I am more happy with the build than I am with my aging eyesight.
18 April 2023 Copyright ModelingMadness.com. All rights reserved. No
reproduction in part or in whole without express permission. If you would like your product reviewed fairly and fairly quickly, please contact the editor or see other details in the
Note to
Contributors.