Hobby Boss 1/72 MiG-15UTI 'Midget'
| KIT #: | 80262 |
| PRICE: | $7.50 from Roll Models - $10.00 MSRP |
| DECALS: | Two options |
| REVIEWER: | William Alcott |
| NOTES: | Cambodian Markings from Crosswind Hobbies. |
| HISTORY |
With its combination of small size, maneuverability,
speed, and potent armament, the MiG-15 came as a nasty surprise when first
encountered in the skies over
| THE KIT |
Hobby Boss introduced its range of “easy assembly” kits a few years ago. These kits feature simplified parts breakdown through extensive use of multi-part (slide) molds, while still showing good exterior detail. This range of kits concentrates mostly on WWII single engine types, but recently expanded to include the MiG-15 and F-86, each available in two versions.
The MIG-15UTI in particular caught my attention. So far as I am aware, this version was only previously kitted by KP in the early ‘80s, and that kit was typical of the brand – poor fit, minimal cockpit detail, and lots of raised surface details. Eduard have long announced a 1/72 MiG-15 family, but it has been many years in coming.
Say what you will about Hobby Boss, but their easy
assembly kits certainly show truth in advertising – the box top features a
photo of th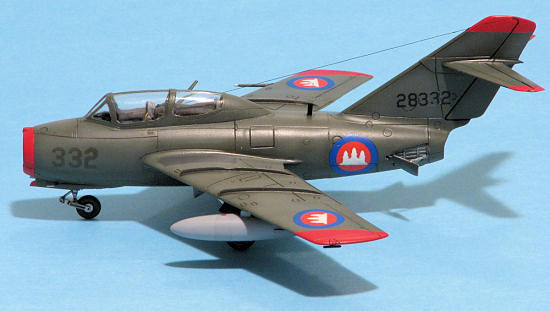 e
completed model, complete with wing root gaps!
Inside, the fuselage halves (top and bottom!),
one-piece wing and some small parts are presented in a vacuformed tray.
Underneath, a second sprue provides most of the
remaining parts.
I was surprised by the number of parts in the kit –
probably nearly as many as a typical Hasegawa single-seater kit.
e
completed model, complete with wing root gaps!
Inside, the fuselage halves (top and bottom!),
one-piece wing and some small parts are presented in a vacuformed tray.
Underneath, a second sprue provides most of the
remaining parts.
I was surprised by the number of parts in the kit –
probably nearly as many as a typical Hasegawa single-seater kit.
The parts count is somewhat inflated by the inclusion of duplicate parts for many of the smaller components – you get 4 each of the radar altimeter aerials, speed brake actuators, and drop tank supports (2 of each required), as well as a spare blade aerial. The only option in the kit is a choice of two styles of drop tanks.
The cockpit is basic – a separate tub, including basic side console details and crude sticks molded-in, two single part seats, which at least look generally like MiG-15 seats, and two featureless instrument panels. Hobby Boss could make a big improvement with the addition of decals for the instrument panels.
The major parts feature somewhat heavy recessed panel detail. The landing gear struts are well molded, and have nice robust attachment points. The main gear doors and wells feature internal details.
Basic decals are provided for camouflaged Soviet and Iraqi UTIs. The decals appear well printed, but I didn’t try them in anger to see how they’d perform.
A single sheet shows the assembly sequence, and
includes a color painting guide showing four views of each scheme, and
listing Mr. Hobby,
To see the sprues layout, please visit this preview.
| CONSTRUCTION |
Construction starts with the cockpit.
I added tape belts to the seats, and scrounged some
instrument panel decals from the spares box.
Before adding the tub to the lower fuselage, don’t
forget to install the two windows in the belly (I was unable to find
 any
reference to these, nor any evidence they don’t belong!)
I also added some lead fishing weights to help keep
the nose down.
I painted the interior parts as well as the wheel
wells in blue grey.
any
reference to these, nor any evidence they don’t belong!)
I also added some lead fishing weights to help keep
the nose down.
I painted the interior parts as well as the wheel
wells in blue grey.
The parts breakdown requires you to trap the cockpit and wing between the fuselage halves. The wing is molded as a single piece with a connecting bridge. If I were to build this kit again, I would suggest cutting this bridge in two, and installing the wings as separate parts after the fuselage is assembled. As it stands, the wing is a poor fit, requiring filling of a sizable gap at the wing roots, the only major fit issue I encountered. The fit of the fuselage halves is helped with a ledge molded along the insides of the parts. There are also pins near the nose, but I removed these as they would be visible through the intake. I realized too late that this would have been a good time to try to clean up the inside fuselage seam, which is visible on the finished model. The external fuselage seam cleans up nicely, though I didn’t attempt to hide the seams inside the speed brake wells.
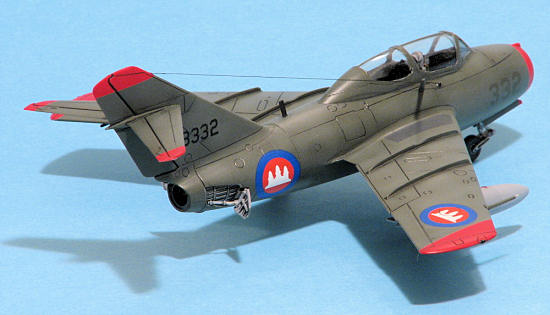
Next I added the intake splitter/nose wheel well. There is a little space inside the splitter for nose weight as well. The intake ring finishes off the fuselage. There are two concerns in this area – I found small gaps around the front of the nosewheel well that allowed daylight through, which I filled with scrap plastic. Also, the nose ring is shared with the MiG-15 kit. As such, it features reinforcements for the two 23 mm and one 37 mm cannon of the single seater. The UTI only had a single 23-mm cannon, so I removed the extra reinforcement. The kit also provides a very shallow exhaust section, which I chose to leave as is.
At this stage, all that remained before painting was to add the tailplanes and canopy. The tailplanes fit well, while I had to fill and sand the canopy seam. Another disappointment in the kit was the lack of any indication of the separate canopy sections on the single piece canopy part. The canopy framing is well defined, but no lines separate the fixed windscreen and centre section from the hinged forward and sliding rear canopy sections. I scribed these in lightly with a toothed number 11 blade.
| COLORS & MARKINGS |
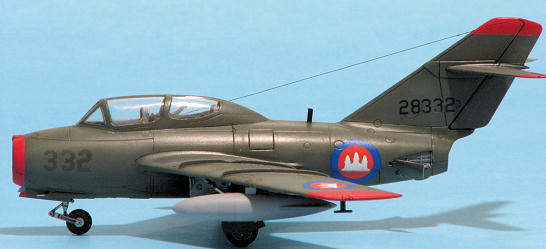
I originally planned to finish the model as a
MiG-15UTI of the VPAF (Vietnamese People’s Air Force), but I didn’t feel
like tacking another natural metal finish, so instead opted for an overall
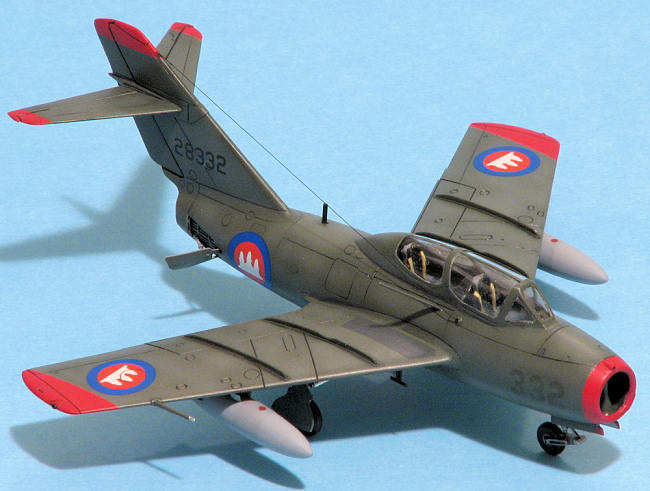
green AVRK (Aviation Royal Khmer /Royal Cambodian Air Force) aircraft.
There is an excellent color photo of this aircraft
in Rene Francillon’s
 I
masked the canopy with Bare Metal Foil, a task made easy by the well defined
framing on the part.
I then primed the model with Testor Model Master
French dark blue-grey enamel, which I was using as my cockpit color.
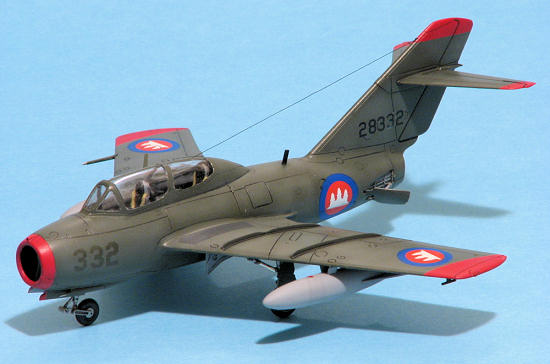
The nose and tips of all flying surfaces were
sprayed white, and then sprayed with insignia red, brightened with a few
drops of yellow.
The red areas were then masked off.
I
masked the canopy with Bare Metal Foil, a task made easy by the well defined
framing on the part.
I then primed the model with Testor Model Master
French dark blue-grey enamel, which I was using as my cockpit color.
The nose and tips of all flying surfaces were
sprayed white, and then sprayed with insignia red, brightened with a few
drops of yellow.
The red areas were then masked off.
For the base color, I chose Model Master RAF dark green. I post shaded the model with a lightened version of the green, mixed with French dark blue grey. I added very dark grey wing-walk areas to add a little interest. These aren’t visible in my reference photo, and may have only been carried on natural metal aircraft. When dry, the model was given a coat of Humbrol gloss clear, and then a water color wash of black mixed with a little brown. In the area of the decals, I sprayed a second coat of gloss clear to seal the wash, and avoid it running when the decals were applied.
The markings for the model came from Crosswind Hobbies of Australia (www.crosswindhobbies.com). Their sheet number 4 includes AVRK roundels, fin flashes as well as specific markings for several aircraft. For the serial number on the tail, I scavenged the digits from several sheets. My reference photo also showed a nose number of 332 apparently painted out in green but still visible. To create this, I found some suitable number decals, and carefully cut the numbers from the backing sheet, leaving the backing sheet intact. I then used the backing sheet to create a stencil, through which I sprayed a mix of the base color and olive drab.
| FINAL CONSTRUCTION |
 I’d
pre-painted the landing gear and doors, and so I added these next.
The landing gear struts feature very sturdy mounting
points, and fit nicely into place.
I’d
pre-painted the landing gear and doors, and so I added these next.
The landing gear struts feature very sturdy mounting
points, and fit nicely into place.
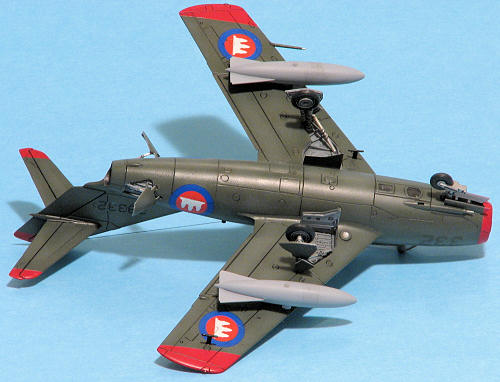
Based on my reference, I used the larger drop tanks. Here I encountered another problem. The kit includes separate parts for the forward V-shaped mounting struts, but these tanks should have a third strut located behind the forward pair. I added this from scrap plastic, though I’m not convinced I got the nose-down angle of the tanks quite right.
I also added a blade aerial on the spine from scrap, and used monofilament to add the HF wire aerial. This should enter the fuselage via the molded ‘nub’ below the canopy on the starboard side. A final modification was to replace the 23-mm cannon barrel, which I had managed to knock off during finishing, with a short length of hypodermic needle.
| CONCLUSIONS |
This was my first attempt as one of the easy assembly kits, and I was pleasantly surprised. The engineering of the kit is excellent, with very good fit aside from the wings. I only wish the kit had included instrument panel decals.
 Looking
at the finished model, I think the stance may be a little off, as the
MiG-15UTI tends to assume a tail-low position on the ground.
Also, the panel lines are probably too heavy, though
on my dark finish this is not too noticeable.
Looking
at the finished model, I think the stance may be a little off, as the
MiG-15UTI tends to assume a tail-low position on the ground.
Also, the panel lines are probably too heavy, though
on my dark finish this is not too noticeable.
If you’re looking for something you can stick together in a few nights and not be ashamed of, these kits may be for you!
William Alcott (e-mail not given by request)
October 2008
| REFERENCES |
If you would like your product reviewed fairly and quickly, please contact me or see other details in the Note to Contributors.