Monogram 1/72 A-1E Skyraider
| KIT #: | PA-146 |
| PRICE: | $ |
| DECALS: | One option |
| REVIEWER: | Nicolai Plesberg |
| NOTES: | 1967 tooling. Added stars and bars from Xtradecal sheet X72-112 |
| HISTORY |
The Douglas AD Skyraider needs no introduction. It was conceived during the closing months of World War 2 as a combined torpedo / dive bomber to replace the Grumman Avenger and Curtiss Helldiver. It was ordered as the XBT2D-1 in July 1944 and suitably enough named Dauntless 2, as a real successor to the old SBD Dauntless of the same company, since the Dauntless’ intended successor, the Helldiver, wasn’t as successful or popular with the crews, as the Navy had hoped for. The XBT2D-1 first flew on 18 March 1945 and in April the Navy began evaluating it at the Naval Air Test Center. Renamed Skyraider in February 1946 the first production variant, the AD-1, began delivery to fleet squadrons in December of the same year.
Its distinctive features were a
rather large fuselage with big, straight wings sticking out with seven hard
points under each wing plus one under the fuselage. This structure gave the
Skyraider excellent low-speed
 manoeuvrability and it could carry between two and
three times its own weight of ordnance, something the newer jets were unable to
do until many years later. A Wright R-3350 18-cylinder two row radial engine of
2700 horse power made all the constructional ends meet into the finest prop
driven attack aircraft flown post war.
manoeuvrability and it could carry between two and
three times its own weight of ordnance, something the newer jets were unable to
do until many years later. A Wright R-3350 18-cylinder two row radial engine of
2700 horse power made all the constructional ends meet into the finest prop
driven attack aircraft flown post war.
The Skyraider appeared in seven main versions plus several minor specialized variants such as target towing, airborne early warning, night attack and electronic countermeasures. After the AD-2 and AD-3 variants had been produced (only minor improvements on these versions) the AD-4 were build in larger quantity. It had strengthened landing gear plus equipment improvements and four 20mm cannons instead of the two the older versions had.
The AD-5 (redesignated A-1E in 1962) introduced the wider fuselage for side-by-side seating of the crewmembers and room for additional crewmembers for some of the roles mentioned earlier. The dive brakes were deleted on this version. The AD-6 (A-1H post 1962) was an improved AD-4 with general structural strengthening and the AD-7 (A-1J post 1962) had increased wing fatigue life and strengthened landing gear as well as minor improvements from the AD-6. Production ended in 1957 when 3180 aircraft had been built.
The first combat use of the Skyraider came during the Korean War, where they performed ground attack missions night and day under all weather conditions. Later in Vietnam Skyraiders performed many missions, at first with the US Navy and the South Vietnamese Air Force and later also the US Air Force recognized the Skyraider as indispensable in some roles, for example Sandy rescue missions of downed air crews. However, the mighty Skyraider was eventually replaced with jets in the late sixties and early seventies but served on with other nations until the early eighties. Several Skyraiders fly to day as warbirds, so it is still possible to watch this magnificent bird in its right element.
| THE KIT |
 This is another of the old
Monogram kits which still look quite good despite its age, but this kit is the
only game in town to 72nd
scale if you want the side by side variant; the single seaters have been made by
several kit manufacturers over the years. You get 31 parts, inclusive the
display stand, molded in a mid grey plastic plus a clear canopy in one piece.
Mine was filled with scratches but more about this later. The decal sheets
(oddly two were in my boxing) looked okay, but time will tell how they would
behave. Also slight yellowing of the carrier film could be detected here.
This is another of the old
Monogram kits which still look quite good despite its age, but this kit is the
only game in town to 72nd
scale if you want the side by side variant; the single seaters have been made by
several kit manufacturers over the years. You get 31 parts, inclusive the
display stand, molded in a mid grey plastic plus a clear canopy in one piece.
Mine was filled with scratches but more about this later. The decal sheets
(oddly two were in my boxing) looked okay, but time will tell how they would
behave. Also slight yellowing of the carrier film could be detected here.
| CONSTRUCTION |
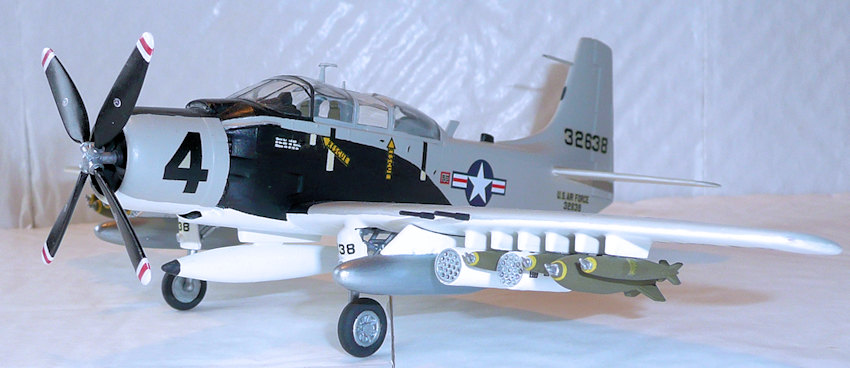
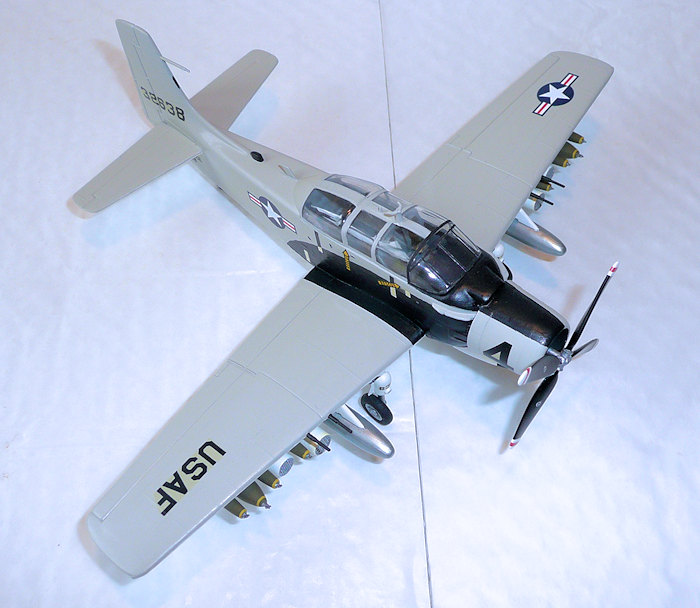
As the kit only offers two napalm canisters for the inner wing stations and a drop tank for the centre station, I raided my Hasegawa and Italeri weapon sets to complement the hard points available; Mk 81s, M117s, LAU-3s and LAU-68s which were glued together. The wings were also glued together at this stage; also the fuselage (with the cockpit floor and tail wheel trapped inside). I reasoned anyway it would be an easy task to paint these items after assembly.
While things were put aside to
dry, I painted the propeller hub plus gear legs Silver (Humbrol 11 acrylic)
while the blades went Black (Humbrol 85 acrylic). After filling / sanding of
joins the wings and tail planes were glued to the fuselage, so I pretty much had
a whole airframe at a very early stage in construction.
 Bombs were painted Olive
Drab (Humbrol 155 acrylic), engine Black (Humbrol 33 acrylic), napalm canisters
and bomb fuses Silver (Humbrol 11 acrylic), prop blade tips and gear bays White
(Humbrol 34 acrylic).
Bombs were painted Olive
Drab (Humbrol 155 acrylic), engine Black (Humbrol 33 acrylic), napalm canisters
and bomb fuses Silver (Humbrol 11 acrylic), prop blade tips and gear bays White
(Humbrol 34 acrylic).
The canopy had some scratches, but some hard rubbing action with toothpaste removed them, just like magic, and afterwards cleaned in soapy water to remove the toothpaste. Then I started detailing the cockpit: rudder pedals, stick, gun sight and I also made a bulkhead at the rear of the interior, so it won’t be possible to look into the emptiness of the rear fuselage. Then the interior plus canopy framing (except the front ones which were painted Black) was painted Dark Gull Grey (FS36231) – Humbrol 140 - twice with drying time in between. The prop blades were glossed in order to add some logos and the red strips on the tips were found in the decal dungeon; I was not going to mask off and paint these!!
The chosen rocket pods together with the drop tank and napalm racks were painted White (Humbrol 22 acrylic) the side consoles, instrument panel shroud and instrument boxes on the bulkhead were painted Black. Seats went olive or khaki green (can’t remember what exactly color I used) and prop blades were given Humbrol Satin Cote to secure the decals. The instrument panel decal was cut out of the sheet, trimmed and glued in place with white glue. The stick was glued in last then the canopy was glued in place with Humbrol Gloss Cote.
 Decals were applied to some of
the ordnance; when dry secured with Humbrol Matt Cote. Prop was put through
engine, then retainer glued in place. I had considered how to avoid attaching
the propeller to the latest possible stage of construction, but I found it was
not possible to leave the retainer out in this case. The cowling and gear were
then glued in place; the cowling needed some sanding/filling to blend in nicely.
When that was accomplished, and after the obligatory cleaning of the airframe
from sanding dust and other dirt, the model went to the paint shop.
Decals were applied to some of
the ordnance; when dry secured with Humbrol Matt Cote. Prop was put through
engine, then retainer glued in place. I had considered how to avoid attaching
the propeller to the latest possible stage of construction, but I found it was
not possible to leave the retainer out in this case. The cowling and gear were
then glued in place; the cowling needed some sanding/filling to blend in nicely.
When that was accomplished, and after the obligatory cleaning of the airframe
from sanding dust and other dirt, the model went to the paint shop.
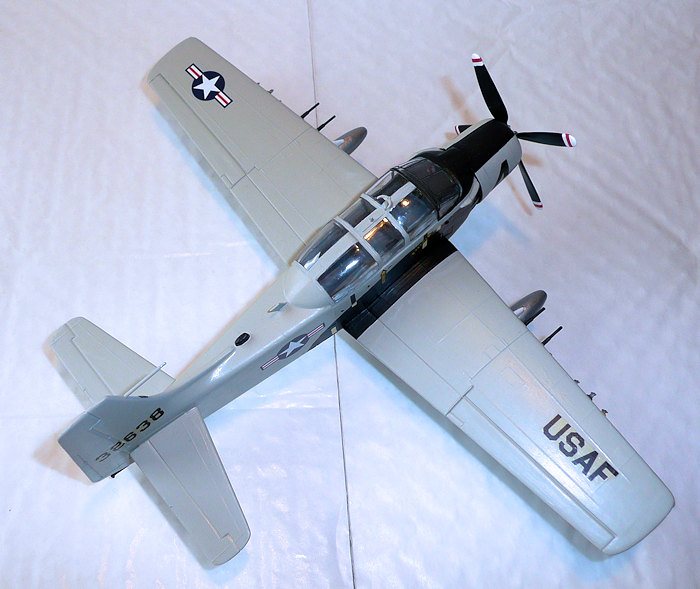
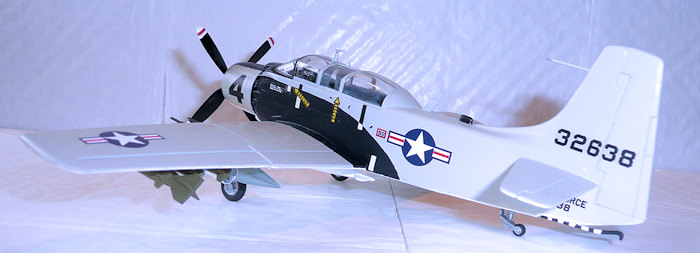
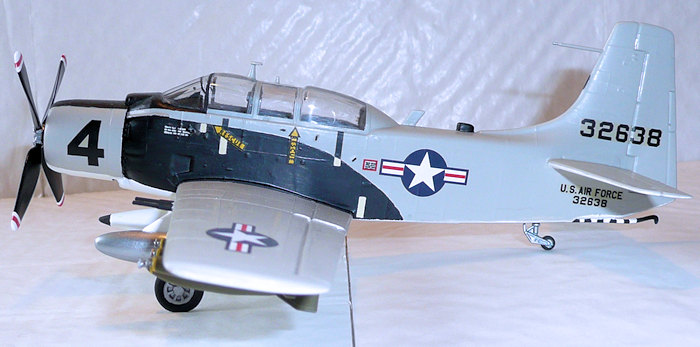
| COLORS & MARKINGS |
Three basic colors were used
for this paintjob: White for the undersides, Light Gull Gray for the sides and
upper surfaces and Black for walk ways, anti glare panel, the front sides from
cowling to under the cockpit
 (stain hiders) plus some other smaller details
specified in the instructions. After the obligatory touch up sessions the model
was Gloss Coted in preparation for the decals.
(stain hiders) plus some other smaller details
specified in the instructions. After the obligatory touch up sessions the model
was Gloss Coted in preparation for the decals.
The decals worked fine, they were just a bit slow to get loose from the base paper, but I guess it’s normal for old kit decals to do so. However, I replaced the stars and bar insignias with ones from an Xtra decal sheet simply because they looked better. After the decals had dried they were gloss coted in order to remove the little silvering that appeared for the kit decals; the Xtradecals didn’t of course, but were given a gloss cote just for good measurement anyway!
After drying time the whole model was given a coat of Humbrol Matt Cote even though a satin one would probably had been more accurate (something that I read), but I stuck with my choice! After a couple of touch up sessions with the Matt Cote (it’s rather difficult to get it all covered because of the sheen of the gloss surface compared with the Matt Cote when it’s newly applied), I marked the position lights with their respective colors and at last glued the ordnance in place and the Skyraider was finished.
| CONCLUSIONS |
Hey, what can I say else than this is a fine kit which, despite its age, can be turned into a good looking model if you take your time and don’t get upset about the lack of super details that modern kits has to offer. It’s possible there are aftermarket goodies for this kit (though I’m not aware exactly what exists), but why don’t use it as a “relaxing” build in between those super-detail-and-almost-impossible-to-finish projects we all tend to start but (almost) never get finished because it all gets AMS?! Recommended to modelers of all skills and ages.
| REFERENCES |
Profile Publications no 60: The Douglas Skyraider © Harry Gann 1965
American Warplanes, by Bill Gunston 1986 Salamander books Ltd. ISBN 0-517-61351-4
Vietnam: The war in the air, by René J. Francillon 1987 Arch Cape Press ISBN 0-517-62976-3
14 June 2016
Copyright ModelingMadness.com
If you would like your product reviewed fairly and fairly quickly, please contact the editor or see other details in the Note to Contributors.