Hasegawa 1/72 SP-2H Neptune
| KIT #: | JS-082 |
| PRICE: | $6.50 (in 1972) |
| DECALS: | Two Options |
| REVIEWER: | Bob Leonard |
| NOTES: | Caracal 72055 decals |
| HISTORY |
 The Lockheed Neptune
was the only US aircraft designed from the start for the land based
antisubmarine patrol role. It’s predecessors, the PV-1 Ventura and PV-2
Harpoon, had their origins in Lockheed airliners, while it’s successors, the
P-3 Orion, was an adaptation of the L-188 Electra airliner and the P-8 is a
revision of the Boeing 737-800. The Neptune was highly successful with 1,177
built and adaptable to many roles, it was used by the US Navy, US Air Force
and the US Army. Likewise, dozens for foreign allies flew the Neptune and it
is still a popular wildfire tanker. Later versions of the Neptune were one
of the few aircraft that had both propeller and jet engines.
The Lockheed Neptune
was the only US aircraft designed from the start for the land based
antisubmarine patrol role. It’s predecessors, the PV-1 Ventura and PV-2
Harpoon, had their origins in Lockheed airliners, while it’s successors, the
P-3 Orion, was an adaptation of the L-188 Electra airliner and the P-8 is a
revision of the Boeing 737-800. The Neptune was highly successful with 1,177
built and adaptable to many roles, it was used by the US Navy, US Air Force
and the US Army. Likewise, dozens for foreign allies flew the Neptune and it
is still a popular wildfire tanker. Later versions of the Neptune were one
of the few aircraft that had both propeller and jet engines.
In 1946, the third production P2V-1 was chosen for a record-setting mission to test crew endurance, long-range navigation and to display the capabilities of the US Navy's latest patrol bomber. Nicknamed "The Truculent Turtle," it was loaded with fuel in extra tanks fitted in practically every spare space in the aircraft. It set out from Perth, Australia to the United States with a crew of four (and a nine-month-old gray kangaroo, a gift from Australia for the National Zoo in Washington, D.C.) The Neptune flew on 9 September, with rocket-assisted takeoff and 55h, 18m later, "The Turtle" touched down in Columbus, Ohio after 11,236.6 mi (18,083.6 km) in the air. It was the longest un-refueled flight yet. This would stand as the absolute unrefueled distance record until 1962 when it was beaten by a USAF B-52, and remain as a piston-engined record until 1986 when the Rutan Voyager circumnavigated the globe. "The Turtle" is preserved at the National Museum of Naval Aviation at NAS Pensacola.
| THE KIT |
 Revell issued the first injection molded
Neptune in the ever popular 1/104 scale. They later issued the kit with skis for
use on snow. Aeroclub produced a short run 1/144 injected kit the late 1980s and
early 1990s. Both P2V-5 and P2V-7 kits were available, but I never got ahold of
one. The kits had decals, vacuform clear pieces and white metal parts. The
Neptune is the size of a B-17 bomber, so I always thought 1/144 is a good size
for a Neptune kit. Hasegawa issued the only 1/72 Neptune in 1972, a logical
selection since the P2V was used for the Japanese Maritime Self Defense Force.
It was later re-boxed by Frog, Minicraft and Revell.
Revell issued the first injection molded
Neptune in the ever popular 1/104 scale. They later issued the kit with skis for
use on snow. Aeroclub produced a short run 1/144 injected kit the late 1980s and
early 1990s. Both P2V-5 and P2V-7 kits were available, but I never got ahold of
one. The kits had decals, vacuform clear pieces and white metal parts. The
Neptune is the size of a B-17 bomber, so I always thought 1/144 is a good size
for a Neptune kit. Hasegawa issued the only 1/72 Neptune in 1972, a logical
selection since the P2V was used for the Japanese Maritime Self Defense Force.
It was later re-boxed by Frog, Minicraft and Revell.
| CONSTRUCTION |
 For 50+ year old kit, the engineering is superb. The
way the wings and horizonal stabilizers fit the fuselage would shame some 2025
kits. If you are contemplating modeling the P2V, the TailHook Topics website by
Tommy H. Thompson is an essential resource. The landing gear bays are devoid of
detail, so I resorted to plastic strip, rod a .3mm wire. In particular, the main
landing gear bays are simplistic representations and somewhat fanciful. I looked
at many P2V walkarounds to depict a more realistic landing gear bay. Even then,
I did not change the main landing gear struts themselves, as it was just more
work than I wanted to do. The real P2V has a nose up attitude when on the
ground, so I added about 4mm of plastic rod to the front landing gear strut and
also added a landing light. I bought the Eduard flightdeck photo-etched set, but
frankly I would not do it again. So little of the flightdeck is visible, the set
was not that useful. I also detailed the searchlight on the starboard wing tank
with a plastic disc painted chrome and a clear plastic rod for the light. The
nose cone for the observer is not very clear, but I polished it the best I
could. On the ailerons and rudder, there are sink marks that took about an hour
to fill, sand and polish. With propeller aircraft, I often like to make the
props spin, so I used telescoping tubes to enable that feature. A light breeze
is all that is needed to simulate a spinning prop. I also used aluminum tubing
to replace the exhausts
For 50+ year old kit, the engineering is superb. The
way the wings and horizonal stabilizers fit the fuselage would shame some 2025
kits. If you are contemplating modeling the P2V, the TailHook Topics website by
Tommy H. Thompson is an essential resource. The landing gear bays are devoid of
detail, so I resorted to plastic strip, rod a .3mm wire. In particular, the main
landing gear bays are simplistic representations and somewhat fanciful. I looked
at many P2V walkarounds to depict a more realistic landing gear bay. Even then,
I did not change the main landing gear struts themselves, as it was just more
work than I wanted to do. The real P2V has a nose up attitude when on the
ground, so I added about 4mm of plastic rod to the front landing gear strut and
also added a landing light. I bought the Eduard flightdeck photo-etched set, but
frankly I would not do it again. So little of the flightdeck is visible, the set
was not that useful. I also detailed the searchlight on the starboard wing tank
with a plastic disc painted chrome and a clear plastic rod for the light. The
nose cone for the observer is not very clear, but I polished it the best I
could. On the ailerons and rudder, there are sink marks that took about an hour
to fill, sand and polish. With propeller aircraft, I often like to make the
props spin, so I used telescoping tubes to enable that feature. A light breeze
is all that is needed to simulate a spinning prop. I also used aluminum tubing
to replace the exhausts
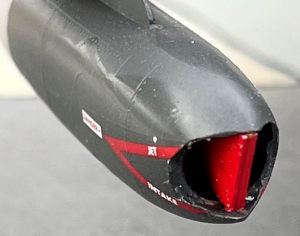 on the radial and jet engines. The jet engines had doors
on the front that would fold inward when the jet was fired up. Hasegawa molded
the jet engines with the doors in the closed position, so I modified the doors
on one engine to depict that engine operating. The part of the construction I
dreaded was the flightdeck canopy. It is a two part affair, much like the
Hasegawa 1/72 and Kinetic 1/48 S-2 Tracker. Truthfully, with a bubble shaped
canopy, I do not see how model companies could tool it in one piece. I glued the
two canopies together with Tamiya Extra Thin, let it set up overnight, and then
the next day added it to the fuselage very slowly, adding Tamiya Extra Thin very
sparingly one section at a time. After drying, I used Tamiya White putty and Mr.
Surfacer 500. It took about four sessions of careful sanding and priming to get
the canopy faired in with the fuselage. As I removed the masking, I was very
pleased to see no debris inside the canopy. Overall, I have worked considerably
harder constructing much newer kits, so I was happy how well the Hasegawa kit
went together.
on the radial and jet engines. The jet engines had doors
on the front that would fold inward when the jet was fired up. Hasegawa molded
the jet engines with the doors in the closed position, so I modified the doors
on one engine to depict that engine operating. The part of the construction I
dreaded was the flightdeck canopy. It is a two part affair, much like the
Hasegawa 1/72 and Kinetic 1/48 S-2 Tracker. Truthfully, with a bubble shaped
canopy, I do not see how model companies could tool it in one piece. I glued the
two canopies together with Tamiya Extra Thin, let it set up overnight, and then
the next day added it to the fuselage very slowly, adding Tamiya Extra Thin very
sparingly one section at a time. After drying, I used Tamiya White putty and Mr.
Surfacer 500. It took about four sessions of careful sanding and priming to get
the canopy faired in with the fuselage. As I removed the masking, I was very
pleased to see no debris inside the canopy. Overall, I have worked considerably
harder constructing much newer kits, so I was happy how well the Hasegawa kit
went together.
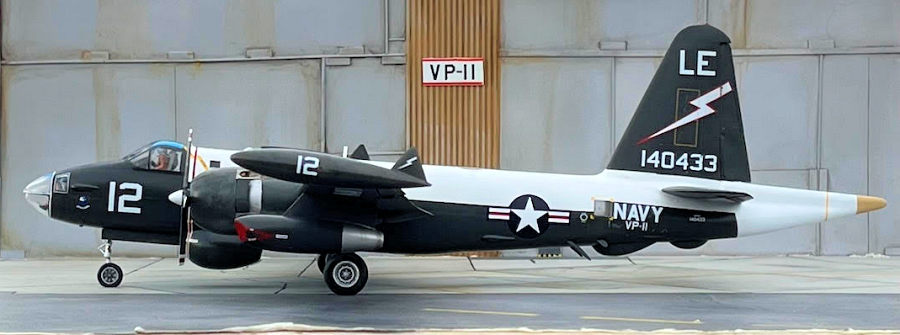
| COLORS & MARKINGS |
The white is Tamiya Liquid Surfacer White (my favorite). The gloss Engine Gray is Mr. Color C339. The wing walkway is Testors Dark Gull Gray FS36231. Caracal 72055 P2V Neptune decals performed flawlessly.
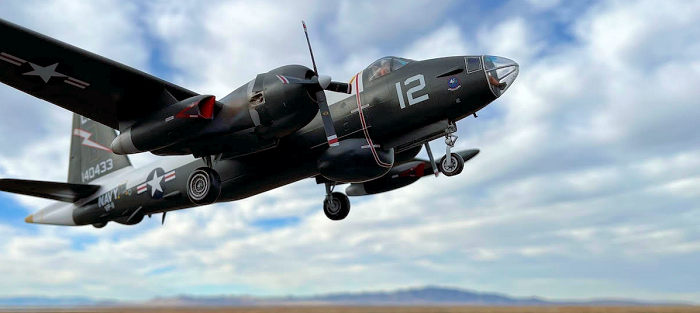
| CONCLUSIONS |
If you want an injection molded 1/72 P2V, this is it. It goes together very well in my experience and the two available Caracal decals feature a number of colorful machines.
| REFERENCES |
Squadron/Signal P2V in Action No. 1068.
Bob Leonard
2 February 2026
Copyright ModelingMadness.com. All rights reserved. No
reproduction in part or in whole without express permission from the editor.
If you would like your product reviewed fairly and fairly quickly, please
contact the editor or see other details in the
Note to
Contributors.