Rareplanes 1/72 FJ-4B Fury
| KIT #: | ? |
| PRICE: |
£5 |
| DECALS: | None |
| REVIEWER: | Carmel J.Attard |
| NOTES: |
Vacform type of kit,
lots of surface detail, contains no decals or metal parts. |
| HISTORY |
Perhaps the most graceful
of all shipboard fighter aircraft design produced by the North American Company
evolving from the F-86 Sabre, the FJ-4 Fury was the last of the very successful
Fury line. It started with the straight wing version FJ-1. Then developed into
FJ-2 and FJ-3 and finished with the FJ-4, which had vastly improved performance
over its predecessors. It was
 designed
specifically as a fighter-bomber incorporating the stiffened wings of the F-86H
that went in service with the USAF. The FJ-4B had six wing pylons and was
equipped with
designed
specifically as a fighter-bomber incorporating the stiffened wings of the F-86H
that went in service with the USAF. The FJ-4B had six wing pylons and was
equipped with
The FJ-4B was one of the
earliest to carry effective air to ground missile system and was capable of
carrying five ASM-N-7 bullpup ground attack missile with the guidance
transmitter on the sixth under wing station. It was also suitable for use as an
in-flight refuelling tanker, which carried large underwing, tanks that contained
fuel, hose reel, and drogue-stabilised refuelling receptacles. The type was
easily distinguished as it carried a generator run by a small propeller in the
nose of the fuel tank that provided power to operate.
Between December
1956 to May 1958 the North American’s
| THE KIT |
 This is
one of Rareplanes best vacform kits and is suitable for those new to the method
of building vacform types as well as those who have experience. Even when
compared with later release in injection type form by Emhar the Rareplanes in my
opinion remains the more accurate type at the nose contour and shape of the
canopy. The Rareplanes model comes in two thick sheets of white styrene
containing all the parts including five accurate Bullpup missiles and a guidance
transmitter pod. There are also two massive in flight refuelling pods for the
tanker version. Panel line detail is of top quality as generally found in all
Rareplane kits. There are sufficient parts to make a well-detailed cockpit
interior without adding extra scratch built parts. No decals come with the kit
and on the negative side are the wheel legs that I preferred to build from
scratch using stretch sprue parts as the kit ones were difficult to cut. The kit
was produced long before Rareplanes started to incorporate metal parts for
these.
This is
one of Rareplanes best vacform kits and is suitable for those new to the method
of building vacform types as well as those who have experience. Even when
compared with later release in injection type form by Emhar the Rareplanes in my
opinion remains the more accurate type at the nose contour and shape of the
canopy. The Rareplanes model comes in two thick sheets of white styrene
containing all the parts including five accurate Bullpup missiles and a guidance
transmitter pod. There are also two massive in flight refuelling pods for the
tanker version. Panel line detail is of top quality as generally found in all
Rareplane kits. There are sufficient parts to make a well-detailed cockpit
interior without adding extra scratch built parts. No decals come with the kit
and on the negative side are the wheel legs that I preferred to build from
scratch using stretch sprue parts as the kit ones were difficult to cut. The kit
was produced long before Rareplanes started to incorporate metal parts for
these.
| CONSTRUCTION |
 are left
in the moulding process are removed with the tip of a knife blade. Wing parts,
fuel tanks, and missile parts are all cut and items joined together. A
refuelling probe is made from stretch sprue; the shape and size are obtained
with reference to the excellent five-view drawing that comes with the kit. I did
not use the Bullpup
missiles as I decided to make both kits as refuelling tankers. (At the time
Tankers were lacking in my collection of combat types) and the Bullpups were
left to fit in a future FJ-4 I might build.
are left
in the moulding process are removed with the tip of a knife blade. Wing parts,
fuel tanks, and missile parts are all cut and items joined together. A
refuelling probe is made from stretch sprue; the shape and size are obtained
with reference to the excellent five-view drawing that comes with the kit. I did
not use the Bullpup
missiles as I decided to make both kits as refuelling tankers. (At the time
Tankers were lacking in my collection of combat types) and the Bullpups were
left to fit in a future FJ-4 I might build.
Having cut the parts from the backing sheet and assembled the small items, the
next step was to bring the fuselage, wings and tail unit together. Weight was
needed on the nose of the model and a nose wheel well box was also constructed
from backing acetate. The cockpit interior was well represented in the kit. This
was cut and shaped to fit and join up with the top of fuselage where it
contained the upper part of the ejection seat. The lower part of the seat was
made from plastic pieces cut to required shape. The nose air intake is made
separately from three plastic pieces consisting of two cylindrical halves and an
air intake lip. When put together in one piece they fitted snugly in the
fuselage front space. A jet pipe was made from a used ball pen that had the
correct diameter to fit inside the fuselage. A length was cut and was blanked at
the inside end. The open end mated with the engine outlet orifice eliminating
see-through when viewed from the rear. Liquid polystyrene cement of Humbrol
brand was used throughout the building process.
The cockpit office
consisted of instrument panel, cockpit interior, control column, rudder pedals
were added and the whole area painted dark grey with black touch es
and white dots for instruments. Gun ports were also opened on each side of the
nose. Reference to the Squadron Signals publication FJ Fury In Action series No
103 proved to be a good source throughout the kit build. The two fuselage halves
were then joined together, applying liquid cement at the mating seams. The main
wing was then assembled and any gaps that showed up were treated with Revell
Plasto filler. Tail planes were put in place and careful checks ensured exact
position and alignment right in their place. Sanding down the filler was a
little time consuming and in the end a small piece of wet and dry paper was used
to smoothen up the area.
es
and white dots for instruments. Gun ports were also opened on each side of the
nose. Reference to the Squadron Signals publication FJ Fury In Action series No
103 proved to be a good source throughout the kit build. The two fuselage halves
were then joined together, applying liquid cement at the mating seams. The main
wing was then assembled and any gaps that showed up were treated with Revell
Plasto filler. Tail planes were put in place and careful checks ensured exact
position and alignment right in their place. Sanding down the filler was a
little time consuming and in the end a small piece of wet and dry paper was used
to smoothen up the area.
The undercarriage legs described earlier were fitted in small holes drilled in the wheel wells. I used the vacuform wheels provided which fitted perfectly to the legs using a tiny amount of super glue for quick drying. I needed checking to get the correct attitude ‘sit’ of the fuselage that is evidently a characteristic of the Fury when it is on the ground. Smaller detail like wing fences, refuelling probe, pylons, and arrestor hook were all added at this stage. The cockpit was also cut with a trimming knife and fitted in place using white glue.
| COLORS & MARKINGS |
Cockpit, which was now
firm in place, was masked. I applied an undercoat of matt white overall to the
model and any blemishes were attended to. A final coat of semi gloss white Model
Master 1596E was applied. Elevator, tail plane areas, rudder and lower
 surfaces
were masked with Tamiya tape and the kit airbrushed in Gull Grey Humbrol USN5 FS
36440.
Finally there was some touching up done when all masking was removed. My
first FJ-4B was completed as a Marines Fury belonging to VMF-354. The red bands
across the fuselage and tail fin and rudder were airbrushed and the speed bird
motif was drawn on a black decal, cut with a sharp knife to appear superimposed
across the fuselage band.
surfaces
were masked with Tamiya tape and the kit airbrushed in Gull Grey Humbrol USN5 FS
36440.
Finally there was some touching up done when all masking was removed. My
first FJ-4B was completed as a Marines Fury belonging to VMF-354. The red bands
across the fuselage and tail fin and rudder were airbrushed and the speed bird
motif was drawn on a black decal, cut with a sharp knife to appear superimposed
across the fuselage band.
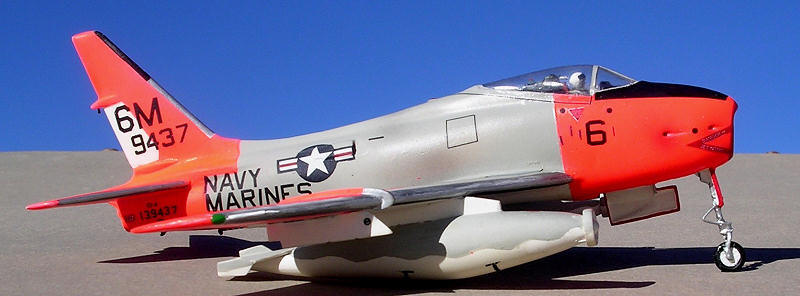
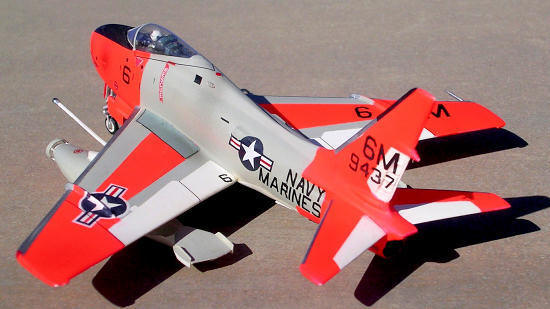
My second FJ-4 represent the type
circa 1962 during a time when it was phased out of front line use and were
operated mainly by reserve squadrons. Unlike the FJ4B, the FJ-4 carried no
additional lower fuselage speed brake and hence was removed from the kit. The
Fury is shown in markings when it was assigned to the Navy Reserve Air Unit
(NRAU) at NAS Memphis during summer of 1962.
Model
Master Day-Glo orange/red was used at different areas shown. Wi ng
leading edges were painted silver.
As for decals all lettering came from Super scale sheet
letters and numbers. Other standard markings came from spares decal box.
ng
leading edges were painted silver.
As for decals all lettering came from Super scale sheet
letters and numbers. Other standard markings came from spares decal box.
My third FJ4 was an updated kit from the Emhar injection moulded Fury belonging to Marine Fighter Squadron VMF-323 during spring of 1958. Markings came from Xtradecal sheet XO-37-72. The kit was converted to FJ-4 by removing under fuselage speed brake, carried only 4 under wing pylons, and used a spare Rareplanes canopy, detailed cockpit and slightly modified nose shape and nose wheel door.
| CONCLUSIONS |
I always seem to get a feeling of satisfaction when completing a vacform type of kit and making two of the type gave all the more. It is becoming difficult to get a model of the Rareplanes FJ4 these days and it is still possible to find one from e-bay but for a price that goes beyond the value when the kit was first released.
| REFERENCES |
Squadron /Signals publication FJ Fury in action No 103
December 2010
If you would like your product reviewed fairly and quickly, please contact me or see other details in the Note to Contributors.