Tamiya 1/48 A-1H Skyraider
| KIT #: | 61058 |
| PRICE: | $25.00 when new |
| DECALS: | Three options |
| REVIEWER: | Spiros Pendedekas |
| NOTES: | 1996 release |
| HISTORY |
The Skyraider was a late WWII Douglas design to fulfill the United States Navy requirements for a carrier-based, single-seat, long-range, high performance dive/torpedo bomber that would be a follow-on to the Dauntlesses, Helldivers and Avengers. While the prototype’s first flight took place on 18 March 1945 and the evaluation started immediately afterwards, it was not before the end of 1946 that delivery of the first examples commenced, which were by then designated AD-1.
 A
straightforward design, the big bird featured large straight wings with no less
than seven hardpoints apiece. Powered by the big R-3350 Duplex-Cyclone radial
engine and having prioritized weight reduction from early design, it exhibited
excellent maneuverability at low speeds, could carry a large amount of ordnance
over a considerable combat radius and had a long loiter time for its size.
A
straightforward design, the big bird featured large straight wings with no less
than seven hardpoints apiece. Powered by the big R-3350 Duplex-Cyclone radial
engine and having prioritized weight reduction from early design, it exhibited
excellent maneuverability at low speeds, could carry a large amount of ordnance
over a considerable combat radius and had a long loiter time for its size.
The type was used by the
USN over Korea and Vietnam and by the USAF and the RVNAF during the Vietnam War,
where it became famous for being able to take a good amount of hits and keep
flying. USAF Skyraiders featured the Stanley Yankee extraction system,
extracting the pilot from the cockpit via twin rockets.
Apart from attack, the plane was modified to serve as a carrier-based airborne
early warning aircraft, replacing the Grumman TBM-3W Avenger. It fulfilled this
function in the USN and Royal Navy, being replaced by the Grumman E-1 Tracer and
Fairey Gannet respectively in those services. In the attack role, the plane was
systematically replaced by the A-6 Intruder.
The Skyraider was rugged with good survivability over low level combat environments, could carry a respectable load in both quantity and variety, had long loiter time and was relatively easy to keep airworthy. so, it was no surprise that this “anachronism” stayed operational for such a long time, finding its niche in the Vietnam War, where its qualities fit like a glove there. A total of 3,180 were built.
| THE KIT |
 Tamiya came
in 1998 with their new tool naval Skyraider, followed by a sort of “limited
edition” soon after that included French markings, then, in 2000, came the USAF
version and, finally, a motorized USN one in 2001. To my understanding, the
basic USN and USAF versions are sort of regularly reissued, totally unchanged.
Tamiya came
in 1998 with their new tool naval Skyraider, followed by a sort of “limited
edition” soon after that included French markings, then, in 2000, came the USAF
version and, finally, a motorized USN one in 2001. To my understanding, the
basic USN and USAF versions are sort of regularly reissued, totally unchanged.
These are really fine kits, considered by many to be the best 1/48 Skyraiders to this date (2024). They are ‘modern” with excellent molding, fine engraved panel lines and feature a good level of detail. The specific kit was the original USN version, bought in 2004 from my then usual/now sadly closed toy/hobby shop in my hometown and for a deep look at its contents you may look no further than our Editor’s thorough review of the almost identical motorized version.
| CONSTRUCTION |
I started by putting together the very nicely engineered 4-piece cockpit, then trapping it, together with the tail wheel well, between the fuselage halves. Cockpit floor, sidewalls and rear view area were painted Hu140 Gull Gray, whereas everything else, including the seat, were painted black. The instrument panel received the nice instrument decal provided, while the side consoles were dry brushed with silver and various “knobs” were done by “pinning” red, yellow and white paint with a toothpick. Whilst, apart from seat belts, the cockpit is quite comprehensive, I decided to add the very nice pilot, painted per the instructions, to busy-up the area.
Moving to the engine, I decided to go for open front inlet baffles and raised cowling flaps. The complete engine with the cowling was an 8-piece affair which went together nicely, with the very handy poly-cap trapped in, to receive the prop axle. The engine cylinders were painted black, then heavily dry brushed with silver, the gearbox was painted dull aluminum, the rear firewall was painted black, while the inlet baffles and all cowling innards were painted white, which was more or less what the instructions stated and in accordance with the Navy practices by then. The exhausts were left off, to be attached at end stages.
 The main wing
was next assembled by attaching the top wing halves to the lower one-piece half.
In order to give a chance to withstand my less than delicate handling, I did not
trap the main doors (which were molded together with their corresponding side
well walls) between the wing halves, hoping to be able to slip them in just
before painting.
The main wing
was next assembled by attaching the top wing halves to the lower one-piece half.
In order to give a chance to withstand my less than delicate handling, I did not
trap the main doors (which were molded together with their corresponding side
well walls) between the wing halves, hoping to be able to slip them in just
before painting.
The main wing was next attached to the fuselage, followed by the 2-piece tail
planes, the 2-piece flaps with their actuators and finally, the ventral and side
dive brakes, all attached in “retracted” position. The carburetor and oil cooler
inlets were attached on top and bottom fuselage front area respectively at this
time, as well, with their meshed areas painted black and dry brushed with
silver.
This concluded basic model assembly. I used a slight amount of filler on some joints, mainly due to my questionable attitude on adding filler almost everywhere even if not necessary. In fact, I believe most modelers will hardly use any putty, as fit was truly excellent.
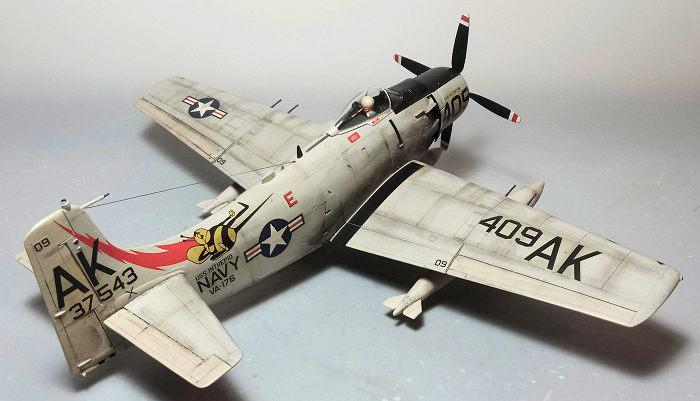
I went on assembling the three wing tanks and the inner wing pylons, all 2-piece affairs, then attached all pylons (a good 15 of them!) on the main wing, followed by the four exhaust shields aft of the exhaust areas. Since all landing gear parts, wells and door innards were white, I decided to attach everything, sans the main wheels, prior to painting. To my satisfaction I was able to slide-in the aforementioned main doors/well walls in the wings uneventfully. It was only then that I temporarily affixed the engine in place and took the bird to the paint shop!
| COLORS & MARKINGS |
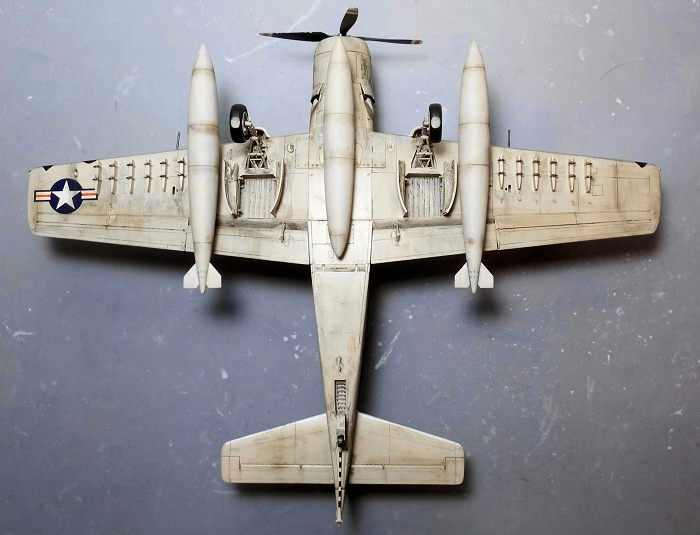
 I first gave
all undersides, including all landing gear parts, a coat of Hu130 white. The
flaps and elevators topsides, the rudder and all three wing tanks were painted
the same white too. After masking the white, I gave the remaining a coat of
Hu129 US Gull Gray. The front anti-glare area, as well as the three leading edge
fitted RWR antennas were painted black, while the wings’, tail planes’ and inner
pylons’ leading edges were carefully masked and painted Tamiya XF-11 Chrome
Silver. After removing the masking, a coat of Future prepared the bird for
decaling.
I first gave
all undersides, including all landing gear parts, a coat of Hu130 white. The
flaps and elevators topsides, the rudder and all three wing tanks were painted
the same white too. After masking the white, I gave the remaining a coat of
Hu129 US Gull Gray. The front anti-glare area, as well as the three leading edge
fitted RWR antennas were painted black, while the wings’, tail planes’ and inner
pylons’ leading edges were carefully masked and painted Tamiya XF-11 Chrome
Silver. After removing the masking, a coat of Future prepared the bird for
decaling.
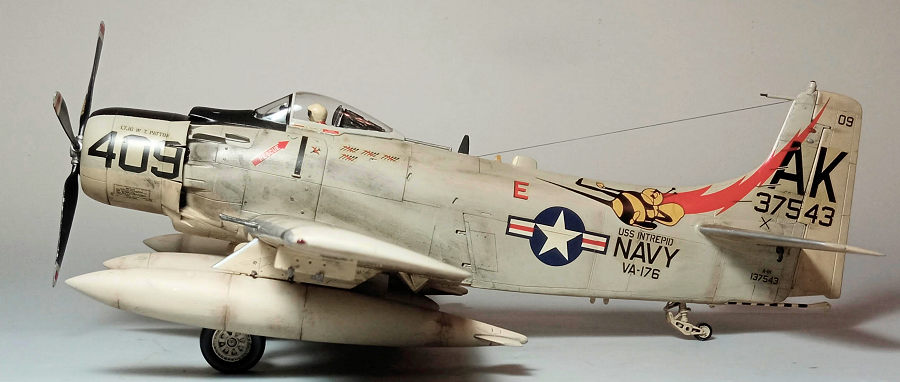
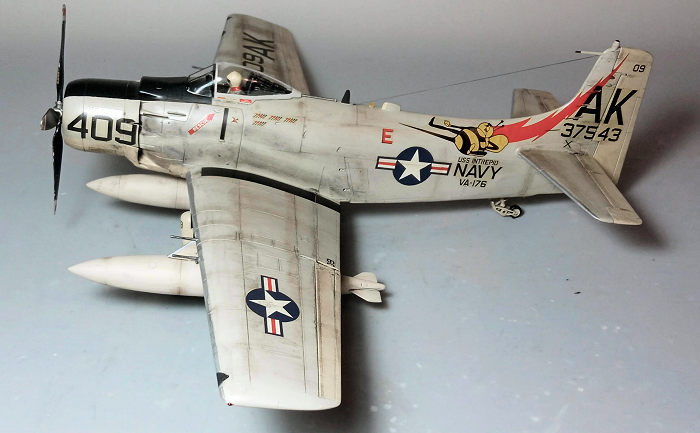
I used the kit decals,
in order to represent VA-176 “Thunderbolts” #35743/AK409 machine, as it stood
aboard USS Intrepid in October 1966. The decals were in excellent condition and,
while tad on the thick side, they behaved very well, giving me no issues at all
and succumbing nicely everywhere with the help of decal softening solution. A
coat of Future sealed the decals.
The landing gear oleos were carefully painted silver with a fine tip silver pen.
The main wheels were then attached in position, with the bird nicely standing on
her feet. All wheels had white rims and black tires. I merely filed the main
wheels to look weighted, since, to my understanding, those tires were inflated
to high pressures for carrier operations.
I decided to fit all three wing tanks but no other underwing ordnance. To add
some flavor, I painted the numerous sway braces of the wing pylons gunmetal. The
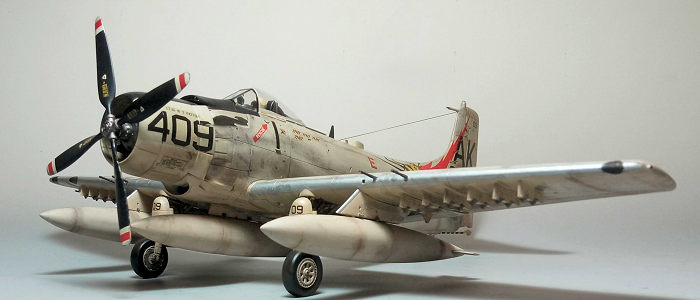
arresting hook was painted with white and black stripes and also attached.
The exhausts were
painted Testors Burned Metal and attached, followed by permanent gluing of the
engine in position. The very nice one-piece prop was also attached, It had steel
hub and black blades, with the white/red tips represented by decals. By studying
net pics, no serious signs of wear were evident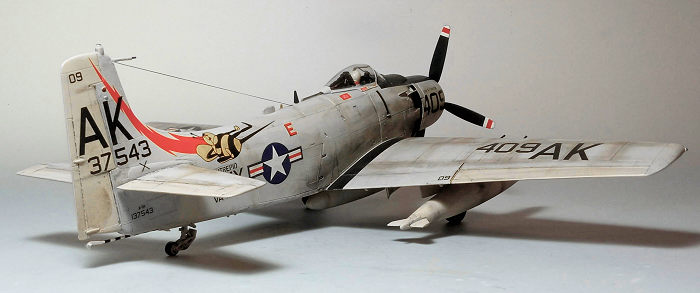 on the blade leading edges and tips of the Navy Skyraiders (meaning the ground
personnel would meticulously retouch any signs), so I resisted the temptation to
chip the tips too much.
on the blade leading edges and tips of the Navy Skyraiders (meaning the ground
personnel would meticulously retouch any signs), so I resisted the temptation to
chip the tips too much.
Time for some weathering, which consisted of a black wash to accentuate all recessed panel lines but also to give the landing gear area a used, oily look. Then, dark brown and dark dry pastels were applied to all places where dirt and grime would reside. The distinctive exhaust stains were replicated with like-colored dry pastels, as well, with an almost matt coat giving the bird its final hue.
The transparencies had their well defined frames hand painted and attached in position, with fit being very good. The port underwing pitot, the fin-located static head and the four wing guns were accordingly painted and attached in place. Stretched sprue was run from the fin to a hole drilled in front of the small IFF antenna, to represent the aerial wire. The bigger VHF antenna was painted black. Blobs of red, green and orange clear paint were used to represent the various lights (wingtip, anti-collision and tail navigation), before calling the Skyraider done!
| CONCLUSIONS |
While more than 25 years old (as of 2024), this is still a great kit of the iconic Skyraider: general shape looks correct, molding is superb, panel lines are finely recessed and fit is excellent. Cockpit, though not exhaustively detailed, will satisfy the majority of us and the same can be said for the other key areas of engine and landing gear. Transparencies are nice and clear, instructions are close to perfection on par with the usual Tamiya engineering which made building the kit a most pleasant experience. Finally, decals, though tad on the thick side, worked very well.
The kit seems to be periodically re-released with fresh decals and, to the credit of Tamiya, at very sensible (towards cheap) prices. Suitable even for a beginner, with a fine result guaranteed, if you want to build a 1/48 Skyraider, the Tamiya kit is definitely worth tackling.
Happy Modeling!
4 June 2024 Copyright ModelingMadness.com. All rights reserved. No
reproduction in part or in whole without express permission from the editor. If you would like your product reviewed fairly and
fairly quickly, please
contact
the editor
or see other details in the
Note to
Contributors.