Tamiya 1/48 AD-4B Skyraider
| KIT #: | 61058 |
| PRICE: | $45.00 |
| DECALS: | Three options |
| REVIEWER: | David Jones |
| NOTES: |
Mild conversion. ESCI decals |
| HISTORY |
 The
Douglas AD Skyraider was an attack aircraft designed for the U.S. Navy in 1945
and flew all the way through Korea and into the Vietnam War. It was used by the
U.S. Navy, U.S. Marines and U.S. Air Force. Among foreign users were the British
Royal Navy, the French Air Force, and Vietnam Air Force.
The
Douglas AD Skyraider was an attack aircraft designed for the U.S. Navy in 1945
and flew all the way through Korea and into the Vietnam War. It was used by the
U.S. Navy, U.S. Marines and U.S. Air Force. Among foreign users were the British
Royal Navy, the French Air Force, and Vietnam Air Force.
The original designation AD (Attack Douglas) was changed in 1962 to A-1 which is what most people know the type as. The plane in this article is the AD-4B which was the direct precursor to the AD-6 or as it was later known, the A-1H.
The Tamiya Douglas A-1H U.S. Navy kit came out in 1998 and was followed by their Douglas A-1J U.S. Air Force boxing shortly thereafter. Aside from the decals, the only differences were the seats, and an additional sprue of ordnance included with the Air Force version. As I chose to do a U.S. Navy Aircraft in 1959, I needed the early seat.
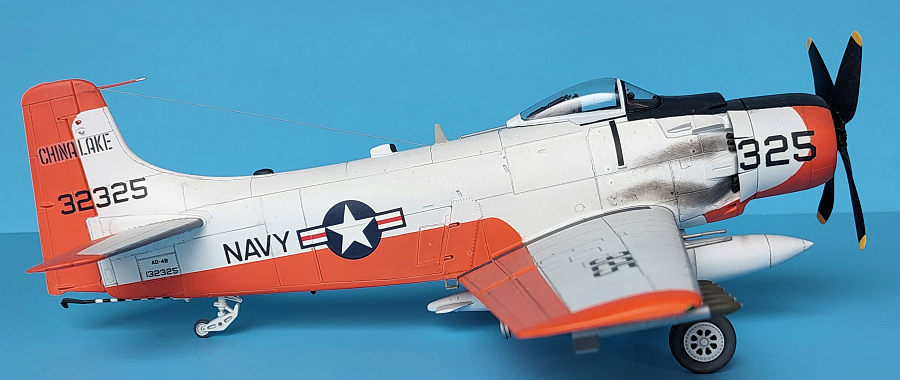
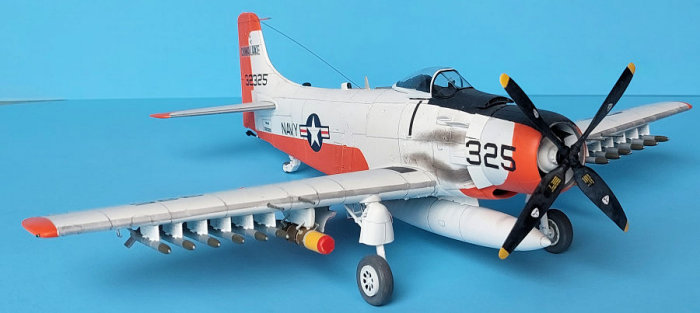
The reason I chose to do this particular aircraft is twofold. My Father worked on AD Skyraiders in Training Squadron VT-30 in the early 1960’s in similar colorful markings, and I wanted something “different” from my other Skyraiders. I settled on aircraft Bureau Number 132325 that was used at the Naval Ordnance Test Station, Naval Air Station China Lake in March of 1959.
Unusually enough, the photos show the aircraft carrying Mk.44 torpedoes so that added interest as well.
| THE KIT |
Tamiya’s Skyraider is made up of five light gray colored sprues that are very crisp with engraved panel lines. There is also a clear sprue with the canopy. The breakdown of parts is very conventional:
Sprue B: Lower Wings
Sprue C: Upper Wings
Sprue D: Cowl, Engine and Prop
Sprue E: Ordnance and Tailplanes
Sprue F: Transparencies
 The
instructions are comprehensive with a guide for weapons loadouts and decal
markings guides for three Vietnam era Flat Gull Gray over white aircraft: U.S.
Navy squadrons VA-25 “Fists of the Fleet,” VA-52 “Knightriders,” and the VA-176
“Thunderbolts.”
The
instructions are comprehensive with a guide for weapons loadouts and decal
markings guides for three Vietnam era Flat Gull Gray over white aircraft: U.S.
Navy squadrons VA-25 “Fists of the Fleet,” VA-52 “Knightriders,” and the VA-176
“Thunderbolts.”
The decals are well printed and generally correct but the white/red/white prop tips on the back sides of the propellor blades are incorrect for the Vietnam era. On the back side, only the tips should be yellow and in some cases the fronts as well. Always check your photos! The few Tamiya decals I used worked well after hot water and a little setting solution.
I added a few things to “accurize” my Skyraider and convert it into an AD-4B version:
A-1H Seatbelts from Eduard -Unless you are putting the pilot figure in, you’ll probably want to add some brand of seatbelts to the bucket set.
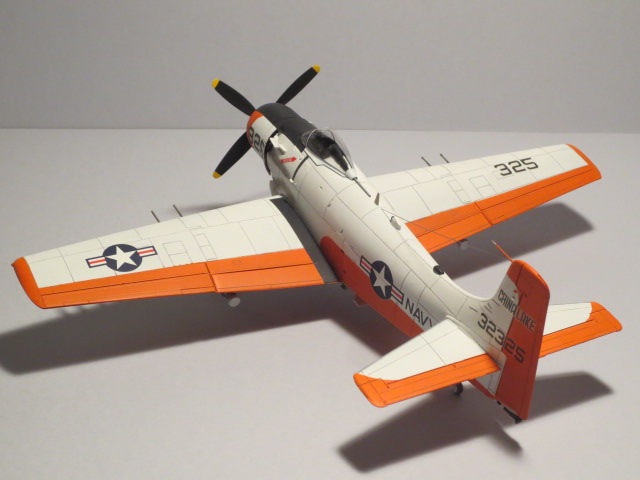
A-1 Skyraider Boot Enclosure from Quickboost -This leather boot was fitted behind the headrest to the vast majority of Skyraiders starting in the 1950s. Check your photos.
A-1 Skyraider Propellor from Metallic Details -The kit prop is malnourished although few will notice. This is more a matter of taste.
Early Skyraider Conversion from Model Design Construction -This is made up of the two main wing hardpoints and four sway braces. It’s a simple swap. The set is out of production currently but there are other options available.
The antenna and tail beacon configuration varied so again, check your photos.
| CONSTRUCTION |
I started with the cockpit as is traditional. The only thing I deviated from the instructions was the addition of seatbelts. The cockpit was painted dark gull gray with black consoles. The fit is a little loose in the fuselage, so I used superglue to ensure a solid connection to the fuselage sidewall. The tailwheel bay was painted white and installed at this time as well.
The fuselage halves were ready to close at this point and the fit is excellent. You are given the option of the three dive flaps with (accurate) inner and outer flap parts to be posed open at this point. However, the dive flaps were seldom deployed on the ground unless they were undergoing maintenance. Since I left the flaps closed on my build, I left the inner parts off for a more positive fit.
 The engine
and cowling (minus the prop) are constructed next. I have both the front and
rear cowl flaps open but that’s a matter of taste. The R-3350 engine is
represented by a front only but is very nice. It can be dressed up or entirely
replaced by an aftermarket engine, but I feel it’s adequate as it is. Tamiya
would have you mount the engine assembly now, but I prefer to wait until things
are painted due to the different contours of the cowl and fuselage.
The engine
and cowling (minus the prop) are constructed next. I have both the front and
rear cowl flaps open but that’s a matter of taste. The R-3350 engine is
represented by a front only but is very nice. It can be dressed up or entirely
replaced by an aftermarket engine, but I feel it’s adequate as it is. Tamiya
would have you mount the engine assembly now, but I prefer to wait until things
are painted due to the different contours of the cowl and fuselage.
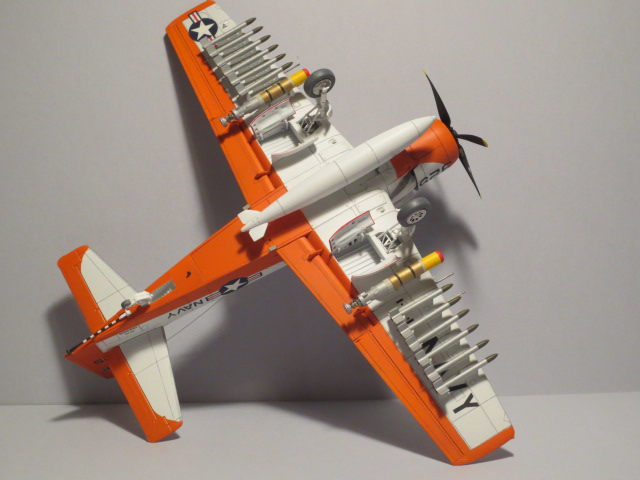
The wings came next. The construction of the wheel well doors and inner sidewalls is clever and fits very well, but it does not lend itself to painting. If you have different wing surface and wheel well colors, it is a masking nightmare. I’ve built several Tamiya Skyraiders in different color schemes and came up with the following solution: Cut the gear door hinges in half so you have separate doors and inner wheel well walls. The doors can be reattached to the hinge mounts later with superglue after painting. It’s not for everybody but I’ve had great success with this method.
After that, the wings are assembled and are mated to the fuselage. Then the lower dive flap and tailplanes are installed easily with a very positive fit on all parts. You have the option of lowered or raised flaps. I have mine in the raised position.
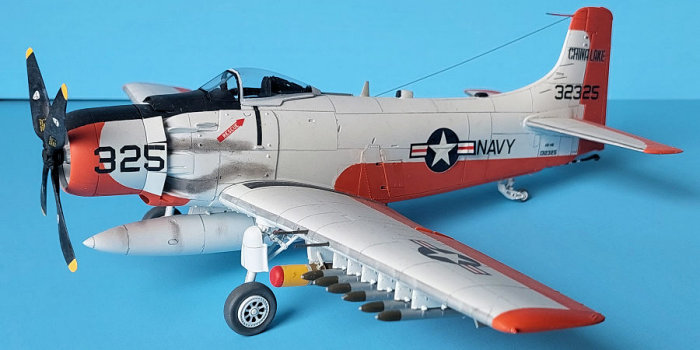
The kit is ready for painting and decaling at this point and afterwards the landing gear, gear doors and weapons pylons are ready to mount. I ended up going with two Mk.44 torpedoes from Aerobonus and the kit 300-gallon fuel tank centerline per my photos. The kit 5-inch HVARS rounded out the load to dress it up a bit.
| COLORS & MARKINGS |
 The model was
painted with a combination of Tamiya Acrylic paints and the few Testors Model
Master Acrylics I had left. The overall base coat was Tamiya white primer
straight from the rattle can. Afterwards I applied the Testors International
Orange. It is no longer available and while it is spot on in color, it was
terrible to work with. It may have been the paint’s age but even after mixing it
thoroughly, it came out stringy and semi-translucent. It took nearly five
watercolor like coats to get the color even and opaque. Next time I will mix
some Tamiya colors to get what I need.
The model was
painted with a combination of Tamiya Acrylic paints and the few Testors Model
Master Acrylics I had left. The overall base coat was Tamiya white primer
straight from the rattle can. Afterwards I applied the Testors International
Orange. It is no longer available and while it is spot on in color, it was
terrible to work with. It may have been the paint’s age but even after mixing it
thoroughly, it came out stringy and semi-translucent. It took nearly five
watercolor like coats to get the color even and opaque. Next time I will mix
some Tamiya colors to get what I need.
The decals were from an old ESCI boxing of their 1/48 Skyraider I had in my decal dungeon. It is from an A-1H kit that comes with the second decal option of an AD-4B (although the kit has no parts for AD-4B). Despite their age, they worked beautifully over Tamiya’s Acrylic Gloss. The model was then painted with Tamiya Flat and weathered with pastels and pencils. Since the photos of the actual aircraft show it to be very clean, I kept weathering to a minimum. Afterwards it was sealed with another coat of Tamiya Flat.
| CONCLUSIONS |
I was very pleased with the results of my build. The Tamiya kit is well engineered and went together without any real fuss that I did not cause myself. I would recommend Tamiya’s Skyraider to anyone who has a few kits under their belt. Aside from adding seatbelts, the kit is fine out of the box.
| REFERENCES |
There is a plethora of Skyraider books out there but the primary ones I used for this model are:
Douglas AD/A-1 Skyraider: Part One (Naval Fighters 98) by Steve Ginter
Douglas AD/A-1 Skyraider: Part Two (Naval Fighters 99) by Steve Ginter
Modeler’s Guide to the Skyraider by Jay Sherlock
Warpaint Series No. 18, Douglas Skyraider by Ken Wixey
Happy Modeling!
9 April 2024 Copyright ModelingMadness.com. All rights reserved. No
reproduction in part or in whole without express permission. If you would like your product reviewed fairly and fairly quickly, please
contact the editor or see other details in the
Note to
Contributors.