Frog 1/72 F8F-1B Bearcat
| KIT #: | F-407 |
| PRICE: | $ |
| DECALS: | Two options |
| REVIEWER: | Nicolai Plesberg |
| NOTES: | New tool kit |
| HISTORY |
For a full brief on the Bearcat’s history, please go here.
| THE KIT |
 Unlike the Monogram kit, which I
have reviewed earlier, the Frog kit is engineered in quite a more traditional
manner with two fuselage halves (which include the cowling alright), the wings
split on one lower half (although not tip-to-tip) and two upper halves as well
as two separate stabilizers. The interior consists of a very small floor (just
about enough to hold the seat), the seat, a pilot and a sort of instrument panel
is molded to the fuselage halves under the coaming. All remaining parts, such as
gear, doors and engine / propeller plus ordnance are molded in a traditional
manner too; some of the parts are indeed too coarse, but that is what to expect
from such an old kit as this (mid 1970s). All in all you get 37 parts molded in
a dark blue plastic plus two in clear – the windscreen and canopy of course. The
surface detailing is of the raised variety (not unexpected) and is actually
quite nice, while all the control surfaces are of the engraved type, but that
isn’t unexpected either.
Unlike the Monogram kit, which I
have reviewed earlier, the Frog kit is engineered in quite a more traditional
manner with two fuselage halves (which include the cowling alright), the wings
split on one lower half (although not tip-to-tip) and two upper halves as well
as two separate stabilizers. The interior consists of a very small floor (just
about enough to hold the seat), the seat, a pilot and a sort of instrument panel
is molded to the fuselage halves under the coaming. All remaining parts, such as
gear, doors and engine / propeller plus ordnance are molded in a traditional
manner too; some of the parts are indeed too coarse, but that is what to expect
from such an old kit as this (mid 1970s). All in all you get 37 parts molded in
a dark blue plastic plus two in clear – the windscreen and canopy of course. The
surface detailing is of the raised variety (not unexpected) and is actually
quite nice, while all the control surfaces are of the engraved type, but that
isn’t unexpected either.
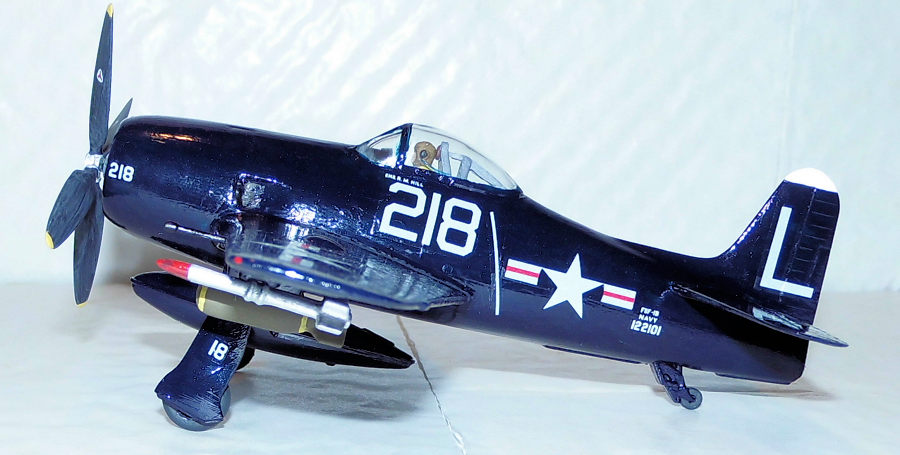
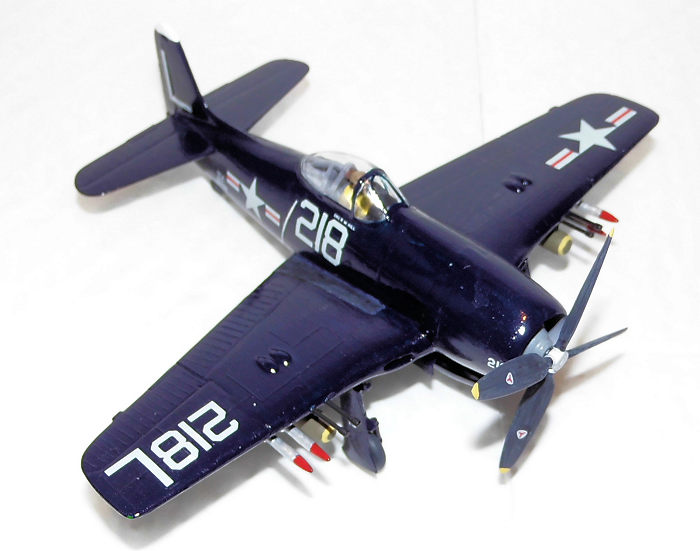
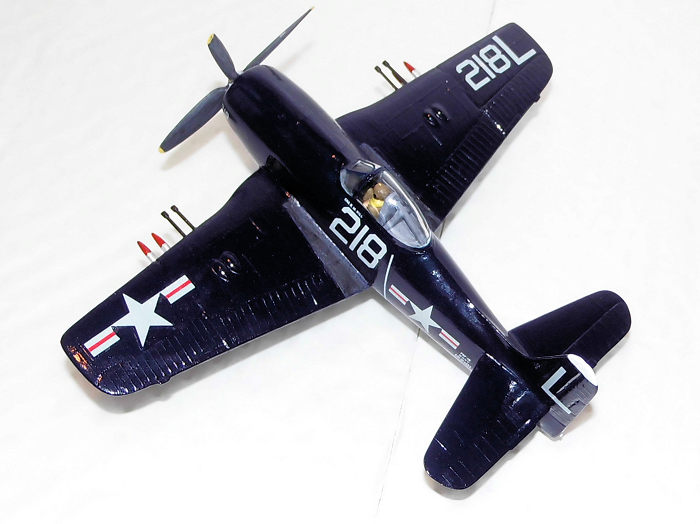
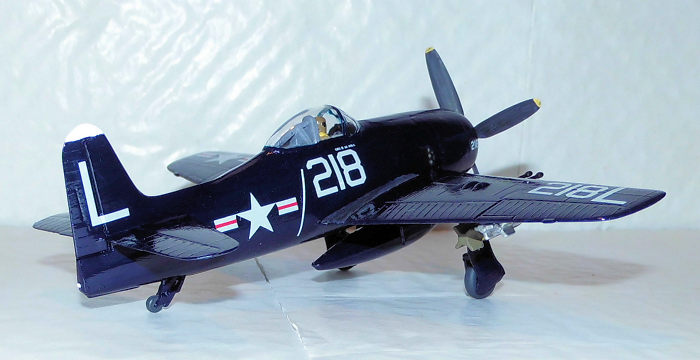
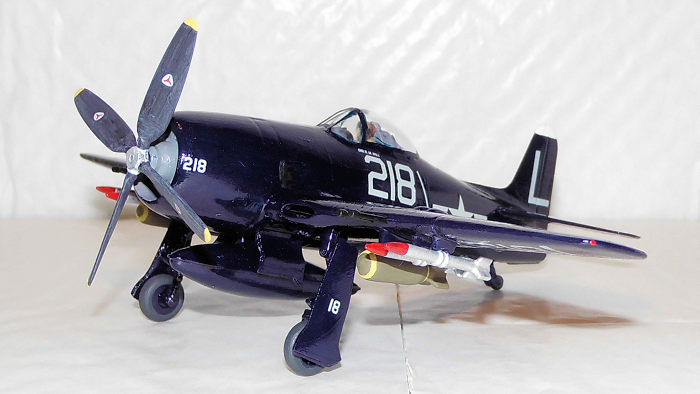
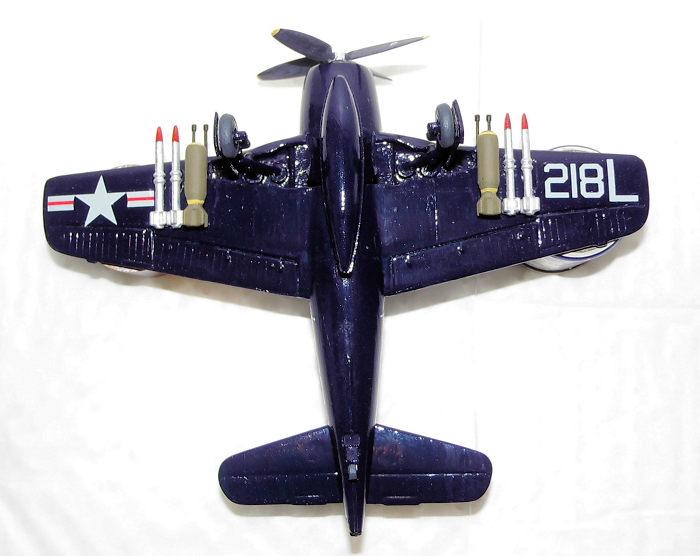
A word on the decals; two variants are possible. A Bearcat from the US Navy, VF-72 on board the USS Leyte, 1950 (or NAS Quonset Point, Rhode Island when land-based) or one from the Armée de l’Air (French Air Force), Bac-Mai (Hanoi) French Indochina, 1952. The decals are, for the time, quite nicely printed although a few register issues are present, such as the French roundels – the red dot in the middle is not quite centred, but that’s about to be counted as a common mistake, even today!
| CONSTRUCTION |
 I normally don’t wash the
plastic parts of a kit before commencing construction, but my experience in
this field goes like this: if I have a very old kit in my hands it will be a
good idea to wash mold release agent, grease, dirt or other nasty things
that will prevent the paint stick to the plastic surface simply because old
kits tends to have more of these aforementioned things stuck on their
surface than newer kits. Of course if the surface feels like it’s very
greasy the styrene will be washed regardless of the kit’s age. I took my
dishwashing bowl, tossed the sprues in it together with a few drops of
detergent together with lukewarm water (too hot water will damage the
plastic!) and while I was at it, I cleaned up a few other kits at the same
time. I let the detergent work for a few minutes; if stubborn dirt is
present an old toothbrush can be used to scrub it off. The next step is to
flush the sprues with clean water and drying them in an old towel although
air drying afterwards could be necessary as well.
I normally don’t wash the
plastic parts of a kit before commencing construction, but my experience in
this field goes like this: if I have a very old kit in my hands it will be a
good idea to wash mold release agent, grease, dirt or other nasty things
that will prevent the paint stick to the plastic surface simply because old
kits tends to have more of these aforementioned things stuck on their
surface than newer kits. Of course if the surface feels like it’s very
greasy the styrene will be washed regardless of the kit’s age. I took my
dishwashing bowl, tossed the sprues in it together with a few drops of
detergent together with lukewarm water (too hot water will damage the
plastic!) and while I was at it, I cleaned up a few other kits at the same
time. I let the detergent work for a few minutes; if stubborn dirt is
present an old toothbrush can be used to scrub it off. The next step is to
flush the sprues with clean water and drying them in an old towel although
air drying afterwards could be necessary as well.
As the cockpit opening on this one is not especially big, I decided to utilize the pilot (seldom, but it happens from time to time) so he was painted to the best of my ability and understanding of US Navy flight gear from that time and put aside to dry.
 Next came some subassemblies: seat
glued to the floor, wings glued together as were bombs and the drop tank. The
interior color for the cockpit and the cowling was being described as “Dark
Grey” by Frog, so I took my best shot and used Vallejo Dark Sea Grey (991) on
those surfaces. It may or may not be an equivalent to Dark Gull Grey, but I
figured it had to be something like that, so I went ahead and used that color
anyway. The engine was painted flat black while the gear housing went grey (Humbrol
156 to be exact). When all those things were in order, the pilot was glued to
the seat and the interior plus engine attached to the starboard fuselage half.
Before attaching the instrument panel decal in my Monogram Bearcat, I had
photocopied the decal sheet; resulting in that I now could glue a perfect black
and white copy of the instrument panel decal in my Frog Bearcat using white
glue. Immediately afterwards I could join the fuselage halves.
Next came some subassemblies: seat
glued to the floor, wings glued together as were bombs and the drop tank. The
interior color for the cockpit and the cowling was being described as “Dark
Grey” by Frog, so I took my best shot and used Vallejo Dark Sea Grey (991) on
those surfaces. It may or may not be an equivalent to Dark Gull Grey, but I
figured it had to be something like that, so I went ahead and used that color
anyway. The engine was painted flat black while the gear housing went grey (Humbrol
156 to be exact). When all those things were in order, the pilot was glued to
the seat and the interior plus engine attached to the starboard fuselage half.
Before attaching the instrument panel decal in my Monogram Bearcat, I had
photocopied the decal sheet; resulting in that I now could glue a perfect black
and white copy of the instrument panel decal in my Frog Bearcat using white
glue. Immediately afterwards I could join the fuselage halves.
The prop was handled next; first I modified and attached the shaft so I could wait attaching the propeller to after completing painting and decaling, because this had the classic engineering; prop attached to prop shaft through the engine before it is attached to one fuselage half (and before gluing the fuselage together!). The hub went silver, blades went flat black and the tips of the blades went yellow.
 Before doing anything about the
fuselage seam I glued on the wings – also to get more strength built into the
airframe, as was the little separate piece in front of the windscreen. When
wings had dried thoroughly, I started sanding the seams with 600 grit sandpaper,
then using filler to get things smoothed in. It took a couple of sessions to get
the job done, but once it was achieved, the horizontal stabilizers were glued in
place. They also needed a slight “smoothe in”, but that was really no big deal.
Once the seams had been dealt with the cockpit was finished by touching up with
grey and black, cleaning the clear parts then attaching them to the opening
using clear gloss.
Before doing anything about the
fuselage seam I glued on the wings – also to get more strength built into the
airframe, as was the little separate piece in front of the windscreen. When
wings had dried thoroughly, I started sanding the seams with 600 grit sandpaper,
then using filler to get things smoothed in. It took a couple of sessions to get
the job done, but once it was achieved, the horizontal stabilizers were glued in
place. They also needed a slight “smoothe in”, but that was really no big deal.
Once the seams had been dealt with the cockpit was finished by touching up with
grey and black, cleaning the clear parts then attaching them to the opening
using clear gloss.
Gear went next; cleaning the parts (removing mold seams, sprue attachment points etc) and then painting them. All gear parts, including gear bays, but except the oleos (which went silver) and tires (which went tire black) went gloss sea blue (well, at least an approximation to it – Humbrol 15 Midnight Blue), which is one of the things I learned during my Monogram build! When gear and bays were to my satisfaction, the gear was attached, after the remaining airframe had been cleaned once again and the model went to the paint shop.
| COLORS & MARKINGS |
 The fin tip and the walkways were
masked off and the remaining airframe, including the drop tank, was painted
Humbrol 15 Midnight Blue. Three coats were required and then even some more,
since I discovered the fact that the black walkways came as decals!! So more
blue was painted to correct that little mistake! The fin tip was painted gloss
white in a couple of sessions and, when all that was ok, the decals went on.
They worked fine despite being so old; no tendencies of cracking, crumbling or
other “no go” habits showed. I believe that one of the things that Frog did very
well was their decals and these were no exception. I flooded the propeller logo
decals in gloss acrylic varnish on the spot of the propeller blades were they
were supposed to sit when applying them and the technique worked pretty well.
Removing the water should be done with care though; a cotton bud rolled
carefully over the logo is all what’s needed! So instead of glossing the whole
prop blade this is a technique I can recommend using.
The fin tip and the walkways were
masked off and the remaining airframe, including the drop tank, was painted
Humbrol 15 Midnight Blue. Three coats were required and then even some more,
since I discovered the fact that the black walkways came as decals!! So more
blue was painted to correct that little mistake! The fin tip was painted gloss
white in a couple of sessions and, when all that was ok, the decals went on.
They worked fine despite being so old; no tendencies of cracking, crumbling or
other “no go” habits showed. I believe that one of the things that Frog did very
well was their decals and these were no exception. I flooded the propeller logo
decals in gloss acrylic varnish on the spot of the propeller blades were they
were supposed to sit when applying them and the technique worked pretty well.
Removing the water should be done with care though; a cotton bud rolled
carefully over the logo is all what’s needed! So instead of glossing the whole
prop blade this is a technique I can recommend using.
When the decals had dried they were given a coat of gloss to seal them in. Furthermore were the walkways given a flat coat to give a realistic finish on those surfaces. Then came the last things to attach; remaining gear doors, the propeller not to mention the ordnance and doing the last touch ups and marking of the position lights the model was done.
| CONCLUSIONS |
Well, what can I say other than it’s probably easier to construct than the Monogram kit because of its more traditional engineering, but down side is it must be a lot harder to come by than Monogram’s, since the original Frog boxings become like valuable rarities, and, heaven forbid, some schmuck actually building them (sorry, I just did!), instead of saving them as part of a retirement plan.
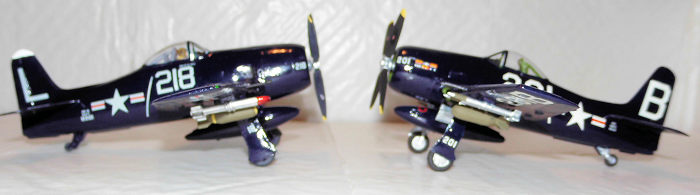 Instead of saying something about
how it actually adds up against the Monogram kit, I have included a photo with
both together so you can judge for yourself. One note though:
As I have written in
this review that this is actually a F8F-1B while the Monogram kit depicts a
F8F-2. The one noticeable difference between these two versions is the height of
the fin, since the F8F-2 had a more powerful engine and to compensate for the
torque from the engine the fin had to be increased in height. This is in fact
the case even though it may not be very clear in the photos that I’ve taken. The
reason for this is very simple; the angle of the tail gear is not the same on
the two models – hence they do not appear with quite the same stance! Had it
been the same stance, then I’m sure it would have been clearer that the F8F-2
has in fact a higher fin than the F8F-1B, which is pretty accurately reproduced
in both kits.
Instead of saying something about
how it actually adds up against the Monogram kit, I have included a photo with
both together so you can judge for yourself. One note though:
As I have written in
this review that this is actually a F8F-1B while the Monogram kit depicts a
F8F-2. The one noticeable difference between these two versions is the height of
the fin, since the F8F-2 had a more powerful engine and to compensate for the
torque from the engine the fin had to be increased in height. This is in fact
the case even though it may not be very clear in the photos that I’ve taken. The
reason for this is very simple; the angle of the tail gear is not the same on
the two models – hence they do not appear with quite the same stance! Had it
been the same stance, then I’m sure it would have been clearer that the F8F-2
has in fact a higher fin than the F8F-1B, which is pretty accurately reproduced
in both kits.
| REFERENCES |
Profile Publications no 107:The Grumman F8F Bearcat © Harold Andrews 1966
American Warplanes, by Bill Gunston 1986 Salamander books Ltd. ISBN 0-517-61351-4
Vietnam: The war in the air, by René J. Francillon 1987 Arch Cape Press ISBN 0-517-62976-3
Wikipedia, the Online Encyclopedia
19 November 2019
Copyright ModelingMadness.com
If you would like your product reviewed fairly and fairly quickly, please contact the editor or see other details in the Note to Contributors.