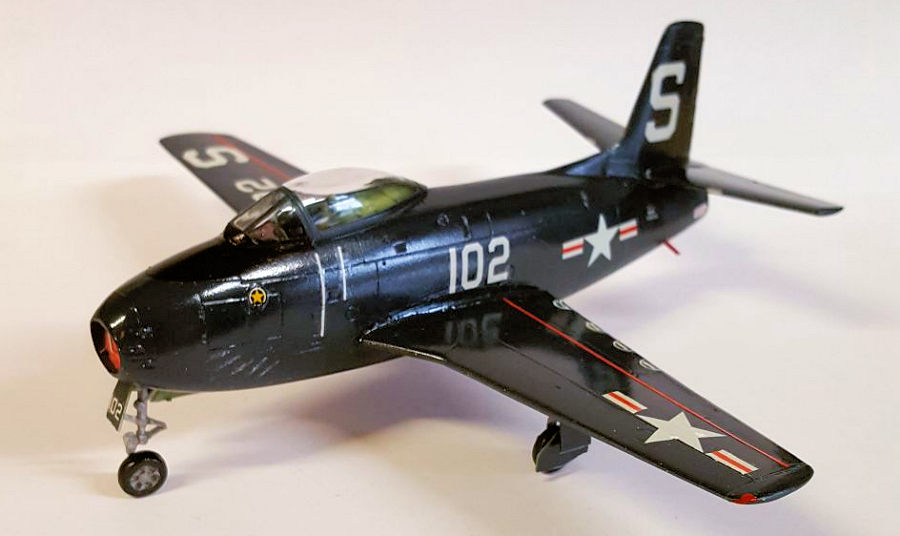
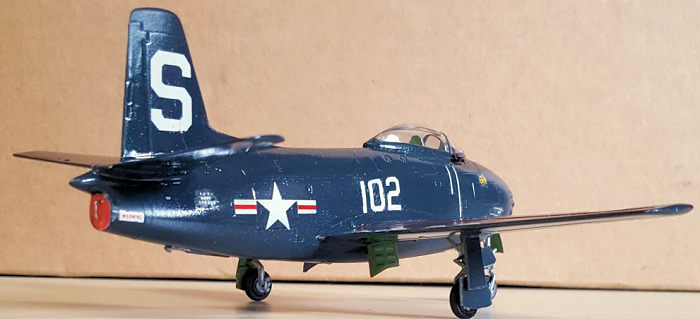
| KIT #: | Si1 |
| PRICE: | $8.00 from a vendor |
| DECALS: | Two options |
| REVIEWER: | Chris Mikesh |
| NOTES: | Expletives deleted by reviewer! |
| HISTORY |
 (Quote from the instruction
sheet - Abridged) The Navy's first XFJ-1 Fury took to the air on September 11th
1946. The aircraft was simple, had a straight forward axial-flow turbojet, low
mounted, very thin wing. During November of 1947 deliveries of the FJ-1 begin to
arrive at VF-5a, later re-designated VF-51 in 1948. The first landing of an FJ-1
was aboard the USS boxer CV-21, and was made on March 6th of 1948 by Commander
Evan Pete Arend. The FJ-1 Fury operated with VF-51 until 1949 when it was
replaced by the F9F Panther. Then aircraft were assigned to Naval Air Reserve
squadrons to serve as jet transition trainers. By early 1954 all FJ-1s had been
retired from the US Navy. Historically, North American FJ-1 Furies were one of
the first United States Navy jet carrier-based fighters.
(Quote from the instruction
sheet - Abridged) The Navy's first XFJ-1 Fury took to the air on September 11th
1946. The aircraft was simple, had a straight forward axial-flow turbojet, low
mounted, very thin wing. During November of 1947 deliveries of the FJ-1 begin to
arrive at VF-5a, later re-designated VF-51 in 1948. The first landing of an FJ-1
was aboard the USS boxer CV-21, and was made on March 6th of 1948 by Commander
Evan Pete Arend. The FJ-1 Fury operated with VF-51 until 1949 when it was
replaced by the F9F Panther. Then aircraft were assigned to Naval Air Reserve
squadrons to serve as jet transition trainers. By early 1954 all FJ-1s had been
retired from the US Navy. Historically, North American FJ-1 Furies were one of
the first United States Navy jet carrier-based fighters.
| THE KIT |
Looking at the kit, it looks well thought out, and pretty easy. Clip, glue,
sand, paint, Voila! Instant airplane! At first view, the kit looks appealing and
your mind wanders off to competing in a model contest. “Wow! This will be a
head-turner!” I imagined a nice smooth Navy Blue – so all I need to do is get
the surface smooth and the decals straight. After all… it’s a plain blue plane.
How hard can it be? …That was mistake #1 !
| CONSTRUCTION |
When building this model, think of this as a vacuum-formed model, or a resin model. Actually, a combination of both. The plastic is soft, and can easily be shaped. But like a Vac-kit, you will have to fit, shape, and fit and shape, and fit again.
Construction was typical and simple. Starting with the cockpit tub and building sub-assemblies such as landing gear, tip tanks, etc. Everything is intuitively obvious. (…deceiving little Rascal!)
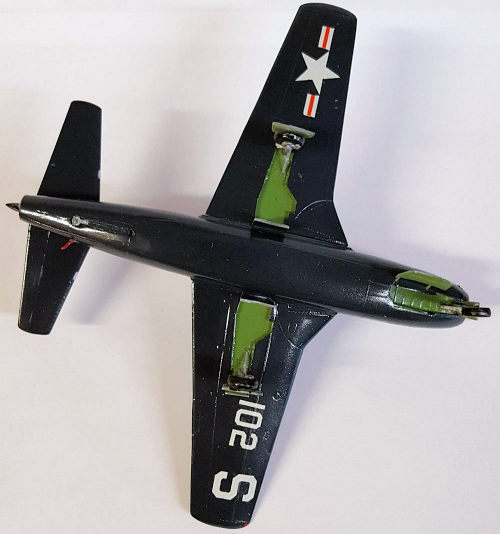
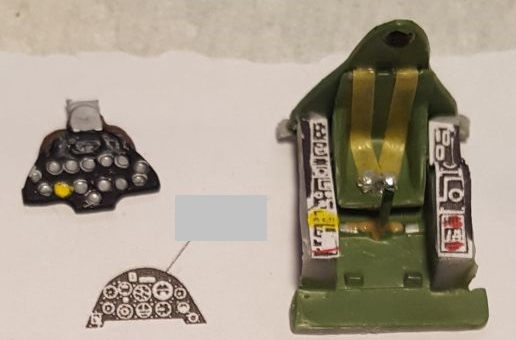 Cockpit: Looking at the well
graphed instructions, I clipped off the pieces for the cockpit. DON’T USE
CLIPPERS! ‘PING’ and the control stick disappears! (Well, you can’t see it
anyway.) CLIP… Where did the canopy strut go? When will I quit making rookie
mistakes!? (Expletives expressed by reviewer were not vocalized or printed.)
That was mistake #2 ! Ok… stretched sprue will suffice.
Cockpit: Looking at the well
graphed instructions, I clipped off the pieces for the cockpit. DON’T USE
CLIPPERS! ‘PING’ and the control stick disappears! (Well, you can’t see it
anyway.) CLIP… Where did the canopy strut go? When will I quit making rookie
mistakes!? (Expletives expressed by reviewer were not vocalized or printed.)
That was mistake #2 ! Ok… stretched sprue will suffice.
Siga did an ok job on the tub. There is enough detail in the instruments and control panels to make something out of it. I had a cockpit decal layout from a Corsair that fit pretty well in the cockpit. After Testors Chromate Green painting, Seat belts, and fitting new parts in place, the decal “busied” up the cockpit so it didn’t look too bad. In the end it is difficult to see because of the thick canopy. Don’t waste a lot of time in the cockpit.
Wings; The general shape of the wings are good. The panel lines are rather deep, but nothing really drastic. The two haves did not look warped at first glance. But pressing the halves together revealed the leading edge will need major help. Think Vacuum-formed model at this point, and sand the contact surfaces flat, so they fit better. I have a board with sandpapers glued on it, and simply sand off the burrs and thin the warps. Once glued, I had to clamp the Leading edges together but that didn’t fully resolve the problem. I had to fill with some Super Glue and shape the edges to look normal. (gee… I was hoping for an easy kit.)
Fuselage: The fuselage
halves go together after much work and sanding. The two fuselage halves are not
a mirrored image of one another. The length of the port side of the fuselage is
a little over 2 mm longer in
 length and needed to be cut down. The right side of
the fuselage has a little bit more angle at the cockpit area then the left. So
the tub needed to be worked and fitted to get a horizontal fit. Watch out that
the panel line match up before closing the fuselage halves.
length and needed to be cut down. The right side of
the fuselage has a little bit more angle at the cockpit area then the left. So
the tub needed to be worked and fitted to get a horizontal fit. Watch out that
the panel line match up before closing the fuselage halves.
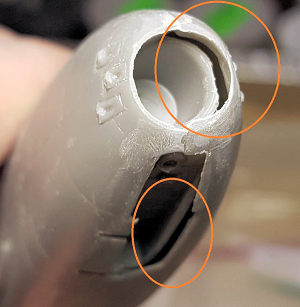
The nose wheel well and the air intake is a very poor fit. It is to be mounted on the starboard side of the fuselage before the two halves of the fuselage is glued together. Though the fuselage halves fit together (now) with all of the nose weight, cockpit, air intake, exhaust and nose well inserted, it leaves almost unreachable gaps. These items do not make contact with the port fuselage half. They're just simply not large enough. There is a large gap at the air intake and the nose wheel well. This can be fixed with a lot of effort and experience. The fuselage needed considerable work. Sanding and filling is the name of the game with this model. Go slow and deliberate.
Strong recommendation; use an excessive amount of nose weight which can fit behind the air intake and in front of the cockpit. The instructions recommend 4 grams but I discovered that was too light. I used 7 grams, and that was more than enough. At that time, I feared an overweight on the nose landing gear. If you have a postal scale, you'll discover 6 grams is probably ideal. That equals to about 10 BBs, or a half of a small wheel weight that you will find at the side of a road in the gutter.
Fill and sand gaps in the fuselage halves. Then fuss and fume about how you are going to fix that air intake and nose wheel well. (…more deleted expletives…)
Wing fit: The wings when mated to the fuselage will leave large gaps. Even after sanding the physical connection to make a better fit, the gap was so large it could not be fitted properly, (putty shrinks and endless sanding). The elevators were much the same way.
Solution: Clip off the tabs and sand the surface flat to meet the fuselage. NOTE: The Wing Root is molded to the fuselage is not the same size as the wing. The wings of my example were about 1mm thinner than the wing root and it was about 1mm shorter. This could be self-induced because of correcting the two halves of the wing due to poor molding. More sanding and shaping… grind, grind. Be patient or you’ll make it worse.
I used Super Glue to glue the wings to the fuselage. Fresh glue will give you enough time to make sure you have them level to the fuselage and able to correct to get the dihedral pretty close to accurate. The instructions and internet pictures help a lot with this. Be patient again because Super Glue sets up suddenly – usually after you pull the parts apart and wonder what’s taking so long. Fill minor gaps and do the same with the elevators.
More Fuselage Issues and
Canopy: The FJ-1 canopy problems persisted. Looking at the canopy away from the
model, the canopy is pretty squared up and should fit normally.
So, we're back to the fuselage problems as the fuselage is not a mirror image of the other half. The right side, (starboard side) of the fuselage around the canopy is about 2 mm below the port side by comparison. There's no way the canopy can fit normally without significant filler. I used Evergreen 25 mm strips (#125) to fill the gap. At places I had to stack them three layers high. A lot of dry fitting showed that the canopy was level to the fuselage and that the gap was filled. Minor filling with white glue was needed to level things off. The canopy is very thick, and will cover a lot of mistakes, so be prepared for that.
There is no way to fill the gap in the air intake nor the gap in the nose well without considerable effort, reshaping and filling. But I have a plan! As with the canopy, I used more of the stacked Evergreen strips to fill the nose wheel well gap. A sharp X-Acto knife to trim the Evergreen and the gap is filled. I like Evergreen a lot because the plastic is soft and can be trimmed easily.
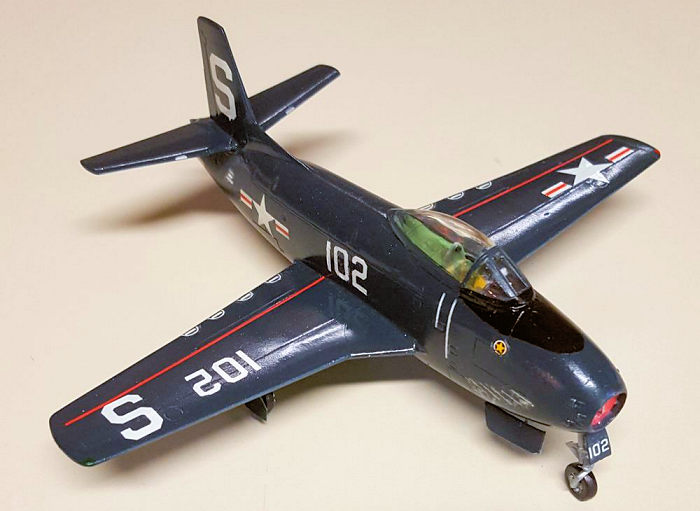
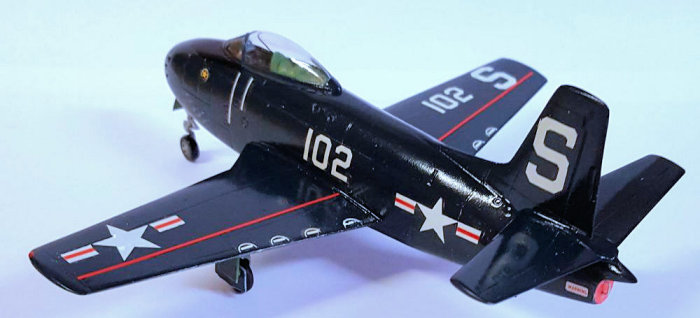
| COLORS & MARKINGS |
After masking the canopy, Mr. Surfacer was used as an under coat for Vallejo 71.300 Gloss Sea Blue. The Mr. Surfacer went on so nice, I was tempted to paint the underside white and pretend it was post 1962, but I didn’t have the decals. I wanted to try out a new Airbrush, and I had not used Vallejo to any large degree. Why not – the FJ could be a working victim. (Mistake #3)
 The paint went on ok, but the surface remained flat,
not glossy. “Just get the stupid paint on the thing and quit fiddling with it!”
Airbrush setting? Old paint? I dunno – but it didn’t turn out the smooth glossy
surface I was hoping for. OK, now I have a blue plane. It’s time to get out the
decals. I should have used a spray can.
The paint went on ok, but the surface remained flat,
not glossy. “Just get the stupid paint on the thing and quit fiddling with it!”
Airbrush setting? Old paint? I dunno – but it didn’t turn out the smooth glossy
surface I was hoping for. OK, now I have a blue plane. It’s time to get out the
decals. I should have used a spray can.
Decals: The sheet has 2 options and I opted for the USS Boxer, VF-5. Out of the box (OTB) decals were a near disaster. Thanks to reading a review on ModelingMadness (Mark Fordham’s review of his FJ-1) I knew the decals would be a complication. The previous builder mentioned that the decals dissolved in water and shattered. I took advantage of that knowledge and coated the decals with a decal saver.
I always start with a small decal to see how it is going to react. Will the decal curl up, shatter, or settle to the model? After the first small decals were applied, it looked relatively satisfying. I used MicroSol and MicroSet to help with the decals. On to a larger decal. (Mistake #4)
The Siga decals have an adhesive that is reminiscent
to old postage stamps, and did not really adhere to the model. The thin decal
structure - which is now really the decal saver that I applied to the surface -
is all that holds the decal in place. Once the decal was in place, I could see
it slowly dissolve. I did everything I
 could to prevent its destruction, but it
was inevitable. The out-of-the-box decals are sadly useless. But that's all I
had. I recommend trying to find other decals for this model. (I recommend “Decal
Cancer” picture)
could to prevent its destruction, but it
was inevitable. The out-of-the-box decals are sadly useless. But that's all I
had. I recommend trying to find other decals for this model. (I recommend “Decal
Cancer” picture)
At this point after working on the FJ decals for several days I've come to the conclusion that it is just too fiddly and the tiny decals that remain are not worth the frustration. I'm looking at decals as they are decaying on the model. Is it a chemical reaction? Perhaps they are too old? The national markings have all but decayed completely while on the airplane. Other decals are showing signs of cancer as well. Several had to be painted on as the decals self-destructed. Strong recommendation to replace and not use the Siga decals. I replaced what decals I could from a Corsair and an A-1. Several could not be replaced or were simply deleted. Some were hand-painted the best I could but I was getting frustrated and making matters worse.
However, my compliments to Siga with regard to their instruction sheet. It provides a lot of details for the positioning of the decals.
| FINAL CONSTRUCTION |
 As noted
earlier, the air intake is way off center as you assemble the fuselage. I
recommend not using it at all if possible. However if you have no other
alternative, or have already installed it, prepare to use an air intake cover,
and display the airplane as it were sitting on a ramp or in a museum.
Fortunately, I took a head-on picture of the Intake and Engine covers. I simply
printed them on my printer and trimmed to shape. The handles were a staple
shaped around a needle nose plyer and punched through the paper cover. A hint of
Elmer’s glue to tack it in place and the air intake problem is solved – same
with the exhaust. (I recommend “Engine Intake Cover” picture)
As noted
earlier, the air intake is way off center as you assemble the fuselage. I
recommend not using it at all if possible. However if you have no other
alternative, or have already installed it, prepare to use an air intake cover,
and display the airplane as it were sitting on a ramp or in a museum.
Fortunately, I took a head-on picture of the Intake and Engine covers. I simply
printed them on my printer and trimmed to shape. The handles were a staple
shaped around a needle nose plyer and punched through the paper cover. A hint of
Elmer’s glue to tack it in place and the air intake problem is solved – same
with the exhaust. (I recommend “Engine Intake Cover” picture)
Wheels, gear doors, and hook were straight forward. A coat of Future Floor Finish and Voila! I have created a new dust collector.
| CONCLUSIONS |
It is certainly not for the novice! Be patient and think it through as you assemble the model. Anything that can go wrong - will go wrong. Unfortunately, I’m not going to have pleasant memories of this model. But, I’m glad to have it. It is very deceiving that it looks good in the box, but has assembly difficulties as you can see. In the end, it turns out ok and looks great on the shelf.
I’m glad I looked at Mark Fordham’s review in Modeling Madness. It helped a lot, and I hope my review helps you – or at least brings you a smile. 2 X-acto blades and 2 sanding sticks lost their lives in construction of this model. If I had a cat, it would be on life #9 now.
Constructive comments, sympathies, and modeling friends are welcome to write.
| REFERENCES |
http://modelingmadness.com/review/korean/fordhamfj1.htm
Yanks Air Museum – personal visit 2014 Photographs of subject
https://en.wikipedia.org/wiki/North_American_FJ-1_Fury
20 May 2020
Copyright ModelingMadness.com If you would like your product reviewed fairly and fairly quickly, please
contact
the editor or see other details in the
Note to
Contributors.
Back to the Main Page
Back to the Review
Index Page
Back to the Previews Index Page