| KIT #: | 80356 |
| PRICE: | $29.99 SRP |
| DECALS: | Two options |
| REVIEWER: | Dan Lee |
| NOTES: | SAftermarket parts and decals |
| HISTORY |
The Grumman F8F Bearcat is an American single-engine carrier-based fighter aircraft introduced in late World War II. It went on to serve into the mid-20th century in the United States Navy, the United States Marine Corps, and the air forces of other nations. It would be Grumman Aircraft's final piston engined fighter aircraft. Modified versions have broken speed records for piston-engined aircraft, and are popular among warbird owners.
The F8F prototypes were
ordered in November 1943 and first flew on 21 August 1944, a mere nine months
later. The first production aircraft was delivered in February 1945 and the
first squadron, Fighter Squadron 19 (VF-19), was operational by 21 May 1945, but
World War II was over before the
 aircraft
saw combat service.
aircraft
saw combat service.
Postwar, the F8F became a major U.S. Navy and U.S. Marine Corps fighter, equipping 24 fighter squadrons in the Navy and a smaller number in the Marines. Often mentioned as one of the best-handling piston-engine fighters ever built, its performance was sufficient to outperform many early jets. Its capability for aerobatic performance is illustrated by its selection as the second demonstration aircraft for the navy's elite Blue Angels flight demonstration squadron in 1946, replacing the Grumman F6F Hellcat. The Blue Angels flew the Bearcat until the team was temporarily disbanded in 1950 during the Korean War and pressed into operational combat service. The F9F Panther and McDonnell F2H Banshee largely replaced the Bearcat as their performance and other advantages eclipsed piston-engine fighters.
The F8F-1 was equipped with folding wings, a retractable tailwheel, self-sealing fuel tanks, a very small dorsal fin, powered by a 2,100 hp (1,566 kW) Pratt & Whitney R-2800-34W Double Wasp radial piston engine, armed with four 0.50 in (12.7 mm) machine guns, 658 built.
VA-112 was an Attack Squadron of the U.S. Navy. It was established as Bomber-Fighter Squadron VBF-11 on 9 April 1945, redesignated Fighter Squadron VF-12A on 15 November 1946, then as VF-112 on 15 July 1948. It was finally redesignated as VA-112 on 15 February 1959. The squadron was disestablished on 10 October 1969. Its nickname from 1961 to 1969 was the Broncos.
| CONSTRUCTION |
 I wanted to
load up my Bearcat for aftermarket bear. I used the Eduard Zoom PE Set for the
cockpit, Quickboost engine (the crankcase looked a lot better than the kit one),
Quickboost exhausts, Quickboost main landing gear well (for the fuselage) which
includes the engine piping and vents, a True Details Vaccuform canopy and
Barracuda Studio resin wheels which are a big improvement on the kit wheels.
I wanted to
load up my Bearcat for aftermarket bear. I used the Eduard Zoom PE Set for the
cockpit, Quickboost engine (the crankcase looked a lot better than the kit one),
Quickboost exhausts, Quickboost main landing gear well (for the fuselage) which
includes the engine piping and vents, a True Details Vaccuform canopy and
Barracuda Studio resin wheels which are a big improvement on the kit wheels.
The various interior details were sanded off and then the interior was painted interior green while the cockpit consoles were painted flat black. After the paint was dry I added the Eduard Zoom PE (attached using CA glue.) I ended up using most of the parts including the handles. This was an easy to use PE set for someone with a lot of experience with PE like me. Might be a bit more daunting for a beginner.
I painted and glued the
various non cockpit interior pieces including aftermarket parts into the
starboard half of the fuselage. I opted to leave off the tailwheel assembly till
after painting as it was going to be painted gloss sea blue not interior green
as per the instructions. The hollow Quickboost exhaus ts
were added to both fuselage halves. I bought the Quickboost wheel wheel part
because it adds the details that HB simplified/removed when they shrunk down the
1/32 Trumpeter kit (I know because I have the Trumpeter kit.) The most
noticeable absence is the venting from the engine to the wings, but is on the
Quickboost part.
ts
were added to both fuselage halves. I bought the Quickboost wheel wheel part
because it adds the details that HB simplified/removed when they shrunk down the
1/32 Trumpeter kit (I know because I have the Trumpeter kit.) The most
noticeable absence is the venting from the engine to the wings, but is on the
Quickboost part.
When I closed up the fuselage, I discovered that everything fit including the aftermarket parts. I know it sounds improbable, but I was shocked too. The fuselage was thrown into the box to let the glue cure at least for a couple of weeks to eliminate those pesky phantom seams.
The only fuselage component that I seemed to have an issue with was the Quickboost engine as the only way to align it in the cowling was by visual means which took a while. I had to drill out the hole for the prop, attach the prop and use it as a alignment tool as I glued the engine into the cowling with CA glue.
The biggest issue I
observed with this kit are the wing inlet plates. The way the wings were
designed means you have an obvious seam in a really tight area. If you choose to
ignore it then that's fine, but I didn't and opted to remove the plates. I then
added my own made of plastic card (20 thou card stock.) This modification
eliminated the headaches of filling/sanding the seam. Once done the wings were
then assembled in flight position (there is the option of folding the wings, but
I wanted this Bearcat to be ready for flight.) When I glued the wings to the
fuselage it was then I found an annoying glitch. The Q uickboost
engine piping did not line up with the piping in the wings. I couldn't do much
and left it.
uickboost
engine piping did not line up with the piping in the wings. I couldn't do much
and left it.
The main landing gear well set also includes detail for the wing portion of the wheel wells. I cut those off from their casting blocks and glued them into place.
Various sub assemblies like the tailplanes were added, but I deviated from the instructions as I left off the arrester hook.
The rear canopy clear plastic was way too thick which is why I used the True Details vacuuform canopy which is actually for the Hobbycraft/Academy Bearcat kits. I still had to use the Hobbyboss windscreen due to the way the part was designed as the windscreen piece contains part of the surrounding fuselage.
After about a month sitting in the box I filled the various seams with CA glue and then sanded them smooth (repeated this at least twice.) Once relatively smooth, I polished the seams with various grades of micromesh sanding cloths (the main paint is gloss which needs a relatively smooth surface and any large scratches will show up in the paint.)
| COLORS & MARKINGS |
The prop was painted first. The entire prop was airbrushed flat black then everything but the prop tips were masked off, sprayed flat white then gloss yellow. I removed the masking and then masked the prop blades and sprayed the prop hub Vallejo Metal Coat Dark Aluminum. It was sprayed with a gloss coat for the prop decals which were added when the coat was cured and then a final flat coat was sprayed on.
 After the
plane was wiped clean using a damp cloth I jammed makeup sponges into the cowl
and fuselage portion of the wheel well to protect those areas from paint. The
cockpit was protected by the windscreen (which had been masked off and sprayed
flat black for the interior color) and the original kit canopy both parts were
glued in place with white glue (temporarily.) I also masked off the vaccuformed
rear canopy and sprayed on the interior color (Xtracrylix Interior Green.)
After the
plane was wiped clean using a damp cloth I jammed makeup sponges into the cowl
and fuselage portion of the wheel well to protect those areas from paint. The
cockpit was protected by the windscreen (which had been masked off and sprayed
flat black for the interior color) and the original kit canopy both parts were
glued in place with white glue (temporarily.) I also masked off the vaccuformed
rear canopy and sprayed on the interior color (Xtracrylix Interior Green.)
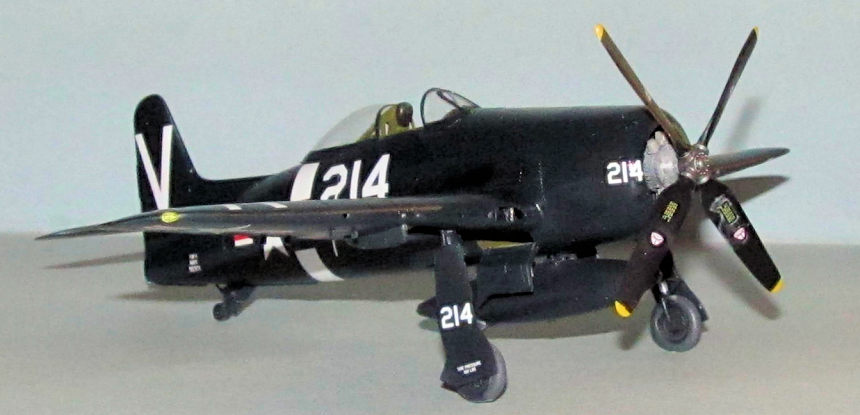
I sprayed the various parts of the model with a base coat of Xtracrylix Gloss Sea Blue aka GSB. It provided nice coverage and went on fairly smooth. Once dry, I sprayed on a gloss coat of Xtracrylix gloss to provide a smoother surface for the decals. The model sat for a while as things got busy in my work and personal life.
I used the Superscale 48-1082 sheet. It is actually
designed for the Hobbycraft/Academy kit but it can be used by the Hobby Boss
without much modification. As readers might have guessed from the introduction,
I selected the VF-12A markings. These went on very well with MicroSol/MicroSet
and a little bit of Solvaset for the some rather stubborn areas (I did not like
the two piece insignia with the separate red band.) The only part I had trouble
with was the white bands at the bottom of the fuselage
 as only the
top bands lined up while the bottom ones were too short and I had a gap between
them (it seems the HB fuselage is slightly bigger.) To fix it, I used
Post-It-Notes to mask off the offending area area and then sprayed it with light
coats of Tamiya Flat White paint. Unfortunately, I had a bit of overspray to
fix, but nothing serious.
as only the
top bands lined up while the bottom ones were too short and I had a gap between
them (it seems the HB fuselage is slightly bigger.) To fix it, I used
Post-It-Notes to mask off the offending area area and then sprayed it with light
coats of Tamiya Flat White paint. Unfortunately, I had a bit of overspray to
fix, but nothing serious.
I did not weather this Bearcat. After wiping off the decal solution, I sprayed Tamiya gloss coat in several thin coats for the final coat.
| FINAL CONSTRUCTION |
The multipart Barracuda resin wheels were removed from their casting blocks, washed and sprayed Xtracrylix GSB. I drilled out the holes/resin flash and used CA glue to stick everything together.
The landing gear was a bit
more troublesome as I discovered attachment points needed to be shaved off at
one side to allow it to be mounted at the proper angle (ie: 90 degrees to the
wing.) This was caused by the resin pieces I added to the wing wheel wells which forced the landing gear to splay
off to one side. These parts were sprayed GSB and added. I hand painted the
oleos using Vallejo White Aluminum while the tires were painted German Grey.
pieces I added to the wing wheel wells which forced the landing gear to splay
off to one side. These parts were sprayed GSB and added. I hand painted the
oleos using Vallejo White Aluminum while the tires were painted German Grey.
I painted the tailwheel parts and then added then to the model, but it took some patience as I had to find the attachment points. I had to realign the tailwheel a couple of times.
Next I added the pylons (with the bomb attachment points removed), and already painted fuel tank as I didn't want it to carry much underwing. I did not add the HVARs, just the clipped off the anchor points and glue them in place to fill in the holes in the wings. I had to hand paint them GSB, but Xtracrylix brushes well so I had no problems.
Lastly I removed the masking off the canopy parts and glued them in using white glue.
| CONCLUSIONS |
I enjoyed building the HB Bearcat. There are some issues I found with the kit like the wing inlet plates, but nothing that made it unbuildable. I know that there are folks grumbling about the cowling etc and I can see where they might have a problem with the profile, but the shape issues weren't serious enough to stop me from buying and building this kit. Without aftermarket parts it builds up nice, but the little extra details make it stand out which is why I purchased all those parts in the first place.
I can recommend this kit for all skill levels. Makes for a nice change from the usual prop fighters, but there aren't a lot of marking choices out there.
5 June 2017
Copyright ModelingMadness.com
If you would like your product reviewed fairly and fairly quickly, please contact the editor or see other details in the Note to Contributors.
Back to the Main Page Back to the Review Index Page Back to the Previews Index Page