| KIT #: | 4042 |
| PRICE: | $8.98 in 1979 |
| DECALS: | Three options |
| REVIEWER: | Chuck Horner |
| NOTES: |
| HISTORY |
 As the
Korean war progressed into 1951, the Navy recognized the limitations of their
straight-wing fighters (F9F Panthers and F2H Banshees) against the swept-wing,
MiG-15. They also saw the success of the Fury’s sibling, the Air Forces’ F-86.
As such, they went to North American and called for, what was initially, a Navy
Sabre. The FJ-2 Fury was North American’s swept-winged follow-on to their
straight-winged FJ-1.
As the
Korean war progressed into 1951, the Navy recognized the limitations of their
straight-wing fighters (F9F Panthers and F2H Banshees) against the swept-wing,
MiG-15. They also saw the success of the Fury’s sibling, the Air Forces’ F-86.
As such, they went to North American and called for, what was initially, a Navy
Sabre. The FJ-2 Fury was North American’s swept-winged follow-on to their
straight-winged FJ-1.
The XFJ-2 first flew in December, 1951 with legendary test pilot, Bob Hoover, at the controls. In August, 1952, the Dash-2 began carrier trials but its poor low speed handling and a weak nose gear made it unsuitable. The Navy decided to send all Dash-2’s to the land-based Marines and wait for the Dash-3, which would correct these faults. The FJ-2 was retired from service in 1957.
| THE KIT |
The ESCI FJ-2/3 is at best, an “arms-length” kit. It is neither an F-86 nor an FJ-2 and is definitely not an FJ-3. ESCI went to the trouble to make some changes to their F-86E kit by adding the Fury style landing gear, wheel wells and the FJ-2 style canopy, but didn’t enlarge the tail nor the nose intake, which would have created a slight deeper forward fuselage. It was originally released in 1979 and I recently saw the same molds re-boxed under the Italeri name.
The kit comes in dark blue plastic and with all ESCI kits of that time, it has reasonable surface detail but a simple cockpit and wheel wells.
| CONSTRUCTION |
 While
finishing my FJ-1 model, I had pulled this kit from my deep stash. Knowing that
it “is what it is”, I decided I’d build it out-of-box in navy-blue to complement
my FJ-1. I quickly found that the decals had aged so badly that they were
flaking off the paper in my hands. I checked with Caracal decals and discovered
they had a sheet for the FJ-2 that included the YFJ-2 in navy-blue. The YFJ was
somewhere between a blue F-86 and a production FJ-2, making the ESCI kit
slightly “less wrong”.
While
finishing my FJ-1 model, I had pulled this kit from my deep stash. Knowing that
it “is what it is”, I decided I’d build it out-of-box in navy-blue to complement
my FJ-1. I quickly found that the decals had aged so badly that they were
flaking off the paper in my hands. I checked with Caracal decals and discovered
they had a sheet for the FJ-2 that included the YFJ-2 in navy-blue. The YFJ was
somewhere between a blue F-86 and a production FJ-2, making the ESCI kit
slightly “less wrong”.
I made one other substitution. I had a resin seat for my Hobby Boss FJ-4 so I took the HB seat, which was much better than the over-simplified ESCI seat. I added a metal lap belt and shoulder harnesses from Tamiya tape. These were painted light Khaki with silver buckles.
An excellent reference for navy aircraft is Tommy Thompson’s Tailhook Topics blog. He has covered, in great detail, many Navy aircraft including the FJ series. He notes that North American was allowed to deliver the FJ-2 (and Dash-3) with a non-standard cockpit color – a shade of teil green. I took some British cockpit green and darkened it with a bit of blue. In hind-sight, this wasn’t enough but it is definitely not what you normally see -- American cockpit green, zinc-green or gray.
 Before I
closed up the fuselage, I added weight to the nose. For many years, I’ve use
non-hardening, modeling clay that I impregnate with lead shot or small fish
weights. The clay allows me to push it into small areas, it molds to the
interior contour and stays put without added any glue. I have never had a
problem with it coming loose inside a model. The clay that I am using now is
over 20 years old and is still as soft and pliable as when I bought it.
Before I
closed up the fuselage, I added weight to the nose. For many years, I’ve use
non-hardening, modeling clay that I impregnate with lead shot or small fish
weights. The clay allows me to push it into small areas, it molds to the
interior contour and stays put without added any glue. I have never had a
problem with it coming loose inside a model. The clay that I am using now is
over 20 years old and is still as soft and pliable as when I bought it.
After closing the fuselage, I quickly added the wings and tail. The fit was quite good. I use Mr. Surface 500 to fill some gaps around the nose piece and the belly wing joints. Next came an over-all coat of Mr. Surface 1000 and a light, wet sanding with a 3000-grit sanding sponge.
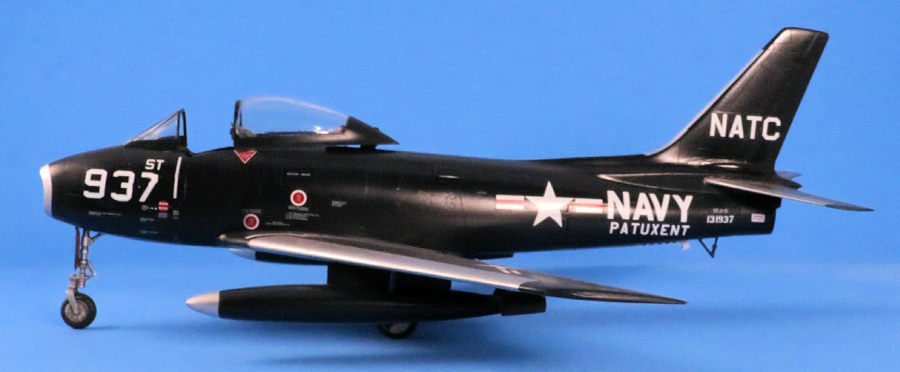
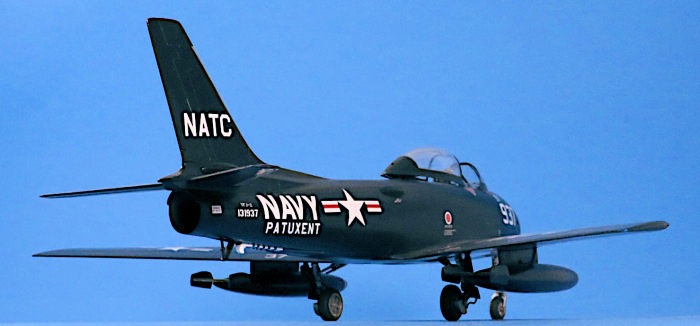
| COLORS & MARKINGS |
Thompson’s blog noted that not only were the inner gear doors red, but so were the entire wheel wells. I painted the wells and inner doors with insignia red, then sealed them up in prep for final painting. The decal instructions showed that the YFJ-2 wing slats, drop tank tips, leading edge of the tail surfaces and nose intake were silver. I painted these with Tamiya silver lacquer and masked them off.
 From my
previous build of the FJ-1, I had lightened the entire bottle of Tamiya Sea Blue
with some white for a scale color effect. I sprayed my custom Sea-blue, applied
a good coat of Future and was ready for decals. The Caracal markings for the
YFJ-2 went down with no problems at all.
From my
previous build of the FJ-1, I had lightened the entire bottle of Tamiya Sea Blue
with some white for a scale color effect. I sprayed my custom Sea-blue, applied
a good coat of Future and was ready for decals. The Caracal markings for the
YFJ-2 went down with no problems at all.
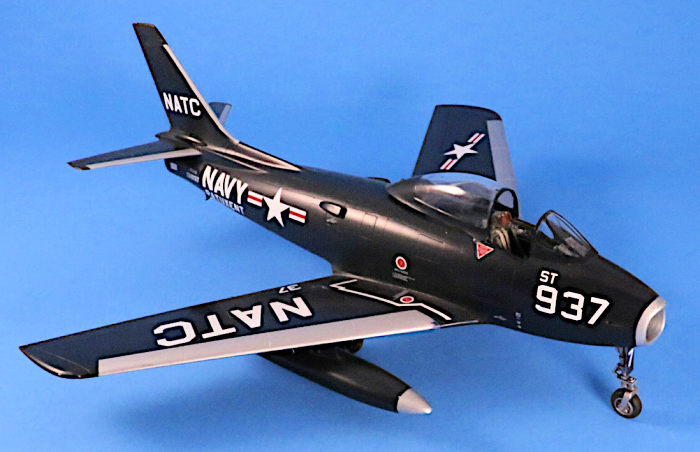
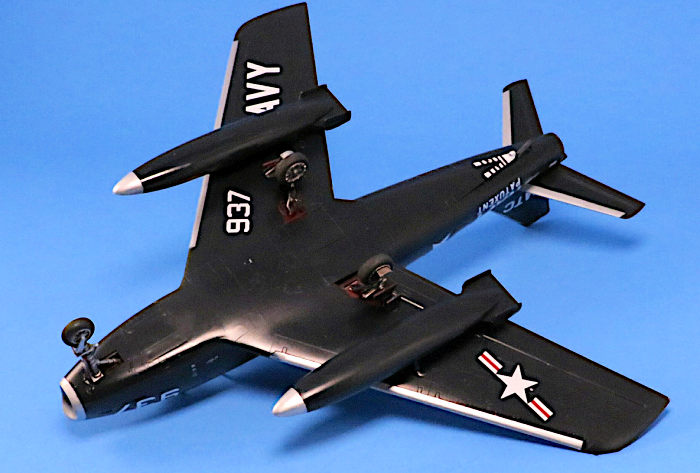
After another sealer coat of Future, followed by a coat of Tamiya clear, semi-gloss, I unmasked everything and added the landing gear. To give the plane a slight nose-high stance, I added a spacer in the nose well to mount the gear to. This created a “longer” nose gear and a higher nose.
After everything was dry, I took some photos and realized I had a problem that I hadn’t noticed before. I had glued the canopy closed and saw that the seat barely showed over the cockpit ledge. I don’t know if the cockpit is too deep or the canopy is too tall. The canopy was easy to remove, but I had supper-glued the seat to the cockpit floor and it wasn’t going to come out without breaking something. I decided that with the canopy open, it didn’t look too bad.
| CONCLUSIONS |
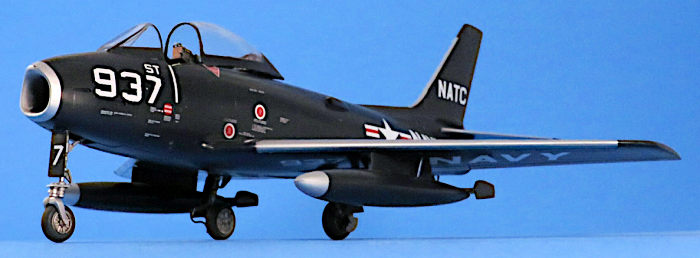
For all of the kit’s faults, it really looks good in the white NATC markings over dark sea blue. Placed next to the FJ-1, the contrast in shape and form is so great that they really should have been the FJ-1 and the F2J-1, but I’m sure that the Navy’s decision not to do this was more political/funding issues rather than design.
I probably won’t do an FJ-3 since it is nearly externally identical to the Dash-2, but I do have an FJ-4 that I will someday add to this set.
| REFERENCES |
Tailhook Topics (an internet blog) by Tommy H. Thompson, https://tailspintopics.blogspot.com/
Chuck Horner
17 April 2025
Copyright ModelingMadness.com. All rights reserved. No reproduction in part or in whole without express permission.
If you would like your product reviewed fairly and fairly quickly, please contact the editor or see other details in the Note to Contributors.