| KIT #: | |
| PRICE: | $39.00 shipped from an old kit retailer |
| DECALS: | One option |
| REVIEWER: | Joel Hamm |
| NOTES: | 1957 re-box, possibly from Trim Molds |
| HISTORY |
The history of the plane, history and contents of the kit, and history of how it ended up on my workbench are covered in an earlier submitted Kit Preview, so let’s get down to:
| CONSTRUCTION |
 Our most cherished
convictions are often easily overthrown. The story circulates in scientific
circles of a chemist who proved that you actually can make a silk purse out of a
sow’s ear. He procured the raw materials from a slaughter house, dissolved them
in acid, denatured and renatured the proteins into a gelatin which he extruded
and coagulated into fibers, then spun and wove into a purse. If he could do it
why not we?
Our most cherished
convictions are often easily overthrown. The story circulates in scientific
circles of a chemist who proved that you actually can make a silk purse out of a
sow’s ear. He procured the raw materials from a slaughter house, dissolved them
in acid, denatured and renatured the proteins into a gelatin which he extruded
and coagulated into fibers, then spun and wove into a purse. If he could do it
why not we?
I had bought this prehistoric kit because it was advertised as 1/72 scale; thus the only legitimate injected rendering of the Cutlass’s sexy dash one variant. The dashing of those expectations was going to consign it to the curiosities bin with all the Mach 2 and Merlin not-worth-the-effort purchases. Building an ancient off-scale might be fun, but would steal valuable time from the task of serious seventy second scale modeling.
Task? Serious modeling? Steal time? The thought triggered one of those epiphany things; a religious experience; though on this site we’re not supposed to discuss religion. In such State of Grace I said to myself: “Self, modeling is a hobby. Hobbies are for happiness. Tom Jefferson guaranteed the inalienable right to pursue happiness in any way that is legal and doesn’t cause blindness or hair to grow on the palms of our hands. Some guys model whiffers. Some build Luftwaffe ’46. Some do sci-fi. Others sculpt pubescent Japanese schoolgirls with bulbous eyeballs and burgeoning breasts. If it would bring happiness to build an odd-scale model from childhood days – BY GAWD - BE HAPPY!
Besides, Serious Modeling had become a snore and a chore. Diddling, doodling, canoodling, and horbgorbling with a who-gives-a-damn project might restore the spring to my step and the joie to my vivre.
 First intent was to see what emerged from an OOB
slap-together IAW the patience, style, and skill level of a 1957 8 year old. But
the quality of the plastic pleaded for better (see op cited kit preview).
Banking into a steep 180 I committed the total of my resources and talents to
bringing this 60 year old relic into the 21st
century.
First intent was to see what emerged from an OOB
slap-together IAW the patience, style, and skill level of a 1957 8 year old. But
the quality of the plastic pleaded for better (see op cited kit preview).
Banking into a steep 180 I committed the total of my resources and talents to
bringing this 60 year old relic into the 21st
century.
First ministrations were to the few sink holes and such. The shrink dimples on the vertical fin sponsons and the underwing slots for the mythical rockets were Bondo’ed and sanded; Bondo’ed and sanded; then Bondo’ed and sanded again, because that filler shrinks so badly on drying.
Blocked off openings next had to be opened. The nose gear rectangle yielded to a razor saw, then was backed up with something out of the miscellaneous bin that resembled a wheel well. After fuselage join-up the cockpit blank-out, with its shrunken pilot’s head, seat, and HUD got ground away.
The canopy was now too small, as well as rough, clouded, and misshapen. The chance was zero of finding something suitable in the spares box, but an attempt was nevertheless made that unearthed a few close-but-no-cigar bubble tops; the best forming the basis for a proper vacu-formed transparency.
A tub of tape was wound around it and filled with JB Quick Weld. That epoxy plug got repeatedly eyeballed and Dremeled until the size and shape matched a GOOGLE-supplied profile view. After finish smoothing it was mounted on the vacuum box of my kitchen table set-up (refer to archived how-to articles). Heated acetate was overlaid, and one full atmosphere worth of kilo-Pasquales applied via Shop-Vac.
Three tries and I had a perfect female copy of the male mold, from which it was freed, rough trimmed, and re-filled with Durham’s Rock Hard wood putty to facilitate final fitting and framing.
Sliding the fins onto the wings would have sent an Ike era whelp running to Dad for assistance, which he likely would have provided using Mom’s nail files and emery boards, landing them both in hot water. The engine exhaust section also demanded filing to fair it into the fuselage.
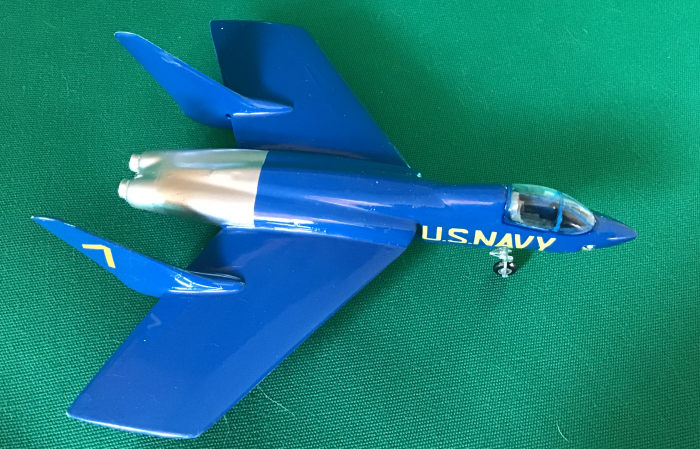
| COLORS & MARKINGS |
 That
step completed airframe assembly and sent the project to the paint shop where
another dose of Gilberts Chemistry Set experimentation was applied. In a Readers
Forum blog I had discussed the use of Wal-Mart bottom-of-the-line acrylic hobby
paints. Here was an opportunity to put my $0.87 worth of money where my mouth
was.
That
step completed airframe assembly and sent the project to the paint shop where
another dose of Gilberts Chemistry Set experimentation was applied. In a Readers
Forum blog I had discussed the use of Wal-Mart bottom-of-the-line acrylic hobby
paints. Here was an opportunity to put my $0.87 worth of money where my mouth
was.
Prior experience proved primer was necessary, so I resorted to W-M’s ninety six cent gloss white spray can. It came out in a heavy coat, but heavy was appropriate to cover bloopers and blend seams. It dried to blotches of gloss, semi gloss, and flat; but for $0.96 you get what you pay for. A few swipes with a nylon automotive paint buffer unified everything and gave the acrylic something to bite onto.
Water was the only solvent that did not curdle the dark navy satin (full gloss was sold out). To get any sort of coverage and adhesion it had to be thinned to where it just barely shpritzed from the Badger 200. Normal recommendation for airbrushing is the viscosity of milk. I’d call this the consistency of condensed milk – maybe sweetened condensed milk; with pressure set to just below the hose bursting point, and the needle cranked out to full emergency war power. Repeated clogging was a problem but I’m told that’s par for the course with even top end acrylics.
Despite its heavy coat the paint forgave sags and runs, then leveled to re-reveal the raised surface detail. It passed the fingernail scratch test, but dried with a slight graininess and red-purple iridescence. Both glitches disappeared under a gloss coat, though not with Future / Kleer, which earlier experimentation showed would soften and lift the paint even after a week of curing. Minwax Polycrylic wood finish, cut to half strength with water and applied in multiple mists, was better tolerated.
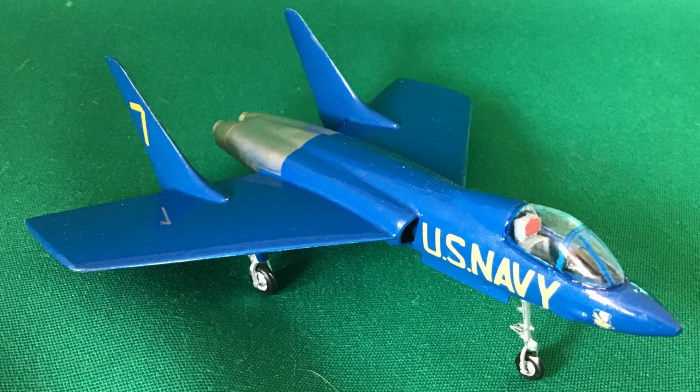
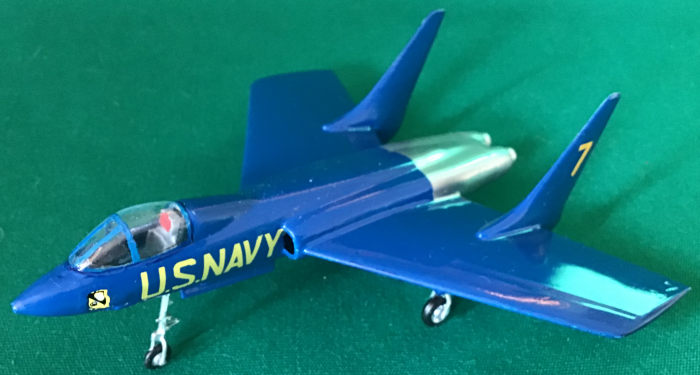
 The
rear fuselage hot section was treated to Testors chrome auto lacquer.
The
rear fuselage hot section was treated to Testors chrome auto lacquer.
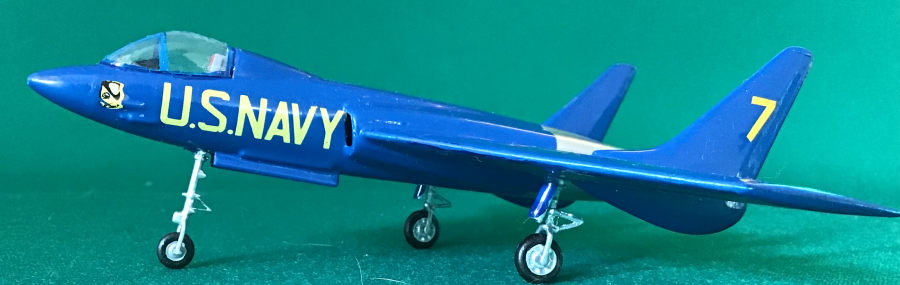
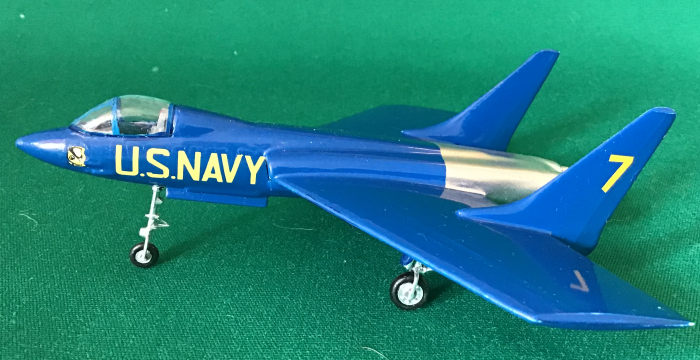
What to wear – what to wear? The kit decals had not aged gracefully; nor had they been much to start with. Then again, on both those counts I’m not one to talk. Blue Angels yellow-gold lettering would perfectly accessorize Wal-Mart’s royal robes; but a miracle would be needed to find appropriate markings in the spare decal box.
Well, miracles do happen; sometimes in abundance. A reach into the Zip Loc brought up a fistful of unused Navy demo team markings, as well as a pair of Microscale yellow letters/numbers sheets. Unfortunately, all had been in repose and residence for several decades. Dressing a project in old decals is always a painful procedure, excruciating when the transfers are 1/72 and the airplane is 1/96.
Trial and extensive error with the extra transfers confirmed suspicions that age had rendered them highly explosive upon water contact. I was out of Testors Decal Saver varnish; but that stuff was never worth a damn anyway. Several coats of Future had zero effect; but a brushing of Polycrylic did hold them together – at the cost of creating a heavy, dullish film.
Multiple Solvaset soaks eventually settled them down. An eight year old urchin would have been pleased with the result but I was not. I removed them with tape; continued rummaging through the spares bag; and after many false starts and backtracks that threatened the project with CFIT, came up with enough acceptable markings to complete the scheme in which 2 Cutlasses joined the Blue Angels as non-aerobatic participants during the late ‘50’s.
| FINAL CONSTRUCTION |
 Furnishing the flight
deck was the first of the last steps required. An amorphous ejection seat
came from the spares box and was roto-tooled into acceptable size and shape.
The instrument panel cowl was cut from an underwing store, and joystick
(correctly Joyce stick) from stretched sprue.
Furnishing the flight
deck was the first of the last steps required. An amorphous ejection seat
came from the spares box and was roto-tooled into acceptable size and shape.
The instrument panel cowl was cut from an underwing store, and joystick
(correctly Joyce stick) from stretched sprue.
The home-brewed vacanopy appeared a tad overblown, but fit perfectly when affixed with Dollar Tree Store transparent gel. (Refer to “Pharmacopeia” Readers Forum thread.)
On a one to ten scale, grading on a curve to make allowance for the kit’s vintage, the clearly and cleanly spoked wheels rank a twelve; and the struts come up at eight or nine. The wheel forks had to be cleaned up and thinned a bit; and of course the axle holes opened; but when the 1957-molded parts were snapped together with the help of a nano-drop of Super Stickum, they looked more realistic than anything now cranked out by the Hsemiyans, or flung over The Great Wall.
Torque links were molded as solid triangles, just as they often still are three quarters of a century later. Schnipping them away and replacing from a spare PEB fret was a small step with small parts that required large measures of skill, time, and patience but made a large difference in the buildup results.
When it was all together the single lead shot in the nose proved insufficient to prevent tail squatting; but thanks to the ersatz nose gear well, an inch of plumber’s solder brought the CG properly and invisibly back into the envelope.
| CONCLUSIONS |
Snazzy silk purse, if I do say so myself.
March 2014
Copyright ModelingMadness.com
If you would like your product reviewed fairly and quickly, please contact the editor or see other details in the Note to Contributors.