| KIT #: | 07225 |
| PRICE: | $40.00 |
| DECALS: | Three options |
| REVIEWER: | Hans Gertje |
| NOTES: | Aftermarket used: CAT4 nose section, Wolfpack airbrake, Eduard wheels & seat, Aires gear bay, Furball decals. |
| HISTORY |
Still active since its establishment in 1945, Fighter Squadron 32 (VF-32, aka the “Fighting Swordsmen” and now known as VFA-32) has a rich history. This squadron has participated in various conflicts since their inception. They first saw combat action in the Pacific Theater of World War II. In the Korean War, their ranks included the first African American flight training graduate Jesse L. Brown, and Medal of Honor recipient Thomas Hudner. Hudner received this award in his attempt to rescue Brown, who had been shot down in a sortie. VF-32 was deployed to the 1958 Lebanon Crisis and provided escort for reconnaissance missions during the 1962 Cuban Missile Crisis. They also made several deployments in WESTPAC during the Vietnam War. In 1989, VF-32 F-14s shot down Libyan MiGs in the second Gulf of Sidra incident.
In 1956 VF-32 became the
first naval combat-ready squadron to receive the F8U Crusader, and they would
derive their nickname the “Fighting Swordsmen” from this aircraft. They soon
deployed to the Mediterranean in response to political unrest in Lebanon in
1958. VF-32 would later receive an upgraded version of the Crusader, the F8U-2N,
with “N” indicating its new night/all-weather cap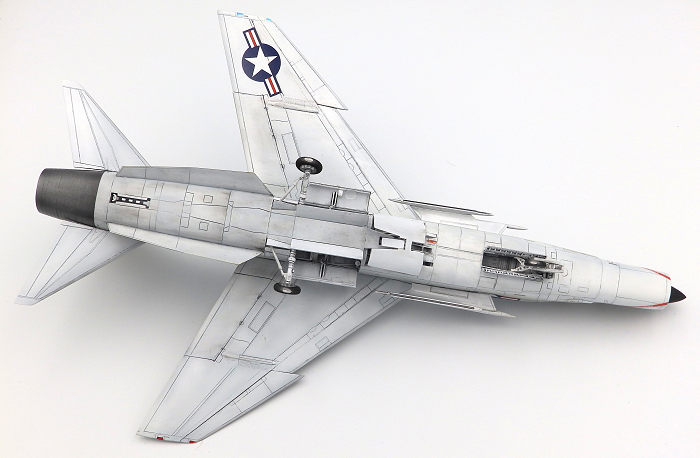 ability.
Aboard the USS Saratoga,
VF-32 completed several tours, all in the Mediterranean. During their 1961-1962
cruise, VF-32 demonstrated their fighters aboard the French aircraft carrier
Clemenceau, which lead
the Aéronavale to adopt the F-8 as their premier naval fighter. VF-32 would tour
with the F-8 for the last time in 1965. One of their aircraft, BuNo. 148710, was
featured at the 1965 Paris Air Show.
ability.
Aboard the USS Saratoga,
VF-32 completed several tours, all in the Mediterranean. During their 1961-1962
cruise, VF-32 demonstrated their fighters aboard the French aircraft carrier
Clemenceau, which lead
the Aéronavale to adopt the F-8 as their premier naval fighter. VF-32 would tour
with the F-8 for the last time in 1965. One of their aircraft, BuNo. 148710, was
featured at the 1965 Paris Air Show.
The F8U-2N first flew in 1960 and 152 were built. Following the 1962 Tri-Service Aircraft Designation System, the F8U-2N was redesignated the F-8D. The F-8D was the fastest and most capable version of the Crusader yet. Receiving the Pratt & Whitney J57-P-20 engine upgrade gave it unprecedented speed, reaching Mach 1.9. It was also the first all-weather version, equipped with the AN/APQ-83 intercept radar. Other new features included the addition of an IR scanner beneath the windscreen, a rudimentary autopilot, and removal of the seldom-used belly rocket pack in place of added fuel.
In 1967, F-8Ds were part of a remanufacturing program and were upgraded to the F-8H, including the aircraft of this build article (BuNo. 148710). These aircraft received advanced avionics equipment, strengthened landing gear, underwing pylons, and other improvements. As an F-8H, BuNo. 148710 was piloted by Lt. Cdr. Lowell “Moose” Meyers of VF-51. In June 1968, Meyers shot down a VPAF MiG-21 with this aircraft.
| THE KIT |
The best possible kit to model the F-8 Crusader in 1/48 is still the 2003 tooling from Hasegawa. Although a mold break in the fuselage parts of this kit hints that earlier versions of the F-8 were in store, over 20 years later we are still waiting and will likely never see them—from Hasegawa at least. As of 2025, complete injection molded kits for the RF-8 and F-8A/B/C/D/H/Ks do not exist in 1/48 (kit manufacturers! If you’re reading this, please consider a new tooling for this wonderful jet, including early and recon versions!). For those unfamiliar with the Hasegawa F-8, you can read its preview here: https://modelingmadness.com/review/viet/chladekf8preview.bak
The void of backdated F-8s has thus always been filled by aftermarket manufacturers. The latest in the long line of conversion kit makers is CAT4. In 2024, they released quite a few parts that can be used to build something other than an F-8E or J with your Hasegawa kit. You can read more about them in my preview here (https://modelingmadness.com/others/conversions/cat4f8.htm). For this build, I am using R48100, which includes the narrow forward fuselage and smaller nose, a “humpless” middle wing section, and various other modifications such as the early instrument panel and control stick.
 CAT4 does
not provide much information at all about which components are needed for which
version, so you must do careful research to determine the necessary parts
yourself. R48100 has the components needed to build an F-8B, C or D, except for
the full-length windscreen part needed on the B and C (R48102), which must be
purchased separately. As I was interested in building an F-8D with some CAT4
provided decals (more on them in a moment), R48100 meets all the needs for this
jet. The major changes include replacing the forward fuselage, instrument panel,
and removal of the Bullpup hump. The F-8D had the IR scanner also equipped by
the E, which means using the Hasegawa windscreen instead of R48102.
CAT4 does
not provide much information at all about which components are needed for which
version, so you must do careful research to determine the necessary parts
yourself. R48100 has the components needed to build an F-8B, C or D, except for
the full-length windscreen part needed on the B and C (R48102), which must be
purchased separately. As I was interested in building an F-8D with some CAT4
provided decals (more on them in a moment), R48100 meets all the needs for this
jet. The major changes include replacing the forward fuselage, instrument panel,
and removal of the Bullpup hump. The F-8D had the IR scanner also equipped by
the E, which means using the Hasegawa windscreen instead of R48102.
Although CAT4 did an admirable job capturing the shape of the early forward fuselage, the nose cone part that is attached is not shaped correctly. CAT4 had previously improved on their first version of the early F-8 nose and reissued it as a single piece that is attached by butt joint. In the process they redesigned the nose cone that is somewhat more accurate but still misses the mark. It is too short and vertically wide. I sought some help from a 3D printing expert, Jonathan Smith, aka CrosseyedModeler. Jonathan used line drawings and an example of the CAT4 kit I sent him to print an accurate-as-possible nose cone that would also fit with CAT4’s forward fuselage. The result is an excellent part that fits well and is a dead ringer for the early nose.
In addition to CAT4’s components, I chose to include a Wolfpack airbrake bay, Aires resin wheel wells, and some Eduard detail parts (wheels, cooling scoops, and ejection seat). CAT4 also provided a small set of ECM fairings and a catapult pin, the latter of which I will install into the airbrake bay.
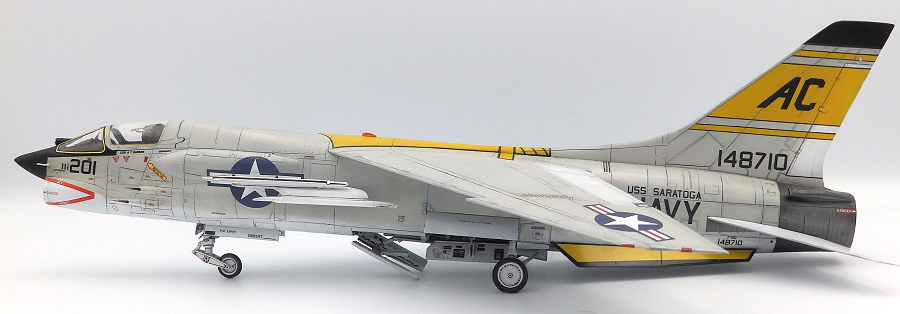
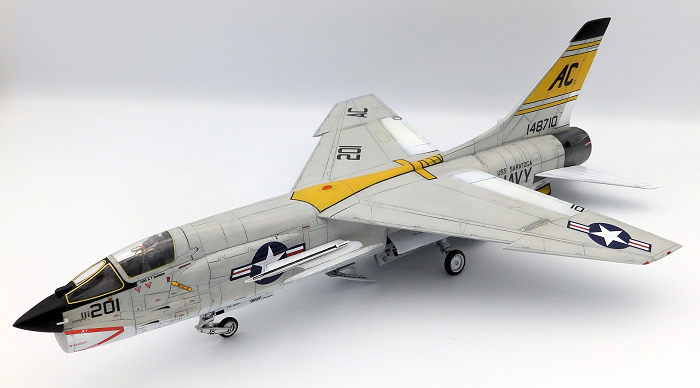
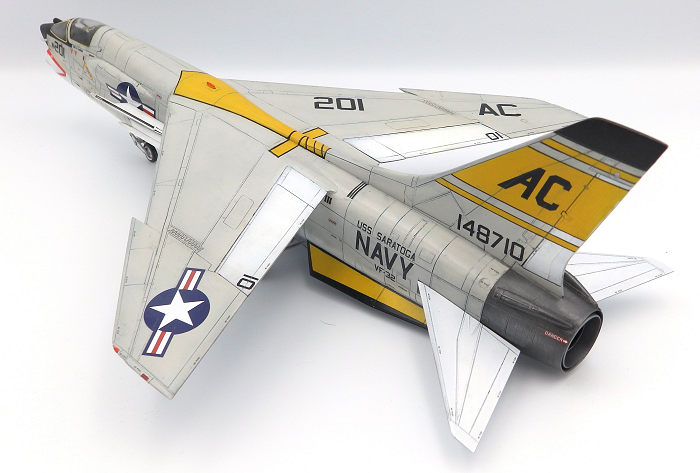
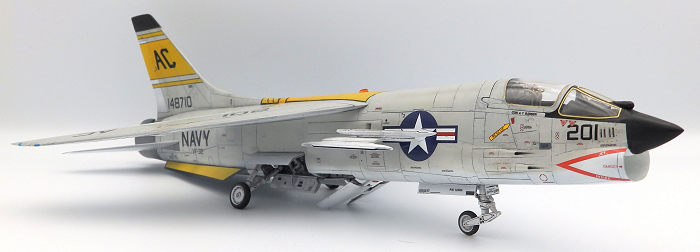
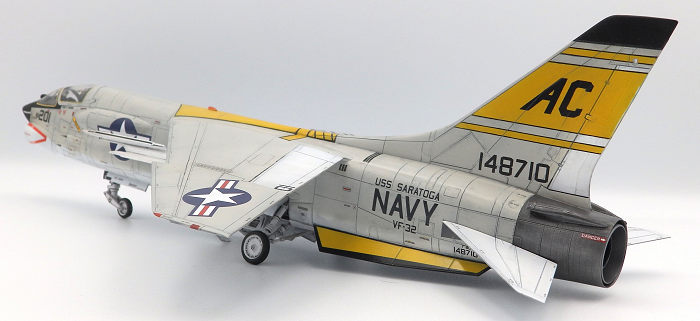
The decal sheet provided by CAT4 (D48007) includes two options for the F-8D. One is for a VF-32 jet that toured off the USS Saratoga in 1965 (148710, which would later be Lt. Cdr. Meyer’s MiG killer). The other is a VF-62 jet. The VF-32 scheme is particularly great, as it features striking yellow markings on the tail and fins, and a giant yellow sword on the spine. There are issues with this option, however—mainly the large “AC” tail code lettering is too bold compared to reference photos. Since I am a diehard and a masochist, I have a plan to paint over and add my own tail codes. The yellow areas are a bit on the light side, so once these decals are laid on, they will be painted over with Gunze FS Insignia Yellow, and I will make a mask derived from scale photos to paint on the “AC” tail code.
| CONSTRUCTION |
 I
technically began this build last year when I first cut into this Hasegawa F-8
to assess CAT4’s forward fuselage parts. Finally, this past May, I had a
complete plan in place to receive the 3D printed nose cone from Jonathan and
began construction in earnest. Starting with the fuselage halves, I cut away the
molded airbrake section to accommodate the open Wolfpack airbrake. In reference
photos, parked F-8s often had their airbrakes lowered to varying degrees due to
the steady slacking of hydraulic pressure, so this is a realistic feature to
add. The panel lines on the bottom side of the fuselage are quite poorly molded,
so I scribed them deeper and sanded down to improve the appearance.
I
technically began this build last year when I first cut into this Hasegawa F-8
to assess CAT4’s forward fuselage parts. Finally, this past May, I had a
complete plan in place to receive the 3D printed nose cone from Jonathan and
began construction in earnest. Starting with the fuselage halves, I cut away the
molded airbrake section to accommodate the open Wolfpack airbrake. In reference
photos, parked F-8s often had their airbrakes lowered to varying degrees due to
the steady slacking of hydraulic pressure, so this is a realistic feature to
add. The panel lines on the bottom side of the fuselage are quite poorly molded,
so I scribed them deeper and sanded down to improve the appearance.
Much work went into grinding away excess resin from the Aires wheel wells, especially the nose wheel well. On the kit, the nose wheel well is attached to the intake assembly, so this had to be removed and replaced with the equivalent resin part, which required loads of grinding and sanding so it would fit properly between the fuselage halves. I can’t say it’s something I’d want to do again. Part of my reason for using them was to avoid filling in the numerous ejector pin marks in hard-to-reach spaces. Although these resin wells are immaculately detailed, I’d rather spend time just scratchbuilding these details, and deal with the ejector pin marks.
To accommodate the CAT4 forward fuselage part, the forward ~1.8 cm of the kit intake assembly must be cut away. To get a completely flush fit, I left a little more than I was supposed to cut, carefully sanded the connection point of the fuselage and the intake so they would be aligned. The intake seams were cleaned up with putty and super glue, sanded down, and painted Tamiya X-2 White using the “pour method”. This took several tries to get a good buildup of paint to hide seams.
Tired of resin parts, I opted to use the kit part for the cockpit tub. This was simply painted with Gunze Dark Gull Grey and Tamiya Flat Black for the instrument panels. The cockpit is meant to act as a connection point that helps align the CAT4 forward fuselage and the main fuselage when they are joined, but the fit is not perfect. The F-8D also had an earlier instrument panel with a circular radar scope, this was taken from the CAT4 R48100 kit and painted Flat Black. All the dials, gauges and switches were detail painted with various white, red, and yellows as appropriate, and gauges were given a “glass” cover with tiny drops of W&N Galeria Gloss.
 As I was
preparing to join the fuselage halves with innumerable test fits, I was also
working on the wings. This time, I’m opting for a simple “wing down”
configuration for the Crusader’s variable incidence wing, mainly because I want
to display the large VF-32 sword decal on the jet’s spine. The F-8D did not have
the Bullpup hump, so I cut off the wings from the top half of the main wing
assembly halves and assembled them with the “humpless” middle wing section from
R48100. The fit was decent but far from perfect, as there was a step between the
kit and resin parts that make up the bulkhead. There were also sizable gaps to
fill between the top wing halves and the middle wing section. The top of the
joints for the wing fold mechanisms have strange raised “bumps” that are
entirely fictional, so I alternately sanded these down and scribed deeper the
panel lines of the “piano joints” until the bumps were gone.
As I was
preparing to join the fuselage halves with innumerable test fits, I was also
working on the wings. This time, I’m opting for a simple “wing down”
configuration for the Crusader’s variable incidence wing, mainly because I want
to display the large VF-32 sword decal on the jet’s spine. The F-8D did not have
the Bullpup hump, so I cut off the wings from the top half of the main wing
assembly halves and assembled them with the “humpless” middle wing section from
R48100. The fit was decent but far from perfect, as there was a step between the
kit and resin parts that make up the bulkhead. There were also sizable gaps to
fill between the top wing halves and the middle wing section. The top of the
joints for the wing fold mechanisms have strange raised “bumps” that are
entirely fictional, so I alternately sanded these down and scribed deeper the
panel lines of the “piano joints” until the bumps were gone.
I glued in the fuselage “guts” to include the gear bays, intake, tailhook recess, and airbrake bay, and drilled out holes for the afterburner cooling scoops and missile launch rails. The F-8D I am building also did not have the ECM antenna on the upper trailing edge of the tail at the time, so this was removed. The halves went together well considering the amount of modifications, the biggest challenge getting the nosegear well to sit completely flush with the inner recess it attaches to. I then inserted the cockpit where it normally fits above the intake, then attached the forward fuselage.
Further work on the fuselage needed to be done, including cutting away the fuselage section of Bullpup hump. CAT4 provides a plug specifically for filling in this part, which I used, but found that it is rather flat. The middle wing section should be perfectly flush with the rest of the aircraft, and test fits show this was not the case. I used gel super glue to build up that area forward of the wing above the CAT4 plug and spent a lot of time sanding this and the attached wing section down until they were in conformation. Panel lines in this area needed to be rescribed.
On the airbrake bay, I drilled out a section in the middle to add a CAT4-provided catapult pin—a small but distinct detail that is completely missing on the Hasegawa kit and the Wolfpack bay. I then attached some panel parts from the Wolfpack and Hasegawa kits to complete the bottom fuselage around the gear and brake bays.
Final parts of the major construction phase included attaching the 3D printed nose cone, masking and attaching the windscreen with Krystal Klear, and attaching the ventral fins and Eduard resin afterburner cooling scoops. The forward ~2mm of the windscreen had to be sawed off to accommodate the nose cone part. Then it was on to the long prep of the entire model to fill and sand all the gaps, scratches, and steps. Care was taken to profile the seams for the CAT4 forward fuselage. The seams are along a panel line, but there are steps to be sanded down, and the seam is wider and unrefined, so it was filled in with superglue and rescribed.
| COLORS & MARKINGS |
On this model, I debuted my new Harder & Steenbeck Evolution 2024, which I got from John Miller (aka Dr. Strangebrush) at Model Paint Solutions (modelpaintsol.com). John’s products and customer service are top notch. In addition to excellent airbrushes and modeling supplies, John provides excellent customer support and instruction that you wouldn’t get from any other distributor. His advice really helped dial in an excellent, glossy finish with my paints, using a 30:60:10 ratio of paint:thinner:retarder.
This F-8 is painted as they all were, with Gunze FS16440 Light Gull Grey over gloss white, which was achieved with a combination of Tamiya White and Gunze Insignia White. Details painted on included masking off to paint the nose cone and windscreen Tamiya Flat Black. The tail cap was painted Flat Black as well—this detail is provided as part of CAT4’s decals, but like many I prefer painting if I can. Finally, the tailpipe was painted gloss black, then layered with Gunze Super Metallic Aluminum and Iron. And so, painting this model was simple as anything, and it’s on to the decals…
 …or so I
thought. Unfortunately, the CAT4 decals for the tail stripes and sword on the
spine broke. This put me at a decision to either select a different set of F-8D
markings or try to paint the markings on. Since I already planned to paint over
the decals to correct them anyway, and had photocopies of the sheet for this
purpose, I went ahead with painting them. Using the panel line of the fin cap to
align all the masking tape, I laid down masking tape strips cut out that matched
the width of the stripes on the sheet. After painting the yellow, I masked over
that to paint the black pinstripes on the tail and the “AC” modexes. On the
starboard side, I cut the lettering masks from a scale photo of the jet’s tail,
which has the correct font. For the sword, I cut out the complete shape from the
photocopy. This would serve as a negative template for the shape. I laid it down
on the model, lined strips of tape along the edges, and then removed the
template for where the yellow was to be painted. After painting the yellow, I
lines strips of tape to make the black stripes. It was very satisfying to pull
all the masks to reveal the painted replication of the VF-32 markings.
…or so I
thought. Unfortunately, the CAT4 decals for the tail stripes and sword on the
spine broke. This put me at a decision to either select a different set of F-8D
markings or try to paint the markings on. Since I already planned to paint over
the decals to correct them anyway, and had photocopies of the sheet for this
purpose, I went ahead with painting them. Using the panel line of the fin cap to
align all the masking tape, I laid down masking tape strips cut out that matched
the width of the stripes on the sheet. After painting the yellow, I masked over
that to paint the black pinstripes on the tail and the “AC” modexes. On the
starboard side, I cut the lettering masks from a scale photo of the jet’s tail,
which has the correct font. For the sword, I cut out the complete shape from the
photocopy. This would serve as a negative template for the shape. I laid it down
on the model, lined strips of tape along the edges, and then removed the
template for where the yellow was to be painted. After painting the yellow, I
lines strips of tape to make the black stripes. It was very satisfying to pull
all the masks to reveal the painted replication of the VF-32 markings.
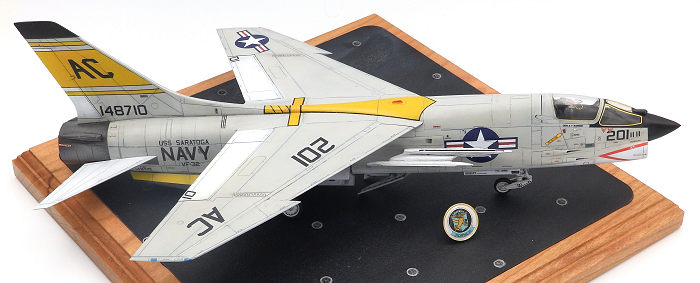
From there, I managed to use the essential CAT4 sheet decals to get the job done, most importantly the “NAVY/USS SARATOGA/VF-32” letterings that wouldn’t be available from any other sheet I had. I also used the nose and wing numbers and letters. I do not know if my earlier mishap with the CAT4 decals was because of the water being too hot, but even with warm water, these decals were difficult to move around the model and tore in a couple places. Fortunately, I was able to get everything set in place and any tears were fixable. After that it was all Furball. Because this jet is a future MiG Killer and featured on the MiG Masters sheet as an F-8H, I used those BuNo. decals and standard F-8 stencils and insignia instead. After poring over photos of this aircraft, I also decided to add some details that would add to the overall authenticity, so I home printed the pilot and ground crew names from my interpretation of photos, and a few other stencil details from other sheets in the stash.
I weathered this F-8 relatively lightly, using Tamiya Grey Panel Line Accent Color and Tamiya Weathering Set B. I also lightly brushed some Winsor & Newton black, white, and brown oil paints into various parts of the jet. I generally hew to the “less is more” philosophy on weathering and found that the best of it came out when simply removing the excess panel line wash, which left a nice, slightly off-color patina.
| FINAL CONSTRUCTION |
 The
trickiest part of final assembly was ensuring proper fit with the kit plastic
landing gear and the resin wheels and gear bays. The connecting points on the
plastic main gear legs had to be sanded down. I still got a very snug, sturdy
fit and attached them with gel super glue. I carefully attached the gear doors,
airbrake, and tailhook, and slowly stuck the rear horizontal stabilizers in
place, which were very snug with the poly caps that Hasegawa uses. The Hasegawa
kit’s engine assembly sticks out slightly beyond the end of the tailpipe, which
is incorrect. I shaved off some plastic between the two parts and trimmed off
part of the “rails” that run inside to ensure the engine was flush with the end
of the tailpipe. As a final touch, I drybrushed some Model Master Chrome Silver
on the tailpipe to give it a more flat finish.
The
trickiest part of final assembly was ensuring proper fit with the kit plastic
landing gear and the resin wheels and gear bays. The connecting points on the
plastic main gear legs had to be sanded down. I still got a very snug, sturdy
fit and attached them with gel super glue. I carefully attached the gear doors,
airbrake, and tailhook, and slowly stuck the rear horizontal stabilizers in
place, which were very snug with the poly caps that Hasegawa uses. The Hasegawa
kit’s engine assembly sticks out slightly beyond the end of the tailpipe, which
is incorrect. I shaved off some plastic between the two parts and trimmed off
part of the “rails” that run inside to ensure the engine was flush with the end
of the tailpipe. As a final touch, I drybrushed some Model Master Chrome Silver
on the tailpipe to give it a more flat finish.
The Sidewinder launch rails were assembled and painted white. VF-32 F-8s from this period have double launch rails. They were empty in virtually all photos I found, likely owing to the low intensity of operating in the Mediterranean in 1965, so there was no need to build and paint ordnance.
I used an Eduard ejection seat with pre-painted photo etch. Some 91% IPA accidentally got in the plastic pouch that held the fret, which in turn ruined the painted-on details. I repainted these and attached the repainted parts to make a very nice-looking seat. The bottom of the seat and interior frame and bulkhead parts of the canopy needed to be trimmed quite a bit to successfully fit the canopy in a closed position. I painted and attached the wingtip, tail, and top and bottom fuselage lights (Tamiya Clear Blue and Red as directed). CAT4’s early F-8 set provides a 3D printed pitot tubes and angle-of-attack vanes, which are respectively attached to the port and starboard sides of the cockpit. Once these were attached, I finally declared the model finished.
| CONCLUSIONS |
This is undoubtedly the most work I’ve put into a model yet, exceeding even the Monogram F-8E I built previously. Between the conversion and extra painting of the markings, it has taken 7 months to complete. As you can see, a conversion with CAT4’s early F-8 parts can be done, albeit you would have to live with some inaccuracies or try to correct them. The same can be said for the decals. A great deal of work and care must be put into prepping and aligning parts. CAT4’s forward fuselage shape is a great component on its own, as it captures the narrower profile of the early jet, and has a very thin intake lip which looks excellent. The hump-less middle section is great too, although if you want to build the jet in wing-down configuration, you might consider just removing and filling in the hump for an easier time making everything flush. CAT4 also did a great job in providing the small details like the instrument panel, pitot probe, and AoA vanes.
This was a very rewarding project. The parts and effort have produced a very nice model that I’m proud to display. I extend my great thanks to CAT4 for stepping up to help fill the conversion kit void for early F-8s. My thanks also to Jonathan Smith, who very kindly provided his 3D printing expertise to improve the nose cone, and one last shoutout to John Miller, whose airbrush products and support helped me get the nicest finish I’ve had on a model yet. Having completed this backdated F-8 kit, I offer it up as a sacrifice to the Modeling Gods. May they soon bless us with complete and accurate injection-molded toolings of the early F-8s and RF-8s in 1/48 and other scales.
| REFERENCES |
F-8 Crusader – Walk Around No. 38. Squadron/Signal. Ed Barthalmes (2005).
F-8 & RF-8 Crusader in Detail & Scale. Bert Kinzey & Rock Roszack (2019).
Naval Fighters #19, Part 4: Vought's F-8 Crusader - Navy Fighter Squadrons. Steven J. Ginter (1990).
USS Saratoga (CVA 60) Mediterranean Cruise Book 1964-65 (https://www.navysite.de/cruisebooks/cv60-65/)
3 February 2026
Copyright ModelingMadness.com. All rights reserved. No reproduction in part or in whole without express permission.
If you would like your product reviewed fairly and fairly quickly, please contact the editor or see other details in the Note to Contributors.