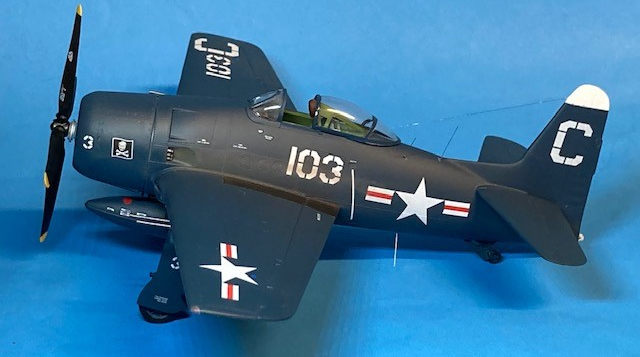
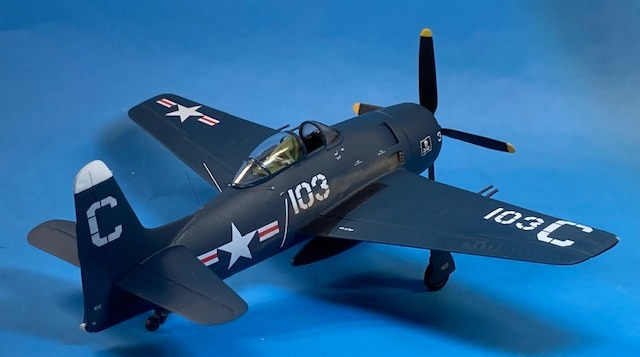
Hobbycraft 1/48 F8F-2 Bearcat
| KIT #: | 80358 |
| PRICE: | 22.50 |
| DECALS: | Two options |
| REVIEWER: | H. Davis Gandees |
| NOTES: |
| HISTORY |
I’ve built a lot of Bearcats and this 1:48 Hobby Boss, F8F-2, kit 80358, released in 2013, in my opinion is the best of the lot in 1:48 scale, but there were a few things needing correction for an accurate Bearcat:
The kit contains no pitot head. So, one was sourced from the parts bin and installed under the left wing.
There is a prominent parting seam down the center of the nicely molded canopy that was removed by scraping with a new single edge razor blade and then polished.
The kit wheels have spokes on both sides as Hobby Boss obviously designed the kit based on the Bearcat in the Naval Air Museum in Pensacola that has no brake discs. Discs were cut to size from sheet styrene, painted steel, and installed on the wheels.
 No
manufacturer can seem to get the Bearcat cowling leading edge shape
correct. Most are too blunt and need re-shaping with a coarse sanding
stick to make it more tapered. I masked the forward panel line to
protect it from the sanding process. It was finished with finer grades
of sticks and then the whole cowling was polished and ready for
painting.
No
manufacturer can seem to get the Bearcat cowling leading edge shape
correct. Most are too blunt and need re-shaping with a coarse sanding
stick to make it more tapered. I masked the forward panel line to
protect it from the sanding process. It was finished with finer grades
of sticks and then the whole cowling was polished and ready for
painting.
The prop hydraulic reservoir found behind the prop hub was not included, so the Testors part from the parts bin was painted steel and mounted on the rear of the prop hub.
There were no pylons for the wing mounted rockets that I chose not to install, so 4 pylons from a Hobbycraft kit were liberated from the parts bin and mounted in the correct wing locations.
An Eduard seat belt/harness was installed. I don’t know why kit manufacturers ignore this detail and don’t include at least a decal or PE set to correct this obvious omission.
The centerline fuel tank has no vent tube or filler cap that is clearly visible on the box art. They were fabricated from copper wire and styrene rod and painted red.
So, forget what I said about building it out of the box!
| THE KIT |
 The Bearcat
was arguably the greatest prop driven fighter ever and just missed seeing action
with the remnants of the Japanese air forces. With a top speed of 455 mph and a
climb rate of 4,500 fpm it would have finally been the aircraft that would have
matched the lightweight Japanese fighters in every aspect of aerial combat. It
was the Navy and Marine mainstay interceptor until the jets were available.
The Bearcat
was arguably the greatest prop driven fighter ever and just missed seeing action
with the remnants of the Japanese air forces. With a top speed of 455 mph and a
climb rate of 4,500 fpm it would have finally been the aircraft that would have
matched the lightweight Japanese fighters in every aspect of aerial combat. It
was the Navy and Marine mainstay interceptor until the jets were available.
My best friend, Terry is a lover of big radial engine fighters, especially Corsairs and my favorite, the Bearcat. So, I decided to build Terry a Bearcat to sit next to his Corsair I built several years ago. As this Bearcat would not see a model contest, I decided to build it pretty much out of the box.
| CONSTRUCTION |
The Hobby Boss kit is very straightforward and well-engineered, so fitment was not a problem. The fuselage seam required only slight scraping with a new razor blade. The kit panel lines, and rivet detail are excellent.
Starting with the cockpit,
the entire area in the fuselage was painted interior green. I tried to use an
Eduard PE instrument panel for a Hobbycraft kit, but it did not fit so the
acceptable kit panel was painted flat black
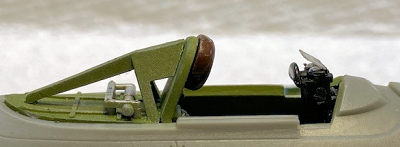 and given a light dry brushing
of aluminum. An Eduard seatbelt/harness was installed, and the completed cockpit
was given a light dry brushing of aluminum. The kit Mk8-0 gunsight was painted
flat black and assembled looking quite realistic by painting the two reflector
lenses chrome silver and then installing the reflector glass.
and given a light dry brushing
of aluminum. An Eduard seatbelt/harness was installed, and the completed cockpit
was given a light dry brushing of aluminum. The kit Mk8-0 gunsight was painted
flat black and assembled looking quite realistic by painting the two reflector
lenses chrome silver and then installing the reflector glass.
The area between the firewall and cockpit bulkhead that are clearly visible when the model is completed, was assembled and the entire area painted interior green and dry brushed with aluminum.
The engine cylinders were
painted aluminum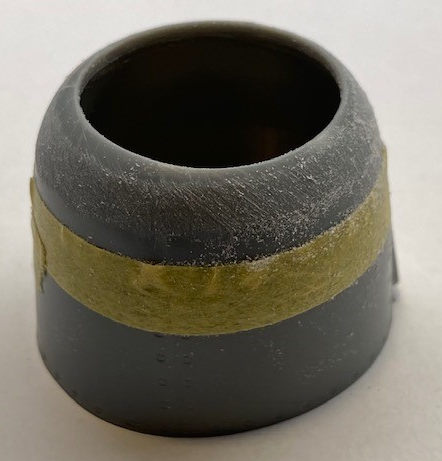 and given a black wash and the crankcase dome was painted engine gray. The
exhaust stacks were drilled out and painted gunmetal and lightly dry brushed
with steel. I had difficulty getting everything lined up correctly that required
removing all the aligning keys and aligning the 2 rows of cylinders and the
crankcase properly. The firewall engine mount ring was sanded thinner so the
prop distance from the cowling would not be too great with the addition of the
hydraulic prop reservoir behind the prop hub. The engine cowling is too square
at the front but can be reshaped.
and given a black wash and the crankcase dome was painted engine gray. The
exhaust stacks were drilled out and painted gunmetal and lightly dry brushed
with steel. I had difficulty getting everything lined up correctly that required
removing all the aligning keys and aligning the 2 rows of cylinders and the
crankcase properly. The firewall engine mount ring was sanded thinner so the
prop distance from the cowling would not be too great with the addition of the
hydraulic prop reservoir behind the prop hub. The engine cowling is too square
at the front but can be reshaped.
The model parts were all assembled without difficulty checking for proper wing and stabilizer dihedral and set aside to dry. The Bearcat landing gear placement is critical so check photo references for the proper alignment side and front views. The inner landing gear doors are often installed backward, so make sure the triangular section is to the rear.
The nav lights were drilled to replicate bulbs and painted red/green and blended into the wing tips, polished, and masked. The wing walks were painted flat black and masked and the tail was painted white according to period photos as the kit instructions showed it too tall. These areas were masked, and the model was ready for paint.
The windscreen was masked with an Eduard mask and installed, and the cockpit masked and filled with pieces of foam rubber to keep out paint.
 Since the no
longer availability of my favorite Model Master F.S. 15042 Gloss Sea Blue, I’ve
switched to Tamiya AS- 8, U.S. Navy Blue rattle can acrylic lacquer. It is
slightly lighter, but I think just enough to adjust for scale. Two coats were
applied lightly to save details and when dry, a wet clear coat was applied for
applying decals. Blue formation lights were cut out with a punch and die and
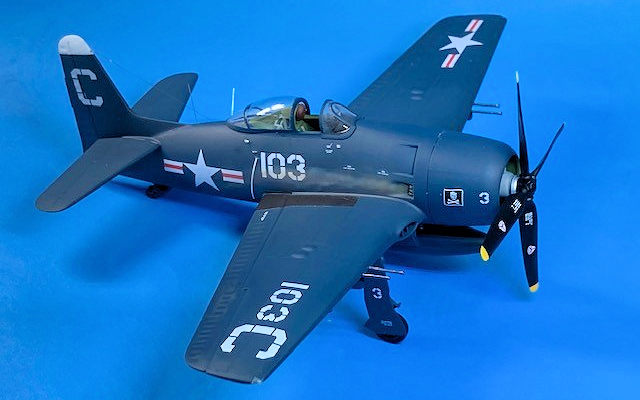
installed on the wings. The kit decals for VF-61, Jolly Rogers went on easily
and when dry a final semi-glass coat gave the Bearcat the realistic look of one
in service. I applied layers of gray, brown/orange exhaust staining using
pastels and a soft brush. Three #8 guitar string whip antennas were installed
along with a nylon thread antenna wire from a #80 hole drilled in the tail
leading edge to a styrene rod insulator on the left side aft of the handhold.
Since the no
longer availability of my favorite Model Master F.S. 15042 Gloss Sea Blue, I’ve
switched to Tamiya AS- 8, U.S. Navy Blue rattle can acrylic lacquer. It is
slightly lighter, but I think just enough to adjust for scale. Two coats were
applied lightly to save details and when dry, a wet clear coat was applied for
applying decals. Blue formation lights were cut out with a punch and die and
installed on the wings. The kit decals for VF-61, Jolly Rogers went on easily
and when dry a final semi-glass coat gave the Bearcat the realistic look of one
in service. I applied layers of gray, brown/orange exhaust staining using
pastels and a soft brush. Three #8 guitar string whip antennas were installed
along with a nylon thread antenna wire from a #80 hole drilled in the tail
leading edge to a styrene rod insulator on the left side aft of the handhold.
| CONCLUSIONS |
The Bearcat was finished in a pleasurable 40 hours. And is a kit that a new modeler can build a presentable Bearcat with little difficulty. Kudos to Hobby Boss for an accurate Bearcat kit.
I hope Terry likes it and hopefully you readers too! Building models for others is a lot of fun and takes up no space in your model display case.
| REFERENCES |
F8F Bearcat in Action- Squadron Signal Publications #99
F8F Bearcat Detail in Action- Squadron Signal Publication 39007
Grumman F8F Bearcat- Steve Ginter Publications Naval Fighters #80
H. Davis Gandees
11 April 2024
Copyright ModelingMadness.com. All rights reserved. No reproduction in part or in whole without express permission from the editor.
If you would like your product reviewed fairly and fairly quickly, please contact the editor or see other details in the Note to Contributors.