Lindberg 1/48 XFY-1 'Pogo'
|
KIT #: |
536 |
|
PRICE: |
$5.00 'used' |
|
DECALS: |
One option |
|
REVIEWER: |
Christopher Campbell |
|
NOTES: |
A blast from the past and a
diamond in the rough |
 The entire
era of the Cold War saw some of the most interesting and unusual aircraft ever
proposed, developed, and tested throughout the world. There was no shortage of
unusual design in the United States. While the Convair Pogo might not have been
the most bizarre aircraft proposed or to have flown, it certainly ranks near the
top.
The entire
era of the Cold War saw some of the most interesting and unusual aircraft ever
proposed, developed, and tested throughout the world. There was no shortage of
unusual design in the United States. While the Convair Pogo might not have been
the most bizarre aircraft proposed or to have flown, it certainly ranks near the
top.
Vertical takeoff had been an idea for point defense
fighters dating back to W.W.II and came very close to being fielded by Germany
in the form of the rocket powered Bachem Ba.349 Natter. In the post war years,
the United States Navy had the idea to develop a vertical takeoff fighter armed
with four 20mm cannon that could be launched and recovered from the fantail of
ships as small as destroyers to provide air cover and defense when aircraft
carriers might not be available. It was a good idea in concept, though clearly
ahead of its time technologically speaking.
Proposals were fielded by Convair, Lockheed, Goodyear,
and Martin in response to a 1948 Navy proposal for a vertical takeoff fighter
and contracts let for prototypes from Convair and Lockheed 1951. The Convair
submission, the XFY Pogo was the only aircraft that could be seen as a serious
contender and ever actually having a chance to see service. Lockheed’s XFV
“Salmon” proved to be so unstable and difficult to handle that it was only flown
when fitted with a bizarre ground carriage that allowed it to be taken off and
landed horizontally in the manner of a conventional aircraft. While it made the
transition from horizontal to vertical flight and simulated landings were
conducted at altitude, it was considered too unsafe to actually attempt to take
off or land on the ground in the manner in which it was intended.
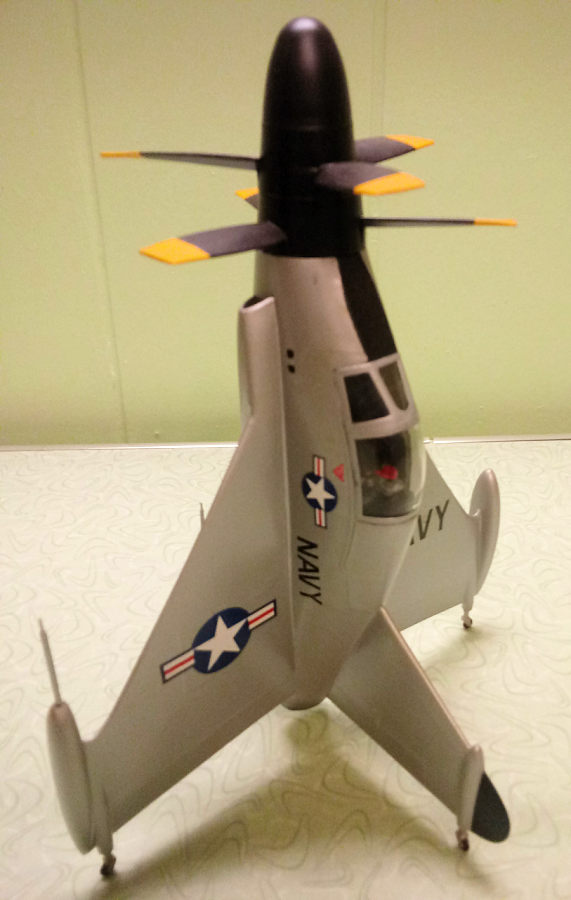
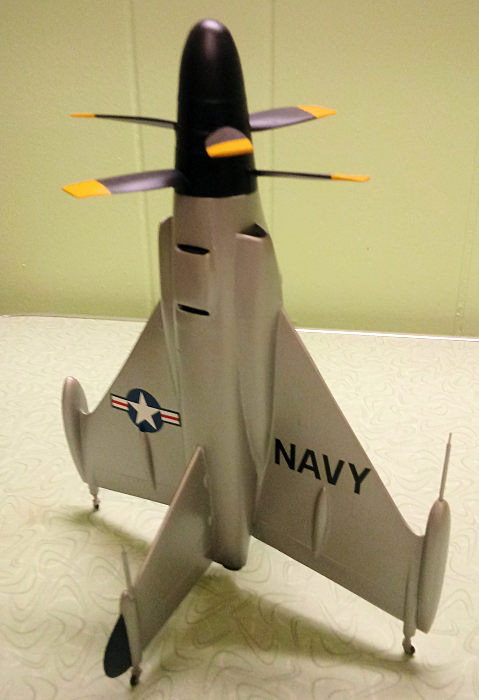
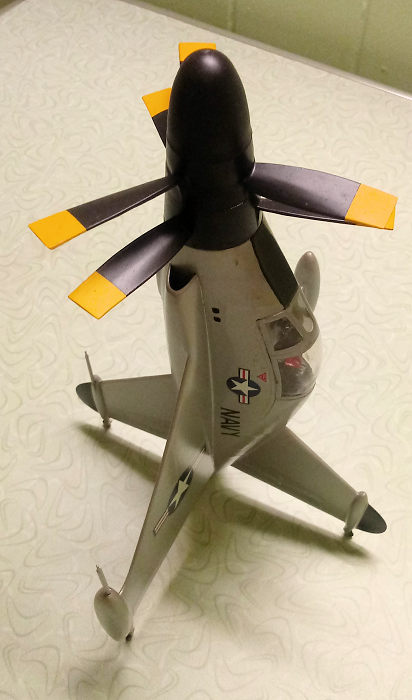
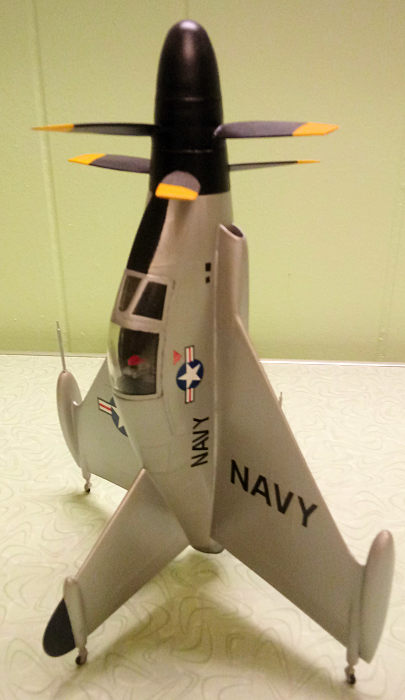
Convair’s XFY was more stable, with a somewhat chunky
profile, broad delta wings, and thick vertical, broad vertical and ventral
tails. While unorthodox in appearance, it was probably as stable a design as
could have been achieved at the time. Powered by an Allison YT40-A-6 turboprop,
which was actually a pair of T38 engines mated and producing 5,100 shaft
horsepower turning a pair of contrarotating 16-foot diameter Cutriss-Wright
three-blade propellers, the Pogo actually had a shot a being the aircraft that
it was intended to be.
Testing began in 1954, initially with simple tethered
hops and eventually free flights. Unlike the Lockheed XFV, the XFY Pogo could
actually take off and land vertically, as it was designed to. The ejection seat
had a gimble mount to allow it to rotate 45 degrees to assist the pilot’s
orientation in its quite unorthodox takeoff and landing and transition to and
from horizontal flight.
It achieved a top speed of 474 mph in level flight and
a rate of climb of nearly ten thousand feet per minute, which was not
unimpressive for a prop job, but inadequate in the jet age where speed and
altitude records were falling almost daily. With this subsonic top speed and a
service ceiling of only 37,500 feet, time had passed the Pogo by almost before
it had flown. The jet age was in full swing and all parties concerned soon saw
the XFY as a dead end development, almost before testing had begun. This was
severely compounded by the difficultly of landing the beast.
In an age before the type of sophisticated electronics
that modern age aircraft boast, the Pogo had to be landed much in manner of
someone backing a car out of a driveway. The pilot had to look over his shoulder
and gauge his approach as he worked the throttle and stick to lower it down for
a smooth landing. At best this could be described as being a difficult operation
performed from an unnatural orientation. At worst, such as in bad weather on a
pitching ship deck, or with battle damage, it more than bordered on suicidal.
Still, it flew as it was intended to and handled
perhaps even better than could be expected. Unlike the Lockheed XFV, the Pogo’s
only real vice was the difficulty in landing it and the lack of speed in light
of the rapid pace of jet aircraft development. The engineering and design team
at Convair gave it their best shot and they came close. Had modern electronics
existed to assist the pilot during landing mode, it is fair to say that the XFY
might have actually seen service as the seaborne point defense fighter that it
was designed to be. Sadly, that was not be.
Tests ended in 1956 and the Pogo became little more
than an oddball footnote in the history of aviation and an era in almost which
any idea, no matter how seemingly crazy, had shot at the bigtime. The Hawker
Siddley/McDonnel Douglas Harrier would finally validate the vertical takeoff
concept and even go to war on more than one occasion. Still, there were many
steps, even baby steps in between the Pogo and the highly capable Harrier
To be fair, the XFY Pogo and its brethren were at
least in some respects and idea that was ahead of its time. (Though, admittedly,
not that far ahead of its time. Harrier, anyone?). With the notable success of
the Harrier and subsequent VTOL aircraft, to include the still controversial
F-35, it is rather fair to quote the timeworn adage that geniuses are said to be
standing on the should of giants. Perhaps it is fair to think of the Convair XFY
Pogo in this light today. While it was ultimately deemed a failure, Convair’s
design team rolled the hard six on this one and came close. I doubt that any
aircraft company or design team, given the limitations of the technology
available to them at the time could have done better.
A single prototype remains in the hand of the
Smithsonian National Air and Space Museum. It has yet to be restored and
exhibited, though hopefully this day will come. The Pogo deserves that much, at
least. It is more than just an interesting footnote to an age in which the
wildest ideas imaginable were given form and took to the skies. In truth, it is
a direct ancestor of all vertical takeoff aircraft in service around the world
today.
 First
released in 1958, this kit is long in the tooth by most standards today. This is
essentially a basic kit of the era with a decently rendered exterior, a very
basic cockpit, consisting of nothing more than a rudimentary pilot figure and an
even more rudimentary seat, functional contra rotating props, a relatively
detailed boarding ladder, and decals that I initially thought to be essentially
accurate for the aircraft being depicted, though later found after I had
completed the kit were not.
First
released in 1958, this kit is long in the tooth by most standards today. This is
essentially a basic kit of the era with a decently rendered exterior, a very
basic cockpit, consisting of nothing more than a rudimentary pilot figure and an
even more rudimentary seat, functional contra rotating props, a relatively
detailed boarding ladder, and decals that I initially thought to be essentially
accurate for the aircraft being depicted, though later found after I had
completed the kit were not.
While it was one of the forgotten “weird” kits of this
strange and wonderful era of the Cold War, it has been fairly available since
its 1987 rerelease. The kit featured here was from the 1987 rerelease. The molds
seemed to be in good shape at this time and there was very little flash, and
most of that confined to the boarding ladder. Also, despite the rather
lackluster view held of most Lindberg kits, when I looked this kit over on the
vendor table, I found it a very decent starting point and something of a diamond
in the rough.
With the exception of the cockpit, this kit could
basically be built from the box as decent looking model for any collection. With
a little work and some creative sourcing from the parts box, it clearly had
potential. A brief once over told me everything that I needed to know. With my
fascination with weird Cold War “super science” in all its myriad forms, I had
to have it and had to build it. I bought, brought it home, and went to work
almost immediately. This took place in 2008 and the completed kit still looks
great today and occasionally sits on the tables at model shows
This kit had decent bones; better than decent, really.
While I had initially expected a descent into modeling purgatory, I managed this
start to finish in a could of weeks. The biggest issue as I saw it was the
cockpit or lack thereof. That was what I would attack first and my solution
seemed to be simple and effective in turning this into a decent representation
of this bizarre, tail sitting beast. I did not plan to turn this into a hyper
accurate, 100% realistic representation of the Pogo. However, I wanted to make
improvements that looked right, more or less and would be satisfactory when
looking through the clear canopy.
This was the only part of the kit that I discarded
outright and went straight to the parts bin for. For the cockpit tub, I used a
leftover from a scrapped Monogram 1/48 F-102, complete with the ejection seat.
My assessment from looking at photos showed me that while this might not be
fully accurate, it had the right general plan and look. The distinctive Delta
Dagger control stick with its dual grips was not used, and a generic, period
control stick from the parts bin was selected instead.
 The
cockpit area and the tub and seat were painted in Testors Flat Grey and then
detailed in Flat Olive Drab, Flat Red, Flat Black, and Flat Yellow,
appropriately. Side panels were painted in Testors Flat Black and accented by
dry brushing in Testors Aluminum. The instrument panel came from a newer release
of a vintage Monogram F4U-4 Coirsair, painted in the same Flat Black and dry
brushed in the same manner with a few switches and such popped with Flat Red and
Flat Yellow, as were those on the side panels.
The
cockpit area and the tub and seat were painted in Testors Flat Grey and then
detailed in Flat Olive Drab, Flat Red, Flat Black, and Flat Yellow,
appropriately. Side panels were painted in Testors Flat Black and accented by
dry brushing in Testors Aluminum. The instrument panel came from a newer release
of a vintage Monogram F4U-4 Coirsair, painted in the same Flat Black and dry
brushed in the same manner with a few switches and such popped with Flat Red and
Flat Yellow, as were those on the side panels.
To my surprise, while the fit was a little fiddly,
these parts were installed with a minimum of test fitting fuss and ultimately
fit into the fuselage almost as through they had been designed to. In truth, it
fit better than some cockpits that I have seen in mainstream kits. They were
secured in place with thick CA glue.
I then turned by attention to a few other areas. I had
decided that I needed to do something about the air scoops and vents, opening
then up patiently with a #11 X-acto blade. I painted the areas around the scoops
and vents on the inside in Testors Flat Black and sourced some odd bits from the
parts bin that were likewise painted and served as trunking. Then same what
would really be the biggest challenge in this kit, the exhausts.
The kit has only a general ovoid annulus for the
exhaust opening. While it would hardly be seen, I wanted to make this more
accurate. To this end, I used two sections of brass tubing in either 5/16” or
3/8”, though I do not recall the specific diameter at this point. These were cut
to around 4” and the exit ports were flared slightly with a mandrel. A piece of
thick plastic card was cut and shaped to fit in the fuselage with appropriately
sized and positoned holes drilled to accommodate the exhaust pipes and hold them
in place. This was test fitted repeatedly until it looked right.
The after inch or so of the insides of the pipes was
painted in flat black and the exterior in Testors Steel, as the interior of the
aft fuselage where these would be mounted. With this done, the assembly was
glued in place along using thick CA glue. While I was concerned that it would
wind up offset slight when I closed up the fuselage, as test fitting showed that
I had managed to get it right the first time.
I almost never attach the propeller assembly on any
aircraft at such an early stage in the assembly. However, the Lindberg Pogo is a
different type of aircraft and a different type of kit. It is fitted with a
working contrarotating propeller courtesy of a simple but effective gear system.
I will confess that I had my doubts about this, and even more so that I would
manage to make it work, assemble it, paint it, install it, complete the rest of
the assembly paint and decal the whole thing and at the same time somehow not
manage to break off a propeller blade or ruin the gear system. Still, I wanted
this somewhat toylike, working feature to work if I could manage it. If nothing
else, it would give a realistic positioning of the propellers. It was time to
grit my teeth and go for it.
The propellers required only minimal cleanup with an
X-acto blade and some 0000 steel wool. Then I crossed my fingers and followed
the instruction sheet with one slight deviation. Before mating the two propeller
hubs, I put a small drop of mineral oil on the gear assembly in hopes that it
would not be gummed up with paint and would continue to work. I gave it a few
turns after assembly and found it satisfyingly smooth and the propellers turning
in the opposite directions just as intended and more or less like the genuine
article.
I will note that some of the mineral oil came out when
I did this. Paint would not stick to that, so I cleaned it up with some mineral
spirits on a paper towel followed by a denatured alcohol. The assembly was
clamped in a hemostat with the propeller blades offset as much as possible to
facilitate painting. The yello w
blade tips were done first, airbrushed Testors Flat Yellow and masked off once
they were dry. Once this was dry, it was masked off with Tamiya tape and the
rest of the blades, hubs, and spinner were airbrushed with Testors Flat Black.
This was then set aside to dry for a day while I finished fiddling with the
fuselage interior.
w
blade tips were done first, airbrushed Testors Flat Yellow and masked off once
they were dry. Once this was dry, it was masked off with Tamiya tape and the
rest of the blades, hubs, and spinner were airbrushed with Testors Flat Black.
This was then set aside to dry for a day while I finished fiddling with the
fuselage interior.
The following day, once I was satisfied with multiple
test fits, the fuselage halves were glued together and somewhat amazingly went
together cleanly on the first try. Any gaps were filled with CA glue and the
seams sanded to with 320 and 400 grit sandpaper, followed by 0000 steel wool.
I turned my attention to the wings which went together
with no problems and very minimal seem cleanup. The only part that required any
real attention were the intakes which needed some sanding to cleanup the
interior seam. The intake area was brush painted Flat Black to give the
impression of depth, as they are truncated by at the fuselage. These would not
be plugged or masked off when I painted the aircraft, as I wanted overspray into
the outermost of the recess since they were in the same natural metal as the
rest of the aircraft.
The fuselage was joined with the wings and the fit was
reasonably good. Given the age of this kit, it was quite good. Any gaps were
filled with gap filling CA glue and sanded smooth in the same manner as the
fuselage seems. The horizontal stabilizers were also added at this point and
again, there was only minimal filling and sanding necessary.
There was one thing that I had not addressed on the
kit to this point and that was the overdone rivet detail. This is what amounts
to an ancient kit and it is festooned with rivet detail. A Scott Van Aken noted
in his reviews of this kit, it is actually not all that bad I was not going to
go crazy and sand it down and rescribe the whole thing. I opted for something
that I had done on several kits previously, which was to tone it down. To do
this, I gave the entire model a very light sanding with 400 grit sandpaper
followed by 0000 steel wool. I have done this before on kits with excessive
raised detail and have been very satisfied with the results. After a few passes
with both abrasives, I was satisfied with how it looked and blew away all of the
dust, debris, and residue with attachment on an air compressor hose set at 90
PSI. I followed this up with buffing it with a dryer sheet to rub out residual
scratches and once again blew away any dust and debris.
Now it was effectively complete except for the pitot
and huge casters that served as landing gear on this beast. Time to paint it.
The first thing that I did wen I looked to painting
the model was the canopy framing. This was painted in Testors Aluminum. Once
dry, I gave it a dunk in Future (Now Pledge) floor wax to seal it and make it as
clear as possible. This was set aside to dry and the painting of the aircraft
itself commenced.
The entire propeller assembly was masked off with a
combination of low tack masking tape and paper towels to protect them from
overspray. The cockpit was stuffed with damp paper towel bits as well as the
exhaust area. Then the black areas of the vertical and ventral tails along with
the antiglare panel were then airbrushed with Testors Flat Black. Once dry,
these were masked off with Tamiya tape, which proved a little tricky for the
glare panel due to its somewhat complex curves, but no real problem. After this,
the entire model was airbrushed with Testors Aluminum and set aside to dry for
three full days. I already liked the way that things were shaping up. It looked
like the Pogo and I only had a few things left to do to complete the kit.
 While this
was drying the landing gear was brush painted with Model Master Dark Anodonic
Grey and Testors Rubber. The pitot tube was painted with Model Master Chrome and
save fitting these small pieces along with the canopy, the model was finished
except for the decals.
While this
was drying the landing gear was brush painted with Model Master Dark Anodonic
Grey and Testors Rubber. The pitot tube was painted with Model Master Chrome and
save fitting these small pieces along with the canopy, the model was finished
except for the decals.
As the paint dried, I looked through the decal bin and
sourced some appropriately sized national insignia from a generic decal sheet.
The kit decals had national insignia, but the blue red were both far too bright
to suit me. The decals for the serial numbers and the Navy markings actually
came from the Lindberg decal sheet. (I now know that this was inaccurate, but
did not when I built the model). The decal sheet in my kit was in good shape and
looked reasonably decent aside from the insignia. While Lindberg might not be
known for producing quality decal sheets, I had no problems with these
whatsoever.
When I was satisfied that the paint was dry enough, I
fitted the landing gear casters and the pitot with a small drop of CA glue on
each, removed the all masking, and gave it an airbrushed coat of future to serve
as a gloss. I then commenced decaling with a light application of Solvaset on
each of the decals. To my pleasant surprise, the kit decals settled down quite
nicely along with the aftermarket insignia.
I have found that sometime decal sheets surprise you.
Sometimes ancient ones are still viable and “low quality” sheets from kits prove
quite usable. Some of the “better” aftermarket sets that I have tried have
proven less than satisfactory or user friendly.
While on the initial appraisal, the kit sheet looked
mediocre at best, everything went on perfectly and conformed nicely without any
issues. Some have told me that I made a silk purse out of a sow’s ear on this
one, though I would differ on that score. While they might not have been of the
purported quality of many aftermarket decal sheets, the kit issue items went on
without a hitch. Kudos to Lindberg.
When everything was dry, I gave the whole kit another
airbrushed coat of Future and set it aside for a few hours to dry once more. The
canopy was glued in place with some carefully applied CA glue. Then I weathered
the exhaust area lightly by dry brushing some Testors Model Master Burnt Iron.
No other weathering was applied, as this was a test aircraft and kept fairly
clean and had low hours. Low and behold, I had a Pogo that looked right and made
a perfect addition to my Cold War collection.
 I am not
going to try and pretend that I have built the perfect 1/48 Pogo. Your editor,
Mr. Van Aken produced a more accurate and better looking model than I did. I had
not yet seen and was not even aware of the Ginter book on the Convair XFY at the
time that I built this kit (While my modeling library is extensive, this is one
that I never picked up.), and my research was a bit spotty, mainly where the
serial number and tail markings were concerned. I openly acknowledge that I made
some mistakes.
I am not
going to try and pretend that I have built the perfect 1/48 Pogo. Your editor,
Mr. Van Aken produced a more accurate and better looking model than I did. I had
not yet seen and was not even aware of the Ginter book on the Convair XFY at the
time that I built this kit (While my modeling library is extensive, this is one
that I never picked up.), and my research was a bit spotty, mainly where the
serial number and tail markings were concerned. I openly acknowledge that I made
some mistakes.
Still, I think that the kit looks great. I took it to
a number of IPMS shows and have come away with some awards for it (Which I did
not actually expect). In truth, I mainly wanted to show off what could be done
with this kit with a modicum of effort. As such, this model turns a lot of
heads.
This Pogo is a niche item, no doubt. That being said,
anyone who wants a larger scale rendition of this bizarre and unique aircraft
should give the Lindberg kit a try. Is it a shake and bake kit? No. Out of the
box it has problems. But if any experienced modeler dares to tap into their
ingenuity and skills, a very decent looking model. It is far from perfect, but
it goes together much more readily than some of the limited run kits that have
been so prevalent in the past couple of decades. It could make for enjoyable
build for a novice out of the box. Likewise, if nostalgia beckons, give the
ancient Lindberg Pogo a chance. It will give you a great you a great opportunity
to show off your scratchbuilding and kit bashing skills. In truth, it took far
less work than I had initially anticipated to produce a very presentable model.
While a number Eastern European manufacturers are
producing some very esoteric kits, I would not hold my breath for a Pogo in this
scale. This might be your only shot if you want one in 1/48. I managed this one
in around ten to twelve hours, including all of the modifications, scratch
building and retrofitting. The truth is, many of these vintage “golden age” kits
are actually better than they are given credit for being. Give one a try. What
do you really have to lose?
https://www.militaryfactory.com/aircraft/detail.php?aircraft_id=1445
https://www.defensemedianetwork.com/stories/tail-sitter-xfy-1-pogo-xfv-1/
https://en.wikipedia.org/wiki/Convair_XFY_Pogo
Jane’s Pocket Book of Research and Experimental
Aircraft, from Macmillan Publishing, 1976
The World’s Worst Aircraft, by Bill Yenne, Brompton
Books Corporation, 1990
The World’s Strangest Aircraft, by Michael Taylor,
MetroBooks, 2001
Christopher Campbell
22 August 2022
Copyright ModelingMadness.com. All rights reserved. No
reproduction in part or in whole without express permission.
If you would like your product reviewed fairly and fairly quickly, please
contact
the editor or see other details in the
Note to
Contributors.
Back to the Main Page
Back to the Review
Index Page
Back to the Previews Index Page