Microscale 1/48 F4D-1 Skyray w NOTS
| KIT #: | MS4w |
| PRICE: | $40-50.00 'used' |
| DECALS: | One Option |
| REVIEWER: | Christopher Campbell |
| NOTES: | Reboxed Allyn kit with New Ware NOTS |
| HISTORY |
Ah, the Douglas F4D Skyray. Where to begin? Such a stunning looking aircraft and unmistakable at a glance. Yet, like so many naval fighters of the cold war, it suffered a somewhat protracted development before entering production. Then, with more advanced aircraft ready to replace it in front line service, it was seemingly gone nearly as soon as it got there.
Douglas had already proposed a delta wing design to be a fast interceptor, powered by twin jet engines when, in 1947, the Navy requested further study and a mockup of their design. The aircraft evolved into a single engine design, featuring a rounded delta wing. This was to be powered by the Westinghouse J40 which was beset with woes and failures from the beginning resulting Allison J35 being used in the prototype which first flew in 1951. At 3,500 lbs of thrust, this was only around half that of the projected J40.
 The
aircraft itself was of sound design. Fitted with the APQ-50A radar, it would
be all weather capable. Armament was a mix of four 20mm Colt Mk.12 cannon in
the wing roots and externally mounted rocket pods carrying up to fifty-six
2.75” rockets. A pair of bombs up to 2,000 lbs. could be carried and later,
up to four AIM-9 Sidewinders.
The
aircraft itself was of sound design. Fitted with the APQ-50A radar, it would
be all weather capable. Armament was a mix of four 20mm Colt Mk.12 cannon in
the wing roots and externally mounted rocket pods carrying up to fifty-six
2.75” rockets. A pair of bombs up to 2,000 lbs. could be carried and later,
up to four AIM-9 Sidewinders.
The aircraft as intended from the onset an interceptor, designed to operate at up to 55,000 feet. With the right engine, its delta wing would give it a very rapid climb rate. That engine would not be the J40, however.
With this engine suffering numerous setbacks and service failures in the McDonnell F3H Demon, Douglas opted to fit the Pratt & Whitney J57, producing in excess of 16,000 lbs of thrust in afterburner. This was a larger engine, necessitating redesign of the intakes and internal fuselage structures. This also delayed production and service acceptance.
Fuel tankage was substantial, with storage in the ample wings and the thick fuselage with an internal capacity of 640 gallons. An additional 300 or 600 gallons could be carried externally with 150 or 300 gallon streamlined twin tanks. Additionally, the Skyray would eventually have probe and drogue refueling capability.
With the design essentially finalized, what would become the production aircraft flew in 1954, with carrier trails being conducted on the USS Ticonderoga the following year. The aircraft would finally go operational in 1956.
Looking rather stingray like with its delta wings, it was promptly named the Skyray. It also would be known commonly as the “Ford,” for F4D. It quickly proved that it was quite capable of the high altitude and fast climb for which it was designed, setting a time to climb record of 49,221 feet in 2 minutes, thirty-six seconds from a standing start. This was quite impressive for its time.
 Uniquely,
the first squadron to receive it, VFAW-3 would be assigned to NORAD air
defense duties and stationed permanently at North Island. Many would serve
aboard carriers in the interceptor role. Thirteen Navy squadrons would
operate the Skyray. It would also see service in nine Marine Corps
squadrons.
Uniquely,
the first squadron to receive it, VFAW-3 would be assigned to NORAD air
defense duties and stationed permanently at North Island. Many would serve
aboard carriers in the interceptor role. Thirteen Navy squadrons would
operate the Skyray. It would also see service in nine Marine Corps
squadrons.
Officially, the Skyray never fired a shot in anger. I have heard repeated stories that there may have been one very unofficial incident, in or near the South China Sea. Make of that what you will. Apply to it the adage that the difference in a sea story and a fairy tale is that the fairy tale begins with “Once upon a time,” while the sea story starts with “No s***! This really happened.”
Total production of the Skyray would amount to 422 aircraft, with production ending in 1958. Nearly as soon as the final aircraft were being delivered, the first were being replaced in front line servce. In some cases, this was by the McDonnell F3H Demon, though more often the very capable Grumman F11F Tiger and Vought F8U Crusader.
Aircraft would continue to serve in Marine and Naval Reserve units until early 1964, long enough to be redesignated as F-6 under the uniform designation system implemented in 1962. Four would be used by N.A.S.A. until 1969.
An improved aircraft was designed in flown in 1956 in the guise of the F5D Skylancer. This was a slimmed down design, initially fitted with a J57, though eventually intended to fly with the mighty J79. In many ways it was analogous to what the F-106 was to the F-102. It was not seen as enough of an improvement or offering anything that the Crusader did not. Production was not ordered.
One F5D was lost during tests and the remaining three would serve as research aircraft. The final aircraft was retied by N.A.S.A. in 1970. Thus ended the story of the Skyray.
Eight F4D Skyrays and two F5D Skylancers survive. All are in the hands of various museums across the United States. So, you can still see one of these lovely, unique aircraft.
| THE KIT |
In the mid 1950’s, K & B Allyn company released a number of unique models. These kits had little in the way of detail and were all intended as essentially “desk models” that could be assembled and painted. To date, I have never been absolutely certain of all of their offerings, as every so often I run across one that I did not know about.
To my knowledge, they were all kits of either Douglas or Convair aircraft. Most were 1/48, though not all. As best as I have been able to determine, these were their kits:
1/48: Douglas F4D Skyray, F3D Skyknight, A3D Skywarrior, A2D Skyshark, and AD Skyraider (a note- I have never seen this last one, though I have encountered the others over the years) and the Convair XF-92A
1/60: Convair YF-102 prototype
1/174: Douglas C-124 Globmaster II
 These kits
almost all follow a basic design of the wings and fuselage being molded together
in upper and lower halves. Parts count may be ten or less, including the stand.
Decals were very basic. While there is no cockpit and often no real surface
detail to speak of, the basic shapes tend to be accurate, though generally, like
many kits of this era reflecting prototypes.
These kits
almost all follow a basic design of the wings and fuselage being molded together
in upper and lower halves. Parts count may be ten or less, including the stand.
Decals were very basic. While there is no cockpit and often no real surface
detail to speak of, the basic shapes tend to be accurate, though generally, like
many kits of this era reflecting prototypes.
I am uncertain when these ceased their original production run, but I suspect sometime in the late 1950’s. Originals are now quite collectible and can command high very high prices.
Around 1975, Microscale company acquired some of the molds, or access to them and released their own boxings of several kits. There was no change to the molds, still being very basic, though new Microscale decals were included in the box. Also, instead of the original, clear stands there was a fairly plain and basic black stand in its place.
The kits released included the Douglas A2D Skyshark, Convair XF-92A, Covair YF-102, and the Douglas F4D Skyray. Also, they released a Convair 990 in 1/144. This was originally a topping mold. It is the only one that I have ever seen released by another company that I am aware of.
I am uncertain as to how long the production run was, though I saw them in the Squadron Mail Order catalog at least until the end of the 1970’s (I may be a little off, as I was thirteen at the end of that decade). As to what became of these, or the other Allyn molds is a bit of a mystery. However, I still encounter Microscale releases with some regularity at vendor tables at model shows.
A final note on this kit. Everyone seemed to be jumping on the Skyray bandwagon about this time. This was no doubt due to its most unique and modern look at the times, as well as its then record breaking performance. Released around the same time was a 1/45 Hobbytime vacuform as well as a 1/67 injected kit. Hawk released their 1/72 kit in a most unusual triangular box. Comet joined the fray as well with a 1/89 kit, soon to be acquired by Aurora. There were also wood and stick and tissue models. There was no doubt, the Skyray was a hot item.
| CONSTRUCTION |
So, first of all, I have always loved the Skyray. This started when I first saw the aircraft in the Golden Play Book of Airplane Stamps that my mother bought for me at Woolworth’s around 1971 or 1972. For those who never encountered these or are too young to remember, these were lovely, educational activity books covering many nature and historical subjects. I had this one as well as books on birds, reptiles and amphibians, the Presidents, mammals, dinosaurs, prehistoric mammals, stars and planets, Native Americans, fish, butterflies, flowers, trees, insects, and almost certainly more that I cannot remember.
Each page was about a different subject, in this case, a different aircraft from the Wright Brothers through the X-15 and the Ryan XV-5. There was a brief explanation or summary of the subject and an illustration that could be colored. Inside the front and back covers were sheets of stamps around 2” x 2” each to be moistened and affixed a square on the corresponding page.
These were a lot of fun, as they were somewhat like little encyclopedia volumes that you could color along the way. The Skyray intrigued me, as I liked its lines. It looked like, what it seemed, a jet plane should look like, at least to a five year old. However, I will still say that it was a sleek and elegantly curved aircraft.
This was also where I first saw the F-86, MiG-15, C-99, and B-47, all of which I have a known fixation with. I also became fascinated with the Ryan XV-5. This is no doubt why I had to get the 1/72 Anigrand kit when I saw it.
I had seen the Microscale kits previously mentioned numerous times over the years, though had never owned any. My uncle, Richard Cobb, was passing some of his older builds and parts of his unbuilt stash over to me, the Skyray, YF-102, and XF-92A were among them.
 The Skyray
kit had already been started. The fuselage was glued together, and the canopy
had been glued in place and painted dark blue from the inside. Obviously, it
would be built as an inflight model, though I did not yet know which markings I
might want to choose when I did. I considered the prototype, though was not all
that enthusiastic. Thus, the kit was consigned to the stash for a while until I
ran across the New Ware kit for the N.O.T.S. underwing satellite launcher resin
kit at the Anniston I.P.M.S. show around two years ago.
The Skyray
kit had already been started. The fuselage was glued together, and the canopy
had been glued in place and painted dark blue from the inside. Obviously, it
would be built as an inflight model, though I did not yet know which markings I
might want to choose when I did. I considered the prototype, though was not all
that enthusiastic. Thus, the kit was consigned to the stash for a while until I
ran across the New Ware kit for the N.O.T.S. underwing satellite launcher resin
kit at the Anniston I.P.M.S. show around two years ago.
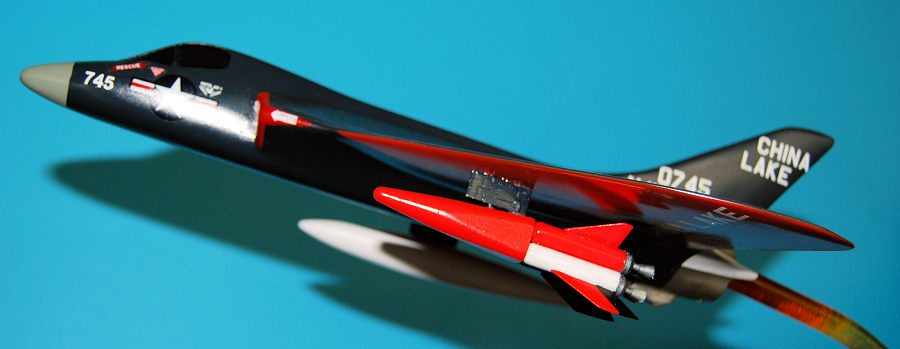
This was an early project to possibly put a small satellite in orbit using a fighter as an airborne launch platform in the late 1950’s. It was also considered as a potential anti-satellite weapon, especially once Sputnik reared its head in the sky.
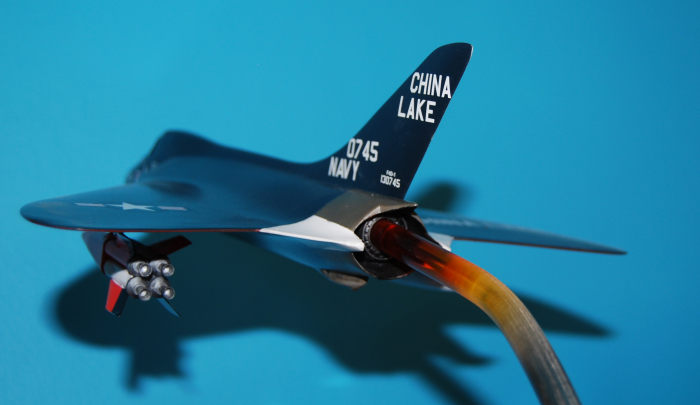
Three tests using this system to launch a probe into orbit were attempted. Dubbed the N.O.T.S.–EV-1 Pilot program. The idea was for the aircraft to climb to somewhere near its service ceiling and launch the rocket which would then propel the probe into space. Neither went orbial. However, the third that was launched may well have gone suborbital, skipping along the atmosphere before burning up. A weak signal appears to have been detected in New Zealand, half a world away from China Lake, where the flight originated. This is, of course, speculative; highly so, perhaps. However, it is worth noting. I now had my subject.
I went to work cleaning up and sanding the join seam, which proved relatively easy using mostly 400 grit sandpaper followed by 0000 steel wool to polish it out. There is no engine annulus detail. It is only a flat, blank spot on the kit. This was the one thing that I would change.
Finding a spare F-102 style exhaust component as used on the late Air Guard service F-100’s, I modified this to fit in place and represent the J57 afterburner. It would be installed after painting, though.
The aircraft used in this test program carried a single external fuel tank on the starboard wing, opposite of the N.O.T.S. rocket. The pylons for both and the tank itself were spares from a 1/48 A-4 Skyhawk kit, Monogram, I believe. These were prepped and set aside, again for post paint installation.
The N.O.T.S. rocket assembly is straight forward. The parts are molded in beige resin and reasonably clean. A minimum of cleanup was required for a resin kit. There are more parts than you might anticipate, though. There are four tanks, four rocket nozzles, four fins, and the nose cone/payload module.
These were painted per the instructions and illustrations and photos that I could find. Due to the complex paint scheme, doing so after assembly would prove to be a bit of a nightmare. So, all parts were painted before assembly.
This included using Testors Flouresent Red, Tamiya Flat White, Tamiya Flat Black, and Testors Model Master Anodonic Grey. This also entailed a fair bit of masking. The results of this can be seen in the photos.
The painting was a touch tedious but went well. Once it was all thoroughly dry, the N.O.T.S. was assembled using CA glue and went together with a little difficulty, though I would say with only a little.
I wanted to mount the model to the stand using acrylic rod through the engine exhaust. So, before proceeding further, this was drilled out using several bits of increasing size until I had an opening that the rod would fit through. Now it was time to paint in earnest.
| COLORS & MARKINGS |
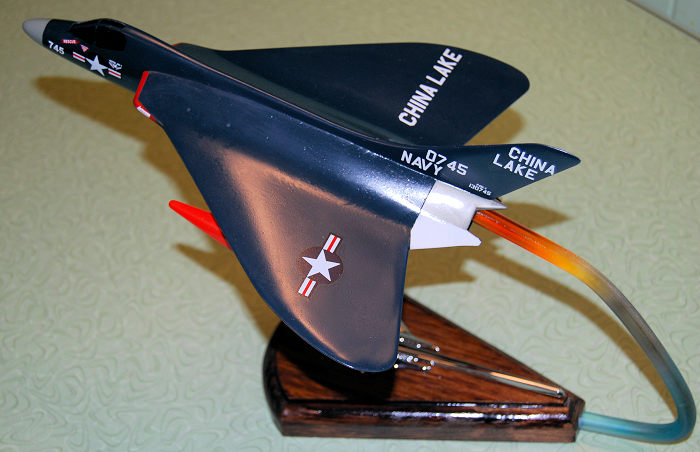
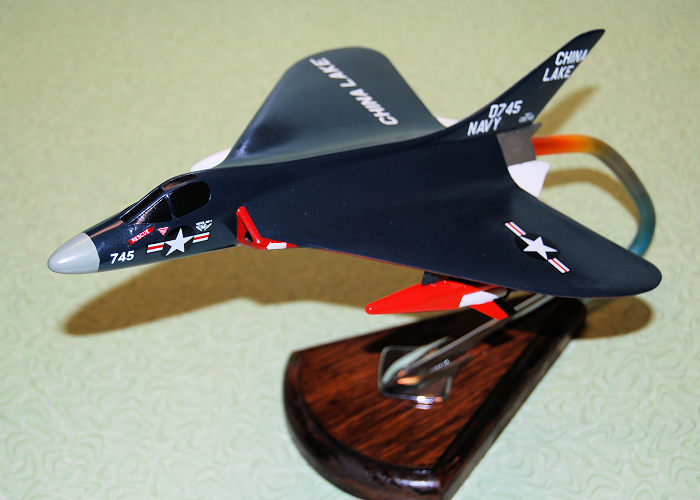
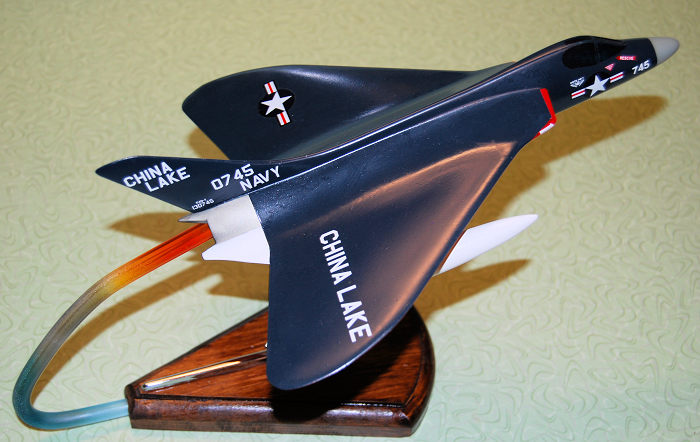 The paint
scheme of this aircraft is colorful and unique, with the wings painted a
striking red beneath. I began with the radome, painting it in simple Testors
Flat Grey. The somewhat triangular pitch trimmers at the aft fuselage were
painted in Tamiya flat white.
The paint
scheme of this aircraft is colorful and unique, with the wings painted a
striking red beneath. I began with the radome, painting it in simple Testors
Flat Grey. The somewhat triangular pitch trimmers at the aft fuselage were
painted in Tamiya flat white.
This was all masked off with Tamiya tape, as well as the cockpit glazing. Then the underwing sections were sprayed in Testors Flat Red along. When this, too, had dried, this area was masked off as well and the remaining surfaces were painted in Model Master Glossy Dark Sea Blue (the last in my stash).
The whole thing was set aside to dry for a day or so. Then the area at the aft fuselage near the engine and tail hook areas were masked and in turn sprayed with Model Master Anodonic Grey. Once everything was thoroughly dry, masking was removed and afterburner assembly was glued into place with some CA glue. The area inside this was paint in flat black.
The entire model was then shot in a light coat of Future. Once dry, the N.O.T.S. kit decals were applied along with various insignia and markings gleaned from the decal file. The engine intake warnings consisted only of a flash, so more Testors red was applied to the leading edges of the intakes.
All decals went on well and settled down cleanly with some Solvaset. Once they had dried and cured it was given another light coat of Future. I wanted it shiny, but overly glossy.
| FINAL CONSTRUCTION |
 This proved
to be rather minimal. The only parts left to install were the tail hook, the
wing tank and the N.O.T.S. rocket. The former was missing from my kit, though I
managed to make something from bits in the spare parts drawers that worked quite
well.
This proved
to be rather minimal. The only parts left to install were the tail hook, the
wing tank and the N.O.T.S. rocket. The former was missing from my kit, though I
managed to make something from bits in the spare parts drawers that worked quite
well.
The locations for the pylons were measured off and the mounting holes drilled out with a fine bit in a pin vise. The external tank, which had previously been sprayed in Tamiya Flat White was then fitted. This was followed by the N.O.T.S. rocket.
A stand post was made from acrylic rod, heated, bent, and painted in Tamiya Transparent Blue, Transparent Yellow, Transparent Orange, and Transparent Red. This would be mounted to a base cut from a piece of scrap cypress wood that I had. Th final touch was a stingray emblem from a Corvette that seemed most appropriate and made for a nice stand accent.
Finally, all was assembled, and it met with my approval. It was given a dusting of Future and the whole thing was finally done. I now had an in-flight Skyray carrying a satellite launcher. It was a perfect piece for my Atomic Lounge.
| CONCLUSIONS |
The vintage MicroScale/Allyn kit is decidedly antiquated. It is mainly a collector piece today. However, since I had one that was started and my uncle wanted to see me build it, why not? It still build up as a nice desk model. However, if you want anything more than that, definitely go with the Tamiya kit. It is the best 1/48 Skyray that we have and very likely to remain such. As I always note, whatever path you choose, remember, this is a hobby. It is above all supposed to be relaxing and fun. Have fun, everyone.
| REFERENCES |
https://www.modelingmadness.com/scott/korean/us/usn/f4d.htm
https://en.wikipedia.org/wiki/Douglas_F4D_Skyray
https://en.wikipedia.org/wiki/Douglas_F5D_Skylancer
https://en.wikipedia.org/wiki/NOTS-EV-1_Pilot
14 May 2024
Copyright ModelingMadness.com. All rights reserved. No reproduction in part or in whole without express permission from the editor.
If you would like your product reviewed fairly and fairly quickly, please contact the editor or see other details in the Note to Contributors.