AModel 1/144 C-123J Provider
| KIT #: | 1406 |
| PRICE: | 15.95 Euros |
| DECALS: | One Aircraft |
| REVIEWER: | Frank Spahr |
| NOTES: | Short run with photo etch and resin parts. |
| HISTORY |
 The C-123 Provider was a
medium-sized military transport aircraft. It was developed by the Chase Aircraft
Co. but built by Fairchild. Between 1954 and 1970, about 300 aircraft in several
variants were produced. They saw service with the USAF, the USCG and various
foreign operators.
The C-123 Provider was a
medium-sized military transport aircraft. It was developed by the Chase Aircraft
Co. but built by Fairchild. Between 1954 and 1970, about 300 aircraft in several
variants were produced. They saw service with the USAF, the USCG and various
foreign operators.
The aircraft was used for transport, for search and resuce missions, for evacuating the wounded, for nocturnal armed reconnaisance missions, and for spraying herbicides, amongst it the infamous Agent Orange. C-123 were also used for covert operations into the 1980s; a C-123 starred in the 1997 movie „Con Air“.
These days, several aircraft are still airworthy around the world, and a number is on display in museums.
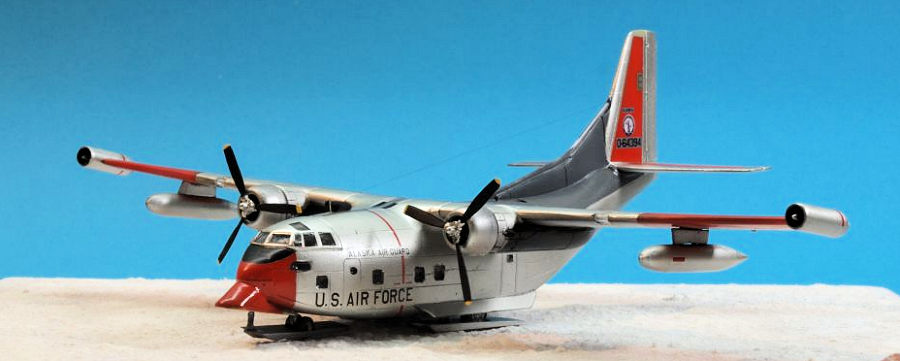
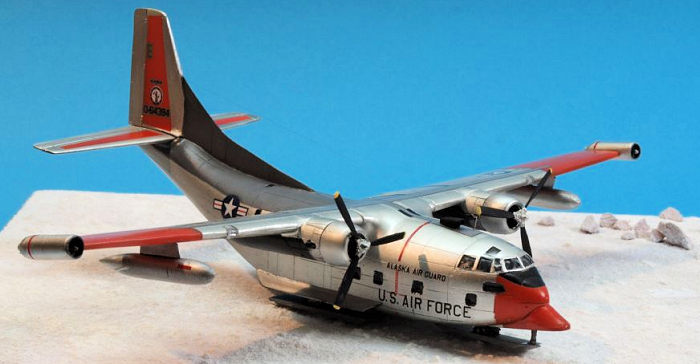
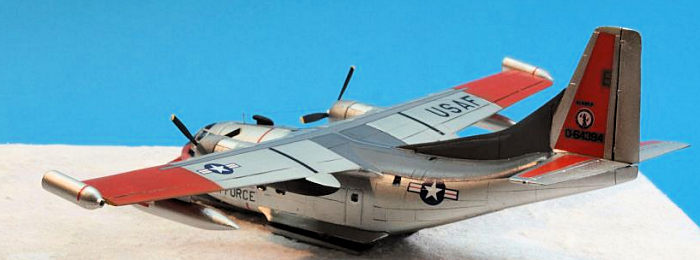
The C-123 J was a variant using wingtip-mounted J-44 jet engines to shorten its takeoff run. It was used by the Alaska Air Guard. Ten aircraft were built.
| THE KIT |
 I don´t quite remember how I laid my hands on this kit. The
pricetag is in Dutch, so it might have been bought at a show in the Netherlands,
or from a Dutch mail order outfit. I had several times over the years opened the
box, but each time (wisely?) returned the kit to the stash.
I don´t quite remember how I laid my hands on this kit. The
pricetag is in Dutch, so it might have been bought at a show in the Netherlands,
or from a Dutch mail order outfit. I had several times over the years opened the
box, but each time (wisely?) returned the kit to the stash.
With the Corona pandemic leaving me with quite some spare time, I acted on an impulse and started the kit. I have only little experience with short run kits, and only later read the disclaimer: „The model is executed on technology short run and is intended only for experienced modelers“
Well, I sure gained some experience. The kit has rather petite engraved panel lines, a very neat decal sheet, and reasonably clear instructions. Colour callouts are in Humbrol shades. The plastic parts are on the thick side, and have quite some flash and irregularities. Fit is rather basic and circumstantial, and each and every part needs consideration and work.
| CONSTRUCTION |
I actually started with the cockpit, and the other interior
parts, realizing early on that I would have to take very great care in making
things fit. I also early on decided that no way would I display the interior
open, and no way would I use the transparent parts save the canopy. I glued a
number of rather heavy screw nuts to the cargo bay floor, and hoped they would
suffice to keep the model from tailsitting. Which they did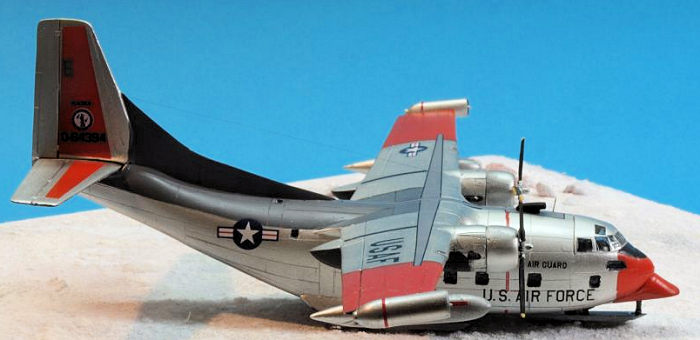 not. I also decided
to ease work by gluing brass tubing into the main wheel wells to later accept
the landing gear, instead of gluing it to the fuselage. Given the amount of
sanding and whatnot, they would have snapped before you could say „I should have
binned this one...“
not. I also decided
to ease work by gluing brass tubing into the main wheel wells to later accept
the landing gear, instead of gluing it to the fuselage. Given the amount of
sanding and whatnot, they would have snapped before you could say „I should have
binned this one...“
I did not undertake any great effort on the cockpit, as very little would be visible later on, so I painted what would go in only in the most basic way. I left the seats, instrument panel and sticks to be added later, before closing the canopy. I had enough work making the fuselage halves fit, let alone the fuselage bottom, which needed a LOT of fitting and trimming and sanding. I added some styrene strips to ease positioning the fuselage halves and especially the cargo ramp doors. I had to open two small windows near the base of the rudder fin.
The wing parts did not fit any better than the fuselage area, so I needed quite a bit of putty around the engine nacelles. I also needed to do some rescribing, one of my least favorite tasks, and marked the petite engraved panel lines with a pen to retain information where they were.
In the end, I rescribed virtually the entire aircraft, not without glitches and a lot of backing-and-forthing. Some blemishes only appeared once the metallic paint was on, whence I had reached the stage of not being overly enthusiastic in again redoing the whole process, thank you very much. In conformation to the current emphasis on social and other distancing, this model is best enjoyed from a safe distance.
 Having assembled the fuselage and
wing assemblies, and having puttied and sanded and rescribed and repeated said
stages several times, I reached the stage where I found it was time to add the
wings to the fuselage. The wing joint on one side needed quite some putty, too.
Having assembled the fuselage and
wing assemblies, and having puttied and sanded and rescribed and repeated said
stages several times, I reached the stage where I found it was time to add the
wings to the fuselage. The wing joint on one side needed quite some putty, too.
At that stage,I also added the cargo ramp doors, which needed a lot of sanding in all dimensions, and then quite some filling of seams. I made sure the canopy would fit reasonably with the fuselage, then I primed the fuselage and wings with Stynylrez black primer. Having painted the cockpit interior, I added the instrument panel and the seats, but somehow forgot to add the sticks.
I only found out after gluing the canopy, and then I didn´t see the sense in removing it and adding sticks nobody would ever see again. I masked the canopy windows with pieces of Kabuki tape. The remaining window apertures were masked with Humbrol Maskol.
Parallel to these tasks, I tackled the remaining subassemblies, like the props, landing gear, jet pods, and auxiliary fuel tanks. I used brass wire on the props, and brass tubing glued into the engine parts.
| COLORS & MARKINGS |
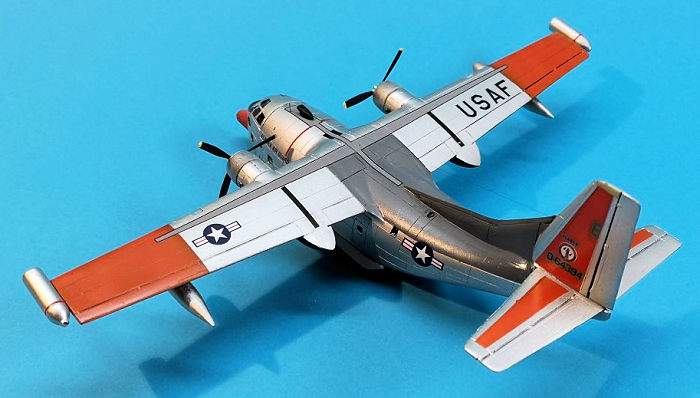
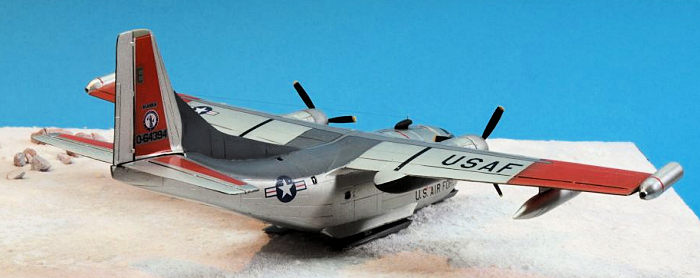
After some more sanding and rescribing, I added an overall black primer layer and masked the anti-glare panel in front of the canopy, before I sprayed the grey areas atop the fuselage and along the rudder fin. I used Neutral Grey, as that seemed to match the grey of the walkway decals best.
That masked, I sprayed the appropriate areas Vallejo ModelAir Orange. Over the black, that resulted in a dark orange I quite liked. I also sprayed and masked the small radome tan area atop the fin. Everything masked, I brought out my shiny new Vallejo metalizers, and sprayed the rest of aircraft Pale Burnt Metal, which looks quite like polished aluminum to me.
 That went quite well, apart from
highlighting some of my mistakes, as mentioned earlier. By now I didn´t mind any
more. After de-masking, I made some minor corrections by brush, and then sprayed
the aircraft with Future overall in preparation for decaling.
That went quite well, apart from
highlighting some of my mistakes, as mentioned earlier. By now I didn´t mind any
more. After de-masking, I made some minor corrections by brush, and then sprayed
the aircraft with Future overall in preparation for decaling.
The next day, I applied the decals, which went surprisingly well, especially with the larger pieces I had been concerned about. After curing, a final coat of Future sealed the decals. I only added some grey exhaust staining to the sides of the nacelles, and refrained from further weathering. I then added the landing gear with the skis, two antennae atop the fuselage, the jet pods, the fuel tanks and an antenna wire made from Caenis monofilament.
After removing the masks from the canopy and windows, I glazed the windows with canopy glaze white glue.
I had found out that the aircraft was a tailsitter despite the weight, so decided to make a simple „snow-covered“ base to glue the model on.
| CONCLUSIONS |
I completed this model and, from the right distance and in the right light, it looks quite nice. That´s about it. It was therapeutic, and an exercise in basic determination. Not Master Class level, but a basic effort to get the bleeping thing completed.
| REFERENCES |
https://en.wikipedia.org/wiki/Fairchild_C-123_Provider
10 August 2020
Copyright ModelingMadness.com
If you would like your product reviewed fairly and fairly
quickly, please
contact
the editor or see other details in the
Note to
Contributors. Back to the Main Page
Back to the Review Index Page
Back to the Previews Index Page