Valom 1/72 North American Navion L-17A
| KIT #: | 72106 |
| PRICE: | $25.00 or so |
| DECALS: | Two options |
| REVIEWER: | Joel Hamm |
| NOTES: | Short run multimedia kit |
| HISTORY |
Here we go with another civilian airplane inducted into military service. Interest in this subject must be widespread because kits in this genre are pouring out of the East European molders.
As North American Aviation’s
swords-to-ploughshares project and entry in the anticipted but never
materialized post war civil flying boom, the Navion, a.k.a. Model 145, shared
design features and slight resemblance with the P-51 Mustang. With another war
flaring the U.S. military bought up the first part of the production run for use
as forward 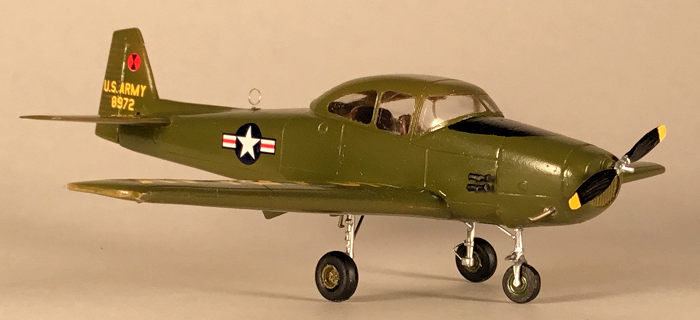 air
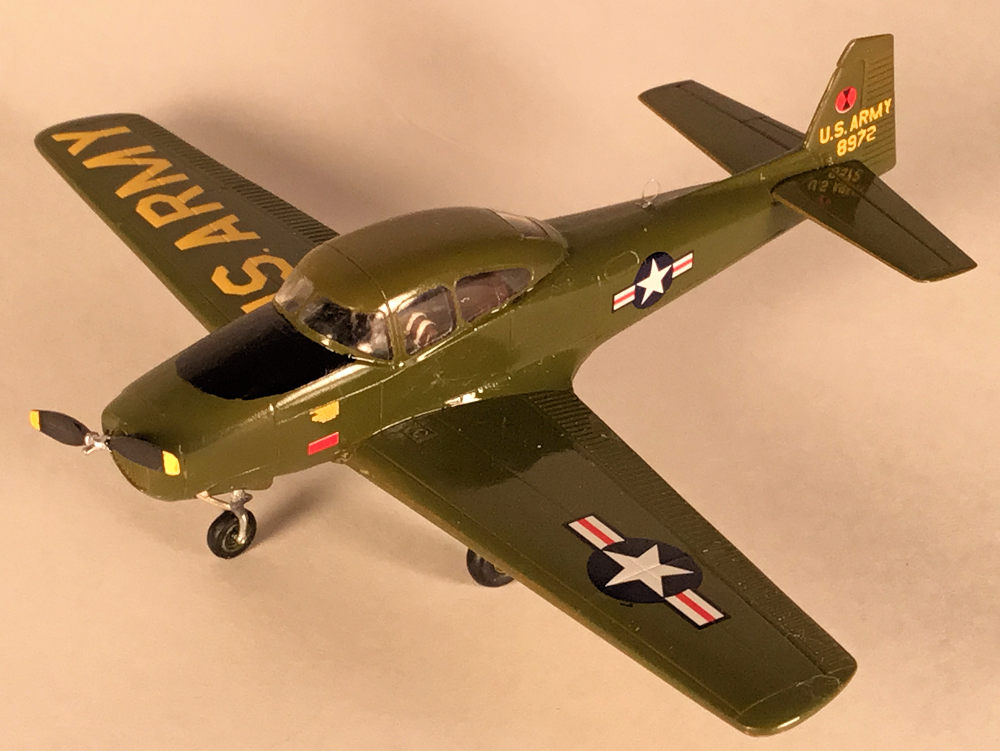
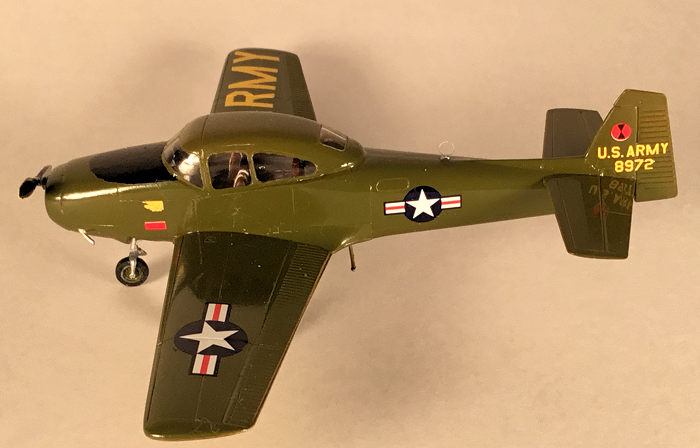
controller, light cargo, and personnel transport planes. The subject of this
build is depicted as General McArthur’s personal limo. Valom also boxes the kit
with other markings, including the Navy’s shark-mouth version and the handful of
export machines.
air
controller, light cargo, and personnel transport planes. The subject of this
build is depicted as General McArthur’s personal limo. Valom also boxes the kit
with other markings, including the Navy’s shark-mouth version and the handful of
export machines.
Production passed through several companies, each making improvements or attempting variations and conversions; but only the initial version, plus up-engined B and C models, saw significant military service, one aboard the carrier USS Leyte. The Navion still enjoys extensive civilian following with one company announcing readiness to return the type to commercial manufacture. That was five years ago, and like so many general aviation ballyhoos nothing has been heard since.
The Web abounds with pics of private planes in colorful liveries. Most are likely fanciful; but there’s nothing wrong with modeling your L-bird to mimic some warbirder’s imagination. There’s nothing wrong with modeling it strapped to a fuel tank and two solid rocket boosters, perched on Canaveral’s Pad 5. They are your toys. Play with them as you like.
| THE KIT |
Valom, and the other Czech companies with
which it appears to have an association, know the meaning of multi-media; and
they do it without the triple digit price tags of high tech Asian imports. For
less than $30, depending on shipping costs an exchange rate, you get flash free,
sharply detailed injected sprues of palstikove dily, a fret of p hoto
etched kovove dily , a bag of resin pieces (no Czech word given), micro-filmed
instrument faces, and a sheet of high quality obtisky (decals). Sorry, no vacu-forms
in this one; you will have to suffer with the scale-thickness, crystal clear
pruledne dily (clear parts).
hoto
etched kovove dily , a bag of resin pieces (no Czech word given), micro-filmed
instrument faces, and a sheet of high quality obtisky (decals). Sorry, no vacu-forms
in this one; you will have to suffer with the scale-thickness, crystal clear
pruledne dily (clear parts).
Two canopies are provided; one closed and the other split behind the windshield for open display. Don’t know why they bothered to do this, since with the new wonder glues available, sticking two clear pieces together is no problem. The kit is full of DKWTBTDT parts, mention of which is not to be construed as whining. On the contrary; these companies deserve kudos for offering extras, even though most modelers would find them not worth the trouble. The kit suffers only minor and easily fixed boo-boos.
| CONSTRUCTION |
Before I forget, let me stress that with its short nose and long tail, this cutie is a pernicious tail sitter. Stuff lots of lead into its engine compartment. How much? Before affixing the nose bowl I super-glued in four 3/0 split shot fishing sinkers; and after the gear struts went on found this was far too little. Through the nose gear well I was able to drop in six more that had been flattened and minced. THAT’S A LOT OF LEAD!
 The
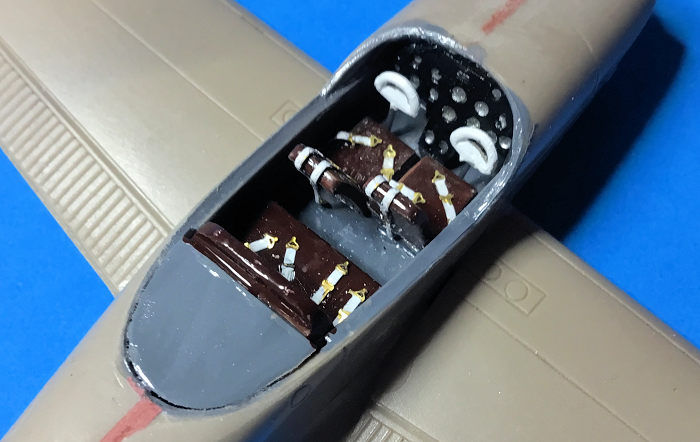
interior furnishings comprise a mini kit of nearly two dozen parts; rightfully
so because everything is highly visible even through the closed canopy, which
needs none of the usual Future-ization to enhance clarity. Move the front seats
forward about a half centimeter. This too far aft error is common across the
spectrum of companies, and obvious to anyone allowed close enough to peek
through the windshield. A bit more believability can be added by staggering the
position and height of the front sets.
The
interior furnishings comprise a mini kit of nearly two dozen parts; rightfully
so because everything is highly visible even through the closed canopy, which
needs none of the usual Future-ization to enhance clarity. Move the front seats
forward about a half centimeter. This too far aft error is common across the
spectrum of companies, and obvious to anyone allowed close enough to peek
through the windshield. A bit more believability can be added by staggering the
position and height of the front sets.
The folks who did the various kit parts may not have been on speaking terms. The instruction sheet calls for shoulder harnesses on all four seats but the kovove dily guy only etched two. He did provide joysticks and massive bomber style suspended rudder pedals. This is an L-17, not a B-17, and took its pitch/roll inputs through yokes and its yaw cues via diminutive “clutch pedals” poking up from below. Unbeknownst to the instruction sheet illustrator, Mr. Plastikove did his homework, injecting a pair of properly shaped steering wheels and adding the correct half round hump to the floorboard.
The instrument panel is a three-layer cake of brass, acetate, and plastic backer. They fit well neither together nor into the fuselage curve. After making a mess reshaping them I tossed the trio and scratch-built a single level piece.
Brass and plastic parts are included to box in the wheel wells; entirely unnecessary since the cabin floor convincingly seals the void. Adding these assemblies will also complicate wing and fuselage closure, making it impossible to add nose weight when inevitably required.
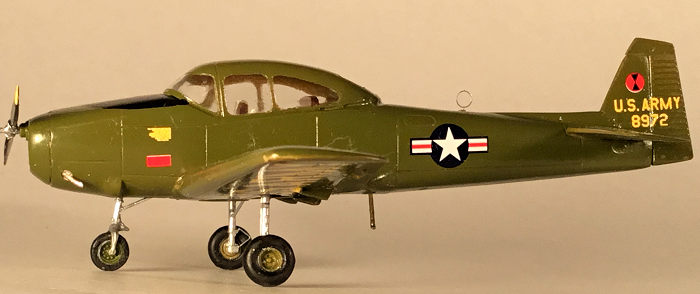
The sprues hold doors for the nose and main landing gear, though photos indicate these were removed from military machines, particularly this McArthur specimen. One slight error spoils the injection molder’s perfect score. The balance horn should be cut from the rudder leaving a straight hinge line.
 Before
proceeding to the paint shop the under-wing appendages should be applied. For
aileron balances a choice is provided between etched metal, squozed plastic,
poured resin, or scratch built. In 1:1 scale these are barely visible so I chose
none. P.E.B. control surface hinges however add a definite dose of je ne sais
quoi. All went on obediently with a dab of cyano-gel, except for the last which
escaped the forceps’s grip and sprang into the fourth dimension. Now, a sane
person would console himself with the thought that no one will creep under the
belly to notice the lack of one microscopic brass snippet. A sane and savvy
person would extrapolate that if they didn’t miss one they wouldn’t miss all
four; and remove the remainders as hedge against further loss. People who diddle
with tiny plastic pieces are not known to be sane people. More correctly, they
are known to be not sane people; and by most are properly paced among insane
people.
Before
proceeding to the paint shop the under-wing appendages should be applied. For
aileron balances a choice is provided between etched metal, squozed plastic,
poured resin, or scratch built. In 1:1 scale these are barely visible so I chose
none. P.E.B. control surface hinges however add a definite dose of je ne sais
quoi. All went on obediently with a dab of cyano-gel, except for the last which
escaped the forceps’s grip and sprang into the fourth dimension. Now, a sane
person would console himself with the thought that no one will creep under the
belly to notice the lack of one microscopic brass snippet. A sane and savvy
person would extrapolate that if they didn’t miss one they wouldn’t miss all
four; and remove the remainders as hedge against further loss. People who diddle
with tiny plastic pieces are not known to be sane people. More correctly, they
are known to be not sane people; and by most are properly paced among insane
people.
I spent a fruitless hour scouring my pile of brass sheets; then a fruitful hour forming a metal scrap into an acceptable replacement. As soon as its affixing super-glob had set, the original rematerialized in the geographic center of my work pad. Now, a sane person would congratulate himself on his manual dexterity, tape the original to a card and file for future use, then continue merrily modeling. Said insanity compelled this one to excise and re-replace the replacement.
I know what you’re thinking and you’re wrong. The original hinge did not again teleport itself through some workbench wormhole. It settled contentedly along-side its slightly misaligned siblings. HOWEVER… at a later date the plane skidded off the table, entered a flat spin, and belly-flopped on the hardwood scattering four hinges to four corners of, if not the world, the workroom. Everyone at this point can guess what proper course of action was ignored. Two sessions were occupied chipping away set cyano-acrylate, Dremeling depressions, and solvent gluing mini obtuse triangles cut from plasticard.
| COLORS & MARKINGS |
Since the oddly shaped windows would be difficult to tape over, I tried something new – after market pre-cut masks. I doubted any existed for such a new and obscure subject, but a check with Hannants’ filtered search engine brought up six different sets, ranging from near $20 to only $2. Guess which I chose, filling the remaining $10 minimum order requirement with sets for other difficult to paint canopies secreted in the stash.
They arrived with typical British
punctuality. The L-17 sheet was the basic set, holding laser cut masks for
windshield, windows, and wheels. Expert sets were available, allowing the
modeler the paint the canopy interior, and the black rubber gasket surrounds;
assuming he can properly position the blank-outs. With that degree of e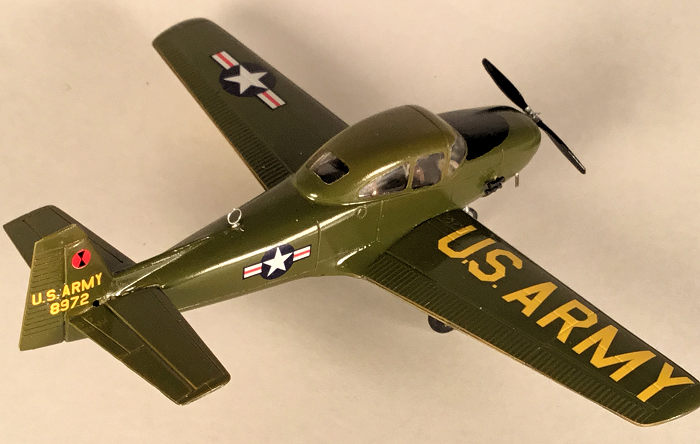 xpertise
I am not blessed. Nor with that degree of need for perfection am I cursed. The
vinyl snippets applied easily, with enough give in the glue to slide them
slightly, or even remove and re-stick.
xpertise
I am not blessed. Nor with that degree of need for perfection am I cursed. The
vinyl snippets applied easily, with enough give in the glue to slide them
slightly, or even remove and re-stick.
The single shade color scheme made painting a one shot deal. Olive Drab is not available in gloss, but is easily concocted to various hues by mixing green and orange (Testors). Dissatisfaction with the results can be cured by moving to a different light source. O.D. changes from near black to tan to iridescent almost purple, depending on whether it basking in CFC, LED, halogen, or plain old illegal incandescent. Photos are best done in diffuse daylight, but at this writing the Mid Atlantic is being drenched by its third Nor’easter in as many weeks.
I brush painted the wheels using the paint masks. They are really intended for airbrushing, but allowed no seepage and produced my sharpest ever and most circular hub/tire demarcation.
Decals are not the “new process” continuous clear layer type. They are individually printed, apply easily, snuggle down tightly, but benefit from the Miro Set / Micro Sol process. The “U.S. ARMY” markings are too long to fit in the span of one wing panel. The trick is to cut way the ARMY and stick it as far as possible outboard. Separate the U. and the S. cutting the periods down to about one quarter size, then scroonch the letters together. They will still sit further inboard than shown on the full color marking guide, which is keyed to four paint brands plus F.S. numbers. Decals dry “painted on” without benefit of an overcoat, but for longevity they got a layer of Future. The hourglass-in-circle markings, which mean I don’t know what, are slightly off register; so are the port side loading and maintenance stencils. No easy fix. No big deal.
| FINAL BITS |
The phinal phase consists of phastening on, or at builder’s discretion phoregoing, lots of phiddly bits. Retraction struts, exhaust pipes, and the like are provided, but are more cleanly made from stretched sprue. I doubted the veracity of the loop DF antenna, having thunked that by the mid 1950’s the streamlined football type would have completely taken over; but a grainy B&W of the actual airplane appeared on GOOGLE Images, and there it was, perched just forward of the dorsal fin.
The canopy latch and OAT probe poking from the canopy would be invisible in real life, and sticking them on would make a mess, so they got left off.
 Alternative
vacuum system venturis come in the resin parts bag, but there’s nothing wrong
with the injected ones. No, that’s not right. There’s something very wrong with
them. They are molded on the sprues with their injection gates right in the
middle of the part, making cleanup impossible. The same goes for most of the
thin strut parts, which are molded cross-wise with their sprue gates at mid
span. By contrast the landing gear legs are longitudinal to the injection ports,
needing no cleanup after snipping them free. Why can’t all parts be arranged
that way?
Alternative
vacuum system venturis come in the resin parts bag, but there’s nothing wrong
with the injected ones. No, that’s not right. There’s something very wrong with
them. They are molded on the sprues with their injection gates right in the
middle of the part, making cleanup impossible. The same goes for most of the
thin strut parts, which are molded cross-wise with their sprue gates at mid
span. By contrast the landing gear legs are longitudinal to the injection ports,
needing no cleanup after snipping them free. Why can’t all parts be arranged
that way?
Said gear legs, the main ones at least, appear a tad long and could benefit from a millimeter or so shortening, while preserving a slight nose down stance. The main wheels look overly Rubinesque and in need of bariatric sanding, but a GOOGLE close-up of the retracting gear confirmed that the plastikove guy got it right again; they really are that fat. The nose wheel, however, will never squeeze into its separate fork. I found a narrower one in the parts bin.
The propeller is delicate at the hub where it has to be cut from its sprue gates. If you are thinking of whipping out a set of micro-drills and deepening the dimple where the shaft attaches – don’t.
Some difference of opinion exists regarding placement of the step. I went with the instructions and put it behind the wing; then decided to check gain with GOOGLE and found that I had been outvoted 6-1 by forward of the wing photos.
The last step was removing the paint masks, which had been left on to preclude disaster befalling the transparencies. They came away easily with the prod of a #11 blade tip, left no residue, but did leave a flawless window outline, with nary a slip-up or hint of seepage. They were still strong and sticky enough to be returned to their backing paper for re-use.
| CONCLUSIONS |
I’m sold on after market paint masks.
20 November 2018
Copyright ModelingMadness.com
If you would like your product reviewed fairly and fairly quickly, please contact the editor or see other details in the Note to Contributors.
Back to the Main Page Back to the Previews Index Page Back to the Review Index Page