Revell 1/56 F-94C Starfire
| KIT #: | H-210 |
| PRICE: | $0.79 in 1954 |
| DECALS: | One option |
| REVIEWER: | Blair Stewart |
| NOTES: | Reissued in 1998 as an SSP kit. Not difficult to find. |
| HISTORY |
The Lockheed F-94
Starfire was the
Lockheed derived the F-94
from the TF-80C (later the T-33A) which was a two-seat trainer version of the
F-80 Shooting Star. To get to the F-94C, Lockheed lengthened the TF-80C’s nose
area and added guns, radar and an automatic fire control system. Since the
conversion seemed so simple, the Air Force awarded a contract to Lockheed in
early 1949, with the aircraft’s first flight on
 The fire
control system was the Hughes E-1, which incorporated an AN/APG-33 radar
(derived from the AN/APG-3, which directed the Convair B-36's tail guns) and a
Sperry A-1C computing gun sight. Since this short-range radar system was useful
only in the terminal phases of an intercept, ground-controlled intercepts would
direct most of the operation.
The fire
control system was the Hughes E-1, which incorporated an AN/APG-33 radar
(derived from the AN/APG-3, which directed the Convair B-36's tail guns) and a
Sperry A-1C computing gun sight. Since this short-range radar system was useful
only in the terminal phases of an intercept, ground-controlled intercepts would
direct most of the operation.
The added weight of the
electronic equipment soon dictated a more powerful engine: the afterburning
Allison J33-A-33 centrifugal-type turbojet replacing the standard J-33 fitted to
the T-33A. The YF-94 was the first
The initial model
was the F-94A. Its armament was four .50 caliber (12.7 mm) M3 Browning machine
guns mounted in the fuselage with the muzzles exiting just behind the radome.
The F-94A could carry two 165-gallon drop tanks - as did the F-80 and T-33 -
under its wingtips. Alternatively, 1,000 lb. Bombs could replace these tanks,
giving the aircraft a secondary fighter-bomber role. Lockheed produced 109
F-94As. The subsequent F-94B, which entered service in January 1951, had
upgraded and more reliable electronics and engines, as well as a new ILS.
Lockheed produced 356 F-94Bs.
The F-94C Starfire
represented a significant modification from the early F-94 variants; in fact, it
was initially designated the F-97, but Lockheed decided to treat it as just a
new version of the F-94. Initially, USAF interest was lukewarm, so Lockheed
funded the development by converting two F-94B airframes to YF-94C types for
evaluation. To improve performance, Lockheed added a totally new wing - much
thinner than the previous one - and a swept tail surface. They replaced the J33
engine with the more powerful Pratt & Whitney J48, a license-built version of
the afterburning Rolls-Royce
The F-94C was
the only variant to be officially named Starfire.
With time, the entire F-94 family adopted the name.
 In March
1951, the Air Force sent F-94Bs to combat in the Korean War, where they equipped
the 339th, 68th, 4th, and 319th FIS. The F-94 had several air-to-air victories,
including the first jet vs. jet night victory. One F-94 is listed as lost due to
enemy action, six more to non-enemy causes on combat missions, two were declared
as missing on a combat mission and three were lost in accidents.
In March
1951, the Air Force sent F-94Bs to combat in the Korean War, where they equipped
the 339th, 68th, 4th, and 319th FIS. The F-94 had several air-to-air victories,
including the first jet vs. jet night victory. One F-94 is listed as lost due to
enemy action, six more to non-enemy causes on combat missions, two were declared
as missing on a combat mission and three were lost in accidents.
Another early detachment was
the 59th Fighter Interceptor Squadron, (all-weather, night-fighter interceptor,)
which was sent to
The first
production F-94C aircraft were delivered in July 1951, 387 examples being
delivered before May 1954. The largest problem discovered in service was that of
the nose-mounted rockets, which blinded the crew with their smoke and fire. The
most severe problem of firing the nose-mounted rockets was that their exhaust
could cause a flameout of the jet engine and could lead to the loss of the
aircraft. As a result, mid-wing fuel and rocket pods were added, each holding 12
rockets. Most of the time, the nose rockets were not installed, and the mid-wing
pod rockets were the sole armament. This version of the aircraft was extensively
used within the Semi Automatic Ground Environment (SAGE) air defense system.
The F-94B remained in USAF service through 1954 before being transferred to the Air National Guard. The Air Force retired the F-94C in 1959, as newer and more capable interceptors entered service. Air National Guard units retired their F-94s a year later.
| THE KIT |
Having started
modeling in the early fifties, I have lately been trying to recapture my youth
by collecting many of the old kits that I built as a youngster. This kit was one
of the first plastic model kits I assembled back then, the first being the 1953
first issue of the Revell USS Missouri, which I built with my dad on my seventh
birthday (note: this kit turned out to be a money maker for Revell, and it
remains in the Revell catalog to this day, probably as Revell’s all time best
selling kit).
The F-94 was
Revell’s first aircraft model. Revell first released it in 1953 as kit no.
H-210. Revell packaged this initial release in a one-piece box without a full
color  illustration
of the aircraft on the box top. The initial kit, sculpted by Revell’s Tony
Bulone, was a desktop model mounted on a stand, with no landing gear and two
crew figure heads molded into the fuselage parts. The kit consisted of 10 parts
molded in silver plastic, a clear one-piece canopy, and a two-piece silver
plastic stand for a total parts count of 13. Revell printed the assembly
instructions on the back of the box.
illustration
of the aircraft on the box top. The initial kit, sculpted by Revell’s Tony
Bulone, was a desktop model mounted on a stand, with no landing gear and two
crew figure heads molded into the fuselage parts. The kit consisted of 10 parts
molded in silver plastic, a clear one-piece canopy, and a two-piece silver
plastic stand for a total parts count of 13. Revell printed the assembly
instructions on the back of the box.
Needless to
say, due to its simplicity and un-inspired box art, the initial kit did not meet
the modeling industry’s standards at the time. In 1954, Revell modified the mold
for this kit and reissued it as H-210. Modifications included: wings molded in
two halves; crew figures and cockpit interior separate from the fuselage; added
landing gear; and “dollar sized” rivets. Typical of its day, the kit had
molded-in raised impressions of the kit markings to aid in placing the decals.
The kit also included Revell’s new clear plastic swivel stand with the steel
spring clip to hold the model in the stand. These modifications resulted in a
total parts count of 26 for the aircraft plus the four parts for the display
stand.
Revell packaged the kit in a box with box top art by the renowned
Richard Kishady, who later became Revell’s in-house art director. Revell also
raised the original $.59 kit price to $.79!
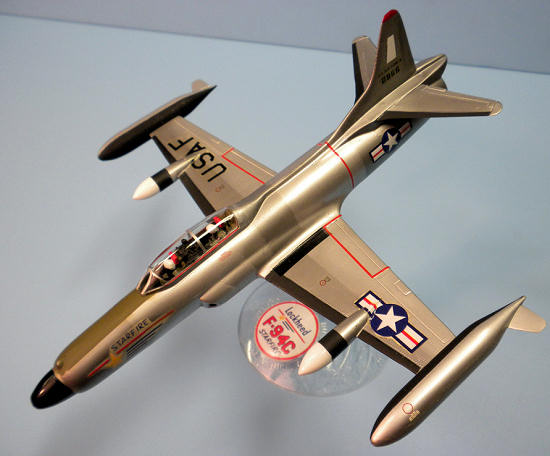
This and other Revell kits were known as “box scale” models; that is, to solve the problem of maintaining a constant scale in both its ship and aircraft models, Revell adopted the approach of scaling these kits to fit specific size boxes and sell at certain price points. Thus, the F-94C turned out to be the now odd scale of 1/56.
| CONSTRUCTION |
I wanted to build this kit as
an example display for my kit collection display, which I currently house in an
old lawyer’s cabinet from the late forties, which was in my family when I was
born. As my “obsession” with old kits has grown, I will either have to purchase
new display cabinets or rotate my kits that I display in this cabinet (someone
PLEASE stop me from buying kits!). Not wanting to build either the 1953 or 1954
issued kits in my collection, I purchased one of the 1998 reissued Revell
Selected Subjects Program (
As one can expect, this is not an
overly difficult kit to assemble, given its low parts count; however, bringing
it somewhat up to today’s modeling standards would require some work I would
have never have done back in the fifties.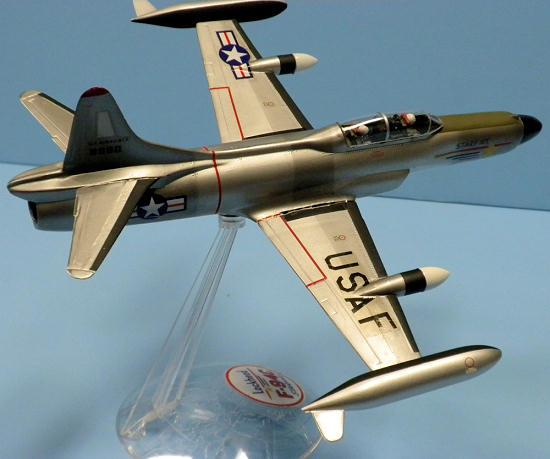 As I intended to display this on the famous fifties Revell swivel stand, I opted
to glue the landing gear doors shut.
As I intended to display this on the famous fifties Revell swivel stand, I opted
to glue the landing gear doors shut.
I started by
gluing the cockpit and crew figures into the right fuselage half and, after
careful test fitting and shaving with an Xacto knife, I glued the two fuselage
halves together. I planned on hand-painting the interior and crew figures, so I
was not worried at this point about painting the interior. I then assembled the
wing halves and horizontal stabilizers and set them aside. I used numerous
miniature clamps to ensure all the seams were glued together. I proceeded to the
two wing-tip fuel tanks and used the same approach for these.
Like most kids in
the fifties, I would have assembled this kit in an afternoon, slapped on the
decals, and, before they fully dried, I would have been outside zooming my newly
assembled model around the yard in some mythical dogfight before suppertime. My,
how times have changed! Now, even though I wish it were still so, that is
neither the acceptable nor normal use for plastic model airplanes. Since I
intended this kit for display, I would have to do some modifications in an
attempt to bring it somewhat up to today’s standards. I started by sanding down
all of the out-of-scale rivets and the decal impressions. This took some time,
and, since in this scale panel lines would not really be very noticeable, I
didn’t worry too much about losing the raised panel lines in the process. I used
a medium coarse sanding stick at first, followed by 2400 and 4000 grit wet
sanding to remove as many sanding scratches as possible.
Once I was satisfied with the model’s surfaces, I glued the wings and the stabilizers to the fuselage. I had to use a little Gunze Sangyo Mr. Surfacer 1000 to fill the gaps in these joints, as well as along the fuselage seams. Once these were dry, I wet sanded them to blend them into the model.
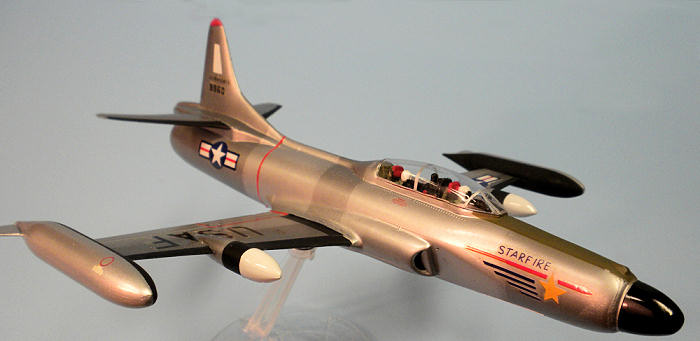
| COLORS & MARKINGS |
Since the
original airplane was only seen in a natural metal finish, this meant that I was
facing the dreaded metal paint finish issue. I know that Alclad has become a
favorite natural metal finishing product for a lot of modelers, but, for my
money, a cheaper alternative is Humbrol’s No. 11 Metallic Chrome Silver. This
paint dries very smoothly, and can be masked over for subsequent painting of
other areas. To ensure a smooth surface, I opted to paint the entire model with
gloss black rattle can spray paint I
 purchased
at Home Depot (note: I am not sure I would use this process again, as some of
the Humbrol silver had a tendency not to adhere to this primer coat in some
areas. For my next natural metal finish, I will return to airbrushing the
Humbrol silver directly onto the plastic.
purchased
at Home Depot (note: I am not sure I would use this process again, as some of
the Humbrol silver had a tendency not to adhere to this primer coat in some
areas. For my next natural metal finish, I will return to airbrushing the
Humbrol silver directly onto the plastic.
Once the initial
silver coat dried, I then masked off various panels using 3M Blue Painters’
Tape. I added some gloss black paint to the Humbrol silver, and then airbrushed
these areas in a darker metal finish to give the appearance of varying metal
finishes that one always sees on natural metal aircraft.
Once everything
was thoroughly dry, I masked the anti-glare panel on the nose and painted it
with Model Master Olive Drab. I then masked the wingtips, the rocket pods, and
the wing/horizontal stabilizer leading edges. I then painted all of these areas
with MM Flat Black. Once the wing rocket pods were dry, I masked off the ends
and painted these using MM Boyd’s Gloss White.
I applied the decals using a little bit of Microscale Super Set. I carefully blotted up excess water and Set as the decals settled to avoid stains as much as possible on the metal surfaces. For the wing no-step areas and the engine fuselage markings, which were not included in the kit’s decal sheet, I used some old Scale Master red stripes cut to size.
| FINAL CONSTRUCTION |
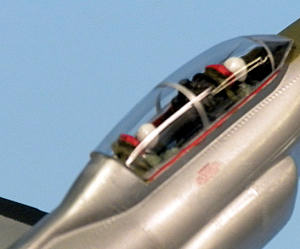 After the
decals were dry, I hand-painted the crewmembers and the sparse cockpit using
Model Master enamel paints. I then masked the canopy and airbrushed the canopy
framing with Humbrol silver. Once dry, I dipped the one-piece canopy into a dish
of Future to fill in the minor scratches that were present. When this dried, I
used Aleene’s Clear Gel Tacky Glue to attach the canopy. The final step was to
push the mounting ball on the lower fuselage into the stand’s swivel receptacle.
After the
decals were dry, I hand-painted the crewmembers and the sparse cockpit using
Model Master enamel paints. I then masked the canopy and airbrushed the canopy
framing with Humbrol silver. Once dry, I dipped the one-piece canopy into a dish
of Future to fill in the minor scratches that were present. When this dried, I
used Aleene’s Clear Gel Tacky Glue to attach the canopy. The final step was to
push the mounting ball on the lower fuselage into the stand’s swivel receptacle.
| CONCLUSIONS |
This was a nostalgic return for me to the modeling days of my youth. Given its age and simplistic construction, I think it looks pretty darn good when it’s assembled and finished using today’s modeling techniques. For any and all that remember building these kits long ago, I highly recommend you pick one up for a pleasant reminder of modeling days gone by!
| REFERENCES |
Lockheed F-94 Starfire, Wikipedia, January 2012.
If you would like your product reviewed fairly and fairly quickly, please contact the editor or see other details in the Note to Contributors.