
| KIT #: | 311 |
| PRICE: | $36.00 SRP |
| DECALS: | One option |
| REVIEWER: | Blair Stewart |
| NOTES: |
| HISTORY |
The Douglas C-124 Globemaster II, affectionately known as "Old Shaky", was a heavy-lift cargo aircraft built by the Douglas Aircraft Company in Long Beach, California.
The C-124 was the primary heavy-lift transport for United States Air Force Military Air Transport Service (MATS) during the 1950s and early 1960s, until the jet-powered Lockheed C-141 Starlifter entered service. It served in Air Force Reserve and Air National Guard units until 1974.
 Douglas Aircraft developed the C-124 from 1947 to 1949, from a prototype they
created from a World War II design, the Douglas C-74 Globemaster; they also
based the design on lessons the Air Force learned during the Berlin Airlift.
Four large Pratt & Whitney R-4360 piston engines, each producing 3,800 hp,
powered the aircraft. The C-124's design featured two large clamshell doors and
a hydraulically actuated ramp in the nose as well as a cargo elevator under the
aft fuselage. The C-124 could carry 68,500 lbs. of cargo. The 77 ft. cargo bay
featured two overhead hoists, each capable of lifting 8,000 lb. As a cargo
hauler, it could carry tanks, guns, trucks and other heavy equipment, while in
its passenger-carrying role it could carry 200 fully equipped troops on its
double decks or 127 litter patients and their attendants. It was the only
aircraft of its time capable of transporting heavy equipment such as tanks and
bulldozers without disassembly.
Douglas Aircraft developed the C-124 from 1947 to 1949, from a prototype they
created from a World War II design, the Douglas C-74 Globemaster; they also
based the design on lessons the Air Force learned during the Berlin Airlift.
Four large Pratt & Whitney R-4360 piston engines, each producing 3,800 hp,
powered the aircraft. The C-124's design featured two large clamshell doors and
a hydraulically actuated ramp in the nose as well as a cargo elevator under the
aft fuselage. The C-124 could carry 68,500 lbs. of cargo. The 77 ft. cargo bay
featured two overhead hoists, each capable of lifting 8,000 lb. As a cargo
hauler, it could carry tanks, guns, trucks and other heavy equipment, while in
its passenger-carrying role it could carry 200 fully equipped troops on its
double decks or 127 litter patients and their attendants. It was the only
aircraft of its time capable of transporting heavy equipment such as tanks and
bulldozers without disassembly.
The C-124 first flew on 27 November 1949, with the C-124A being delivered from May 1950. The C-124C was next, featuring more powerful engines, and an APS-42 weather radar fitted in a distinctive "thimble"-like structure on the nose. Wingtip-mounted combustion heaters were added to heat the cabin and enable wing and tail surface deicing. The C-124As were later equipped with these improvements.
First deliveries of the 448 production C-124 aircraft began in May 1950 and continued until 1955.
| THE KIT |
Since I first flew in a C-124 in June of 1965, I have had a place in my heart
for this old workhorse. In fact, prior to that flight, as a young boy growing up
in Alabama, I could always tell when a C-124 was flying over my house – it was
that unmistakable sound of the four Pratt & Whi tney engines lumbering to keep
the beast aloft (note: in a nostalgic way, I really miss the days of piston
engine aircraft, as each one seemed to have its own distinctive sound; e.g.,
nothing sounded like a B-36, a T-6 or a Merlin-engined P/F-51).
tney engines lumbering to keep
the beast aloft (note: in a nostalgic way, I really miss the days of piston
engine aircraft, as each one seemed to have its own distinctive sound; e.g.,
nothing sounded like a B-36, a T-6 or a Merlin-engined P/F-51).
Thus, when Roden released this kit, I was excited to get my hands on one. Outside of the Anigrand 1/72 and 1/144 scale resin kits, this is the only model kit of this airplane produced to date (Roden first produced the earlier C-124A – Kit #306 - that shares many parts with this kit), and the first in plastic. The kit is comprised of 120+ parts molded in a gray plastic on 10 sprues and two clear parts. The instructions show several parts “grayed out” that you do not use for the C model. Finally, there is a nice 5”x8” color sheet that shows the locations of the markings, other painting, and recommended Model Master paints.
There is some flash on the parts, and the molding is not up to the standards of Tamiya, Academy, Hasegawa and other model companies, but the outline and shape appears spot-on. Besides, in 1/144th scale, a lot of the detail that you get in 1/48th and 1/32nd scale kits would not be visible anyway.
| CONSTRUCTION |
Per the instructions, I started with the front nose gear wheel well and the
sparse cockpit (two plain seats, an instrument panel, the floor and a rear
bulkhead), which I hand painted with acrylic craft paint. This cockpit will be
virtually invisible once the kit assembled, so there was no need for exorbitant
detailing. At this stage, the instructions call for 30gms of weight in the nose,
and I made sure I glued this end, as this kit has a high propensity to be a tail
sitter if you don’t use some weight. Once this dried, I glued the cockpit floor
and nose gear wheel well to the right fuselage half, then glued the two fuselage
halves together. I used a combination of plastic glue and then liquid cement
(MEK) to c omplete the seal. At this point, I glued the radar housing to the
nose.
omplete the seal. At this point, I glued the radar housing to the
nose.
I next glued together the horizontal and vertical stabilizers and the wings. In step 10, you are shown how to saw off the wing tips to accommodate the wingtip combustion heaters that were common to the C model. I then assembled the engines into their nacelles and glued the nacelles onto the wings.
Once these parts dried, I glued the wings, horizontal stabilizers and vertical stabilizer to the fuselage. At this stage of assembly, I had some minor fit problems as well as problems getting all the correct (or near correct) dihedrals for the wings, tail and stabilizers. Be careful here, because if you don’t get these lined up, it will be very noticeable in the end.
With the major assembly of the aircraft, I surveyed what I had and what needed filler: the wing roots; some of the fuselage seam; the horizontal stabilizers; and the tail. I also went ahead and glued the windscreen on the aircraft, as I could see this would require some filling as well. I used a combination of 3M Acryl-Blue Glazing Putty and Mr. Surfacer 1000 to fill the seams. For the 3M putty, I laid down Scotch tape on both sides of the seam, filled in the seam with the putty, and then used fingernail polish and a Q Tip to remove the excess putty and smooth the joints.
After the putty and Mr. Surfacer cured, I used 1800 and 1200 grit sanding pads to wet sand the puttied surfaces. After each sanding, I examined the seams and then used Mr. Surfacer to fill in the inevitable dips and valleys that occur during this process. Once I was satisfied with the seams, I was ready to hit the paint booth (my basement) and shoot the base coat on the model.
| COLORS & MARKINGS |
 Every C-124 I have ever seen in person or via a photograph was either natural
aluminum or aluminum painted (and this is difficult to ascertain, as it is
possible that the pictures I see of 124s that appear to be painted could have
simply anodized over the lifetime of the aircraft. At any rate, it is difficult
at best to find a picture of a “shiny” C-124). Because of this, I was not too
worried about the shine of the bare metal or aluminum paint finish. I did,
however, decide to give the model a coat of Testors gloss black paint before
applying the aluminum paint. Once this dried, I wet sanded the gloss black paint
to get rid of any orange peel and imperfections.
Every C-124 I have ever seen in person or via a photograph was either natural
aluminum or aluminum painted (and this is difficult to ascertain, as it is
possible that the pictures I see of 124s that appear to be painted could have
simply anodized over the lifetime of the aircraft. At any rate, it is difficult
at best to find a picture of a “shiny” C-124). Because of this, I was not too
worried about the shine of the bare metal or aluminum paint finish. I did,
however, decide to give the model a coat of Testors gloss black paint before
applying the aluminum paint. Once this dried, I wet sanded the gloss black paint
to get rid of any orange peel and imperfections.
For the metal paint scheme, I opted to use some old Floquil Bright Silver I have had for over 35 years. I chose this paint because it can actually be buffed out a little and you can handle it and tape over it without much worry.
Assuming my airplane model was of one that was natural metal, I masked off wing panels, the rudder, and a band around the rear fuselage. I then took my Floquil Bright Silver, darkened it with some Testors Flat Black, and then shot these panels to give a different hue to the aluminum surfaces.
Once dry, I polished the aircraft surfaces with a flannel cloth. I then assembled the landing gear, and hand painted these. The color scheme on the propellers is quite intricate (i.e., aluminum, flat black and flat yellow), so I decided to “free-hand” these rather than mask them for airbrushing. I then glued the props to the engines.
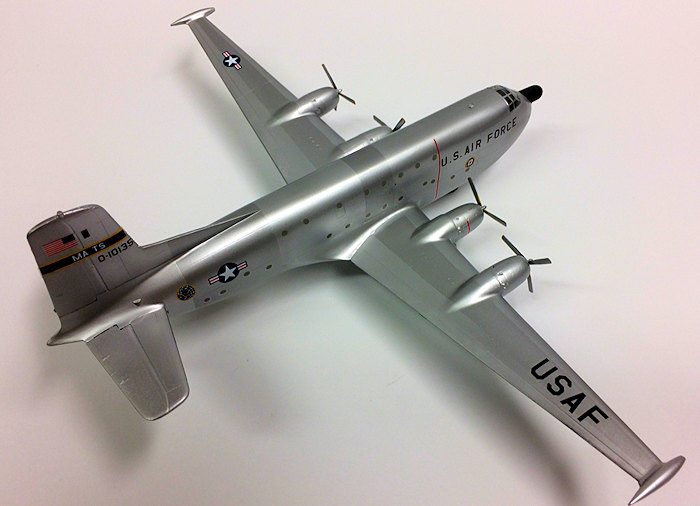
 At this point, I applied the decals, which provide only one MATS aircraft scheme
(in fact, it appears to be the scheme of the aircraft displayed in the National
Museum of the US Air Force in Dayton, Ohio). The Roden decals were very good and
settled onto the model’s surfaces with little or no trouble. I only used
Solvaset on the larger decals – for example, the tail decal, which is one large
decal containing the MATS logo, American flag and tail number. I especially
appreciated the fact that the side windows are represented by grayish colored
decals rather than clear plastic, which would be a nightmare for masking, etc.
In this scale, I also think it would have been better to decal the windscreen,
but I will leave that subject to debate by others.
At this point, I applied the decals, which provide only one MATS aircraft scheme
(in fact, it appears to be the scheme of the aircraft displayed in the National
Museum of the US Air Force in Dayton, Ohio). The Roden decals were very good and
settled onto the model’s surfaces with little or no trouble. I only used
Solvaset on the larger decals – for example, the tail decal, which is one large
decal containing the MATS logo, American flag and tail number. I especially
appreciated the fact that the side windows are represented by grayish colored
decals rather than clear plastic, which would be a nightmare for masking, etc.
In this scale, I also think it would have been better to decal the windscreen,
but I will leave that subject to debate by others.
I was now ready to attach all of the
smaller parts and appendages to the model. The landing gear presents somewhat of
a problem, as the main gear are quite flimsy in this scale (in fact, it is hard
to imagine that, if they are close to scale, the real, fully loaded aircraft
could sit on these without collapsing them). I first glued them into their very
small mounting holes and, once dried, discovered just how flimsy they really
w ere. I pulled them off, scraped off the glue, and then re-drilled the holes for
the main gear. I re-glued them, and then put a couple of drops of Super Glue on
them to strengthen them. I also attached the nose wheels to the gear by drilling
small holes with a pin vise and then supergluing the wheels to the gear with a
small piece of guitar string to hold them in place. Once they dried and I was
satisfied they would support the model, I glued on the gear doors and the
support structures for the nose and main landing gear.
ere. I pulled them off, scraped off the glue, and then re-drilled the holes for
the main gear. I re-glued them, and then put a couple of drops of Super Glue on
them to strengthen them. I also attached the nose wheels to the gear by drilling
small holes with a pin vise and then supergluing the wheels to the gear with a
small piece of guitar string to hold them in place. Once they dried and I was
satisfied they would support the model, I glued on the gear doors and the
support structures for the nose and main landing gear.
Finally, I hand painted the inside of the gear wells with Americana acrylic Plantation Pine craft paint, which is a reasonably good match for interior green (I couldn’t decide if the wells were interior green or zinc chromate, so I just opted to go with the interior green). I then hand painted the bracings on the windshield with Testors Metallic Silver.
| CONCLUSIONS |
Overall, this is a good kit, especially for its shape and outline. There are flash problems with some of the smaller parts, and the fit is not quite up to par with other well-known kit manufacturers. But if you don’t want to spend the $85-125 EBay price for the Anigrand 1/72 scale resin kit, then this is the way to go, especially if you have some experience with filling seams (and, of course, natural metal paint schemes).
| REFERENCES |
Douglas C-124 Globemaster II, Wikipedia, July 2016.
Douglas C-124 Globemaster II, National Museum of the US Air Force Website, July 2016.
22 August 2016
Copyright ModelingMadness.com
If you would like your product reviewed fairly and fairly quickly, please contact the editor or see other details in the Note to Contributors.