Italeri 1/72 C-119G Flying Boxcar
| KIT #: | 146 |
| PRICE: |
195 Danish kroner
=
US$ 30 |
| DECALS: | Five options |
| REVIEWER: | Torben Plesberg |
| NOTES: | Home made decals |
| HISTORY |
When I back in 1965 visited the USA on a program called International Air Cadet
Exchange, the transport between the Danish Air Base Værløse and Rhein/Main was
by a C-119 G of the Royal Norwegian Air Force.
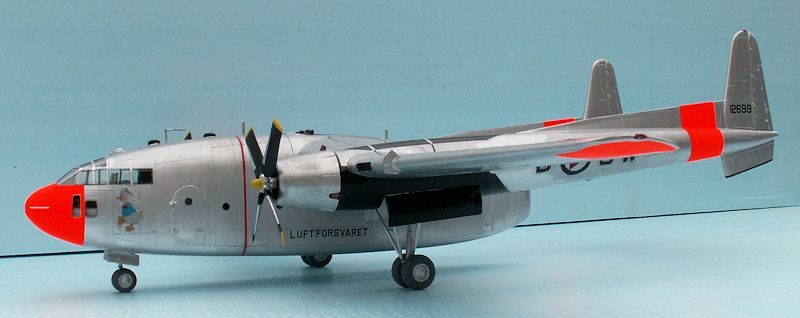
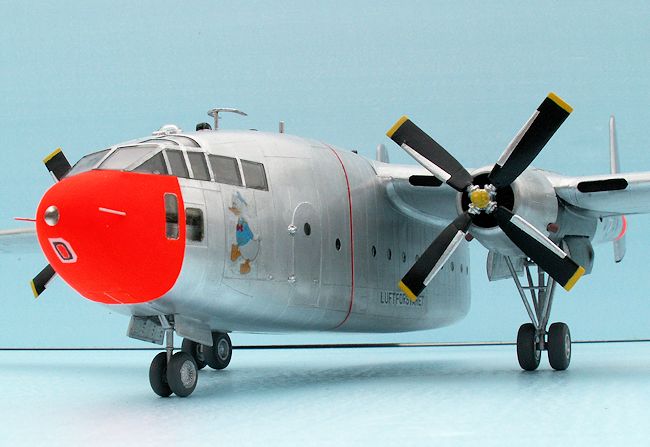
Now – 50 years later – I wanted to model this specific aircraft, the
Donald Duck. The Norwegian Air Force received 8 C-119 G in 1956 from the Belgian
Air Force, and these aircraft were in service until 1969, when they were
replaced by the C-130 H Hercules.
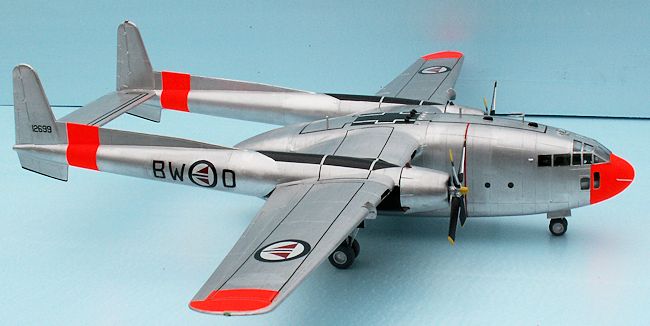
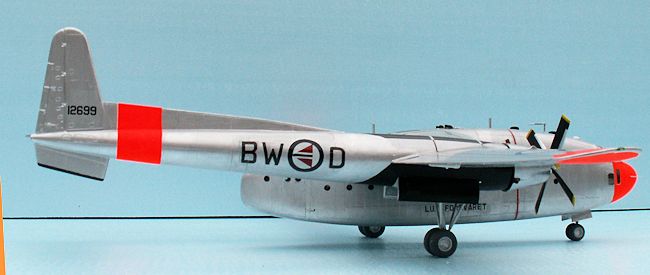 The Norwegian transport Squadron 335,
based at Gardermoen not far from Oslo, coded their C-119s BW and an individual
letter from A to H. The aircraft had a cartoon figure painted on the left side
of the nose beneath the cockpit. The first letter of this figure corresponded to
the individual code letter of the aircraft. Aircraft B was Baloo – the bear of
the Jungle Book, and aircraft D was Donald Duck of course. The serial number of
D was 12699 (51-2699).
The Norwegian transport Squadron 335,
based at Gardermoen not far from Oslo, coded their C-119s BW and an individual
letter from A to H. The aircraft had a cartoon figure painted on the left side
of the nose beneath the cockpit. The first letter of this figure corresponded to
the individual code letter of the aircraft. Aircraft B was Baloo – the bear of
the Jungle Book, and aircraft D was Donald Duck of course. The serial number of
D was 12699 (51-2699).
The main impression of the flight in my memory to this day is that it was
extremely noisy. It was not possible to talk. Even if you screamed directly into
the ear of your neighbor, you could not grasp the words. Every communication in
the main cabin was by gestures. Only in the pilot’s office it was possible to
communicate verbally with other persons -
and get some rest for your ears! The aircraft was adapted to paratroopers, and
we had to wear a fighter pilot’s suit and a parachute – and ear protection as on
the shooting range. The parachute was convenient to sit upon – the seats were
just metal benches.
| THE KIT |
The Italeri kit of the C-119 G comes in a large box and the quality of the light
gray plastic sprues is first class. The clam-shell door in the rear end of the
fuselage is very detailed and might be left open on the finished model, if you
want to make a diorama. There is a very large decal sheet with five options:
USAF, French AF, Taiwan AF, Italian AF and Belgian AF. However, the black walk
lines for one wing is missing. The instruction sheet is large, too, and it shows
clearly how to build the model and how to paint every one of the five options.
However, there are four flaws: ‘The wheel doors of the front wheel (A58) should
be in four smaller parts, not in two large parts. When the undercarriage is
down, the two front doors are closed. The canopy (E20) framing is wrong. If you
paint the canopy according to the framing, the side windows will be too low.
Only t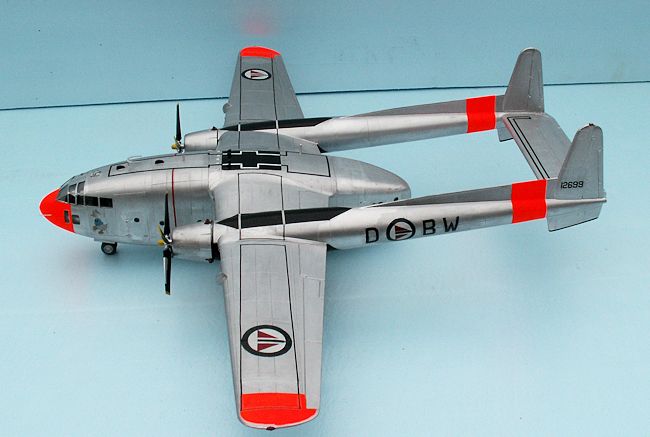 he vertical framing should be there. The windscreen wiper is far out of
scale and should not at all be there.
he vertical framing should be there. The windscreen wiper is far out of
scale and should not at all be there.
According to some sources, the distance
between the top of the fins is about 6 mm too wide. If this should be corrected
it would need a large operation involving a change of both wings and tail plane,
just to correct the distance between the booms by 6 mm. However, the model
matches exactly the three view drawings of the instruction sheet.
Besides - if you multiply the main dimensions of the model by 72, you get
very close to the official data of the C-119 G. The “error” is 1-2 mm only, and
that is more than good enough. Maybe the 6 mm distance error occurs from a not
correct three-view sketch? I have
measured several three-view sketches of the C-119 G, and the dimensions are not
the same everywhere. I don’t see any good reason to suggest that the drawings of
the instruction sheet are wrong dimensionally. And certainly not just because a
random three-view sketch shows different dimensions!
 The only deviation from the official data is the height. It should be 11.2 cm
but is 11.8 cm. I guess that if the aircraft is loaded, the undercarriage sinks
down, and the top of the fins will sink still more and get down to match the
correct figure. The undercarriage
of the model does not sink down like the original does when loaded.
If you go for the correct height, it is just a question of shortening the
undercarriage legs (A60) a couple of mms. The last item is mentioning that the
cowlings (B41) are too narrow, the circular air intake gauge should be 1 mm
bigger. This information comes from
what I can see and measure on photos. Maybe the reason for this is that the
sprue derives from the C-119 C, which has different engines. To correct this in
a proper way would mean to produce another set of cowlings. This would be easier
than trying to modify the cowlings of the kit. I can live with a too small
diameter of the cowling intake!
The only deviation from the official data is the height. It should be 11.2 cm
but is 11.8 cm. I guess that if the aircraft is loaded, the undercarriage sinks
down, and the top of the fins will sink still more and get down to match the
correct figure. The undercarriage
of the model does not sink down like the original does when loaded.
If you go for the correct height, it is just a question of shortening the
undercarriage legs (A60) a couple of mms. The last item is mentioning that the
cowlings (B41) are too narrow, the circular air intake gauge should be 1 mm
bigger. This information comes from
what I can see and measure on photos. Maybe the reason for this is that the
sprue derives from the C-119 C, which has different engines. To correct this in
a proper way would mean to produce another set of cowlings. This would be easier
than trying to modify the cowlings of the kit. I can live with a too small
diameter of the cowling intake!
| CONSTRUCTION |
Since the kit is engineered very well, the construction is quite simple. There
are, however a couple of points to consider. The first is the extra weight in
the nose – if you want the aircraft to rest on the nose
 wheels. The instructions
suggests 20 gram in the nose. I had problems where exactly to place more than
twelve gram if the two fuselage halves should go together without problems. I
thought that it might be possible later to put a further 8 gram into the wheel
bay, but I simply forgot to put in the 8 gram before I glued the front wheel
doors in place, and because of the day glow painting, it would cause too much
trouble to open them again. I found in
the end another solution of the balance problem.
wheels. The instructions
suggests 20 gram in the nose. I had problems where exactly to place more than
twelve gram if the two fuselage halves should go together without problems. I
thought that it might be possible later to put a further 8 gram into the wheel
bay, but I simply forgot to put in the 8 gram before I glued the front wheel
doors in place, and because of the day glow painting, it would cause too much
trouble to open them again. I found in
the end another solution of the balance problem.
The second point: the tail booms should be finished, painted and decaled before
the fixing to the wings. The problem was to paint the day glow bands properly,
and this is most convenient done if you have just the boom in your hand, not the
entire aircraft. On the other hand you get another problem, when you have to
marry two already painted parts. The filling and sanding process will demand
much more care and extra painting.
All of the framing of the canopy and the windscreen wiper was removed with a
needle file, water sanded with grain 1200 paper and polished with toothpaste to
regain transparency. The vertical framing was re-created by 0.8 mm stripes of
very thin tape. The wiper is too small for a model in this scale to be there.
The pitot tubes (D69) on either side of the nose was made of 0.5 mm gauge brass
wire. The dorsal antennas (D74) were made of 1.5 mm gauge wire. The horseshoe
antenna (D70) was made of 1 mm gauge galvanized iron wire, bent in shape and
flattened by a hammer. A 0.5 mm hole was drilled in the bottom of the horseshoe,
a piece of 0.5 mm wire was soldered in the hole. Finally, the
 o.5 mm wire was
put into a piece of 1 mm gauge tube, and the whole thing could be glued into the
one mm hole on the dorsal. I never use the plastic parts for antennas and pitot
tubes since they are too fragile.
o.5 mm wire was
put into a piece of 1 mm gauge tube, and the whole thing could be glued into the
one mm hole on the dorsal. I never use the plastic parts for antennas and pitot
tubes since they are too fragile.
The undercarriage seems a bit fragile. It is possible to get an aftermarket metal undercarriage, but I reckoned that if I handled things carefully, the kit parts would do – and they did so far. I replaced the fragile propeller shafts by 2.5 mm gauge brass shafts. These will not crack. And for the missing weight in the nose: I turned two solid brass plugs each weighing 20 gram and fitting precisely into the boom bases (B37) and extending 5 mm into the engine cowlings (B41). As the engines are well ahead of the main wheels, the extra weight of the engines made the model rest on the nose wheels. I had found an alternative solution of the balance problem.
| COLORS & MARKINGS |
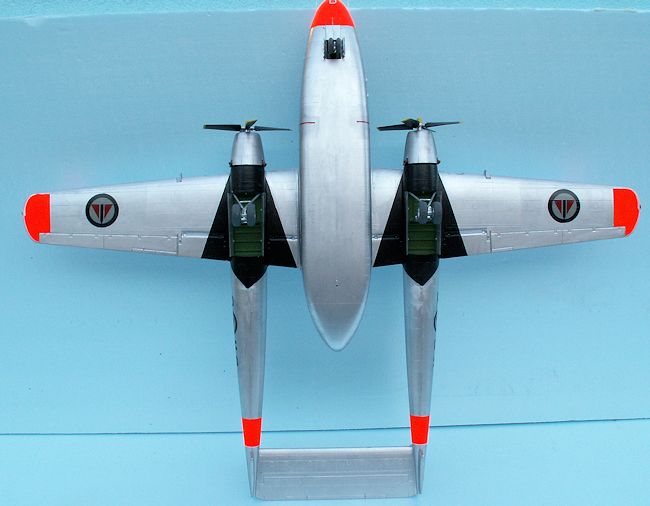 The color scheme is quite simple: natural metal (Humbrol HB 27002) all over with
the following exceptions: There are day glow bands around the booms rather close
to the fins. The wing tips have day glow bands, and the nose is day glow. To
obtain the full day glow effect, I painted the areas three times with a gloss
white (HB 22), and five times with a day glow (HB 209).
I masked the areas with Tamiya’s tape, cut to half width to deal better
with the curves.
The color scheme is quite simple: natural metal (Humbrol HB 27002) all over with
the following exceptions: There are day glow bands around the booms rather close
to the fins. The wing tips have day glow bands, and the nose is day glow. To
obtain the full day glow effect, I painted the areas three times with a gloss
white (HB 22), and five times with a day glow (HB 209).
I masked the areas with Tamiya’s tape, cut to half width to deal better
with the curves.
On the top side of the booms just behind the cowlings there are some prism
shaped black (HB 21) panes, and the same on the underside. Two triangular black
figures are painted on either side of the under wings facing the boom and
nacelles, and making big arrowheads pointing forward.
I guess the purpose of this black
painting is to avoid cleaning up too often the dirt from the engine exhausts. On
the dorsal of the fuselage - between the wings there is a black rectangular
pane. The wheel bays and inner
sides of the doors are green zinc chromate
(Model Master 1734 ). Undercarriage legs are natural metal, and the tires
are very dark gray.
Now for the great challenge of this
model: the decaling. A challenge because the Norwegian AF was not one of the
five options! I bought a sheet with Norwegian roundels, Flying Colors Aerodecals
no . There was, however, only two roundels in the big size needed for the wings.
I copied therefore a part of the sheet to get four big roundels. The quality of
the copies was not as good as the originals – the white was not white enough. I
decided to use only the copies, and this will be the flaw of the finished model!
The smaller roundels of the booms were also copies –all the roundels should look
the same!
 More important actually were the numbers and letters to identify the aircraft.
The serial number on the fins - 12699 – was put together from the serials on the
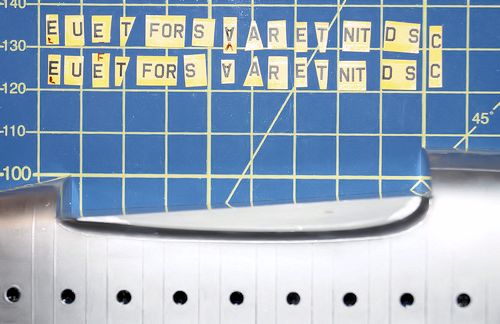
Italeri sheet. LUFTFORSVARET – the official name of the Royal Norwegian AF was a
little tricky. On the decal sheet there were 2 x UNITED STATES AIR FORCE in just
the right size letters. The L could be made of an E quite easily. The L could
also be made of an E, and the V was just an A upside down and without dash. All
other necessary letters were available: EUETFORSAARET became most convenient
changed to LUFTFORSVARET.
More important actually were the numbers and letters to identify the aircraft.
The serial number on the fins - 12699 – was put together from the serials on the
Italeri sheet. LUFTFORSVARET – the official name of the Royal Norwegian AF was a
little tricky. On the decal sheet there were 2 x UNITED STATES AIR FORCE in just
the right size letters. The L could be made of an E quite easily. The L could
also be made of an E, and the V was just an A upside down and without dash. All
other necessary letters were available: EUETFORSAARET became most convenient
changed to LUFTFORSVARET.
Next issue was the big code letters: BW – D. The Belgian decals had four x O,
and these O letters were quite easy to modify for two x D and two x B. The two x
W were made of black pieces from other letters. Now the Donald Duck got his
identity.
Only the cartoon figure was missing. I made a drawing using a photo of the real
C-119 G taken at Rhein/Main as documentation. The drawing was to 8:1 scale, so
it was easy to draw the lines in black ink. The coloring followed by fiber pens
in the following colors: Bill and feet warm yellow. Jacket and cap blue.
 Buttons
and collar stripes lemon yellow and red for the butterfly bow. I cut the
finished drawing out and glued it to a piece of cardboard painted like the
aircraft. I took a picture of the finished drawing, and now it was possible to
print it on a white sheet of decal paper. The size should be 18 mm in the
height.
Buttons
and collar stripes lemon yellow and red for the butterfly bow. I cut the
finished drawing out and glued it to a piece of cardboard painted like the
aircraft. I took a picture of the finished drawing, and now it was possible to
print it on a white sheet of decal paper. The size should be 18 mm in the
height.
However, the background color of the decal did not match the actual color of the
model. I had to paint the background over with a very tiny brush to get the
exact color matching the aircraft. At length the Donald Duck cartoon was decaled
on the model.
The walk lines of the dorsal were at hand as part of the big decal sheet. They
are 1 mm wide and this might be a little too much. As to the walk lines of the
wings and tail plane, only the latter were at hand, one big piece of decal.
There was, however, only walk lines enough for one wing! If I wanted walk
lines on both wings, I had to make them myself. It was an easy job to draw eight
lines (0.7 mm) on a piece of clear decal paper, and after the coat of clear
gloss varnish preserving the black drawing ink had dried, it was no problem to
make the walk lines of the wings. Author Jan Jørgensen e-mailed a nice photo of
a Norwegian C-119 G to me, showing the walk lines, and they were as could be
expected the standard configuration as shown on the Belgian machine in the
instructions.
Now only two small details were missing: The light in front of the nose, and a
small D underneath to make identification of the aircraft easier for the crew
and ground crew. I punched the 4 mm gauge light from a piece of self- adhesive
metal tape, and I drew the D in black ink upon a small piece of white decal
paper.
Some five weeks after the model was finished, I decided to change the Norwegian
roundels for the better. As mentioned the white was not white enough, but rather
light gray blue. The red color was also too dark. The dark blue color was OK. I
made an up-grade kit for the roundels, using white and red decal paper. I was
very careful, when cutting the parts of this very special kit, consisting of 42
parts of decal paper. I wanted the roundels to look good. The roundels ended up
just as good as the roundels on the original decal sheet with Norwegian
roundels. The white was definitely white now!
| CONCLUSIONS |
Italeri offers a very attractive kit of the C-119 G Flying Boxcar.
They have also released a C-119 C and an AC-119 K gunship. Apart from the
flaws mentioned above the kit is almost perfect, and it is possible to make an
impressive model without much effort. The decal sheet is very comprehensive and
boasts five options. The kit is
recommendable - not highly recommendable because of the flaws mentioned.
| REFERENCES |
Jan Jørgensen and others: Nordic Airpower # 3: Luftforsvaret.
ISBN 978-87-993688-2-2
The book contains a lot of outstanding color photos of all types of Norwegian military aircraft from 1945 and to the present day. It is a must if you take an interest in modeling Norwegian military aircraft. If you can’t get it in your local book store, it is obtainable from this internet shop: www.nordicairpower.com
My own photos of the “Donald Duck”
A photo showing the walk lines of a Norwegian C-119 G E-mailed to me by author
Jan Jørgensen.
March 2015
If you would like your product reviewed fairly and fairly quickly, please contact the editor or see other details in the Note to Contributors.