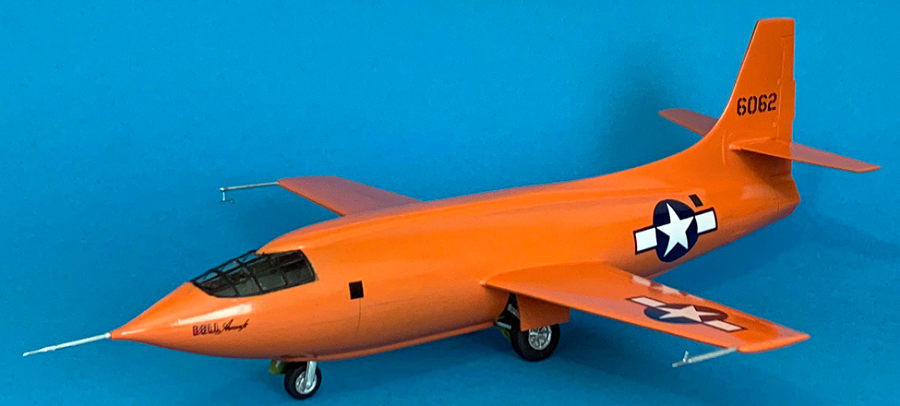
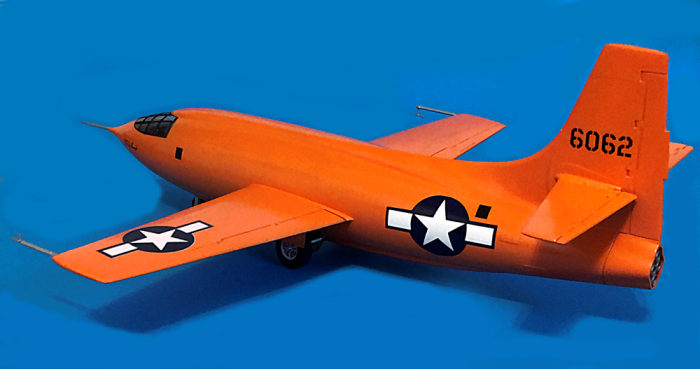
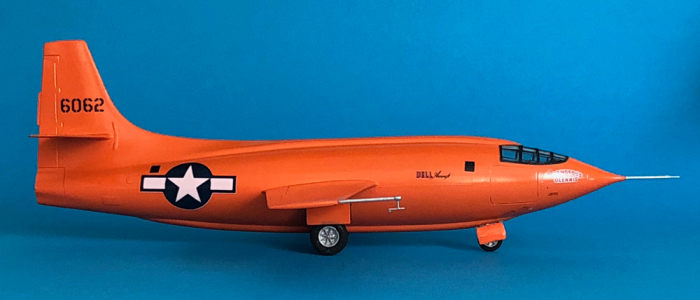
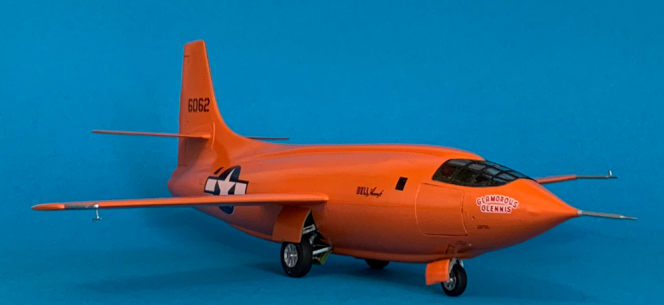
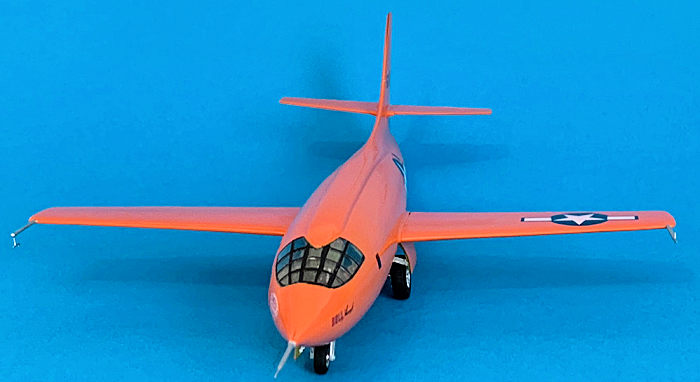
Revell 1/32 Bell X-1
| KIT #: | 5437 |
| PRICE: | $15-25.00 on the second hand market |
| DECALS: | One option |
| REVIEWER: | Blair Stewart |
| NOTES: |
Relatively simple kit, excellent representation of the real aircraft; national insignia decals a little thin. |
| HISTORY |
The Bell X-1 is one of the three most famous aircraft in aviation history. It hangs with the Wright Flyer and the Spirit of St. Louis from the ceiling of the main hall in the National Air and Space Museum.
The Bell X-1, (Bell Model 44), is a rocket powered aircraft fueled by liquid oxygen and alcohol. Originally designated the XS-1, the X-1 was a joint National Advisory Committee for Aeronautics (NACA) – US Army Air force (USAAF) supersonic research project designed and built by Bell Aircraft. Conceived during 1944 and designed and built in 1945, it achieved a speed of nearly 1,000 miles per hour (1,600 km/h; 870 knots) in 1948. The X-1, piloted by Chuck Yeager, was the first crewed airplane to exceed the speed of sound in level flight and was the first of the X-planes, a series of American experimental rocket planes (and non-rocket planes) designed for testing new technologies.
 The
aircraft’s design was inspired by the Browning Machine Gun (BMG) .50 caliber
bullet, which achieves supersonic speed when fired. The body was a semi-monocoque,
aluminum alloy, stressed skin construction, and it was overdesigned due to NACA
concerns about potential transonic stresses when approaching/exceeding Mach 1
speeds.
The
aircraft’s design was inspired by the Browning Machine Gun (BMG) .50 caliber
bullet, which achieves supersonic speed when fired. The body was a semi-monocoque,
aluminum alloy, stressed skin construction, and it was overdesigned due to NACA
concerns about potential transonic stresses when approaching/exceeding Mach 1
speeds.
Bell equipped the aircraft with a moveable horizontal stabilizer based on data supplied by NACA from its tests on the XP-42. The stabilizer had a deflection of 5 degrees up and 10 degrees down. It was fitted with a screwjack that was operated by a pneumatic motor.
The need for a movable stabilizer became critical in the upper transonic speed range when the first XS-1 reached an indicated Mach number of 0.94 and its elevators lost their effectiveness. So important was this discovery that nearly every transonic and supersonic aircraft since that time has had an all-movable horizontal stabilizer, although the Air Force managed to keep the information about it classified for about five years. This was long enough to give the later versions of the U.S. F-86 some design advantages that helped the aircraft in Korean War combat against the highly maneuverable Mig-15.
The X-1’s relatively small fuel capacity limited powered flight time to about 2.5 minutes, which was not sufficient to get the aircraft to 35,000 feet, which was deemed best for supersonic testing. As a result, Bell Aircraft initially used a Boeing B-29 (#45-21800) mother ship to carry the X-1 aloft to approximately 25,000 feet for air-launch powered flight testing.
 On
October 14, 1947, B-29 “eight zero zero” lifted off Muroc’s runway 06 with the
X-1 hanging beneath it. Dick Frost was flying low chase and Bob Hoover (one of
the greatest pilots to ever fly) was ascending to 40,000 feet to fly high cover
for the flight test. At 20,000 feet, and 250 mph indicated speed, the B-29
released Yeager and the X-1. Yeager began the rocket-lighting procedure, and
then began to climb to the desired test altitude. During the climb, Yeager
reported to Col. Jack Ridley that there was “something wrong with this Mach
meter. It’s gone screwy!” Ridley responded, “if it is, we’ll fix it. Personally,
I think you’re seeing things.” At 42,000 feet, Yeager and the X-1 reached Mach
1.05 in the vicinity of Victorville, CA. Later, engineers at Muroc verified that
the X-1 had actually reached Mach 1.06, about 700 mph at 43,000 feet, thereby
officially exceeding the speed of sound. The flight had buried the myth of a
sound “barrier” forever.
On
October 14, 1947, B-29 “eight zero zero” lifted off Muroc’s runway 06 with the
X-1 hanging beneath it. Dick Frost was flying low chase and Bob Hoover (one of
the greatest pilots to ever fly) was ascending to 40,000 feet to fly high cover
for the flight test. At 20,000 feet, and 250 mph indicated speed, the B-29
released Yeager and the X-1. Yeager began the rocket-lighting procedure, and
then began to climb to the desired test altitude. During the climb, Yeager
reported to Col. Jack Ridley that there was “something wrong with this Mach
meter. It’s gone screwy!” Ridley responded, “if it is, we’ll fix it. Personally,
I think you’re seeing things.” At 42,000 feet, Yeager and the X-1 reached Mach
1.05 in the vicinity of Victorville, CA. Later, engineers at Muroc verified that
the X-1 had actually reached Mach 1.06, about 700 mph at 43,000 feet, thereby
officially exceeding the speed of sound. The flight had buried the myth of a
sound “barrier” forever.
| THE KIT |
 Revell originally
released this kit, No. in 1984 (kit No. 4565). Molded in orange plastic, the kit
is relatively simple with only 45 orange plastic parts and two clear plastic
parts. The kit has raised panel lines, but this is not a big deal as the
prototype aircraft’s clean lines do not call for much panel detail. There is a
nice pilot figure included in the kit, as well as the sawed off broomstick that
Yeager “secretly” used to close the hatch once he was inside the aircraft
(Yeager had broken several ribs the night before in a horse riding accident and
was unable to raise his arm enough to close the hatch). The kit also includes a
nicely detailed, 3-part rocket engine that could be super-detailed to represent
the real Reaction Motors, Inc. XLR-11 engine. The instruction sheet is
well-illustrated, and the assembly sequence is straight-forward.
Revell originally
released this kit, No. in 1984 (kit No. 4565). Molded in orange plastic, the kit
is relatively simple with only 45 orange plastic parts and two clear plastic
parts. The kit has raised panel lines, but this is not a big deal as the
prototype aircraft’s clean lines do not call for much panel detail. There is a
nice pilot figure included in the kit, as well as the sawed off broomstick that
Yeager “secretly” used to close the hatch once he was inside the aircraft
(Yeager had broken several ribs the night before in a horse riding accident and
was unable to raise his arm enough to close the hatch). The kit also includes a
nicely detailed, 3-part rocket engine that could be super-detailed to represent
the real Reaction Motors, Inc. XLR-11 engine. The instruction sheet is
well-illustrated, and the assembly sequence is straight-forward.
| CONSTRUCTION |
I first assembled the rocket engine, sprayed it a grayish
gunmetal color, and set it aside to dry. Once dry, I glued it to the left
fuselage half. Next, I assembled the somewhat sparse cockpit. This could also be
super-detailed, but it is not readily visible through the “multi-frame” canopy.
The only thing I added were some paper seat belts with Model Technologies
photo-etched buckles and harness strap adjusters. I then hand-painted the
cockpit tub with slightly darkened artist acrylic olive green paint (note: the
instructions call for the cockpit interior and tub to be painted medium gray;
however, Air and Space Museum pictures of the real aircraft’s interior indicate
its color was interior green). I also hand-painted the left side instrument
panel. I also hand painted the front instrument panel with acrylic black and
then picked out the i nstrument detail with white acrylic paint using the dry
brushing technique. Using the Space Museum photos as a reference, I highlighted
various switches and instrument details with red and yellow paint. As a final
touch, I put a drop of Future on each instrument to represent the clear glass
covers.
nstrument detail with white acrylic paint using the dry
brushing technique. Using the Space Museum photos as a reference, I highlighted
various switches and instrument details with red and yellow paint. As a final
touch, I put a drop of Future on each instrument to represent the clear glass
covers.
Next, I glued the nose wheel well onto the underside of the cockpit tub. I then glued this assembly to the left fuselage half. The kit contains a clear plastic support to glue under the model’s tail to keep it from being a tail sitter, but I didn’t want to use this, so I used some Gorilla Glue to secure some old tire weight lead surrounded by BBs in the nose, checking occasionally to see if it was adequate t to balance the model on its landing gear. Once these weights dried in place, I sandwiched the rudder pedals and the instrument panel between the two fuselage halves and glued them together using a combination of plastic tube cement and MEK liquid, which is a cheap alternative to liquid model glues. Note that the instrument panel can also be glued inside the cockpit once the two fuselage halves have been glued together, a fact I discovered when the instrument panel dislodged from the fuselage halves as I was trying to adjust its position.
I then used various grits of sandpaper and sanding pads to smooth out the fuselage seams. This is relatively unobtrusive to panel detail as the real aircraft has a solid cap-like structure running the length of the fuselage on both the top and the bottom. I then moved to assemble the wing halves and attached them and the horizontal stabilizers to the fuselage. Although pretty good, the fit of the wings was such that I had to use a small amount of putty to close up the small gaps that existed. Once the putty dried, I used a thin sanding stick to smooth it (although I used acrylic putty, which can be easily smoothed after application using one’s moistened finger or a cotton Q-tip).
I then assembled the landing gear and set these aside for later painting and attaching to the model.
| COLORS & MARKINGS |
I was now ready to paint the aircraft. I happened to have had an earlier kit that I had messed up during the painting process, so I had an extra canopy that I just white-glued onto the cockpit for painting purposes. I painted the wheel wells with my custom made acrylic chromate green, then stuffed wet Kleenex into these to mask them.
 Now the dilemma: what orange paint would most closely match the
exterior color of the real aircraft? I looked at Testors Gloss Orange, a bottle
of gloss orange fingernail polish, a bottle of Polly S Fantasy Goblin Flesh, and
Humbrol #11 gloss orange. After viewing as many color photos of the real
aircraft as I could find on-line, I finally opted for the Humbrol Gloss Orange,
and I believe it is pretty spot on (I know others have used colors like Model
Masters Go Mango as well, but none of my local sources carry the full line of MM
paints, and I was too lazy to go searching for it on the web) .
Now the dilemma: what orange paint would most closely match the
exterior color of the real aircraft? I looked at Testors Gloss Orange, a bottle
of gloss orange fingernail polish, a bottle of Polly S Fantasy Goblin Flesh, and
Humbrol #11 gloss orange. After viewing as many color photos of the real
aircraft as I could find on-line, I finally opted for the Humbrol Gloss Orange,
and I believe it is pretty spot on (I know others have used colors like Model
Masters Go Mango as well, but none of my local sources carry the full line of MM
paints, and I was too lazy to go searching for it on the web) .
I primed the entire aircraft with Rustoleum primer gray out of a rattle can (note: be very careful using Rustoleum on plastic. It is a very HOT paint, and if you don’t lightly layer it on the plastic, it can craze the plastic surfaces). Once the primer coat dried, I then wet sanded it with a 4000 grit sanding pad to get rid of any imperfections and uneven areas.
After thinning the Humbrol gloss orange enamel paint with lacquer thinner, I grabbed my trusty Paasche airbrush (50 years old and still humming) and began painting the final color. Since I was looking for a gloss finish, I made sure my coats were going on “wet’” as this is the best way to achieve a good gloss finish. Once the paint was dry, I again used the wet sanding process to smooth out the paint and get rid of the slight orange peel that is almost inevitable with enamel paints. After the sanding process, I buffed out the model’s exterior using a soft bath towel, and this restored the high gloss finish that was slightly dulled by the wet sanding.
Next, I masked the intricate canopy frames using Scotch Magic Tape and an Xacto knife, and then painted the canopy with Testors flat black. Once the canopy dried, I removed the tape and touched up any needed sections of the frame with a very small paint brush.
 I then hand painted the landing gear struts with Humbrol #11
metallic and Testors Metallic Silver. After hand-painting the tires acrylic flat
black, I glued the gear to the fuselage and then attached the gear doors.
I then hand painted the landing gear struts with Humbrol #11
metallic and Testors Metallic Silver. After hand-painting the tires acrylic flat
black, I glued the gear to the fuselage and then attached the gear doors.
The kit decals, even though they were 35 years old, went on nicely. I opted not to use any setting solutions due to the age of the decals. My only issue was the national insignia: their whites are a little transparent to the orange paint. In addition, the decals had a tendency to stay right where you initially placed them, and were somewhat difficult to position on the model if they needed to be straightened, etc. In fact, I tore one of the national insignia trying to position it. Fortunately, I have a large box of decals, and after searching through it, I found some Micro Scale 1/48 national insignia that almost perfectly matched the size of the ones in the kit decals. So, I sucked it up and decided to remove the torn decal. I carefully placed Scotch magic tape over the decal, pressed it down, and, fearing it would also pull off the paint, I slowly pulled up the tape. Low and behold, the decal came off, although it took several applications of the tape to get all of it off the model. I then polished the area where the torn decal had been and replaced it with one of the microscale decals, which, due to their age, I had coated with Rustoleum Crystal Clear spray paint before soaking it in water.
The final pieces were the three flight test probes, which I glued onto the wings and nose of the aircraft and then hand-painted them using a combination of the Humbrol and Testors metallic paints mentioned above.
| CONCLUSIONS |
Such an historic aircraft, and a great pleasure to build this particular kit of it. There were surprisingly few fit problems, and the small parts count made the build go very fast compared to other kits.
| REFERENCES |
1. “NASA – Dryden History – Historic Aircraft – X-1 Technical Data,” World Wide Web, November 2019
2. “Bell X-1,” Wikipedia, World Wide Web, November 2019.
3. Hampton, Dan, “Chasing the Demon,” HarperCollins Publishers, New York, NY, 2018.
If you would like your product reviewed fairly and fairly quickly, please contact the editor or see other details in the Note to Contributors.
Back to the Main Page Back to the Review Index Page Back to the Previews Index Page