Revell 1/40 Bell X-5
| KIT #: | 4556 |
| PRICE: | $5.00 'used' |
| DECALS: | One Option |
| REVIEWER: | Christopher Campbell |
| NOTES: | A little more challenging than some older kits, more of a rough rhinestone than a rough diamond. |
| HISTORY |
During World War II, there was no shortage of innovative, fanciful, and downright weird aircraft being proposed, designed, and even produced for the German Luftwaffe. An amazing number of seemingly oddball designs actually made it through mockup and even to prototype stage. Among these was the Messerschmitt P.1101. This was to have been the world’s first variable geometry or “swing wing” aircraft.
Powered by a Heinkel HeS 011 turbojet engine producing 2,700 pounds of thrust, the P.1101 would feature variable sweep wings that could be positioned from 30, 40, or 45 degrees of incidence. This was not a “shift on the fly” design as in modern swing wings such as the F-14, F-111, Tornado, or MiG-23. The incidence of the wing had to be set on the ground prior to take off and that was how it flew. While there were certain advantages to such flexibility, the concept still needed to be refined to produce a true variable geometry aircraft.
The P.1101 never actually took to the sky, though a prototype was nearly complete when the production facility was overrun by allied troops in 1945. The damaged prototype was taken back to the United States where it was both extensively studied and exhibited. These studies would lay the groundwork for Bell’s X-5.
The design team at Bell built upon the ideas set forth in the P.1101 and did them one better. They produced a design in which the wing incidence could be changed during flight. There were three positions that could be selected: sweeps of 20, 40, and 60 degrees. This was accomplished with a combination of jack screws and disc brakes within the wing roots. Virtually all subsequent variable geometry designs can be traced back this humble, dumpy looking ancestor.
Powered by an Allison J-35 turbojet producing 4,900 lbs. of thrust, the X-5 was clocked as fast as Mach 0.9. Given its somewhat portly looking appearance, this was not bad performance. Still, the aircraft was not about speed so much as testing the new technology that could expand the overall speed and flight envelope through literally changing the shape of the airframe in flight.
 Two airframes were produced, both aircraft taking to the air for the first time
in late 1951. These were tested extensively by both by the United States Air
Force and the N.A.C.A. More than two-hundred flights were logged.
Two airframes were produced, both aircraft taking to the air for the first time
in late 1951. These were tested extensively by both by the United States Air
Force and the N.A.C.A. More than two-hundred flights were logged.
Unfortunately, one aircraft was lost along with test pilot, Air Force Capt. Ray Popson, in October of 1953. The aircraft entered a spin that proved unrecoverable with the wings at full sweep. This was later attributed to the tail and stabilizer design and position. These made the aircraft spin prone and reluctant to recover from them once rotation had begun.
Still, the loss of Capt. Popson was the only serious incident in the program. The basic principle of the design was well proven. The wings could travel through full sweep in less than thirty seconds. While this was not the sort of rapid transition that would be seen on successive swing wing designs, this was, after all, the beginning. In a manner of speaking, it was the acorn from which a might oak would grow.
The concept was proven as viable. A variable wing geometry aircraft could be built and could transition its configuration during flight. More designs would follow and several serve in air forces around the world today. While no longer considered in vogue for new designs, many legendary aircraft trace their roots back to the X-5. Among them are the F-111, the first swing wing in active service, the Panavia Tornado, MiG-23, F-14, B-1, MiG-27, Su-17, Su-22, Tu.160, and more.
Testing on the X-5 was wrapped in 1955. The remaining aircraft continued to be flown at Edwards as a chase aircraft for three more years. Today it can be seen at the Museum of the United States Air Force in Dayton, Ohio.
| THE KIT |
First released in 1960, Revell’s kit of the Bell X-5 started life as something of an oddball. It is one of fairly few aircraft kits produced in 1/40 scale, making it exactly half way between a 1/32 and 1/48 kit in size. Revell, Adams, and a handful of other manufacturers embraced 1/40 and tried to make it a “standard” scale during this period. Revell’s releases in this scale were mostly artillery and armor subjects, with only two or three other aircraft being produced. There is no doubt that this is, to some degree, was a “box scale” kit, though there also seems to have been a push for this scale at the time.
As such, anyone fixated on standardized scales is not going to care for this one. It also makes for finding “scale” parts from the spares bin or in aftermarket form a virtual impossibility. Any detailing of that sort is going to be of the “looks about right” variety.
The kit has been released several times since the original, though was out of production for around twenty years until released as part of their very attractively boxed History Makers series in 1983. The one that I built was from the 1988 Chuck Yeager’s Super Fighters series. The kit is supposed to have been released again in the 1990’s with original style boxing, according to Scalemates. However, if it was, I have personally never actually seen one.
 This kit is fairly typical of models of this period. It has working swing wings,
retractable landing gear, and a sliding canopy. However, these are not geared or
cammed like most modern variable geometry aircraft kits one will find currently.
Mounted on simple pivots, either wing can be positioned in any position of sweep
respective to its opposite, unlike the actual aircraft or modern kits. This does
not make for any real problem with the kit but is something to be aware of. The
landing gear were, as noted, also designed to be retractable, and the gear
covers operational, at least to some degree.
This kit is fairly typical of models of this period. It has working swing wings,
retractable landing gear, and a sliding canopy. However, these are not geared or
cammed like most modern variable geometry aircraft kits one will find currently.
Mounted on simple pivots, either wing can be positioned in any position of sweep
respective to its opposite, unlike the actual aircraft or modern kits. This does
not make for any real problem with the kit but is something to be aware of. The
landing gear were, as noted, also designed to be retractable, and the gear
covers operational, at least to some degree.
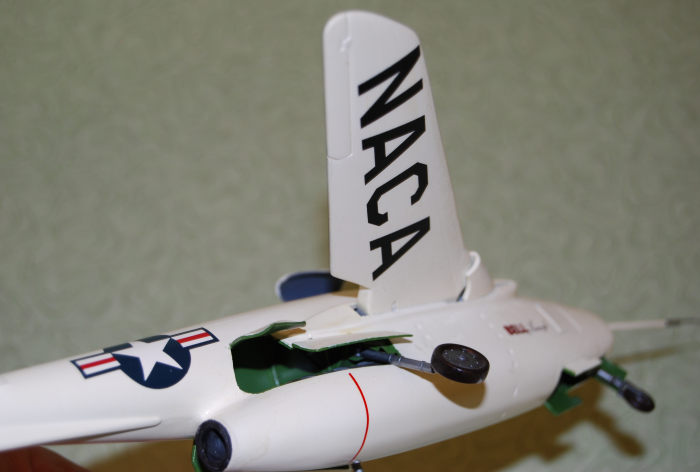
It features a detailed (for its day) complete engine assembly as well as positionable control surfaces and a sliding canopy to display a rather lacking cockpit. There is no intake trunking or actual landing gear wells, so one can see into the aircraft interior through these openings. In the case of the nose, one can look in the intake and out of the nose gear doors.
Decals are provided for one of the test aircraft. These were well printed, although the ones in my kits were in mediocre condition when I obtained it around 2006. I needed to use some of the decals specific to the aircraft being modeled. One of these disintegrated when I attempted to apply it.
This is a fairly typical kit of its era with toylike working features and lacking in detail in some areas while attempting to provide it in others. Panel lines, rivets, and surface detail are a mix of raised and recessed, and quite surprisingly, mostly recessed. Additionally, there was very little flash present on any of the parts and mostly only required some cleanup by some scraping with an X-acto blade.
Turning this into a truly first-rate model was beyond what I really wanted to attempt. It would require a great deal of problematic work creating and boxing in gear bays and the intake. I chose to build it mostly out of the box and improve the cockpit area as I could. Interestingly, I have seen only one other build review of this model, also done essentially out of the box.
| CONSTRUCTION |
This kit was purchase somewhat on a whim from a vendor at a model show. Having a fondness for X-planes, when I saw it on a vendor table for $5, I decided to see what I could do with it. I had looked at one of the kits before, so I knew more or less what to expect. I also knew that I was not going to turn it into a true showpiece. I mainly wanted to try and build it up into a decent representation of the X-5 that would look oaky on the shelf.
I actually started this one with the engine. The interior of the engine halves was sprayed in flat black, then glued together along with the turbine wheel and cone at the front. Then the entire assembly was sprayed in Testors Aluminum. This was then set aside as I turned my attention to the cockpit.
The cockpit on this kit is a bit weird, even by the standards of the day. It was almost as though Revell thought about making an actual cockpit and then changed their minds at the last minute. The modeled a reasonably detailed area behind the seat that could be seen through the canopy which is designed to slide on its rails and be positioned open or shut. However, all that you get to is a cavernous two piece pit where the cockpit should be and one of their classic posed pilot figures in helmet and flight suit with a control stick growing out of his hand and down through his legs on a small plastic slab. (Has anybody besides me noticed a somewhat uncanny resemblance between these and the fossilized alien Engineer known as the “Space Jockey” from the classic science fiction film Alien?)
 This was where I was to devote most of my attention. Finding an actual 1/40 seat
and cockpit simply was simply not going to happen. I fished through my parts
bins until I found things that looked a little oversize and more or less looked
like they might have belonged to an X-5 in this scale. This included an ejection
seat, rudder pedals & control stick, and an instrument panel and throttle
quadrant. I probably could not have told you what they were sourced from then,
and certainly do not recall at this point. However, they seemed sufficient for
the job at hand.
This was where I was to devote most of my attention. Finding an actual 1/40 seat
and cockpit simply was simply not going to happen. I fished through my parts
bins until I found things that looked a little oversize and more or less looked
like they might have belonged to an X-5 in this scale. This included an ejection
seat, rudder pedals & control stick, and an instrument panel and throttle
quadrant. I probably could not have told you what they were sourced from then,
and certainly do not recall at this point. However, they seemed sufficient for
the job at hand.
The instrument panel was shaped with a little filing and sanding and test fitted to make certain that it would work as intended. I then sprayed it and the cockpit areas in Testors Flat Grey. The rest of the fuselage interior was sprayed in Model Master Chromate Green.
The seat and stick were painted in Flat Grey while the instrument panel was painted in Flat Black. Details were then added and enhanced by picking them out or dry brushing as necessary using Testors Flat Red, Flat Yellow, Flat white, Rubber, Black, or Silver. The same was done with the area behind the cockpit.
When these were drying, I performed multiple test fits until I got everything lined up the way that I liked it. I then tacked the instrument panel in place with some gap filling CA glue for strength and shot it with accelerator. Oddly enough, all of the stuff that I added to the cockpit tub fit quite easily and almost as if they were made for it. This came as rather a pleasant surprise.
This was when I realized that I had gotten slightly ahead of myself. I was fairly certain that the model was going to need some weight in the nose to hold it down on its gear due to the long tail boom. The problem was that there were not a lot of places to hide it where it was not going to show, due to what I will somewhat laughingly call the “open concept” nature of the fuselage.
I addressed this in two ways. First, I glued some fishing weights behind the cockpit. Then, for good measure, I poured some #9 lead shot into the engine through exhaust, letting it settle at the front and keeping it titled down as I squeezed a few drops of Elmer’s glue in and let it set.
While with many kits it would now be time to close up the fuselage, that was not the case with this one. The engine, of course, had to be glued in place along with a bulkhead type panel in the aft fuselage which would eventually provide an attachment point for the main gear. Still, there was more to do.
The wings need to be assembled and fitted before gluing the fuselage halves together, as they have to be fitted to their pivot points. The wing halves themselves went together easily. The ailerons were glued in a neutral position using CA glue and then the same glue was used to assemble the wings themselves. Any cleanup needed on the seams was easily accomplished and I soon had wings ready to “swing to action.”
Since these were not geared or cammed as virtually all modern variable geometry aircraft kits are, I decided that I would prefer to glue them permanently in place. The X-5 is by no means an attractive aircraft, but for me the ugly factor increases exponentially with the wings in forward sweep. (Though it looks a little weird to me with them at maximum sweep.) Contributing to my decision on this were the wing joint “cuffs” or “gloves” which also had to move with the wing. I had a rather foreboding feeling that these were going to prove troublesome if I decided to keep with wings posable. I fitted the cuffs and wings, folded them in a mid-swept position, tacked them in place with thick CA glue, and, happily, never looked back.
The rudder was then glued into place in the same manner as the ailerons. Now, taking a deep breath, the entire bastardized homologation was glued together using gap filling CA glue for maximum strength of bond and held in place with a LOT of rubber bands until it had dried. While I did get a solid bond, there were areas that needed filling with more of the same glue and several sanding sessions to clean up the fuselage seem. Still, based on all of my futzing with the way that the kit was made to be assembled and the age of the mold, all things seemed to be going pretty well.
The kit has posable dive brakes at the nose. I chose to glue mine in place in a closed position, as few photos of the aircraft on the ground show them extended, especially on the ground. The horizontal stabilizers and elevators were assembled and fitted to the tail at this point and went on with minor filling at the joint with CA glue.
| COLORS & MARKINGS |
Painting the X-5 is fairly simple. Both of the aircraft were overall glossy white. The biggest problem was plugging up all of the holes in the fuselage. I probably crammed more damp paper towels into this beast than I have any other single seat, single engine, jet aircraft. Additional masking around the cockpit was done with low tack masking tape.
A piece of appropriately sized dowel rod was padded with some masking tape and inserted into the exhaust port, creating a handle that allowed me to spray an entire coat at once more readily. The model was then given several coats of Testors Gloss White. Between coats and for the final drying, I clamped the dowel in a bench vise with the model at an upward angle.
Once this was dry, I assembled the landing gear with slight modifications, as I intended them to be fixed and non-functioning. Functional gear was never something that I was considering, though I question how well they would work, or for how long. The main gear look to be a bit rickety and fragile to be “played with.” In any case, they were fitted in place with some thick CA glue and aligned with no problems. After this was done the entire model was sprayed with Future for a gloss coat.
 Now for the markings. The kit decals looked as though they had been printed well
enough. However, this decal sheet also appeared to be on the crunchy side. I
decided to source them from the decal drawers in the file cabinet. As I was
looking at the photos of the X-5 in the X-planes book, I hit upon an idea that I
had never seen done.
Now for the markings. The kit decals looked as though they had been printed well
enough. However, this decal sheet also appeared to be on the crunchy side. I
decided to source them from the decal drawers in the file cabinet. As I was
looking at the photos of the X-5 in the X-planes book, I hit upon an idea that I
had never seen done.
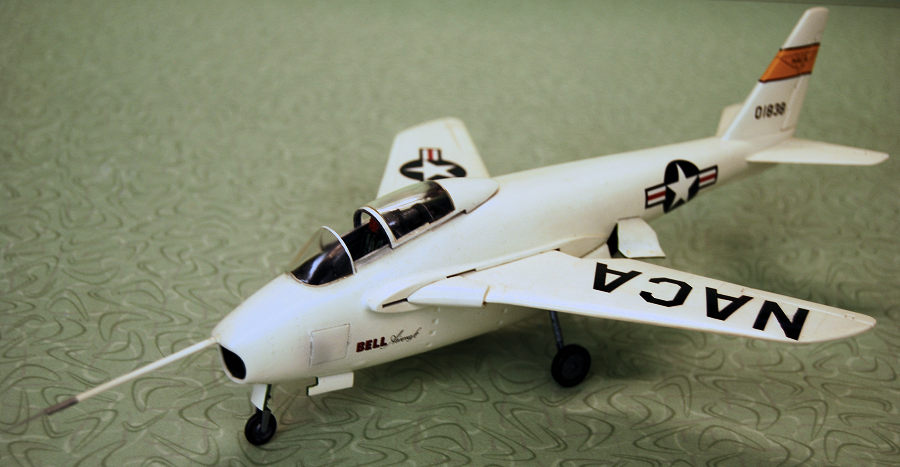
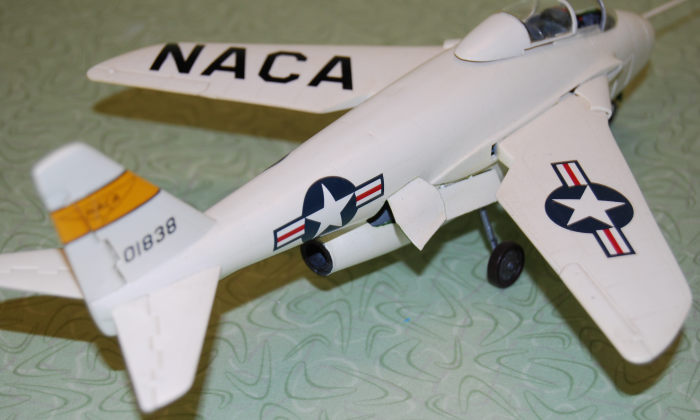
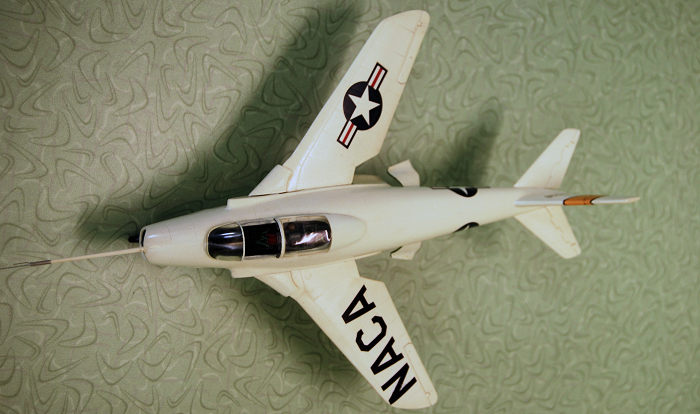
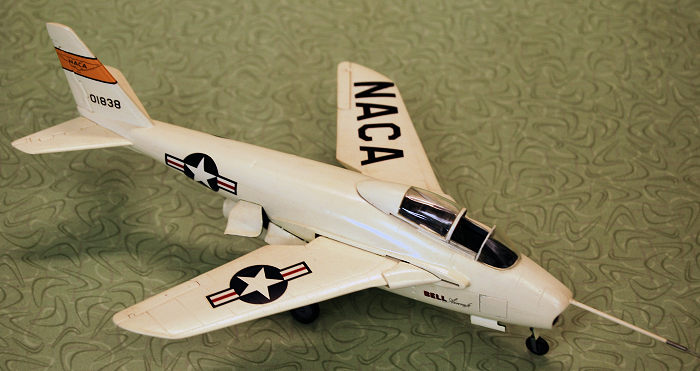
The X-5 was flown in N.A.C.A markings for a time, complete with gigantic lettering on the wings replacing the U.S.A.F. markings. It just so happened that I had markings left over from the Cutting Edge 1/32 decal sheet used on the X-1 that were a perfect fit for this, as well as an N.A.C.A. tail band. I had plenty of number and national insignia decals to use, so that was no problem. There were three specific Bell aircraft/X-5 decals that I would need from the kit sheet. Two of them actually worked.
Unfortunately, the red X-5 logo to be fitted to the left side of the fuselage came apart almost as soon as it hit the water in my decal dish. At the time, I had no effective way to print a new one and I left it off. Still, everything else looked good.
The last thing that I needed to do was fit the long instrumentation boom to the nose. I modified this slightly with probes on the tip made from music wire. It comes out of the box basically as just a big plastic rod, which is only marginally accurate. I wanted to make it a little more presentable. This new assembly was fitted with some CA glue and a very small amount of sanding and touchup painted to make it acceptable. After some minor detail painting with Testors Aluminum, a top coat of Future was sprayed on it and the model was set aside to dry for a while.
The only thing left was the canopy and windscreen. Clear parts were dunked in Future and once dry the framing was painting in Testors Gloss white. When thoroughly dry, the clear portion was glued to the sliding canopy using CA glue applied with a toothpick and then slid onto the rails. The windscreen was glued in place and somewhat surprisingly, it was a very clean fit with no gap to fill. Now the X-5 was ready to join my X-1’s, X-3, and D.558-2 on my shelves.
| CONCLUSIONS |
This was an interesting build and proved to be a bit challenging due to the most unusual nature of the kit with its numerous working features. Overall, I had a good time building at, though I probably would not do it again. One thing that I failed to do that I really should have thought of at the time was to fit some sort of combing to shade the instrument panel behind the windscreen. This is pretty standard in most aircraft and was definitely present in the X-5. I think that there were so many different things going on with this model that it completely slipped my mind until after I was finished.
 If anyone wishes to build up one of these, I would recommend omitting the
working aspects of the kit and building it in a truly static form as I did. I
know that there were certainly a number of things that I could have done to
improve the kit far more than I did. At the time, I just wanted to build it and
put it on the shelf, though. I never intended to make it a true showpiece.
If anyone wishes to build up one of these, I would recommend omitting the
working aspects of the kit and building it in a truly static form as I did. I
know that there were certainly a number of things that I could have done to
improve the kit far more than I did. At the time, I just wanted to build it and
put it on the shelf, though. I never intended to make it a true showpiece.
Oddly enough, on a whim, I did take it to an IPMS show mainly with the intention of displaying it for its novel N.A.C.A. markings and to see such an antique on a display table. Much to my surprise, it took third place! So, I suppose it might have come out a little better than I credited myself for.
Anybody who wants an X-5 in their collection has either this kit or the 1/72 Mach2 kit as their only injection molded options. Neither kit is ideal, though the Mach2 is more of a model and less of a toy. Still, in larger scale, this is it, and is likely to stay that way. As such an obscure aircraft, I would not lay odds on true 1/48 scale kit coming out in the future. Still, with some fortitude and scratchbuilding skills, I think that a really first rate model could be created using this kit as a starting point. My build time on this one ran between fifteen hours.
| REFERENCES |
Messerschmitt P.1101 - Wikipedia
The X-Planes: X-1 to X-31 by Jay Miller, 1988, Aerofax, Inc.
5 September 2022 Copyright ModelingMadness.com. All rights reserved. No
reproduction in part or in whole without express permission from the editor.
If you would like your product reviewed fairly and fairly quickly, please contact the editor or see other details in the
Note to
Contributors.