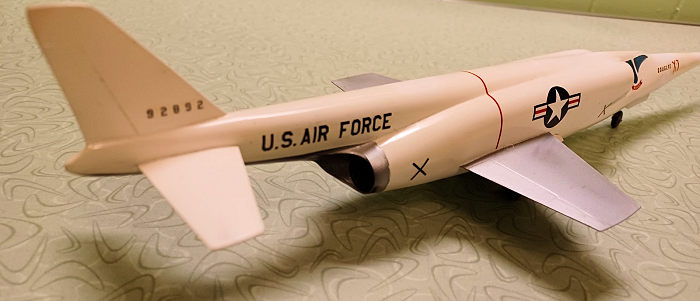
Lindberg 1/48 X-3 Stiletto
| KIT #: | 71426 |
| PRICE: | $10.00 'used' |
| DECALS: | One option |
| REVIEWER: | Christopher Campbell |
| NOTES: | Another rough diamond of a kit |
| HISTORY |
The Douglas X-3 was perhaps the most striking aircraft of the X-series of the late 1940’s and early 1950’s. Looking like it was going Mach-3 while sitting on the ground, sadly looking fast was the best that this aircraft could do. Still, it is one of the most iconic aircraft of the program, despite its ultimate performance shortcomings.
While the previous entries into the X-plane program, the X-1 and X-2 had been designed from the beginning with rocket power to probe ever higher speeds and altitudes and investigate the aerodynamic requirements for such aircraft, the X-3 was a horse of a different color. It was designed from the onset to be jet powered and explore the potential for a high Mach aircraft using more conventional and practical powerplants.
Unlike it predecessors it would be designed to take off from as well as land on the ground, under its own power. It would have a low aspect wing, the shape of which would clearly influence the F-104 Starfighter and other subsequent designs. Also innovative was its significant utilization of titanium in the airframe.
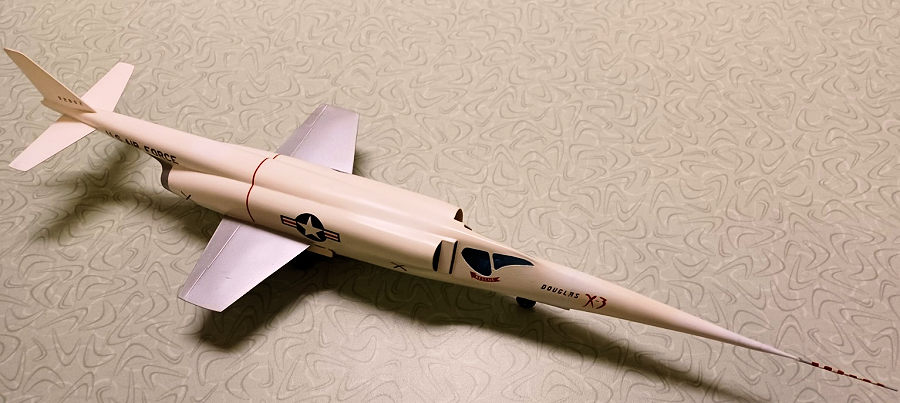
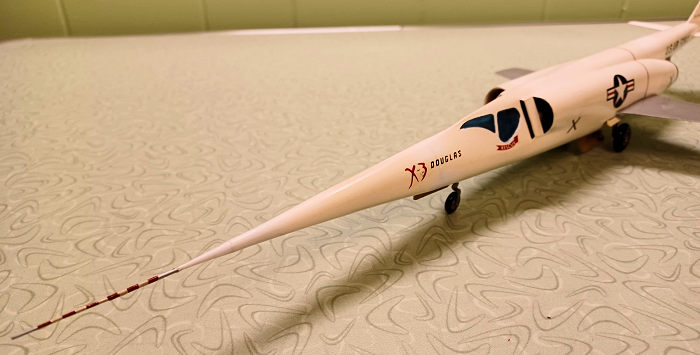
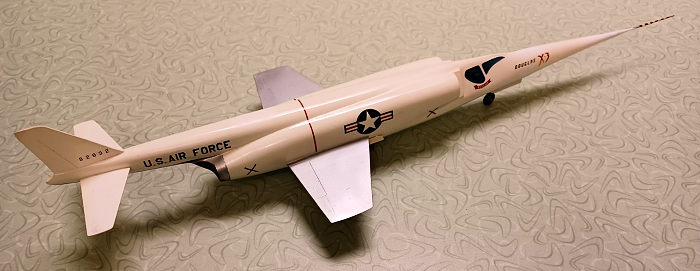
Designed to be as slender as possible, the cockpit was thoroughly blended into the fuselage and the windscreen actually being two tapering side windows giving it a very futuristic look. Even today, it looks like a refuge from a science fiction movie. With its sharp, long and narrow fuselage, there is little doubt where the moniker Stiletto came from.
Because of its design, the cockpit had to be enter from below, with the ejection seat being lowered through a ventral hatch. This was to be a downward firing ejection seat, and in an aircraft intended to reach or exceed Mach 2. Had these speeds ever been reached and an emergency necessitating ever occurred, it is doubtful that the pilot would have survived due not only to the hazards of ejecting at such a speed in the seats of the day, but also the physiological effects of downward ejection, invariably causing redout, sometimes with fatal consequences. Fortunately, this never had to be tested.
Originally slated for afterburning Westinghouse J-46 engines, this engine was fraught with development issues and proved to be too large for intended airframe. Instead, the proven, but less powerful Westinghouse J-34 which essentially doomed the aircraft never to reach its intended speeds. Even in afterburner, these engines produced over 2,000 lbs. of thrust less than the intended 7,000. Still, the program would proceed, though now unquestionably hamstrung.
 Design work
had commenced on the aircraft in 1949 with two aircraft being authorized. Only
one would be completed, which took to the air in 1952. From day one its
performance was lackluster and problematic. It was immediately noted that the
aircraft was underpowered. It also handled poorly. More so, it required a very
long takeoff run and had to reach nearly 300 mph. before takeoff could be a
achieved. Likewise, it tended to be a hot landing aircraft (things like that
tend to happen when an airplane essentially has no wings.).
Design work
had commenced on the aircraft in 1949 with two aircraft being authorized. Only
one would be completed, which took to the air in 1952. From day one its
performance was lackluster and problematic. It was immediately noted that the
aircraft was underpowered. It also handled poorly. More so, it required a very
long takeoff run and had to reach nearly 300 mph. before takeoff could be a
achieved. Likewise, it tended to be a hot landing aircraft (things like that
tend to happen when an airplane essentially has no wings.).
Given the radical nature of its design, the latter was not entirely surprising. However, with its lack of power, while designed to cruise at Mach 2, it could not even reach Mach 1 in level flight. It would only exceed the speed of sound a few times, always in a shallow dive of 15 degrees. Its highest speed would be Mach 1.208 in a 30 degree dive in 1953.
It was flown by legendary pilots such as Chuck Yeager, Frank Everest, and Joe Walker, both as part of the U.S.A.F. and N.A.C.A. test programs. Yet its performance would continue to be anything but legendary. Like most aircraft of this era and these programs, it suffered from lateral instability due to tail that was unquestionably diminutive for what was a very long and somewhat massive, if sleek airframe. It suffered from roll inertia coupling and associated wild, unexpected pitching. This very nearly ended the aircraft and the program, and would have had pilot Joe Walker not succeeded in bringing it under control during one wild ride in 1954.
An examination determined that airframe had been pushed to its limit during the incident and could have broken up. It was, as were many incidents in the long running X-program, a near thing. The aircraft was never again pushed the limits of its flight envelope.
It would be grounded for a year and would make a few more flights before the program was ultimately terminated in 1956. While some valuable information about roll inertial coupling was gained, as beautiful as it was, the X-3 was in the end, ultimately a flop as a test plane. It can be seen to day in the Experimental Hangar at the Museum of the United States Air Force. It is still a thing a beauty, even if it was only skin deep.
| THE KIT |
Given its looks, performance aside, there was little doubt that model kit manufacturers would jump at the chance to kit this needle like aircraft. While there are newer releases today both Lindberg and Revell produced kits of this iconic aircraft during the “classic” era of the 1950’s. Revell would choose a box scale of 1/65 for their offering, while Lindberg would choose a more standard 1/48.
Both kits appeared in 1955 and have been in production off and on ever since. While Revell last released theirs as part of their SSP series in the late 1990’s, the Lindberg kit remains in production. The kit used for this build was from the 1996 release, though it was again released in 2013 and is not difficult to find.
 Oddly enough,
while I built the Revell X-3 more than once as a child in the 1970’s, I never
saw the Lindberg kit until I was in college. It was out of production for more
than a decade, and even though it Lindberg released it again in 1981, the first
one that I actually saw was the 1986 release, though my uncle had told me of it,
and a number of other by then rarer birds from the first Golden Age of plastic
modeling.
Oddly enough,
while I built the Revell X-3 more than once as a child in the 1970’s, I never
saw the Lindberg kit until I was in college. It was out of production for more
than a decade, and even though it Lindberg released it again in 1981, the first
one that I actually saw was the 1986 release, though my uncle had told me of it,
and a number of other by then rarer birds from the first Golden Age of plastic
modeling.
The model is a somewhat curios mixed bag. The kit comprises fairly few pieces, less than forty, including the stand, but everything has the right shape and seems to scale out reasonably well. The surface detail is not excessively overdone as it is on some Lindberg kits, which is nice.
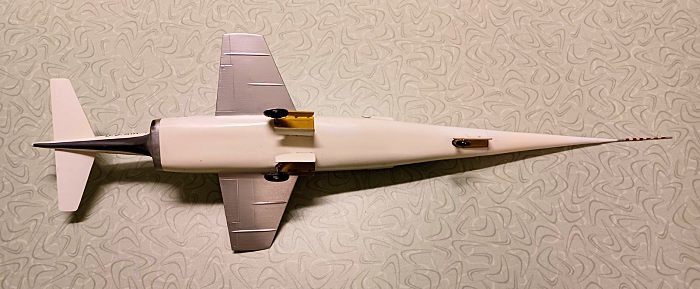
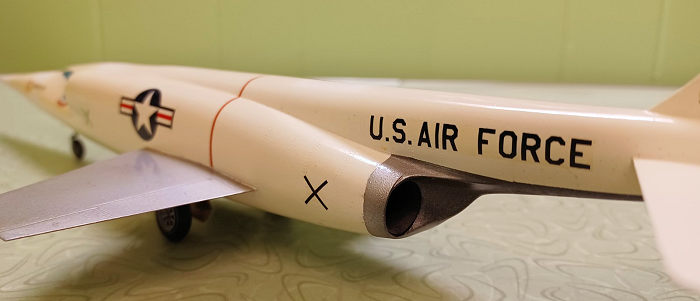
There is little to speak of in the way of a cockpit. One gets a seat and a pilot figure. On the other hand, there are two rather nice looking J-34 engines, though these will remain largely unseen when completed unless the (I am presuming inaccurate) engine hatch in the top of the fuselage is posed open or left operable. The landing gear is fairly well molded, as are the gear bay covers, given the age to which this kit hails.
The decal sheet for mine was well printed and in good shape when I obtained the kit in 2006 or 2007. Instructions are well printed and easily followed. Overall, this is one of Lindberg’s better, large scale early kits. Having owned and built most of them at one point or another, I might even say that it and their Pogo that I previously reviewed are their best, at least in 1/48 scale.
| CONSTRUCTION |
I went on a bit of an X-plane binge in 2007, building the Revell X-5, X-1, D.558-II, this kit, and the Lindberg Pogo. All came out fairly well, though each presented their own challenges. I would begin this one with the cockpit, such as it was.
As my guide to this, I used the previous review of this kit by Caz Dalton, who did an exceptional job as a basis for what to do to the “office” of the Stiletto. In my case, I modified an instrument panel and yoke gleaned from the spares bin. Realizing that there was not going to be that much visible through the windows, as they are a bit thick, I did not detail it out as nicely as he did. However, even less than I had expected could be seen through it them when I was done.
Everything was painted in Testor’s Flat Grey and detailed with back for the gauges, grip handles, and so on. A throttle was added to the sidewall and the seat was painted and detailed as much as possible.
The insides of the intakes were sprayed in Testor’s Yellow Chromate. While this was drying, I turned my attention to the engines which were assembled and sprayed in Testor’s Steel and once dry given a wash of Tamiya Flat Black in denatured alcohol. From the engines back, the fuselage interior was sprayed in Model Master Exhaust.
As noted in Mr. Dalton’s review, there are no exhaust pipes present. Mine were made from some appropriately sized plastic tube, painted black on the inside and again in Exhaust on outside, then glued in place. All of the cockpit parts, such as they were fitted and glued in place with CA glue.
The windows would be problematic. These would have to be fitted before closing the fuselage, something that I did not look forward to as I was certain that I would accidentally pop one loose when working on the exterior. Still, there was no other way to go about.
 As noted in
one of Mike Machat’s Celebrating Aviation videos on YouTube, these were not only
oddly shaped by the standards of any aircraft, but they were also tinted blue.
(*Note: If you have not looked at Mike Machat’s videos on YouTube, do check them
out. They are most enjoyable, informative, and often connect to modeling.) They
were accordingly sprayed in Tamiya Clear Blue and set aside to dry before being
given a dip in Future and then set aside to dry for a full day. The result looks
nice, but reduces even more what can be seen through them.
As noted in
one of Mike Machat’s Celebrating Aviation videos on YouTube, these were not only
oddly shaped by the standards of any aircraft, but they were also tinted blue.
(*Note: If you have not looked at Mike Machat’s videos on YouTube, do check them
out. They are most enjoyable, informative, and often connect to modeling.) They
were accordingly sprayed in Tamiya Clear Blue and set aside to dry before being
given a dip in Future and then set aside to dry for a full day. The result looks
nice, but reduces even more what can be seen through them.
Satisfied that they could be handled, I did some test fitting and tweaking. There was some mild trimming to the openings and the parts themselves with a No.11 X-Acto. Then they were glued into place with carefully applied high strength CA Glue, the seat aside to dry for the better part of day in hopes of getting a very strong bond.
In the meanwhile, I put a health blob of modeling clay with some #9 lead shot kneaded into it into the long, triangular nose cone. The two halves were then glued up with gap filing CA glue. Once set, this was given a basic sanding and set aside to be joined to the fuselage once it was put together.
The wings and horizontal stabilizers were single pieces designed to be inserted and trapped with ethe fuselage halves when assembled. Some test fitting showed that they fit quite well. So, after everything that would be inside the fuselage was glued in place with high strength CA glue and given a shot of accelerator. The wing and stabilizer were then tacked in place with CA glue and the fuselage was closed and glued together with gap filling CA.
Something was not quite aligned in the cockpit, and I got a fairly nasty gap in the ventral fuselage right where the access hatch for raising and lowering the pilot seat is actually decently represented by panel lines. Before attempting to fill and sand it, the air intakes were stuffed with damp paper towels in hopes of keeping debris out the cockpit. This was, for the most part, successful. Unfortunately, the actual filling and sanding of this seam would damage the hatch representation to the point that I ultimately decided to eliminate it entirely rather than half a more than half obliterated panel present.
There was a minor gap around the wings and the stabilizer that was partially filled with some CA glue applied with a toothpick to help secure these parts. This was then followed by a small amount of Squadron White Putty smoothed out with nail polish remover on a Q-tip, then sealed with some thin CA glue and sanded smooth with 400 grit sandpaper and 0000 steel wool.
There was still the elephant in the room, or rather on the top of the fuselage, the supposed engine hatch. This was trimmed and test fitted before being glued into place with gap filling glue and sanded until all trace that it had ever existed had been eliminated. The nose cone was then glued in place and the only a modicum of sanding was required to get a good fit.
| COLORS AND MARKINGS |
Before painting everything was given a light rubdown with 0000 steel wool, then thoroughly blown off before being given a very thorough rub down with a dryer sheet to smooth out residual scratched. The windows were carefully masked with Tamiya tape, carefully applied trimmed with and X-acto blade. It was blown off again and deemed ready for painting.
The landing gear bays were first painted in Testor’s Yellow Chromate and once dry plugged with damp paper towel bits. The exhausts were then closed in the same manner and the entire model given several coats of Testor’s Gloss White over several sessions the same day. It was then set aside to cure for about three days before proceeding further.
When work resumed the area around the exhausts and the wings were masked off. The exhaust “ring” on the fuselage was sprayed in Tetsors Silver as well as the exhaust area. This was subsequently gone over with Model Master Titanium as well as Dark Anodonic Grey and Jet Exhaust in hopes of getting a nice, repeatedly heated metal look. The results were largely what I had hoped for. The wings were then sprayed in Testors Aluminum and it was set aside once more while work began on the landing gear.
 The gear
themselves were painted in Model Master Anodonic Grey and the compressible
struts in Testor’s Silver. The tires would be painted in Testor’s Rubber with
the wheels painted in Model Master Magnesium and the brakes in Burnt Iron and
given some Steel drybrushing to accent them. The landing gear covers had
previously been painted Chromate Yellow on the inside and Gloss White on the
exterior. Everything was glued in place with CA glue making her ready to receive
decals.
The gear
themselves were painted in Model Master Anodonic Grey and the compressible
struts in Testor’s Silver. The tires would be painted in Testor’s Rubber with
the wheels painted in Model Master Magnesium and the brakes in Burnt Iron and
given some Steel drybrushing to accent them. The landing gear covers had
previously been painted Chromate Yellow on the inside and Gloss White on the
exterior. Everything was glued in place with CA glue making her ready to receive
decals.
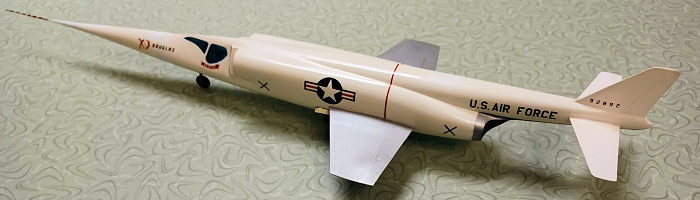
All masking was removed and the whole thing was shot in a coat of Future for a nice, glossy finish. The kit decals proved much better than I had hoped for. These settled down nicely with Microsol. My only real complaint was the carrier film on the U.S. Air Force lettering on the fuselage. This was a bit heavy and in retrospect, I would have source a replacement from my decal stash. Still, I was very happy with what I had. Once dry, another it was given another coat of future and the instrument boom was installed on the nose and painted in Testor’s Silver. I was never happy with this part as it looked shorter than what I saw in photos of the aircraft. Overall, I was happy with the build results though. It looked great on the shelf and got a lot of attention at the my home show, the Huntsville IMPS show of 2007.
| FINAL BITS |
About ten years after I had built this, it had been moved to the X-planes section of the display shelves in my appropriately named Atomic Lounge room in my parent’s former house that I have been restoring and renovating to a very mid-century vibe overall. My wife and I had been watching something on the television in the room when she got up and somehow managed to knock it off of the shelf. (This was the third such incident, the previous casualties being an Airfix MiG-15 in Chinese markings that was beyond repair and the instrument boom of my X-5 that proved an easy fix. She has not been banished from the room but was admonished to please be much more aware of here surroundings. To date, she has been and nothing else has been damaged.)
Unfortunately, the damage was rather bad. The nose cone was broken off. The pitot boom was nowhere to be found. The nose gear was broken off and most of the gear covers came off. At the time, I was so disgusted with the damage that I just put it in a box and stuck it on a shelf in my garage. Around this same time, my uncle, Richard Cobb, having decided to focus almost exclusively on his love of Spitfires, began divesting himself of many of his other built up models, many of which had been in storage and required some cleanup and repair. There were somewhere in the neighborhood of 200 that I acquired and went through several rounds of cleanup and restoration. Starting back in October of 2022, I decided to get back into these once again, as I still had around fifty or so to restore, repair, or rebuild. In late December, I was nearing the bottom of the last box (I still have around ten remaining, though decided once more to take break from them.) and I decided to see if I could fix my X-3.
 The only
real issue was that would present a problem was the noise cone. It was not a
clean break, and actually broken in two places. Worse, the largest ran through a
decal. There was a limited amount that I could do short of a serious rebuild,
repainting and decaling or throwing it away and starting over.
The only
real issue was that would present a problem was the noise cone. It was not a
clean break, and actually broken in two places. Worse, the largest ran through a
decal. There was a limited amount that I could do short of a serious rebuild,
repainting and decaling or throwing it away and starting over.
This was glued back in place with carefully applied CA glue and the cracks addressed as much as I could without destroying the decal. There was some very careful painting with Testor’s Gloss white once this had been sanded with 400 grit followed by 1000 grit. Then it was once more sealed in Future. Unfortunately, some of the crack can still be seen. I may yet try to address this with some Elmer’s glue. However, as it was already, it was a bit of nail biter.
The rest of the repairs were simple, merely gluing the gear doors back I place and the nose gear that had broken cleanly. The long lost instrument boom was to be replaced with one that I found among some of the spares that my uncle had given to me. I am not certain what it had come from. I am also uncertain if the X-3 ever actually carried such a boom and it is unquestionably long. However, “barber pole” booms being quite common in this period and seen in a number of X-plane photos (and a number of X-planes also going through various boom versions through their test lifetimes) Ielected to use it. I also have to admit, I just liked the look of it. My repairs were not perfect, but a least it was no longer in pieces and except from the line running through the decal, the repairs are otherwise not that noticeable and I was happy to have it back in my Atomic Lounge.
| CONCLUSIONS |
 This is far
from a perfect kit, but it is the only game out there in 1/48, and I suspect it
will remain such. It can also be built up into a very presentable modeler by
anyone with a little experience. It also, as was intended, can easily be built
by junior modelers into something that they would be quire pleased to have and
is unquestionably visually appealing to air and space enthusiasts of all ages.
This is far
from a perfect kit, but it is the only game out there in 1/48, and I suspect it
will remain such. It can also be built up into a very presentable modeler by
anyone with a little experience. It also, as was intended, can easily be built
by junior modelers into something that they would be quire pleased to have and
is unquestionably visually appealing to air and space enthusiasts of all ages.
As for the contemporary old Revell kit, with newer, more modern kits out there in 1/72, that is likely the best way to go in smaller scale. For those wanting a 1/48 X-3, for now its Lindberg or nothing. As such, and given the general ease of build, I would recommend the kit as a starting point for what could be a very impressive build with some creative scratch building (Open hatch and seat in the lowered position, perhaps?) Also, reasonably nice engines would make the starting point for a nice maintenance diorama scene.
This is the sort of kit one can go crazy with or just build mostly out of the box and have fun. I try to land somewhere in between when tackling older kits. To each his own, and most of all, have fun. Happy modeling.
| REFERENCES |
The X-Planes: X-1 to X-31, by Jay Miller, 1988, from Aerofax, Inc
http://www.modelingmadness.com/review/korean/cazx3.htm
https://en.wikipedia.org/wiki/Douglas_X-3_Stiletto
https://www.scalemates.com/kits/lindberg-71426-douglas-x-3-stilleto--178925
https://www.scalemates.com/kits/revell-h-259-89-douglas-x-3-stiletto--158439
https://www.youtube.com/watch?v=v5G9HlsqPTE
4 April 2023
Copyright ModelingMadness.com. All rights reserved. No reproduction in part or in whole without express permission.
If you would like your product reviewed fairly and fairly quickly, please contact the editor or see other details in the Note to Contributors.