Revell 1/32 Bell X-1
| KIT #: | 4565 |
| PRICE: | $10-15 'used' |
| DECALS: | One option |
| REVIEWER: | Christopher Campbell |
| NOTES: | Easy to build, well designed kit. |
| HISTORY |
The X-1 is the stuff of legend. It was firmly immortalized in the public mind after the release of the 1983 film The Right Stuff, based on Tom Wolfe’s historical book about test pilots and the road that led to the Mercury program. In 1997 it was featured on a postage stamp commemorating the fiftieth anniversary of Chuck Yeager’s supersonic flight on Oct. 14, 1947. Sadly, it had been somewhat obscure to the public before this. This was in no small part due to the press blackout due in the name of secrecy at the time of this historic flight.
The X-1 began life in 1944 as part of an U.S. Army Air Force project to see if supersonic flight was possible. During the later stages of World War II, the most powerful prop driven aircraft were flirting with speeds that had previously been thought unobtainable. This often came with disastrous results, as the phenomenon of compressibility could result in frozen controls, shattered airframes, and dead pilots. There was even some thought that suspersonic flight was an impossibility.
Bell Aircraft had already been working with jets and had produced the somewhat lackluster P-59 Airacomet, which actually proved slower than the P-51’s and P-47’s already in service. Lockheed’s P-80 Shooting Star was faster and North American and Republic were working on the P-86 and P-84 designs, respectively. However, all of these were designed as warplanes and this first generation of turbojets powering them deemed insufficient to reach or exceed the 700mph mark. Bell’s design team was looking into a pure research aircraft to be rocket powered for the maximum amount of thrust possible
 The aircraft was designed around the silhouette of a
.50 caliber bullet, considered one of the cleanest aerodynamic shapes known,
with wings and a tail attached to it. The canopy was made as flush and
streamlined as possible.
The aircraft was designed around the silhouette of a
.50 caliber bullet, considered one of the cleanest aerodynamic shapes known,
with wings and a tail attached to it. The canopy was made as flush and
streamlined as possible.
Powered by a Reaction Motors, inc., four-chambered XLR-11 rocket engine fueled by liquid oxygen and ethyl alcohol, it produced 6,000 lbs. of thrust. This came with limited duration, though. The aircraft would have to carried aloft by a modified Boeing B-29 Superfortress from which it would be air-dropped and pilot would then ignite the motor, flying until fuel was exhausted and then coming in for a dead stick landing on the dry lake runway at Muroc Army Air Field (Now Edwards Air Force Base).
This was quite unorthodox, to say least. Yet this would soon be the pattern for many aircraft, to include its successor, the Bell X-2, the Douglas D.558-2, and much later the X-15, HL-10, M2F2, and X-24 series. Starting with the X-1, these aircraft revolutionized aviation and paved the way to space, even to the Space Shuttle itself.
Initially designated XS-1, testing began with several simple glide flights over Pinecastle Army Air Field in Florida in 1946. The program was subsequently moved to Muroc in late 1946 and numerous powered flights ensued. Bell chief test pilot Chalmers “Slick” Goodlin made the first powered flight on Dec. 6, 1947. Goodlin might have gone on to make the first Mach 1 flight. However, he demanded a $150,000 bonus if he did so. This, combined with the slow pace at which Bell had been developing the aircraft displeased the Army Air Force. The project was taken over by the military in conjunction with the N.A.C.A. and less than one year later then Captain Charles “Chuck” Yeager took the aircraft past Mach 1 on Oct. 14, 1947. The flight was conducted in total secrecy and passed without notice of the public until the story finally leaked out and was mentioned in Aviation Week two months later. The Collier Trophy was awarded to the program in 1948, but the career of the Bell X-1 was far from over.
 While the initial X-1 airframe continued to be used on
research flights, the aircraft was subsequently developed in the X-1A, X-1B,
X-1D, and X-1E. These subsequent designs would continue to probe the unknown and
set speed and altitude records in the process. Yeager would famously take the
X-1A past Mach 2 and suffer a near fatal tumble due to inertial coupling when
the tail became aerodynamically ineffective.
While the initial X-1 airframe continued to be used on
research flights, the aircraft was subsequently developed in the X-1A, X-1B,
X-1D, and X-1E. These subsequent designs would continue to probe the unknown and
set speed and altitude records in the process. Yeager would famously take the
X-1A past Mach 2 and suffer a near fatal tumble due to inertial coupling when
the tail became aerodynamically ineffective.
Two of the airframes would be lost. The X-1A was subsequently destroyed when a liquid oxygen tank burst shortly before launch. Test pilot Joe Walker escaped without injury. However, the aircraft was jettisoned and destroyed on impact with the ground. A similar fate befell the X-1D on what was to be its first powered flight, the aircraft again being jettisoned, and again, most fortunately with no loss of life.
The final aircraft in the program was the X-1E. It completed its final flight in 1958, being grounded after structural cracks were discovered. This would prove to be one of the longest running test programs, spanning more than a decade. Three aircraft survive located at the National Air and Space Museum, the Museum of the United States Air Force, and at Edward Air Force Base.
| THE KIT |
First released by Revell in 1988, Revell’s X-1 consists of two sprues of nicely molded parts with reasonable detail and a clear canopy. The detail and panel lines are raised, but nicely done and look right in this scale. The first release of this kit was molded in orange plastic, though all subsequent releases, to my knowledge, have been molded in grey.
 The original release was in the Chuck Yeager endorsed
Super Fighters Series, which I believe consisted of this kit and rereleases of
their 1/48 F-15 Eagle, F-16 Falcon, F-18 Hornet, F-4E Phantom II, and their
vintage 1/40 Bell X-5. The kit has been released four times, the initial release
in 1988, and subsequent releases in 2003, 2011, and 2019.
The original release was in the Chuck Yeager endorsed
Super Fighters Series, which I believe consisted of this kit and rereleases of
their 1/48 F-15 Eagle, F-16 Falcon, F-18 Hornet, F-4E Phantom II, and their
vintage 1/40 Bell X-5. The kit has been released four times, the initial release
in 1988, and subsequent releases in 2003, 2011, and 2019.
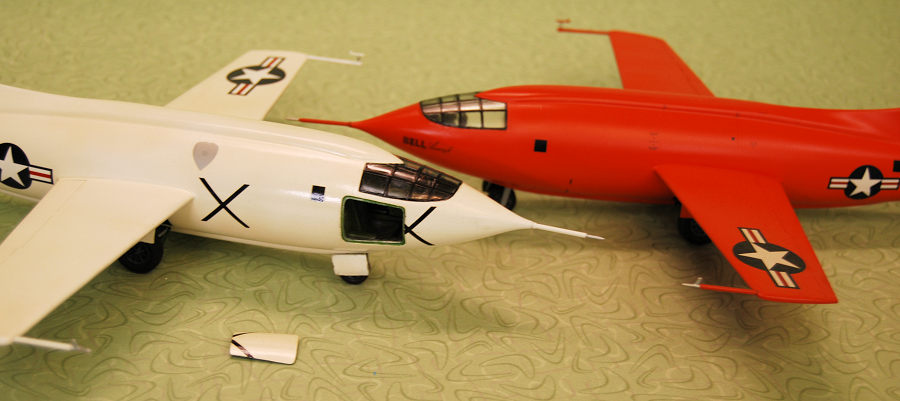
One of the kits built in this review is from the original release in 1988 and other from the 2003 release. The molds have held up well, and I could see virtually no differences in the two kits. I have also looked at the 2011 release of the kit and again found the parts to be cleanly molded and flash free.
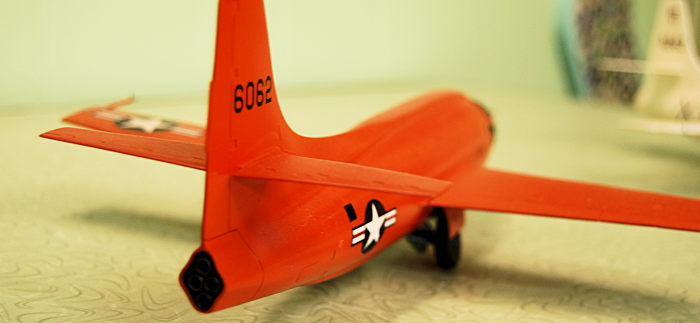
One decal option is provided. While it featured the well-known “Glamorous Glennis” markings carried on the aircraft when Yeager broke the sound barrier in 1947, the national insignia is incorrect, being of the late W.W.II variety used in the earliest phase of the X-1 program. The 2011 and 2019 feature the correct insignia with the red bars present at the time of his legendary flight.
| CONSTRUCTION |
I first built this kit with days of its release in 1988. An injection molded kit of the X-1 had essentially been my Holy Grail kit since childhood. I had read extensively about the X-planes, Yeager, and everything leading up to and through the space program. Unfortunately, in my youth and teenage years, there were virtually no X-plane kits readily available. There had been some from the 1950’s and 1960’s, but most were long out of production by the time I was building models. There were kits of the X-3 from Revell and Lindberg, which is a visually stunning aircraft, if somewhat lackluster in performance, but only a long out of production Stombecker X-1A existed for those wanting to build this legendary aircraft.
There were vacufroms of the X-1, but these were something that I had not yet mastered. When I saw that this new kit had been released, I snapped one up immediately. I actually drove from Huntsville to Birmingham one Saturday to shop at Homewood Toy and Hobby, knowing that they would have one in stock, as they always had the newest releases on hand.
I built it over the weekend and was very pleased with the results. It sat on the shelf in my bedroom through most of my college years until I accidentally knocked down a bracket shelf above it. This “shelf crash” claimed my X-1, my first 1/32 Condor Legion Bf.109E (Hasegawa kit converted to an E-1), a 1/48 ESCI Skyraider nicely modified to a Korean War AD-4, and another 109, also in Spanish Civil War markings, but painstakingly converted to a D model with an Accu-Scale Horizon aftermarket vacuform set. (I have never quite forgiven myself for losing this one.)
 In the late 1990’s I decided that I wanted to build
the X-1 again but found it out of production and actually somewhat hard to find.
I would have to wait until I ran across one at a model show, which would prove
to be a few years. In the early 2000’s I snagged one of the original releases on
e-Bay, just before the kit was rereleased. Around this time Cutting Edge Decals
had released sheet # CED32040, featuring markings for eight different schemes
used on the X-1. I bought this sheet at the Anniston, Alabama IPMS show and also
picked up the 2003 release of the kit the same day, deciding that I would
eventually build two different X-1’s, with plans to use some the decals for yet
another X-plane project.
In the late 1990’s I decided that I wanted to build
the X-1 again but found it out of production and actually somewhat hard to find.
I would have to wait until I ran across one at a model show, which would prove
to be a few years. In the early 2000’s I snagged one of the original releases on
e-Bay, just before the kit was rereleased. Around this time Cutting Edge Decals
had released sheet # CED32040, featuring markings for eight different schemes
used on the X-1. I bought this sheet at the Anniston, Alabama IPMS show and also
picked up the 2003 release of the kit the same day, deciding that I would
eventually build two different X-1’s, with plans to use some the decals for yet
another X-plane project.
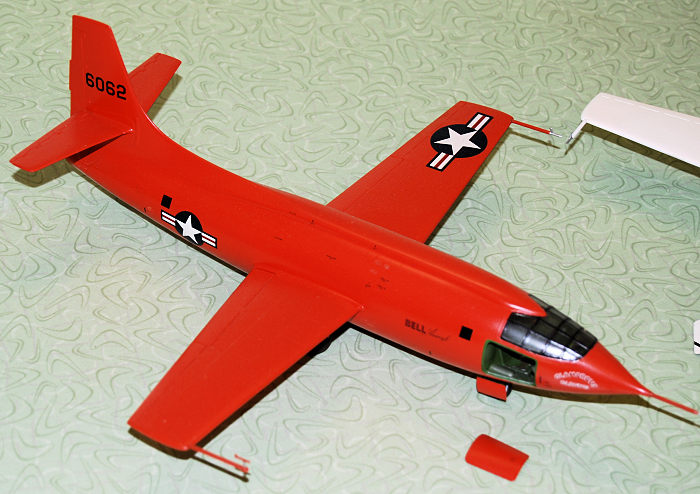
I built Yeager’s “MachBuster” first, though aside from the paint color used, the details of the build are essentially the same. I started with the cockpit and gave the interior fuselage and cockpit tub a coat of Model Master Interior Green. The instrument panel and cockpit wall panel were both painted in Flat Black and the instruments dry-brushed with Testors Silver and Flat white. Some details were picked out with red and yellow, and each instrument was given a drop of Mirco Kristal Clear. The oxygen regulator was painted in Flat Black and accented by dry brushing with Model Master Dark Anodonic Grey. The oxygen hose itself was painted with Testors Rubber.
The seatbelts were painted in a Model Master Buff and then accented with Testors Wood. The buckles were picked out with Model Master Dark Anodonic Grey and a light wash of Tamiya Smoke & Flat Black in denatured alcohol was given to the seat, floor, and boarding area around the hatch. The headrest was paint Flat Black and glued in place and giving some light dry brushing in Flat Grey to imply some use.
The control yoke is a unique, well molded affair with its dual grip and padded central mount. This was painted in Interior Green, Flack Black, Rubber, and Silver, as seemed appropriate based on photos and glued in place. Finally, the nose gear well was painted in Model Master Chromate Green, as was the underside of the canopy floor and seat area. The wheel well was glued in place and the cockpit assembly was set aside for the moment.
The kit actually comes with a clear post, so I knew that this beast would tail-sit. I addressed this by stuffing some lead shot into a wad of brown modeling clay and placing this as far forward in the nose as I could until it felt nose heavy to me when I held the fuselage halves together.
The kit comes with a reasonably nicely molded four chamber rocket engine, though this cannot be seen to any degree when the kit is completed. The after section of the fuselage halves where this would be mounted was airbrushed in Flat Black along with the inside of the engine before it was glued together. Paint was cleaned off of the mating surfaces of the engine halves with an X-acto blade and it was glued together with CA glue. Any remaining seems in the area of the engine exhausts were cleaned up with a scrape of the X-acto blade and a buffing with 0000 Steel wool.
 The engine was then sprayed with Model Master Dark
Anodonic Grey and glued in place in the fuselage. While there is a positive
location point for it, some care needs to be taken to make certain that its is
aligned correctly, as it will tend to sit angled slightly towards the wall of
the fuselage to which it is attached. A quick test fit of the fuselage halves
will show if it is correctly aligned and any necessary correction can be made
before the glue has fully set.
The engine was then sprayed with Model Master Dark
Anodonic Grey and glued in place in the fuselage. While there is a positive
location point for it, some care needs to be taken to make certain that its is
aligned correctly, as it will tend to sit angled slightly towards the wall of
the fuselage to which it is attached. A quick test fit of the fuselage halves
will show if it is correctly aligned and any necessary correction can be made
before the glue has fully set.
Once this was completed, the instrument panel was glued in place with CA glue and the alignment checked with another fuselage test fit. Satisfied that it was good, the cockpit itself was fitted and the alignment checked again. Now the fuselage halves were glued together with gap filling CA glue. This gave a very clean bond and required no additional filling. Only some minor sanding was needed to smooth out the seams.
Assembly of the wing halves was then done with the same glue and with equally satisfactory results. These were then glued to the slots in the fuselage with gap filling CA glue with careful attention given to make certain that they were aligned at the proper angle. It is possible to accidentally cant the wings upwards or downwards slightly, so close attention must be paid.
The wing joint was the only place that I had to use any filler. There was a very small gap that was easily filled with some Squadron Green Putty smoothed out with nail polish remover on a Q-tip. This was subsequently sanded out with 400 grit sandpaper, then overcoated lightly in thin CA glue, sanded again, and finished with 0000 steel wool.
The horizontal stabilizers were then fitted, again with care given to assure correct alignment. These went on without any filling and the model was now nearly ready to paint. Before doing so, the nose boom was fitted, but only to assure that any trimming or sanding necessary was done in advance, so as not to have to repaint the nose if the fit was not good. Once satisfied, I purged any dust and debris away from it and my workbench with a blower on the air compressor hose.
 All openings into the cockpit, the nose gear well, and
the exhaust nozzle were plugged with damp paper towel bits and I prepared to
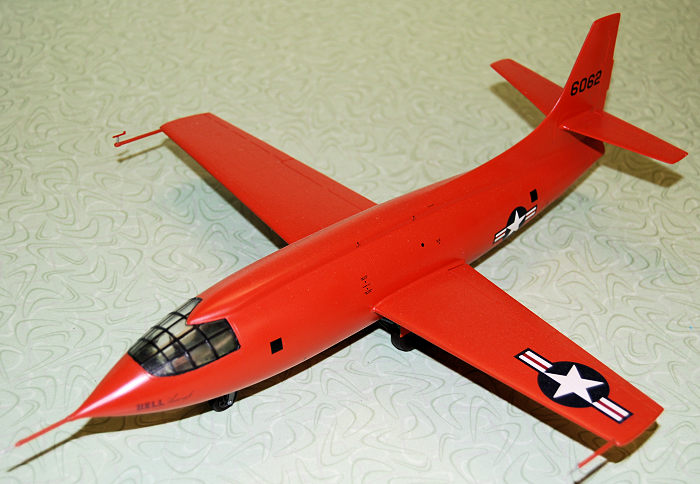
paint it. One aircraft would be painted as Yeager’s used on his Mach 1 flight in
1947. While the instructions specified FS 12197 for the orange paint used on
this aircraft, I found that International Orange looked too bright, and the
wrong color based on the photos that I had seen. I mixed my own using Testors
Orange as the base, then tweaking it with drops of various Testors yellows and
reds and a drop of Flat White until I was satisfied with the shade and tone. I
did not apply this until I let a drop of it dry and found the color suitable.
The whole aircraft was then sprayed in this, as were the outside of the landing
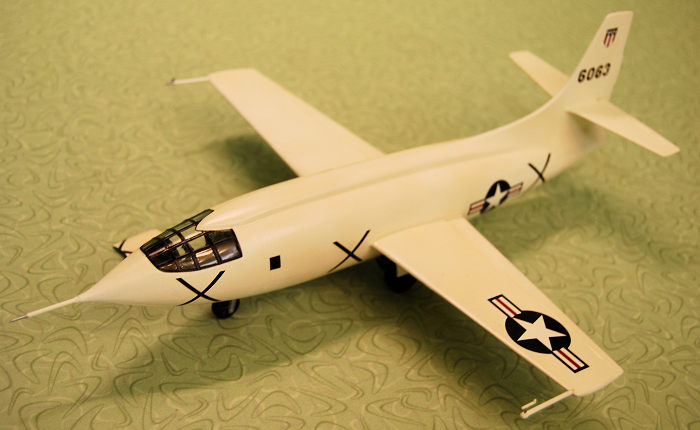
covers, hatch cover, and the instrumentation booms. The later, N.A.C.A. marked
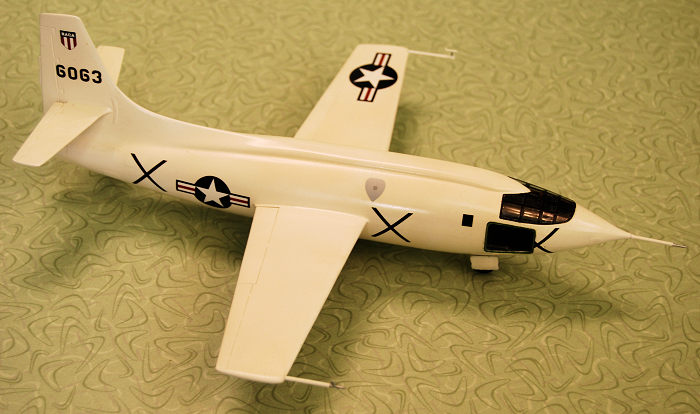
example would be painted in overall Testors Gloss White, with the same being
applied to the gear covers and booms as well.
All openings into the cockpit, the nose gear well, and
the exhaust nozzle were plugged with damp paper towel bits and I prepared to
paint it. One aircraft would be painted as Yeager’s used on his Mach 1 flight in
1947. While the instructions specified FS 12197 for the orange paint used on
this aircraft, I found that International Orange looked too bright, and the
wrong color based on the photos that I had seen. I mixed my own using Testors
Orange as the base, then tweaking it with drops of various Testors yellows and
reds and a drop of Flat White until I was satisfied with the shade and tone. I
did not apply this until I let a drop of it dry and found the color suitable.
The whole aircraft was then sprayed in this, as were the outside of the landing
covers, hatch cover, and the instrumentation booms. The later, N.A.C.A. marked
example would be painted in overall Testors Gloss White, with the same being
applied to the gear covers and booms as well.
While these parts dried, the wheel & tire parts were assembled and painted overall Testors Rubber. The wheels themselves were then painted in Model Master Dark Anodonic Grey, as were the landing gear components and retraction struts. After the paint was thoroughly dried on the aircraft, the area around main landing gear bays was masked off with Tamiya tape and the wheel wells were airbrushed with Model Master Chromate Green. The insides of the gear covers were painted as well, with the inside of the hatch cover getting a coat of Model Master Interior Green.
| COLORS & MARKINGS |
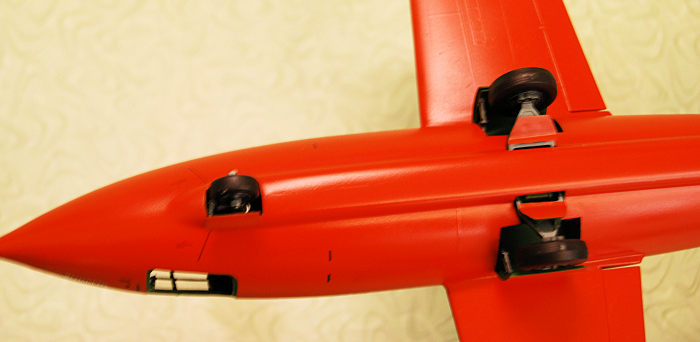
Once everything was dry, the landing gear was assembled and installed per the instructions and the gear covers fitted. This is probably the only tricky part of the assembly. The main gear location is fairly positive, though it can be canted slightly, so take care here. Even in this scale, the gear cover are a little fiddly due to the fact that even when open, they fit closely and the are retraction struts to be fitted. A little patience and care will assure a correct alignment, though. The nose gear cover went on with no problems.
The orange model was given coat of Testors Model Master rattle can Gloss while the white aircraft was coated in Future to avoid possible yellowing issues. Decals were then applied accordingly from the Cutting Edge decal sheet. The Orange model was decaled using the markings appropriate for Chuck Yeager’s first supersonic flight on Oct. 14, 1947. The other scheme was one of two very distinctive all white N.A.C.A. aircraft, the seventh option on the decal sheet CED32040. These went on with no issues whatsoever and they responded nicely to Micro Set. Once dry, the orange one was coated with Model Master rattle can Semi-Gloss while the white one was again sprayed with Future.
 The broad, heavily framed canopy had been trimmed with
an X-acto and test-fitted during assembly. The framing was now painted in
Testors Flat Black. Once this was dry it was given a dunk in Future and set
aside to dry. During this time the instrumentation booms had some small details
painted with Silver. The canopy was then glued in place with some CA glue
applied to the edges with a toothpick.
The broad, heavily framed canopy had been trimmed with
an X-acto and test-fitted during assembly. The framing was now painted in
Testors Flat Black. Once this was dry it was given a dunk in Future and set
aside to dry. During this time the instrumentation booms had some small details
painted with Silver. The canopy was then glued in place with some CA glue
applied to the edges with a toothpick.
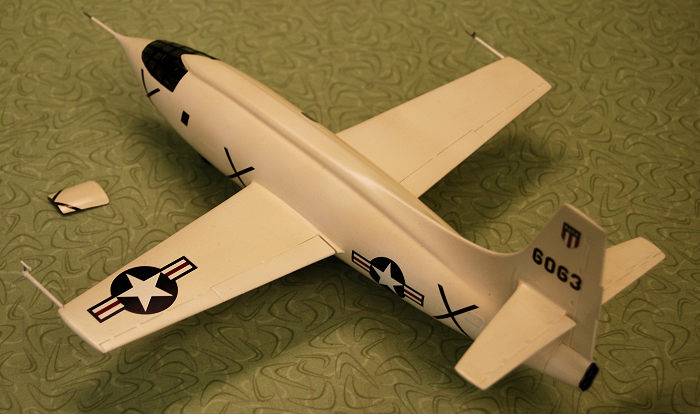
Finally, the instrumentation booms were glued in place and here is where I goofed on both models. While I installed the yaw indicator boom on the starboard wing, as is correct on Yeager’s aircraft, I erroneously inverted it, which I did not realize until writing this article. At the same time, on the N.A.C.A. aircraft, it was also installed inverted, but incorrectly on the port wing.
If I ever manage to break one off accidentally, I will correct it. However, I have been so pleased with the overall results of the models, I did not want to mess with either of them. It must not be very noticeable, as both models have taken first place awards at several IPMS shows. Despite being somewhat O.C.D., I force myself to ignore it. In this case, my take on it is quite literally, if it ain’t broke, don’t fix it.
| CONCLUSIONS |
While this kit may not be considered up to some standards today, it is really an excellent kit for the money. There are some aftermarket parts available for this model, mainly improved cockpit components. I would say that there is not very much to improve on the exterior of the kit. I find the cockpit perfectly acceptable out of the box. Only a moderate amount of detail can be seen through the canopy or the hatch in the side. Masks are available for the canopy and can certainly simply painting the numerous frames.
Interestingly, Cutting Edge produced a conversion kit to allow building the X-1E. I gave consideration to buying and building this but failed to get one when they were readily available. Perhaps I will still build it, if I run across one. Personally, I would have been more interested in an X-1A/B conversion, had one been produced. Unfortunately, there is none to date.
This kit is recommended for all. Even a near novice modeler can produce a very nice representation of the X-1 with this kit. It is a relatively easy build and has very good fit in most areas. I would say that my build time on each kit was around a mere ten to thirteen hours, which was not bad at all for the results that I got. With the improved decal sheet in the latest boxings, the only thing that I generally fault the kit for has been addressed. Anyone who loves X-planes, the space age, or unusual aircraft should give this kit a shot if it is a subject that appeals to them. You will not be disappointed.
| REFERENCES |
The X-Planes: X-1 to X-31, by Jay Miller, 1988, from Aerofax, Inc.
https://www.scalemates.com/search.php?fkSECTION%5B%5D=All&q=1%2F32+revell+X-1
https://en.wikipedia.org/wiki/Bell_X-1#Parallel_development
Christopher
Campbell 17 October 2022 Copyright ModelingMadness.com. All rights reserved. No
reproduction in part or in whole without express permission. If you would like your product reviewed fairly and fairly quickly, please contact the editor
or see other details in the
Note to
Contributors.