Sword 1/72 Lockheed T-33A
| KIT #: | SW 72028 |
| PRICE: | $26.96 SRP |
| DECALS: | Three options |
| REVIEWER: | Derek Olson |
| NOTES: | Includes resin detail parts |
| HISTORY |
 The
Lockheed T-33 trainer was derived from the single seat P-80 series fighter.
This 1940s design was so successful that more than 7,000 were
eventually built and trained pilots in just about every western nation for over
30 years. The
last Air National Guard T-Birds were withdrawn from service and sent to storage
at Davis-Monthan AFB in 1988.
Many were rearmed and sent “south of the border” to soldier on in
The
Lockheed T-33 trainer was derived from the single seat P-80 series fighter.
This 1940s design was so successful that more than 7,000 were
eventually built and trained pilots in just about every western nation for over
30 years. The
last Air National Guard T-Birds were withdrawn from service and sent to storage
at Davis-Monthan AFB in 1988.
Many were rearmed and sent “south of the border” to soldier on in
| THE KIT |
| CONSTRUCTION |
This
kit started like almost every other aircraft model with the cockpit.
The instrument panels and tub are nicely molded with tiny details.
I sprayed the cockpit Testors Model Master Neutral Gray.
Careful application of black paint detailed the instruments and pit
and I added some black ,
red, and yellow decal bits to finish things off.
The seats and sticks were painted at this time but I didn’t install
them until the very end.
The wheel wells were sprayed with Testors Model Master Dark Green and
set aside. I
added a black water color wash to give these parts some depth once the paint was
dry.
,
red, and yellow decal bits to finish things off.
The seats and sticks were painted at this time but I didn’t install
them until the very end.
The wheel wells were sprayed with Testors Model Master Dark Green and
set aside. I
added a black water color wash to give these parts some depth once the paint was
dry.
The intake plates and
tail pipe were painted and glued in place at this time.
Care must be taken installing the intake plates into each fuselage
half as there aren’t any locators to make sure they are properly installed.
The instructions aren’t much help either.
I hope this didn’t contribute to the fuselage / wing fit problems
encountered during construction (more on that later).
The resin dash in front of the front instrument panel was tricky to
fit in place as well since once again, there isn’t really anything to go by in
terms of a positive locator.
Dry fitting is necessary to obtain a good, proper fit.
I super glued it in place and reinforced it underneath with some scrap
sheet styrene bits.
Some lead fishing weight was super glued in the nose a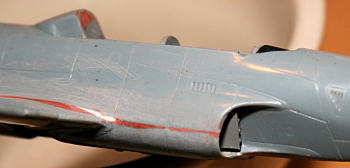 nd
the resin nose gear well was also super glued in place at the same time.
A little Play Doh was stuck over the lead to keep from ever moving.
The tub and tail pipe were glued into the left fuselage half and then
both fuselage halves were glued together.
There aren’t any locating pins so be sure to take your time and line
everything up properly to save yourself extra sanding work later.
Once I was satisfied with the alignment, it was clamped and set aside
to dry.
nd
the resin nose gear well was also super glued in place at the same time.
A little Play Doh was stuck over the lead to keep from ever moving.
The tub and tail pipe were glued into the left fuselage half and then
both fuselage halves were glued together.
There aren’t any locating pins so be sure to take your time and line
everything up properly to save yourself extra sanding work later.
Once I was satisfied with the alignment, it was clamped and set aside
to dry.
Worked started on the wings next.
There were many tall ejector pins on the plastic that have to be removed
here. A few passes with my trusty Dremel tool and they were gone.
I first super glued the resin main wheel / air brake well into the
bottom wing. Then the top halves of the wings were glued on.
I clamped the wing assembly and set it aside to dry.
The trailing edges are thin and look good right out of the box.
 Once the
glue had dried on the fuselage and wings it was time to join them together.
This is where I ran into the only real headache of the build.
Dry fitting revealed a poor fit with large gaps around the air intakes
and wing roots.
I used my Dremel tool to remove some of the resin from the top of the main
wheel well piece.
I thought it might be hitting the bottom of the cockpit tube.
I went ahead and thinned the bottom of the cockpit tub too.
I trimmed and thinned the intake plates also in an attempt to close
the gaps as much as possible.
Try as I might, the big gaps remained.
I gritted my teeth and glued everything together with liquid cement –
I even stuck some pieces of stretched sprue into the wing root gaps while the
glue was still wet.
Once dry, the filling-sanding-repeat started along the joints with 3M
auto body putty filler and super glue.
This went on for some time before I was satisfied with the results.
I even set the model aside for a time as I was tired of fighting with
the seams.
After a little break and some more sanding (plus inspiration in the form of the
new Xtradecal sheet), a final application of super glue and sandpaper cleaned up
the joint and I could finally move on.
Once the
glue had dried on the fuselage and wings it was time to join them together.
This is where I ran into the only real headache of the build.
Dry fitting revealed a poor fit with large gaps around the air intakes
and wing roots.
I used my Dremel tool to remove some of the resin from the top of the main
wheel well piece.
I thought it might be hitting the bottom of the cockpit tube.
I went ahead and thinned the bottom of the cockpit tub too.
I trimmed and thinned the intake plates also in an attempt to close
the gaps as much as possible.
Try as I might, the big gaps remained.
I gritted my teeth and glued everything together with liquid cement –
I even stuck some pieces of stretched sprue into the wing root gaps while the
glue was still wet.
Once dry, the filling-sanding-repeat started along the joints with 3M
auto body putty filler and super glue.
This went on for some time before I was satisfied with the results.
I even set the model aside for a time as I was tired of fighting with
the seams.
After a little break and some more sanding (plus inspiration in the form of the
new Xtradecal sheet), a final application of super glue and sandpaper cleaned up
the joint and I could finally move on.
The horizontal stabs
were last. No
tabs or other locators here.
These attach to the tail with a simple butt-joint.
Care must be exercised here to make sure the stabs are lined up
properly.
Once the glue was dry I dressed up the remaining seams. All lost panel lines were re-scribed with a needle chucked in a pin vise. The model was primed with an application of Krylon Brilliant Silver from a rattle can. Any seams that needed it were repaired. Once I was satisfied all the seams were smooth, my T-bird was ready for paint.
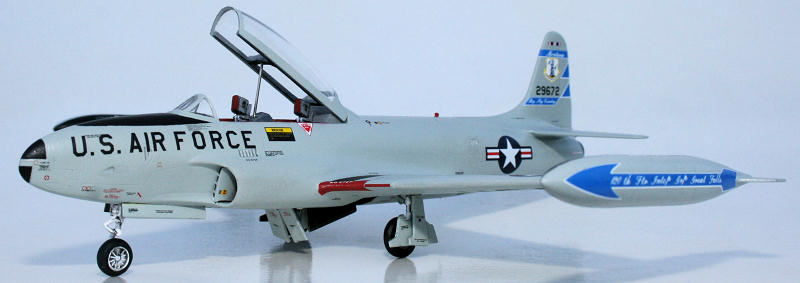
| COLORS & MARKINGS |
I painted
the T-bird with Model Master enamels.
I used Aircraft Gray (aka “
Once the paint was dry I sprayed the model with Future in
preparation for my favorite part, the decals.
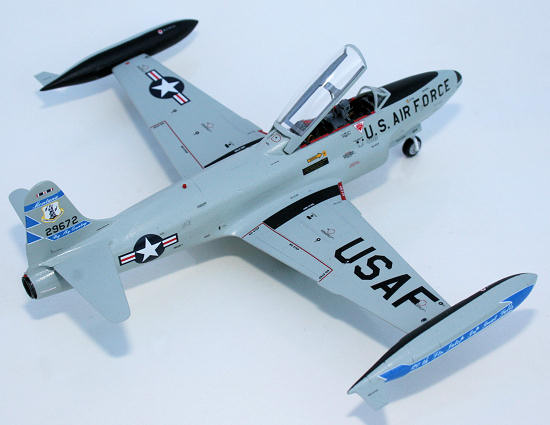
 Most
of the decals came from the new Xtradecal T-33/F-80 sheet number X72-120 with a
few exceptions. The large “USAF” lettering on the wings are much too narrow and
tall as printed on the Xtradecal sheet (I think they are okay for the F-80s on
the sheet?) so I robbed better ones from the Mark I T-33 Colors and Markings
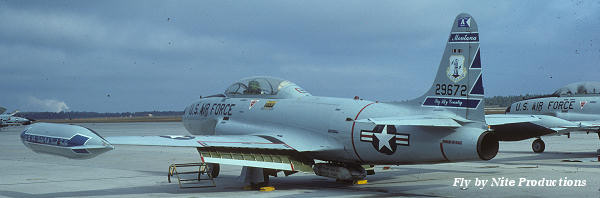
book/decal sheet. I used the same sheet for the various ejection warnings since
they more closely resembled the ones seen on the Montana ANG bird in my
reference photos.
The
Most
of the decals came from the new Xtradecal T-33/F-80 sheet number X72-120 with a
few exceptions. The large “USAF” lettering on the wings are much too narrow and
tall as printed on the Xtradecal sheet (I think they are okay for the F-80s on
the sheet?) so I robbed better ones from the Mark I T-33 Colors and Markings
book/decal sheet. I used the same sheet for the various ejection warnings since
they more closely resembled the ones seen on the Montana ANG bird in my
reference photos.
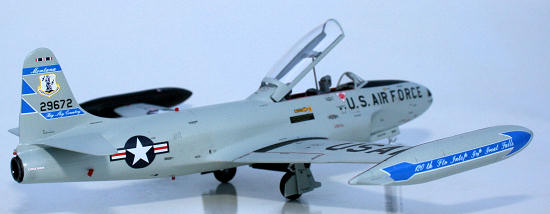
The
Xtradecal missed the Distinguished Unit Award ribbon on the tip of the
vertical fin. This was very visible in the photos I had of this bird.
I didn’t like the color of the ANG shield as provided in the Xtradecal
sheet as it was too dark and too small. Luckily, an Air
| FINAL CONSTRUCTION |
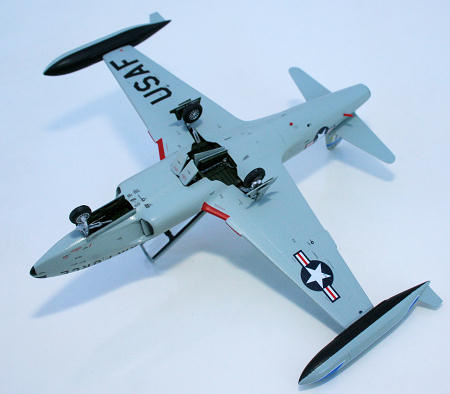
Once the decals were
done and sealed with a coat of Future, I added a few final bits to the model.
The undercarriage was painted and installed along with the gear doors.
Watch out - the instructions would have you add the long narrow gear
doors first (part #37 & 41) but this is wrong.
The gear door over the wheels (part #39 & 40) must be glued on first.
Then the long narrow gear doors can be glued on.
I had to remove about 1/8” or so from the tops of them since they were
too long.
 The
tires don’t have a hole for the landing gear axles to fit in so I had to drill
holes into the hubs with a pine vise.
The actuating rods for the air brakes are very delicate.
I broke one of mine and ended up replacing all of them with pieces
made from stretched sprue.
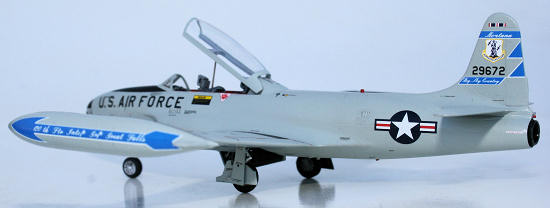
The tip tanks were glued on next and both fit very well onto the wing
tips.
The
tires don’t have a hole for the landing gear axles to fit in so I had to drill
holes into the hubs with a pine vise.
The actuating rods for the air brakes are very delicate.
I broke one of mine and ended up replacing all of them with pieces
made from stretched sprue.
The tip tanks were glued on next and both fit very well onto the wing
tips.
All the little formation/anti-collision lights on the spine, underside, and above the tailpipe were added from stretched spruce. They were painted and then coated with Future. I added a cover to the rear seat instrument panel from foil painted dark gray. I added the fuel dump vain from a small piece of scrap plastic painted red. The plastic canopy open/close arm was replaced with a straight pin. A light misting of Tester Dullcote sealed everything and my little T-Bird was finished.
| CONCLUSIONS |
| REFERENCES |
1.) “Shooting Stars :
Lockheed’s Legendary T-Bird” by Michael O’Leary
2.) “Lockheed T-33 : A
Photo Chronicle” by David R. McLaren
3.) “Lockheed T-33
Thunderbird Colours & Markings” (Mark I Ltd Guide with decal sheet) by Michael
Ovcacik & Karel Susa
4.) My own personal photographs of
the real thing taken in
February 2011
Note: 186 FIS T-33A photo taken in October 1976 at Tyndall AFB, Fla. According to this photo and other 186 FIS planes I've seen, Xtradecal missed the blue color. Ed
If you would like your product reviewed fairly and quickly, please contact me or see other details in the Note to Contributors.