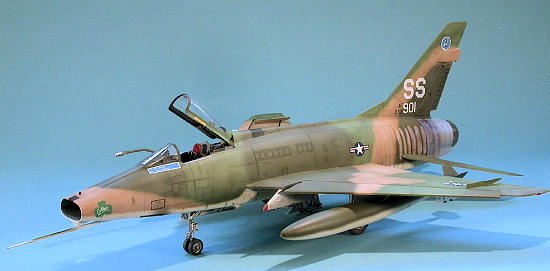
Trumpeter 1/32 F-100D Super Sabre
| KIT #: | 02232 |
| PRICE: | $189.95 SRP |
| DECALS: | Three options |
| REVIEWER: | Lee Kolosna |
| NOTES: | AMS Resin ejection seat, drop tank extension plugs, pylons, and radar warning receiver. Zactomodels resin nose correction. Renaissance Models wheels. |
| HISTORY |
The North American Aviation F-100 Super Sabre brought
level-flight supersonic capability to the US Air Force inventory and marked
the beginning of the “Century Series” of fighter aircraft.
The prototype took to the air in May 1953, with
the first production F-100A coming off the manufacturing line the following
year.
As with all high-performance military aircraft of the
time, there were considerable issues to be resolved before the F-100 could
be considered a reliable platform in which to conduct
 operations.
The F-100C saw numerous improvements and was
the first combat-capable variant.
The F-100D was the most-produced version of the
Super Sabre and was designed specifically for the fighter-bomber role with
six wing and one centerline hard points that could accommodate a variety of
ordnance, both nuclear and conventional.
operations.
The F-100C saw numerous improvements and was
the first combat-capable variant.
The F-100D was the most-produced version of the
Super Sabre and was designed specifically for the fighter-bomber role with
six wing and one centerline hard points that could accommodate a variety of
ordnance, both nuclear and conventional.
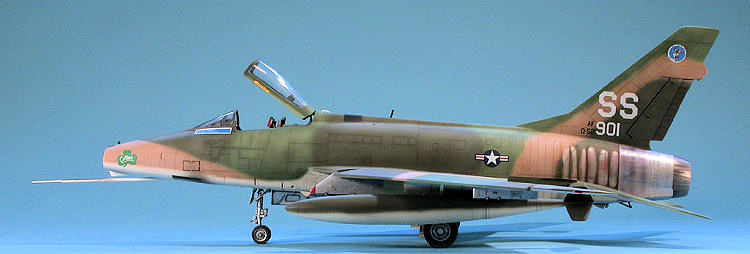
The majority of F-100Ds were deployed to Vietnam at the start of the conflict in 1964. “The Hun” bore the brunt of the air war for the Air Force during the first few years of the war flying MiG Combat Air Patrol, air-to-ground, and SEAD Wild Weasel missions before eventually being replaced by more capable F-4s, F-105s, and A-7s. Despite a very rocky start, the F-100 later earned the best maintenance record of any US Air Force aircraft during the war. That’s not to say though that it wasn’t a handful to fly. It had a very high landing speed, was prone to engine compressor stalls if the throttle wasn’t carefully handled, and was borderline unstable at high speeds. Over 500 of the 1274 D models built were lost in accidents alone, excluding those lost in combat. One former F-100 driver who had flown P-47s during World War II described the Hun to me as “a man’s airplane”. It was big, brutish, fast, and it could kill you in a second if you weren’t careful.
The Air Force Thunderbirds flight demonstration unit flew F-100Ds for four years before an ill-fated transition to F-4Es. Air National Guard units continued to fly the F-100Ds throughout the 1970s until the last one was retired at the end of the decade.
| THE KIT |
Here we have another big Trumpeter jet kit, with the usual glitches we’ve come to expect from this manufacturer. Inside the large, sturdy box you get 684 parts in styrene with photo-etch details, synthetic rubber tires, a metal nose weight, optional metal landing gear, and a clear film for the instruments. Trumpeter provides an entire J57 engine with a two-piece fuselage with a trailer to allow the rear section to be displayed separately. There is detail for open gun bays, two types of air brake, and a curious large upper nose avionics bay with almost no internal detail. A complete air intake trunk is included, as are a rather strange assortment of 275 gallon drop tanks, AN/ALQ-31 and AN/ALQ-87 ECM pods, AIM-9B Sidewinders, a practice bomb dispenser, and LAU-10 rocket pods. Wing control surfaces are all independent pieces.
It is nice to see
that Trumpeter got the clear parts mostly right, which has been a sore point
with so many of their kits.
 There’s no internal canopy detail other than a photo-etch
rear-view mirror and they incorrectly have you mount the rear decking to the
fuselage instead of up inside with the canopy when it’s in the open
position.
There’s no internal canopy detail other than a photo-etch
rear-view mirror and they incorrectly have you mount the rear decking to the
fuselage instead of up inside with the canopy when it’s in the open
position.
The decal sheet is huge and colorful. Three aircraft markings are provided, two in aluminum lacquer (not natural metal, but painted instead like almost every F-100 from the late 1950s onwards), and one Vietnam-era aircraft. I didn’t use the kit decals so I can’t vouch for their applicability. One head scratcher is the wording “THE COHPCRA TIOH” on the red fuselage flash for a 31st Fighter Bomber Wing aircraft from 1958. I guess the decal artist didn’t have a firm grip on the English language and kind of fudged it.
There are a lot of things wrong in regards to accuracy with this model kit, almost too many to list. I will try to summarize the major issues and let the reader determine which (if any) they want to fix:
 Vertical
stabilizer and rudder.
The
fairing near the top of the tail is a couple of millimeters short in
length, not extended far enough out past the rear edge of the rudder.
Also, the fairing depicts an early F-100D.
Vietnam and later era aircraft had a wider fairing with a
Radar Warning Receiver (RWR) mounted on the rear.
The fuel dump vent underneath the fairing is missing.
Vertical
stabilizer and rudder.
The
fairing near the top of the tail is a couple of millimeters short in
length, not extended far enough out past the rear edge of the rudder.
Also, the fairing depicts an early F-100D.
Vietnam and later era aircraft had a wider fairing with a
Radar Warning Receiver (RWR) mounted on the rear.
The fuel dump vent underneath the fairing is missing.
 Pitot probe.
Two
probes are provided, one cranked in the up position.
There are two problems.
One, the probes are too thick.
Telescoping lengths of brass tubing are an ideal replacement.
The second issue is that Trumpeter molds the attachment point
of the probe about 25 mm too far forward on the underside of the nose.
The real aircraft has the rearmost point of the probe fairing
71 inches aft from the lip of the air intake.
In this scale that is 2.2 inches, or about 56 mm back.
If you do mount the kit pitot probe piece in the right
position, it makes the overall length of probe out in front of the model
about 5 mm too short.
On the real aircraft, the probe should extend out 80 inches
(64 mm) forward of the nose of the airplane.
Argh!!!
Pitot probe.
Two
probes are provided, one cranked in the up position.
There are two problems.
One, the probes are too thick.
Telescoping lengths of brass tubing are an ideal replacement.
The second issue is that Trumpeter molds the attachment point
of the probe about 25 mm too far forward on the underside of the nose.
The real aircraft has the rearmost point of the probe fairing
71 inches aft from the lip of the air intake.
In this scale that is 2.2 inches, or about 56 mm back.
If you do mount the kit pitot probe piece in the right
position, it makes the overall length of probe out in front of the model
about 5 mm too short.
On the real aircraft, the probe should extend out 80 inches
(64 mm) forward of the nose of the airplane.
Argh!!! So, are you scared yet? Well, don’t be. The model fits together pretty well and with a few aftermarket parts (AMS Resin’s ejection seat, Zactomodels’ air intake, maybe some bombs from other 1/32 scale kits) and a little work to correct some of the more egregious issues (cut down the landing gear, make a pivot for the stabilators, mount the pitot probe an inch further rearward), you can have a very striking model of a cool airplane. Out the box, an early F-100D in overall aluminum lacquer is the easiest to achieve. You won’t have to extend the fuel tanks and the kit provides the right exhaust nozzle and small cut-out speed brake. For a Vietnam-era model, you’ll need to scratch-build the antennae and in some cases the RWR detectors, and for an Air National Guard airplane, you’ll need to source an aftermarket F-102 style exhaust, plus add a red beacon light on the spine.
| CONSTRUCTION |
I purchased
the kit from the disgusted friend mentioned above, which included the
Zactomodels resin intake, Renaissance resin wheels, Cutting Edge decals, and
some leftover Eduard color photo-etch cockpit pieces.
First, I decided what kind of markings from
what period I wanted on my model, and that let me plan my modifications and
corrections accordingly.
I chose to do an F-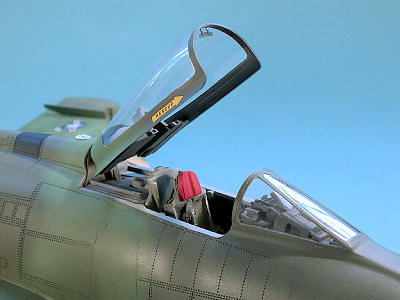 100 flying in Vietnam in
1970, so that would mean a little scratch-building plus a couple of more
aftermarket purchases.
I bought AMS Resin’s ejection seat and 335
gallon fuel tank extension plugs.
The latter also provides the corrected fuel
tank pylon and a RWR receiver for the underside of the nose.
100 flying in Vietnam in
1970, so that would mean a little scratch-building plus a couple of more
aftermarket purchases.
I bought AMS Resin’s ejection seat and 335
gallon fuel tank extension plugs.
The latter also provides the corrected fuel
tank pylon and a RWR receiver for the underside of the nose.
I assembled the J57 engine, incorrect intake cone shape and all, leaving the photo-etched fan blades out. As mentioned previously, the inside of the afterburner pipe has some very prominent seams that are visible from the rear, so I rolled up very thin plastic sheet into a cone-like shape and covered the insides as best I could, leaving the single seam at the top.
The cockpit
was next.
I used the kit instrument panel and glued the
instrument face film directly to the back of the panel and dispensed with
the clear section.
White paint on the backside of the film allowed
the dials to be become visible.
The cockpit and ejection seat was painted with
Testor Acryl FS36231 Dark Gull Gray overall, with flat black side consoles
and instrument bezels.
With the kit, I was given a resin instrument
panel coaming (I’m not sure who originally made it), so that was used
instead of the kit part, to which I added a scratch-built frame for the gun
sight reflector glass.
The seat cushion was painted RAF Sky with Light
Ghost Gray harnesses, Olive Drab oxygen hoses, Insignia Yellow ejection
handles, and Insignia Red headrest and armrests.
A dark gray wash was applied, followed by
dry-b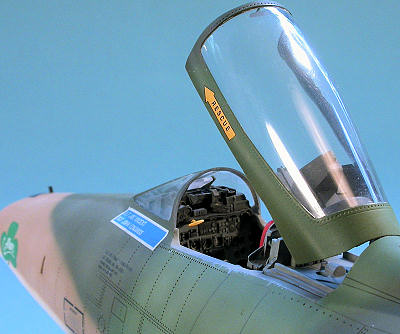 rushing with a light gray.
A silver pencil was used to simulate paint
scuffs on high-wear areas.
rushing with a light gray.
A silver pencil was used to simulate paint
scuffs on high-wear areas.
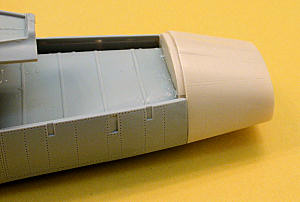
I cut off the
front of the nose as indicated by the instructions of the Zactomodels’ resin
intake and glued the intake trunk, cockpit assembly, and nose wheel well
inside the forward fuselage halves.
Then the resin intake was glued onto the nose,
which fit just okay.
I had large seams to deal with where the trunk
met the inside of the resin intake, which I filled with CA glue and sanded
down with sandpaper wrapped around various diameters of paint brush handles.
Repeated seam filling sessions were required
before I had a truly seamless intake.
This was painted with Floquil Old Silver.
I added the large metal nose weight to the
avionics bay and glued on the access panel after snipping off the hinges
that allow the piece to be displayed open.
The seams were filled around the panel.
I assembled
 the 20 mm cannons and glued them
inside the gun bay.
As I generally prefer a cleaner look on my
models, I closed up all the access panels.
The fit was only fair, so most of the resulting
panel lines were filled with CA glue and sanded smooth.
I would later replace these lines with either
scribing or a pencil line drawn on the model after painting.
the 20 mm cannons and glued them
inside the gun bay.
As I generally prefer a cleaner look on my
models, I closed up all the access panels.
The fit was only fair, so most of the resulting
panel lines were filled with CA glue and sanded smooth.
I would later replace these lines with either
scribing or a pencil line drawn on the model after painting.
Looking at photos of 31st TFW Super Sabres as they were deployed at Tuy Hoa AFB in South Vietnam, most (but not all) of the time the speed brakes were shut when the airplane was on the ground. I used the appropriate large cut-out piece and glued it closed, with the resultant filling and sanding of the surrounding gap. The engine was glued onto the back of the intake trunk. I added some pieces of sheet plastic to box in the tail skid well before gluing the two rear fuselage halves together. This whole assembly was slipped over the protruding engine and glued firmly onto the front half. Again, the seam was filled and sanded. I did an alignment check and found the tail to be off a few degrees from vertical, so I dipped the back half of the model into a large pot of almost-boiling hot water and gently coaxed the tail back into the proper alignment.
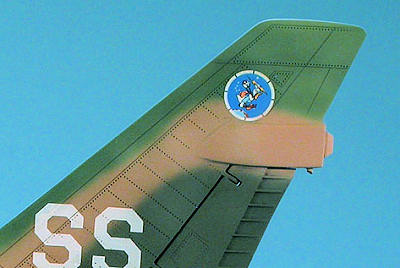 I widened the
tail fairing by laminating on pieces of .020 plastic sheet and blended them
in with Mr. Surfacer.
A rear RWR receiver was scratch-built from bits
of plastic.
I filled the slots for the stabilators and drilled a
hole for a proper pivot point.
I fashioned a KB-18 strike camera from sheet
styrene pieces and attached it to the belly.
The landing light recesses were added and the
seams around those filled.
I widened the
tail fairing by laminating on pieces of .020 plastic sheet and blended them
in with Mr. Surfacer.
A rear RWR receiver was scratch-built from bits
of plastic.
I filled the slots for the stabilators and drilled a
hole for a proper pivot point.
I fashioned a KB-18 strike camera from sheet
styrene pieces and attached it to the belly.
The landing light recesses were added and the
seams around those filled.
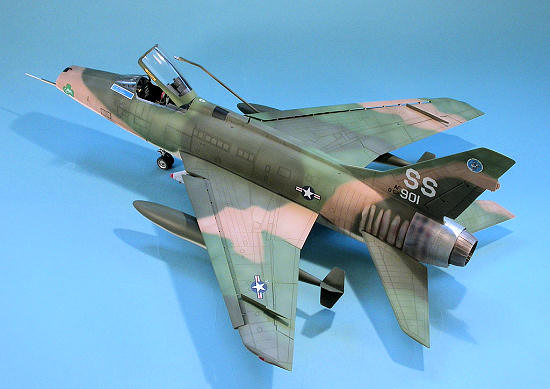
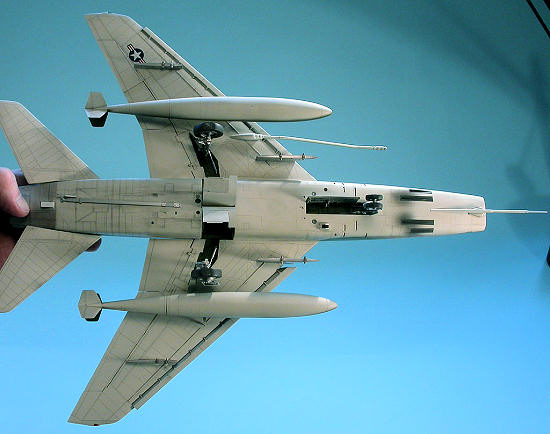
The wings were next. I assembled all the control surface pieces and glued them in the neutral position to the wing. As described previously, the wing fences are about 2 mm too tall, so I cut off that much from the bottom of the photo-etch piece and filed some new notches so that they could be mounted in the slot. Also, the slot is surrounded by a raised bezel which isn’t correct, so that was sanded down flush to the surface of the wing. I added clear green and red resin pieces in their respective locations for the navigation lights and sanded them to the proper teardrop shape and polished them back to clarity.
The wings attached to the fuselage pretty well, requiring filler but not in any unusual amounts. Something got messed up with the alignment, however, so another dunk in very hot water brought the right wing into the proper position with zero dihedral.
I used AMS Resin’s fuel tank extension plugs, but was disappointed because the resin had shrunk when curing and the pieces were smaller than the surrounding fuel tank halves, which were sawed in half to accommodate the plugs. I bulked up the resin pieces with additional layers of CA glue and blended them in with very labor-intensive heavy sanding. If I were to do it over again, I would cut a couple of sections out of the extra fuel tank provided in the kit and use them instead of the undersized resin.
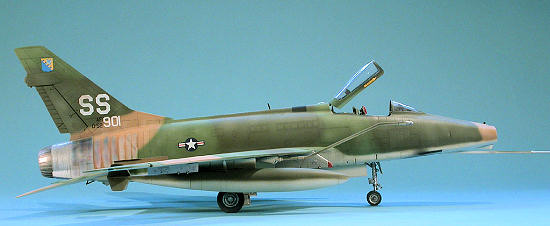
I selected the plastic kit landing struts (instead of the white metal pieces) and chopped off 3 mm from the top. This allows the model to exhibit the characteristic tail-low stance seen on F-100s. The wheel bays were assembled and all the landing gear pieces cleaned up in preparation for painting. Trumpeter instructs you to mount the smaller doors of the main landing gear bay door in line with the larger doors. On most F-100 photos that I could discern, the smaller doors droop downwards towards the gound.
The windscreen was glued on and the joint was filled with CA glue and sanded to insure a smooth transition. This is a personal bug-a-boo of mine. So many modelers just plop on the windscreen after painting is done and call it good. It might work for prop-driven airplanes, but jets don’t look right -- at least to me -- unless there is a nice, faired-in appearance for the canopy pieces.
After checking all of my seam work and restoring panel lines that were obliterated during the filling and sanding process, I washed the model with warm soapy water, let it air dry, and headed out to the paint barn.
| COLORS & MARKINGS |
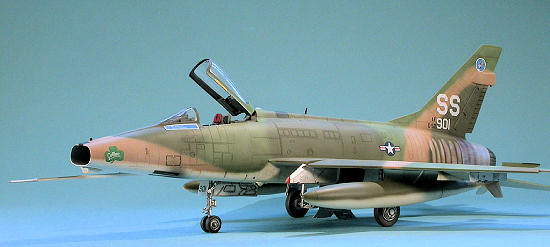
F-100s were originally deployed to Southeast Asia in aluminum lacquer overall, and then painted in the field in the T.O. 1-1-4 camouflage pattern. These airplanes were well worn with a distinct burned appearance to the hot titanium sections on the rear of the fuselage. The paint flaked off because of the heat so much that the Air Force eventually just gave up and stopped trying to apply paint to this area. There also was great variation in the camouflage pattern, with no two aircraft being exactly alike. Additionally, the paint faded quite badly in the brutal tropical sun.
 I first
painted the rear fuselage with Floquil Old Silver and the exhaust with
Testors Metalizer Burnt Metal.
I replicated the burnt paint section by cutting
out irregularly-shaped blobs of drafting tape and applying them to the model
in ways representative of photos that I studied.
Again, no two aircraft were alike, so you only
need to get a decent approximation of the pattern.
The rest of the metallic area was masked off
before camouflage painting commenced.
The underside of the airplane and fuel tanks
was painted Testor Acryl Camouflage Gray FS36622.
The wheel wells were painted with Interior
Green FS34151, with Old Silver used for the landing gear struts, wheels, and
the inside face of the wheel well doors.
The topside camouflage pattern was free-hand
sprayed with Polly Scale TAC Tan (lightened with 10% white) FS30219, Testor
Acryl Medium Green (also lightened with 10% white) FS34102, and Polly Scale
TAC Dark Green FS34079.
To depict the sun fading, I randomly went over
the camouflage with a highly thinned base color lightened with even more
flat white to introduce blotchy tonal variation.
I first
painted the rear fuselage with Floquil Old Silver and the exhaust with
Testors Metalizer Burnt Metal.
I replicated the burnt paint section by cutting
out irregularly-shaped blobs of drafting tape and applying them to the model
in ways representative of photos that I studied.
Again, no two aircraft were alike, so you only
need to get a decent approximation of the pattern.
The rest of the metallic area was masked off
before camouflage painting commenced.
The underside of the airplane and fuel tanks
was painted Testor Acryl Camouflage Gray FS36622.
The wheel wells were painted with Interior
Green FS34151, with Old Silver used for the landing gear struts, wheels, and
the inside face of the wheel well doors.
The topside camouflage pattern was free-hand
sprayed with Polly Scale TAC Tan (lightened with 10% white) FS30219, Testor
Acryl Medium Green (also lightened with 10% white) FS34102, and Polly Scale
TAC Dark Green FS34079.
To depict the sun fading, I randomly went over
the camouflage with a highly thinned base color lightened with even more
flat white to introduce blotchy tonal variation.
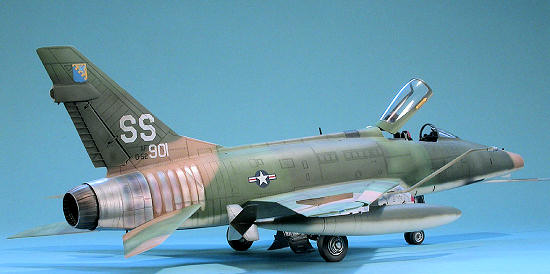
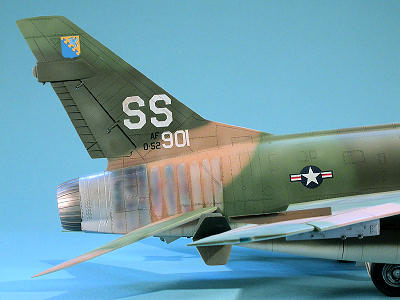
Future Floor polish was used as a gloss coat. The decals came from Cutting Edge sheet 32090, entitled “F-100D Hun #4”. Lt. Joe Vincent’s “Colleen”, F-100D-51-NH serial number 52-2901 of the 309th Tactical Fighter Squadron, 31st Tactical Fighter Wing as based at Tuy Hoa AFB in 1970 was the airplane chosen. The decals went on without incident, although I did slightly tear one of the large “SS” markings on the tail and had to repair that with flat white paint. I also had small tears in a couple of the white sections of the national insignia. One of the great things about the F-100s in Vietnam is that the field-applied camouflage painting wiped out just about every stencil, so I didn’t have to worry about applying those evil little markings which always manage to silver on me, no matter how good the gloss coat underneath.
A wash of
Payne’s Gray and Burnt Umber oil paints mixed with Turpenoid was applied to
all the panel lines, wheel wells, and
 landing gear.
Dark gray pastels were used to dirty up the
exhaust and the underside of the airplane, particularly where the ground and
ordnance crews put their grimy hands.
landing gear.
Dark gray pastels were used to dirty up the
exhaust and the underside of the airplane, particularly where the ground and
ordnance crews put their grimy hands.
A coat of Polly Scale Clear Flat sealed in all the weathering. I pulled the masking tape from the metallic sections on the rear fuselage and started in on the replication of burnt metal. First, I slightly blurred the transition lines between painted area and burnt metal with a thin line of the surrounding camouflage color. Then I sprayed Testor Acryl Clear Blue and Clear Red unevenly in the central areas of the panels. Finally, a highly thinned flat brown went on. I was reasonably satisfied with the effect and added some dark gray and black pastels to bring out some of the panel lines a little more prominently.
The resin tires were painted with Polly Scale Scale Black. I sure hope they don’t discontinue this color and keep it in their railroad series, because it is one of the most useful paints in my collection.
The fuel tank pylons were painted in Camouflage Gray with Dark Green feathered up from the fuel tank itself. The inner and outer pylons were sprayed with Old Silver, as per photographs, with the inner ones receiving an Insignia Red nose, which was a warning to the ground crew of a potential injury hazard. I’m sure more than one airman was been knocked out by walking into the pylon while preoccupied with what they were doing.
| FINAL CONSTRUCTION |
I worked
first on the underside of the aircraft, gluing on the landing gear and the
complicated retraction struts and landing gear doors.
All fit very well, even with the shortening of
the main landing gear legs.
The resin wheels were glued on, paying close
attention to alignment and insuring that the flat spots contacted the ground
precisely.
The landing and position lights were
 attached, and
then I glued on all the pylons and their anti-sway braces.
The resin fuel tank pylons took some work to
shape to the contour of the underside of the wing.
I pinned these pylons for strength and glued
them with five minute epoxy, as the tanks are long and very easy to
accidently knock when handling the model.
The cranked refueling probe went on, and I
added the resin RWR receiver on the lip and mounted the straight pitot probe
in the proper position about an inch further rearward than Trumpeter
designed.
I decided not to make my own pitot probe and used the
kit piece, even though it is too fat and about a quarter inch too short,
mostly because I don’t have a local hobby shop nearby that stocks brass
tubing.
attached, and
then I glued on all the pylons and their anti-sway braces.
The resin fuel tank pylons took some work to
shape to the contour of the underside of the wing.
I pinned these pylons for strength and glued
them with five minute epoxy, as the tanks are long and very easy to
accidently knock when handling the model.
The cranked refueling probe went on, and I
added the resin RWR receiver on the lip and mounted the straight pitot probe
in the proper position about an inch further rearward than Trumpeter
designed.
I decided not to make my own pitot probe and used the
kit piece, even though it is too fat and about a quarter inch too short,
mostly because I don’t have a local hobby shop nearby that stocks brass
tubing.
Flipping the model over, I added the small clear position lights (don’t paint these red and green, they were clear) to the tops of the wings, and the clear beacon behind the cockpit. I had to scratch-build the two blade antennae, one on the nose and one on the spine, and painted them flat black. Trumpeter has you mount part K5 to the rear cockpit decking, which is okay if you depict the model with the canopy closed, but it should attached to the inside of the canopy itself if opened. I added sheet styrene extensions to each side of the part to make it wide enough to glue to the rear of the canopy frame. I also added some structure underneath. The photo-etch rear view mirror was carefully glued on. The last step was to glue the canopy in the open position and I was done. The project took me 80 hours over five elapsed months to complete.
| CONCLUSIONS |
Trumpeter’s F-100D
kit is flawed in many ways, but with some help from some select aftermarket
items and more modeler-supplied work, it can be built up to become a very
impressive model of an important airplane.
Unfortunately, Trumpeter also repeated a number of these mistakes
in their 1/48 series of F-100 kits, so beware if you prefer to work in the
smaller scale.
With a 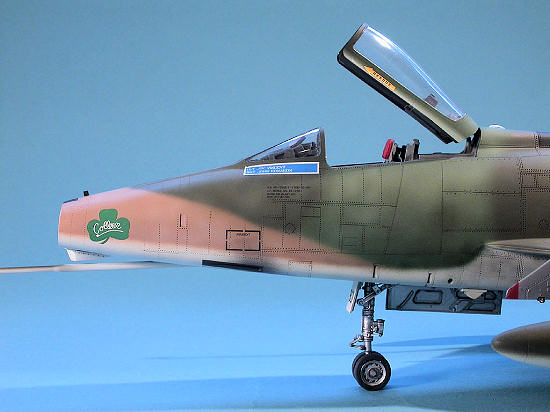 street price of around $150, plus the need for additional supplies, a
reasonably accurate F-100D model project will top out over $200.
That’s kind of par for the course with Trumpeter lately in this
scale, and only the modeler can decide if this is worth it.
You can of course just build the model out of the box as is with
the kit decals (although that weird lettering on the fuselage flash will
have to be painted out) in either of the two aluminum lacquer options and
have a model with a slightly inaccurate nose shape and an extra cushion on
the back of the ejection seat.
Seriously – who’s going to call you out on it if you do?
street price of around $150, plus the need for additional supplies, a
reasonably accurate F-100D model project will top out over $200.
That’s kind of par for the course with Trumpeter lately in this
scale, and only the modeler can decide if this is worth it.
You can of course just build the model out of the box as is with
the kit decals (although that weird lettering on the fuselage flash will
have to be painted out) in either of the two aluminum lacquer options and
have a model with a slightly inaccurate nose shape and an extra cushion on
the back of the ejection seat.
Seriously – who’s going to call you out on it if you do?
I liked this project overall and think that my model came out pretty well. My skills were stretched a bit by the challenge of the burnt metal effect and using some scratch-building to add some items (RWR, strike camera) and to modify the kit parts (horizontal stabilizers, main landing gear struts, pitot probe attachment).
A big thank you goes to Ben Brown for his invaluable and cheerful assistance on this project.
| REFERENCES |
Brown, Ben: numerous e-mail and face-to-face consultations, detailed photos
Kinzey, Bert: “F-100 Super Sabre in Detail & Scale, volume 33”
Baugher, Joseph: “North American F-100D Super Sabre”
If you would like your product reviewed fairly and fairly quickly, please contact the editor or see other details in the Note to Contributors.