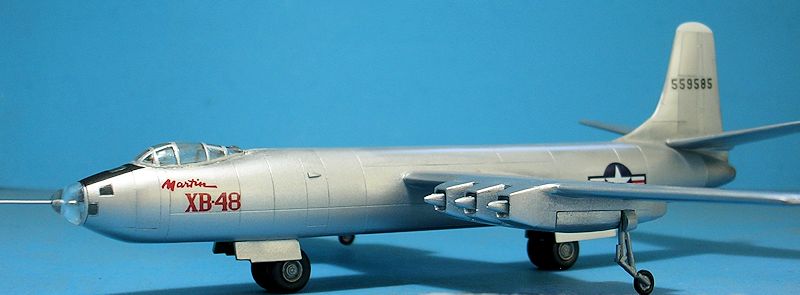
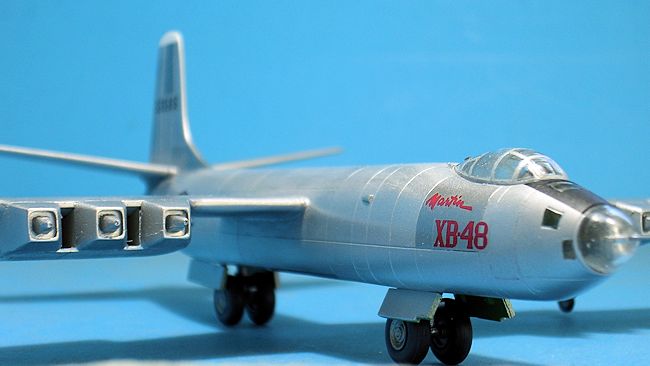
Anigrand 1/144 XB-48
| KIT #: | AA-4048 |
| PRICE: | $65.99 SRP |
| DECALS: | One option |
| REVIEWER: | Mark Joyce |
| NOTES: | Resin, includes three other kits. |
| HISTORY |
Because of the urgency of the jet bomber requirement, the XB-48 competed directly with the Boeing XB-47, the other six engine design. The Martin XB-48 lost out, largely due to the better performance the XB-47 had from its swept-wing design. As a result, only two prototype XB-48s were completed for flight testing before the program was cancelled.
| THE KIT |
This is one of Anigrand’s “Huge
Bird Collection” series, which includes three kits in addition to the main one.
In the case of the XB-48, these additional kits include the Martin XB-51,
Curtiss XP-87 Blackhawk, and Lockheed F-84C (F-97) Starfire.
Each kit is sealed in an individual bag, with the clear parts (which are
also resin) for all four models in an additional bag.
All this comes in a surprisingly small but sturdy box that also includes
two identical decal sheets and an instruction sheet with painting and decal
information on one side and a parts breakdown for each kit on the other. I found
a few of the smaller parts had somehow made their way out of the bags and were
rolling around loose in the box.
I
also found that some of the smaller parts for one kit had made their way into
the bag for another!
Fortunately,
upon sorting everything out I confirmed the parts for all four kits were
present.
I would recommend
repacking each kit in its own Ziploc or equivalent bag and tossing the kit bags.
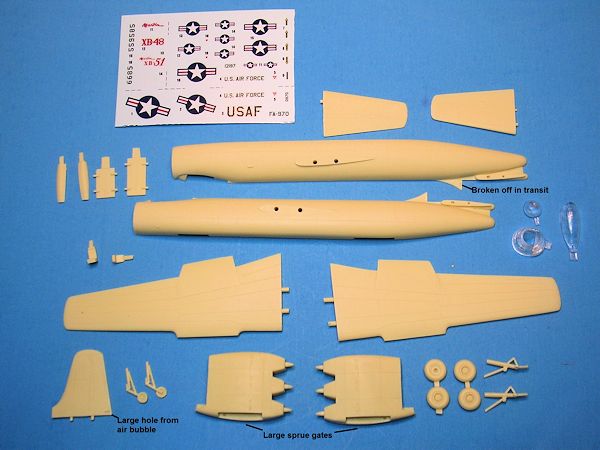 Anigrand has photographs on its website of the contents for each boxing.
Just for the sake of comparison, I took photos of what came in mine and
have posted the one of the parts for the XB-48, the subject of this article.
The parts for mine were generally well cast with only some relatively
minor flaws, mainly consisting of a few small air bubbles on the tips of the
wings and horizontal stabilizers and a larger one at the base of the vertical
stabilizer.
There was a noticeable
gouge in the resin on the fuselage near the front landing gear bay. The front
tip on most of the J35 jet engines wasn’t fully formed, but since I ended up
drilling out each to more accurately represent the actual tips this really
wasn’t an issue.
There was also a
small piece of the vertical stabilizer molded onto the fuselage that had broken
off; fortunately the piece was one of those rolling around in the box and with a
quick application of superglue I was able to reattach it.
Anigrand has photographs on its website of the contents for each boxing.
Just for the sake of comparison, I took photos of what came in mine and
have posted the one of the parts for the XB-48, the subject of this article.
The parts for mine were generally well cast with only some relatively
minor flaws, mainly consisting of a few small air bubbles on the tips of the
wings and horizontal stabilizers and a larger one at the base of the vertical
stabilizer.
There was a noticeable
gouge in the resin on the fuselage near the front landing gear bay. The front
tip on most of the J35 jet engines wasn’t fully formed, but since I ended up
drilling out each to more accurately represent the actual tips this really
wasn’t an issue.
There was also a
small piece of the vertical stabilizer molded onto the fuselage that had broken
off; fortunately the piece was one of those rolling around in the box and with a
quick application of superglue I was able to reattach it.
| CONSTRUCTION |
After cleaning up the casting blocks, or “pour stubs” as I refer to them, on the
jet engine housings and washing the resin parts, my first order of business was
taking care of the few defects in the casting.
I used Mr. Surfacer 500 for the smaller air bubbles and gap-filling
superglue for the larger ones, including the defect on the vertical stabilizer
and the gouge in the fuselage.
Speaking of the fuselage, I added some small lead fishing weights in a cavity
near the nose of one of the halves. Based on the arrangement of the landing
gear, I wasn’t as concerned about this kit being a tail sitter as others, but I
figured a little extra help up front couldn’t hurt.
Once that was accomplished I used gap-filling superglue to glue the
fuselage halves together.
Fit was
quite good, although because I didn’t do the best of jobs aligning the halves I
ended up with a slight step on the bottom.
At this point I addressed the seam between the halves.
I prefer to use superglue for this task since it does a really nice job
of permanently hiding the seam, especially for natural metal finishes, but
because of the step I used both Tamiya putty and Mr. Surfacer 500 on the bottom.
I wasn’t quite sure what color the
cockpit should be but decided on the ubiquitous Interior Green, and went ahead
and painted it at this point.
Cockpit detail is limited to two seats, presumably for the pilot and copilot,
but the resin canopy is so opaque I passed on painting and installing them since
I felt they wouldn’t been seen.
This subsequently proved correct, but at this scale I wasn’t too concerned.
 I next moved on to the wings.
Both
were slightly warped but were quickly and easily straightened with a short
treatment in hot—not boiling—water.
Gap-filling superglue was again used for attaching the engine housing onto each
wing.
The housings aren’t marked
for which wing they are a match for, but it’s pretty obvious by a quick test
fit.
Fit was generally good
with only small gaps between the top of the housing and bottom of the wings,
which I took care of with a little Tamiya putty.
I next moved on to the wings.
Both
were slightly warped but were quickly and easily straightened with a short
treatment in hot—not boiling—water.
Gap-filling superglue was again used for attaching the engine housing onto each
wing.
The housings aren’t marked
for which wing they are a match for, but it’s pretty obvious by a quick test
fit.
Fit was generally good
with only small gaps between the top of the housing and bottom of the wings,
which I took care of with a little Tamiya putty.
The nose section of the kit is clear resin with outlines for the five windows in
this area clearly defined.
Although
I would have preferred to having this area simply included as part of the
fuselage halves, which appears Anigrand did in its 72nd scale XB-48,
I can understand Anigrand’s approach to this in 144th scale: it’s
much easier to have to mask the windows in the clear section rather than trying
to mold the window openings in the fuselage, and have to worry about gluing in
the tiny windows later.
The fit of
the clear nose section to the fuselage is decent, but to get the best fit I
couldn’t get the panel lines to line up perfectly and after gluing it on I had
do some sanding to get the parts flush.
As previously mentioned, the cockpit canopy is quite opaque, but at least
the few frames are very distinct making masking with Tamiya tape a relatively
easy and painless endeavor.
I had
previously dipped the clear parts in Future so wasn’t too concerned with using
superglue to attach them; any fogging wouldn’t have been very noticeable in the
event it did occur.
The fit of the
cockpit canopy was fair.
When I
glued it into what appeared to be the correct location, a small gap occurred
between the rear of the canopy and a small keel on the fuselage, which I filled
with a tiny piece of styrene.
In final preparation for painting, I glued the wings and stabilizers onto the
fuselage.
These parts have locating
pins with corresponding holes in the fuselage to help with alignment, and most
of these holes had excess resin in them that had to be cleaned out.
The horizontal stabilizers of the XB-48 aren’t truly horizontal but
instead have an upward sweep, and Anigrand takes this into account in its
molding of the pins and holes so the kit parts end up with the correct dihedral.
I initially used gap-filling superglue to attach the wings and
stabilizers to the fuselage but after having one wing break off while handling
the model, shearing off the locating pins, I switched to 5-minute epoxy, which
provides a stronger bond.
At this point, it was off to the paint shop.
| COLORS & MARKINGS |
One thing about Anigrand kits:
many of
the aircraft it offers are only in natural metal, which is less forgiving in
respect to surface imperfections.
The XB-48 is no exception.
I
airbrushed Mr. Surfacer 1000 as a primer only to discover a number of these
imperfections that had to be addressed prior to painting.
 Once satisfied that most had been dealt with, I airbrushed Alclad II
Aluminum for my base coat. I then used Tamiya tape to mask off panels for
different shades of Alclad II including DurAluminum, Dark Aluminum, and Dull
Aluminum in my rather feeble attempt to somewhat replicate what I saw in
photographs.
Once done with the
NMF, I masked off the areas to paint the what-appears-to-be white tip of the
vertical stabilizer, the black antiglare panel in front of the cockpit, and the
wheel wells.
Once again, I chose
Interior Green for the latter.
Now
it was time for the decals.
Although I’ve been told that Alclad is smooth enough to decal over, again
heeding to the old adage of being safe rather than sorry, I airbrushed a coat of
Future on the model.
Although this
can affect the different shades of Alclad, I like the fact that it not only
protects the finish but almost guarantees I’ll have no issues with applying the
decals.
Once satisfied that most had been dealt with, I airbrushed Alclad II
Aluminum for my base coat. I then used Tamiya tape to mask off panels for
different shades of Alclad II including DurAluminum, Dark Aluminum, and Dull
Aluminum in my rather feeble attempt to somewhat replicate what I saw in
photographs.
Once done with the
NMF, I masked off the areas to paint the what-appears-to-be white tip of the
vertical stabilizer, the black antiglare panel in front of the cockpit, and the
wheel wells.
Once again, I chose
Interior Green for the latter.
Now
it was time for the decals.
Although I’ve been told that Alclad is smooth enough to decal over, again
heeding to the old adage of being safe rather than sorry, I airbrushed a coat of
Future on the model.
Although this
can affect the different shades of Alclad, I like the fact that it not only
protects the finish but almost guarantees I’ll have no issues with applying the
decals.
There’s not much to the decals.
Anigrand provides the national insignia, the serial number for the first
prototype, and the nose markings.
The decals are on the thick side but once they finally decided to free
themselves from the backing paper, went down with little fuss.
Even with the future, through force of habit I still rely on MicroSet and
MicroSol for most decals, and these were no exception.
| FINAL CONSTRUCTION |
After the decals, it was time for the “fiddly bits,” which in this case only
consisted of the clear bombardier’s greenhouse and the landing gear and
doors.
One thing I noticed
about the greenhouse is that it’s not perfectly round.
Anigrand apparently molded it to get
the correct outline shape once glued in
 the right position, but the trick
was rotating it around until I felt I had that position.
I’m not sure how good of a job I did.
There’s an additional thing about the greenhouse and clear nose
section I noticed:
On the real
XB-48, a section of the fuselage separates the greenhouse from the
forward-most side windows on the nose section.
There is no separation in Anigrand’s kit, so one either needs to mask
off these windows further back from where they are outlined or mask off and
paint part of the bombardier’s greenhouse.
I chose the latter approach, partly because the greenhouse has a
slight lip at the back that makes masking easy.
the right position, but the trick
was rotating it around until I felt I had that position.
I’m not sure how good of a job I did.
There’s an additional thing about the greenhouse and clear nose
section I noticed:
On the real
XB-48, a section of the fuselage separates the greenhouse from the
forward-most side windows on the nose section.
There is no separation in Anigrand’s kit, so one either needs to mask
off these windows further back from where they are outlined or mask off and
paint part of the bombardier’s greenhouse.
I chose the latter approach, partly because the greenhouse has a
slight lip at the back that makes masking easy.
The main landing gear appear sturdy enough to support the model over time, but
the bays have an indentation for part but not all of the gear struts.
I again opted for 5-minute epoxy for a stronger bond.
The small outrigger gears are supposed to touch the ground but the ones
on my model don’t, probably a construction error on my part.
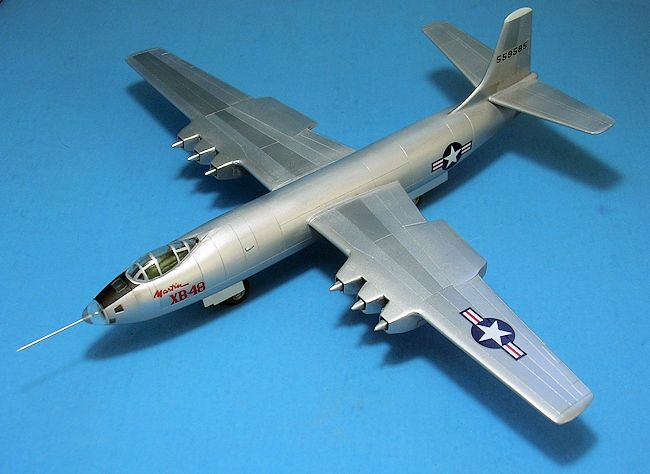
Lastly, most photographs show the XB-48 with what was probably an instrument probe protruding from the nose. The small 144th scale model doesn’t include one, so I drilled a small hole in the nose and stuck in a needle to somewhat replicate one.
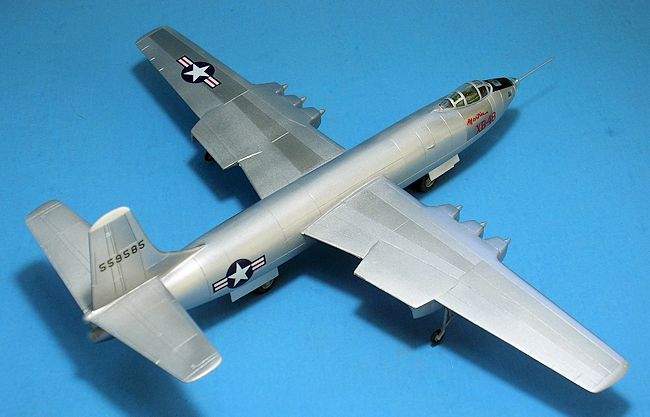
| CONCLUSIONS |
What can I say?
If you want a model
of the XB-48, to the best of my knowledge Anigrand is the only game in town.
I’m not a “rivet counter” but I didn’t notice any obvious accuracy
issues, and to me at least the finished model is a good representation of the
actual aircraft.
Fortunately, the
144th scale kit goes together with little fuss and, because of the
low parts count, would be a good choice for a first all-resin kit.
When one considers the fact that three other nice resin kits come with
it, it’s not a bad return for the investment.
| REFERENCES |
Kit instructions
Wikipedia
National Museum of the US Air Force website
Mark Joyce
May 2015
If you would like your product reviewed fairly and fairly quickly, please contact the editor or see other details in the Note to Contributors.