| KIT #: | 8211 |
| PRICE: | $7.50 when new in the early 1980s |
| DECALS: | Three options |
| REVIEWER: | Blair Stewart |
| NOTES: | Simple kit with surprisingly good fit |
| HISTORY |
The North American F-86 Sabre is best known as the United States' first swept wing fighter that could counter the swept-wing Soviet Mig-15 in high-speed dogfights during the Korean War (1950–1953), fighting some of the earliest jet-to-jet battles in history.
Modeling Madness modelers have built many of these, and their kit reviews include good histories of the aircraft. Accordingly, I will include a brief history of Major James “Jabby” Jabara, whose Korean War F-86E I chose to model (using the kit decals).
 James "Jabby" Jabara (10 October 1923 – 17 November 1966) was the
first American and United States Air Force jet ace in history. Born in Oklahoma,
he lived in Kansas where he enlisted as an aviation cadet at Fort Riley after
graduating from high school. Jabara flew two tours of combat duty in Europe
during World War II as a North American P-51 Mustang pilot and scored 1.5 air
victories.
James "Jabby" Jabara (10 October 1923 – 17 November 1966) was the
first American and United States Air Force jet ace in history. Born in Oklahoma,
he lived in Kansas where he enlisted as an aviation cadet at Fort Riley after
graduating from high school. Jabara flew two tours of combat duty in Europe
during World War II as a North American P-51 Mustang pilot and scored 1.5 air
victories.
Jabara flew his first jet aircraft in 1948, the Lockheed F-80 Shooting Star before transitioning to the North American F-86 Sabre. Flying the Sabre, Jabara shot down 15 Soviet-built MiG-15 jets during the Korean War. He achieved his first confirmed air victory of the war on 3 April 1951. A month later he scored his fifth and sixth victories, making him the first American jet ace in history. He eventually scored 15 victories, giving him the title of "triple ace". Jabara was ranked as the second-highest-scoring U.S. ace of the Korean War, 1 kill behind Captain Joseph McConnell’s 16 kills. He received the Distinguished Service Cross, Silver Star, Distinguished Flying Cross, Air Medal, and the British Distinguished Flying Cross for his combat accomplishments.
| THE KIT |
 Given that I am now 72 years old, I have recently been trying to
pare down my kit stash. I was about to list this kit on Ebay when I opened the
box and saw that it was a relatively simple kit with pretty good detail. Alas:
just the thing to get me back into modeling after a few months’ hiatus! So,
rather than list the kit, I decided to build it.
Given that I am now 72 years old, I have recently been trying to
pare down my kit stash. I was about to list this kit on Ebay when I opened the
box and saw that it was a relatively simple kit with pretty good detail. Alas:
just the thing to get me back into modeling after a few months’ hiatus! So,
rather than list the kit, I decided to build it.
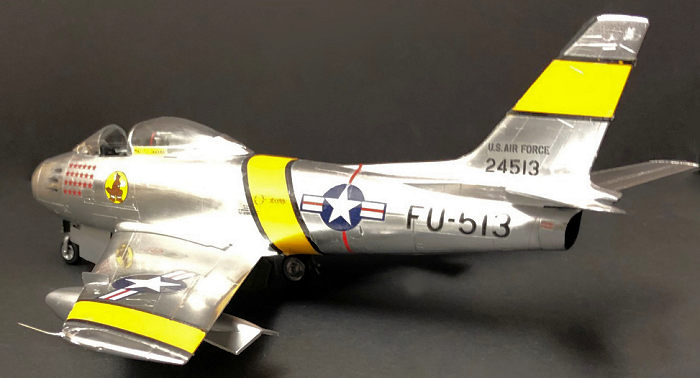
ESCI first released this kit in 1979. My version was the 1982 kit boxed by ESCI for ERTL in the United States. The kit contains 74 parts molded in gray on three sprues and six clear plastic parts on a separate sprue. The decals provide three options: Maj. Jabara’s USAF F-86, a South African Air Force F-86, and a Spanish Air Force F-86. The instructions are very clear and relatively easy to follow. Detail is surprisingly good for the time period with engraved panel lines and other details.
| CONSTRUCTION |
This is a simple kit, compared to some of the latest car and
aircraft kits on the market. Most aircraft kits start with the cockpit, and this
one is no exception. The cockpit is shy on parts and detail, unlike many
modern-day kits in this scale, but it actually builds up to be a nice-looking
representation of the prototype. ESCI used decals to represent the main
instrument and side panels. I assembled the cockpit per the instructions, and
then hand painted most of the components. I used some Future to set the
instrument decals, and once these
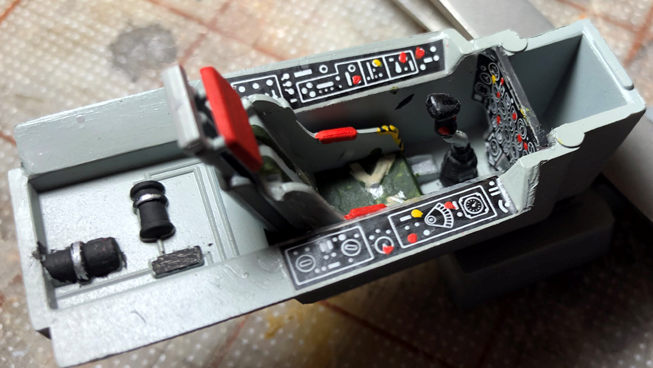 dried, I picked out some details with red and
yellow flat acrylic hobby paints (particularly on the main instrument panel).
The ejection seat has fair detail with molded on harnesses.
dried, I picked out some details with red and
yellow flat acrylic hobby paints (particularly on the main instrument panel).
The ejection seat has fair detail with molded on harnesses.
After assembling the cockpit, I glued it into the right fuselage half per the instructions. I also added part of a tire lead balancing weight to the nose to make sure the model would not be a tail sitter. I secured this weight with Gorilla Glue. I then glued the two fuselage halves together using a combination of plastic tube cement and then MEK via a small brush to make sure all the seams were sealed. I used some small hobby clamps on the vertical stabilizer to make sure it stuck together.
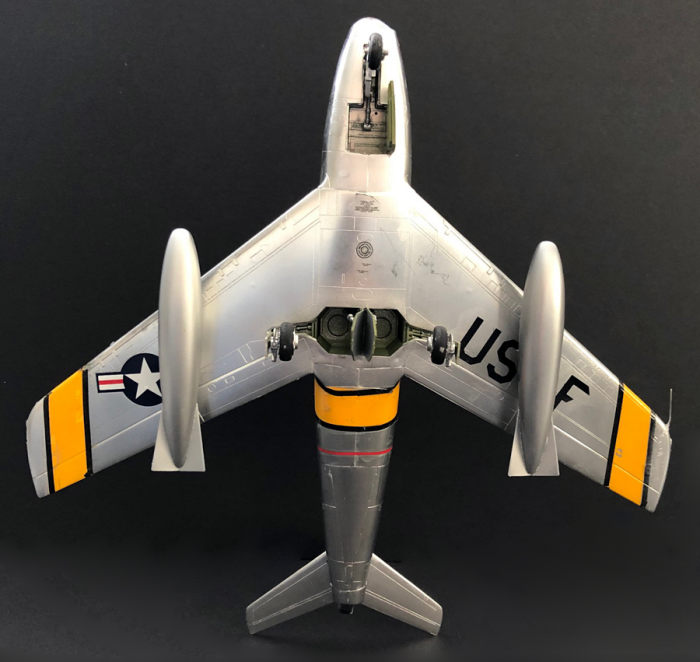
The next step was the wing assembly. Right away, I noticed the molded-on pitot tube on the left wing, and I made a mental note to be careful not to break this off during the assembly process. Needless to say, somewhere along the way, I broke it off (why does this always happen, no matter how CAREFUL I am?). Later, I bent a straight pin and glued it into a drilled hole in the wing to replace this part, and it actually looks to be scale. The wing assembly consists of a single bottom piece with a fuselage span in it and then two upper wing parts. Once the glue dried on these, I cemented the wing assembly to the lower fuselage. I used just a little bit of Mr. Surfacer 1000 to fill these seams.
I then glued on the one-piece horizontal stabilizers (another kit simplification). I discovered that the correct dihedral (upward) angle for these was not necessarily cranked into the kit parts’ molding, so I used an Exacto knife to do some minor surgery on these, and then held them in place with Scotch tape at the right upward angle while the glue dried. I chose just to eyeball the angle so that it looked correct rather than worry about creating any scale angles, etc.
 I decided to simplify my build by gluing the dive brakes closed
(note: I searched F-86 pictures on the web to see if this would be accurate for
a parked aircraft, and I was able to find pictures of the F-86E with both the
dive brakes AND the leading-edge slats closed. I read that ground crews often
would manually close the slats, as they would normally deploy via gravity when
the aircraft was on the ground). Thus, this was a good answer for the fact that
the kit’s slats are molded in the closed position.
I decided to simplify my build by gluing the dive brakes closed
(note: I searched F-86 pictures on the web to see if this would be accurate for
a parked aircraft, and I was able to find pictures of the F-86E with both the
dive brakes AND the leading-edge slats closed. I read that ground crews often
would manually close the slats, as they would normally deploy via gravity when
the aircraft was on the ground). Thus, this was a good answer for the fact that
the kit’s slats are molded in the closed position.
At this stage, I decided to move to the landing gear and drop tanks to assemble them as subassemblies. Per the usual, I would leave these off the kit until I finished most of the painting and decaling. The distinctive F-86 drop tanks went together fairly easily and only required seam filling where the tail mated to the tank.
The overall fit of this kit was surprisingly good: as I stated earlier, I only had to use some small amounts of Mr. Surfacer 1000 on a few seams. This was a pleasant outcome, as I was expecting to have to use a lot of filler and sanding on this kit. This, in turn, can make getting a reasonable natural metal finish (NMF) much more difficult due to sanding scuff marks, removal of detail, etc.
| COLORS & MARKINGS |
 USAF Korean War era F-86s were NMF, so I was facing yet another
NMF challenge. I opted to use Alclad Chrome for the final finish rather than
some of my usual NMF paints (e.g., Humbrol #11 metallic, Floquil Old Silver,
etc.). As with all NMFs, the key is to have as smooth a surface as possible, so
I used very fine buffing pads and wet sanding to make sure the surfaces were as
smooth as possible. I also used Brasso and a fine cloth to polish out some of
the surface scratches. I opted not to prime the model, as I find that this can
contribute to not as good a metal finish as when I leave the kit unprimed. Note,
however, that you need to make sure the kit is washed in soap and water to
remove oils, etc. and that you have to be very careful handling the model once
it is painted, or the NMF finish can easily mar and/or rub off in some cases.
USAF Korean War era F-86s were NMF, so I was facing yet another
NMF challenge. I opted to use Alclad Chrome for the final finish rather than
some of my usual NMF paints (e.g., Humbrol #11 metallic, Floquil Old Silver,
etc.). As with all NMFs, the key is to have as smooth a surface as possible, so
I used very fine buffing pads and wet sanding to make sure the surfaces were as
smooth as possible. I also used Brasso and a fine cloth to polish out some of
the surface scratches. I opted not to prime the model, as I find that this can
contribute to not as good a metal finish as when I leave the kit unprimed. Note,
however, that you need to make sure the kit is washed in soap and water to
remove oils, etc. and that you have to be very careful handling the model once
it is painted, or the NMF finish can easily mar and/or rub off in some cases.
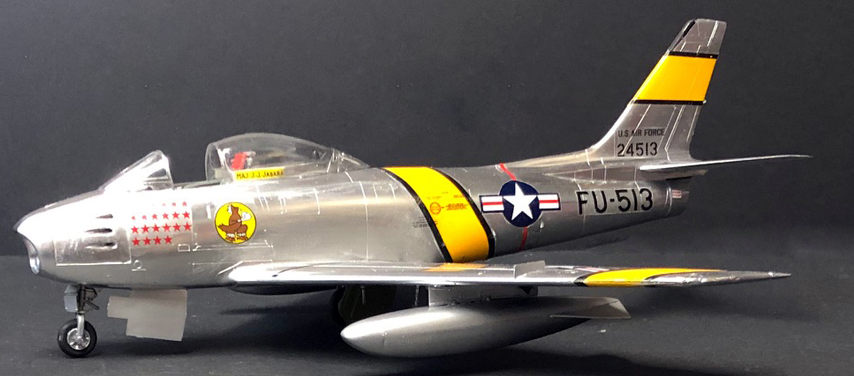
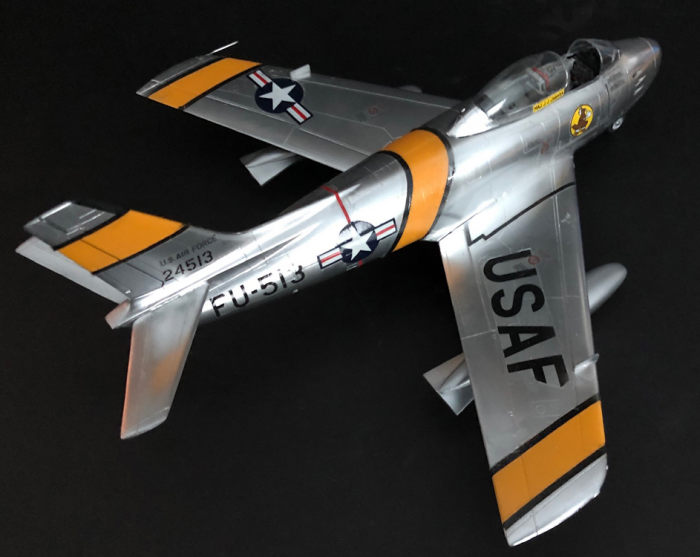
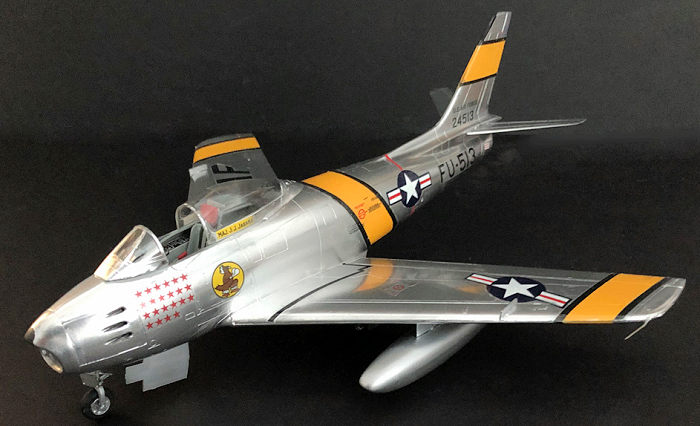
Another challenge with Korean War F-86s is the yellow wing, fuselage and sometimes tail bands that adorned these aircraft (and that are outlined in black). I used Floquil flat German Yellow to paint these first, and then I masked these off using some GM striping tape to get the correct width before masking them in preparation for the NMF finish.
Once I got all of these bands masked, I then sprayed on the NMF, and then carefully removed my masking tape from the bands. It was at this point that I noticed the Alclad Chrome was just a bit too shiny, as most of the pictures I could find of Korean War Sabres revealed them to be relatively dull aluminum. In hindsight, I probably should have used Alclad Aluminum, but I was too lazy to remask the yellow bands and repaint the model, so I pressed on. I did, however, paint the drop tanks and gear doors with Alclad Aluminum. I also noticed from pictures that most of the F-86 gun access panels were considerably duller aluminum than the rest of the aircraft, and I should have at least used Aluminum on these, but I had already gone too far to fix this at this stage of the assembly process.
 Once the paint dried, I was ready for decals. Since the German
Yellow paint was flat, I used some Future applied with a brush to provide a base
on which to lay down the black striping decals that outline the yellow bands.
The ones that gave me trouble were on the wings and the vertical stabilizer, as
these must settle down into multiple angles at the wing and tail leading edges.
I must say this gave me some fits, and is one of the reasons I haven’t built too
many Korean War vintage Sabres in my modeling years (in fact, the old Monogram
kit, the last Sabre I built, didn’t have striping decals for the yellow bands,
and one either had to buy black stripe decals or mask and paint these, which
added considerable pain to the kit’s construction).
Once the paint dried, I was ready for decals. Since the German
Yellow paint was flat, I used some Future applied with a brush to provide a base
on which to lay down the black striping decals that outline the yellow bands.
The ones that gave me trouble were on the wings and the vertical stabilizer, as
these must settle down into multiple angles at the wing and tail leading edges.
I must say this gave me some fits, and is one of the reasons I haven’t built too
many Korean War vintage Sabres in my modeling years (in fact, the old Monogram
kit, the last Sabre I built, didn’t have striping decals for the yellow bands,
and one either had to buy black stripe decals or mask and paint these, which
added considerable pain to the kit’s construction).
Given the age of the kit, I was feeling pretty good about the integrity of the decals, even though the little voice in my ear was telling me to gloss coat the decal sheet just in case. Lo and behold, I went to apply the large wing USAF decal, and it disintegrated into a million parts, whereupon I then heard the little voice say, “I told you so.” Luckily, I have a box of decals, and I found an old 1/48th scale F-104 sheet with a USAF decal that was the right size and shape, so I used it as a replacement. I then went to the basement and gloss coated the remaining decals to prevent them from a similar fate. For those of you who have not ever done this, it works – you just have to trim each decal rather closely to avoid applying with each decal rather large remnants of the one giant decal film that you now have created on your decal sheet.
Once all the decals dried, I glued on the canopy with white glue, attached the landing gear and gear doors, and glued the drop tanks to the wings. In the end, I was left with a decent looking replica of the F-86 with a minimal amount of construction effort: just what I needed at this time!
| CONCLUSIONS |
This is a relatively simple kit with good fit and good lines. It actually looks like an F-86 and is a good addition to my finished kit display. If you have one of these in your stash or can find one on Ebay, and you want a rather quick build with surprisingly good results, then I highly recommend this kit to you! Unlike some of the mega-part kits of today, this is a simple kit that creates a pretty darn good replica of the F-86E. Highly recommended!!!
| REFERENCES |
8 January 2019
Copyright ModelingMadness.com. If you would like your product reviewed fairly and fairly quickly, please
contact
the editor or see other details in the
Note to
Contributors. Back to the Main Page
Back to the Review
Index Page
Back to the Previews Index Page